【Spring】Spring5 注解驱动开发

image-20210629094903500

本文将详细介绍Spring5注解驱动开发的细节。其中Spring AOP的源码分析见【Spring】Spring5 AOP源码分析

IoC 容器

导入maven依赖

1
2
3
4
5
<dependency>
<groupId>org.springframework</groupId>
<artifactId>spring-webmvc</artifactId>
<version>5.3.5</version>
</dependency>

IoC容器部分案例汇总:

1
2
3
4
5
6
7
8
9
10
11
12
13
14
15
16
17
18
19
20
21
22
23
24
25
26
27
28
29
30
31
32
33
34
35
36
37
38
39
40
@PropertySource(value = {"classpath:/person.properties"}) // 导入外部资源文件
@Conditional({WindowsCondition.class}) // 满足当前条件,这个类中配置的所有bean注册才能生效
@ComponentScan(value = "com.zhao", excludeFilters = {
@Filter(type = FilterType.ANNOTATION, classes = {Controller.class, Service.class})
})
@ComponentScans(
value = {
@ComponentScan(value = "com.zhao", excludeFilters = {
@Filter(type = FilterType.ANNOTATION, classes = {Controller.class, Service.class})
}) ,
@ComponentScan(value = "com.zhao", includeFilters = {
@Filter(type = FilterType.ANNOTATION, classes = {Repository.class}),
@Filter(type = FilterType.ASSIGNABLE_TYPE, classes = {BookService.class}),
@Filter(type = FilterType.CUSTOM, classes = {MyTypeFilter.class})
}, useDefaultFilters = false)
}
)
@Import({User.class, MyImportSelector.class, MyImportBeanDefinitionRegistrar.class})
@Configuration(proxyBeanMethods = true)
public class SpringConfig {

@Scope("singleton") // prototype:多实例的,singleton:单实例的
@Lazy
@Conditional({WindowsCondition.class})
@Bean("user")
public User user(initMethod = "init", destroyMethod = "destroy") {
return new User("zhangsan", 18);
}

// 外部无论对配置类中的该组件注册方法调用多少次,获得的都是之前注册在容器中的单实例对象
@Bean
public UserService userService(@Autowired UserDao userDao) {
return new UserService(userDao);
}

@Bean
public StudentFactoryBean studentFactoryBean(){
return new StudentFactoryBean();
}
}

使用AnnotationConfigApplicationContext类获取IoC容器中的组件

1
2
3
4
5
6
7
8
9
10
11
12
13
14
15
16
17
@Test
public void test() {
// 加载配置类 SpringConfig
ApplicationContext context
= new AnnotationConfigApplicationContext(SpringConfig.class);

String[] beanDefinitionNames = context.getBeanDefinitionNames();
for (String name : beanDefinitionNames) {
System.out.println(name);
}

User user = context.getBean(User.class);
System.out.println(user);

Object studentFactoryBean = context.getBean("studentFactoryBean");
System.out.println("bean的类型: " + studentFactoryBean.getClass()); //返回的是Student类对象
}
阅读全文

【Spring MVC】SSM 整合配置

img

Maven 依赖

1
2
3
4
5
6
7
8
9
10
11
12
13
14
15
16
17
18
19
20
21
22
23
24
25
26
27
28
29
30
31
32
33
34
35
36
37
38
39
40
41
42
43
44
45
46
47
48
49
50
51
52
53
54
55
56
57
58
59
60
61
62
63
64
65
66
67
68
69
70
71
72
73
74
75
76
77
78
79
80
81
82
83
84
85
86
87
88
89
90
91
92
93
94
95
96
97
98
99
100
101
102
103
104
105
106
107
108
109
110
111
112
113
114
115
116
117
118
119
120
121
122
123
124
125
126
127
128
129
130
131
132
133
134
135
136
137
138
139
140
141
142
143
144
145
146
147
148
149
150
151
152
153
154
155
156
157
158
159
160
161
162
163
164
165
166
167
168
169
170
171
172
173
174
175
176
177
178
179
180
181
182
183
184
185
186
187
<dependencies>
<dependency>
<groupId>org.springframework</groupId>
<artifactId>spring-aop</artifactId>
<version>5.0.2.RELEASE</version>
</dependency>

<dependency>
<groupId>org.springframework</groupId>
<artifactId>spring-core</artifactId>
<version>5.0.2.RELEASE</version>
</dependency>

<dependency>
<groupId>org.springframework</groupId>
<artifactId>spring-context</artifactId>
<version>5.0.2.RELEASE</version>
</dependency>

<dependency>
<groupId>org.springframework</groupId>
<artifactId>spring-expression</artifactId>
<version>5.0.2.RELEASE</version>
</dependency>

<dependency>
<groupId>org.springframework</groupId>
<artifactId>spring-beans</artifactId>
<version>5.0.2.RELEASE</version>
</dependency>

<dependency>
<groupId>org.springframework</groupId>
<artifactId>spring-web</artifactId>
<version>5.0.2.RELEASE</version>
</dependency>

<dependency>
<groupId>org.springframework</groupId>
<artifactId>spring-webmvc</artifactId>
<version>5.0.2.RELEASE</version>
</dependency>

<dependency>
<groupId>org.springframework</groupId>
<artifactId>spring-tx</artifactId>
<version>5.0.2.RELEASE</version>
</dependency>

<dependency>
<groupId>org.mybatis</groupId>
<artifactId>mybatis</artifactId>
<version>3.4.5</version>
</dependency>

<dependency>
<groupId>mysql</groupId>
<artifactId>mysql-connector-java</artifactId>
<version>5.1.6</version>
</dependency>

<dependency>
<groupId>org.springframework</groupId>
<artifactId>spring-jdbc</artifactId>
<version>5.0.2.RELEASE</version>
</dependency>

<!--AspectJ 实现Spring AOP-->
<dependency>
<groupId>org.springframework</groupId>
<artifactId>spring-aspects</artifactId>
<version>5.0.2.RELEASE</version>
</dependency>

<dependency>
<groupId>org.aspectj</groupId>
<artifactId>aspectjweaver</artifactId>
<version>1.8.13</version>
</dependency>

<dependency>
<groupId>aopalliance</groupId>
<artifactId>aopalliance</artifactId>
<version>1.0</version>
</dependency>

<!--json-->
<dependency>
<groupId>com.alibaba</groupId>
<artifactId>fastjson</artifactId>
<version>1.2.60</version>
</dependency>

<!-- 数据库连接池 -->
<dependency>
<groupId>com.mchange</groupId>
<artifactId>c3p0</artifactId>
<version>0.9.2.1</version>
</dependency>

<dependency>
<groupId>com.mchange</groupId>
<artifactId>mchange-commons-java</artifactId>
<version>0.2.11</version>
</dependency>

<!--spring整合mybatis包-->
<dependency>
<groupId>org.mybatis</groupId>
<artifactId>mybatis-spring</artifactId>
<version>2.0.4</version>
</dependency>

<!--谷歌图片验证码-->
<dependency>
<groupId>com.github.penggle</groupId>
<artifactId>kaptcha</artifactId>
<version>2.3.2</version>
</dependency>

<dependency>
<groupId>org.springframework</groupId>
<artifactId>spring-core</artifactId>
<version>5.3.5</version>
</dependency>

<!--junit与spring整合-->
<dependency>
<groupId>org.junit.jupiter</groupId>
<artifactId>junit-jupiter-api</artifactId>
<version>5.7.1</version>
<scope>test</scope>
</dependency>

<dependency>
<groupId>org.springframework</groupId>
<artifactId>spring-test</artifactId>
<version>5.3.5</version>
</dependency>

<!--日志-->
<dependency>
<groupId>org.slf4j</groupId>
<artifactId>slf4j-api</artifactId>
<version>1.7.21</version>
</dependency>

<dependency>
<groupId>org.slf4j</groupId>
<artifactId>slf4j-log4j12</artifactId>
<version>1.7.21</version>
</dependency>

<!--文件上传下载-->
<dependency>
<groupId>commons-fileupload</groupId>
<artifactId>commons-fileupload</artifactId>
<version>1.3.1</version>
</dependency>

<dependency>
<groupId>commons-io</groupId>
<artifactId>commons-io</artifactId>
<version>2.4</version>
</dependency>

<dependency>
<groupId>junit</groupId>
<artifactId>junit</artifactId>
<version>4.12</version>
<scope>test</scope>
</dependency>
</dependencies>

<!--指定maven编译环境-->
<build>
<plugins>
<plugin>
<artifactId>maven-compiler-plugin</artifactId>
<version>3.1</version>
<configuration>
<source>1.8</source>
<target>1.8</target>
</configuration>
</plugin>
</plugins>
</build>

为避免资源导出问题可以添加以下代码(使得普通目录下的资源文件也能导出)

1
2
3
4
5
6
7
8
9
10
11
12
13
14
15
16
17
18
19
20
21
<!--静态资源导出问题-->
<build>
<resources>
<resource>
<directory>src/main/java</directory>
<includes>
<include>**/*.properties</include>
<include>**/*.xml</include>
</includes>
<filtering>false</filtering>
</resource>
<resource>
<directory>src/main/resources</directory>
<includes>
<include>**/*.properties</include>
<include>**/*.xml</include>
</includes>
<filtering>false</filtering>
</resource>
</resources>
</build>

MyBatis 配置

mybatis-config.xml

1
2
3
4
5
6
7
8
9
10
11
12
13
14
15
16
17
18
19
20
21
22
23
24
25
<?xml version="1.0" encoding="UTF-8" ?>
<!DOCTYPE configuration
PUBLIC "-//mybatis.org//DTD Config 3.0//EN"
"http://mybatis.org/dtd/mybatis-3-config.dtd">
<configuration>
<settings>
<!--设置mybatis输出日志-->
<setting name="logImpl" value="log4j"/>
<!--开启驼峰命名模式,将数据库字段与实体类进行转换-->
<setting name="mapUnderscoreToCamelCase" value="true"/>
</settings>

<typeAliases>
<package name="com.zhao.pojo"/>
</typeAliases>

<!--
若在Spring中配置SqlSessionFactory时指定了
<property name="mapperLocations" value="classpath:mapper/*.xml">
则此处就不需要指定每一个xml路径
-->
<mappers>
<mapper resource="mapper/BookMapper.xml"/>
</mappers>
</configuration>

log4j.properties

1
2
3
4
5
6
7
8
# Global logging configuration
log4j.rootLogger=ERROR, stdout
# MyBatis logging configuration...
log4j.logger.priv.zwh.mall.dao=DEBUG
# Console output...
log4j.appender.stdout=org.apache.log4j.ConsoleAppender
log4j.appender.stdout.layout=org.apache.log4j.PatternLayout
log4j.appender.stdout.layout.ConversionPattern=%5p [%t] - %m%n

database.properties

1
2
3
4
5
jdbc.driver=com.mysql.jdbc.Driver
# 如果是MySQL8.0+,需要添加 &serverTimezone=Asia/Shanghai
jdbc.url=jdbc:mysql://localhost:3306/test?useUnicode=true&characterEncoding=utf8&useSSL=false
jdbc.username=root
jdbc.password=123

Spring 整合 MyBatis

applicationContext.xml

1
2
3
4
5
6
7
8
9
10
11
12
13
14
15
16
17
18
19
20
21
22
23
24
25
26
27
28
29
30
31
32
33
34
35
36
37
38
39
40
41
42
43
44
45
46
47
48
49
50
51
52
53
54
55
56
57
58
59
60
61
62
63
64
65
66
67
68
69
70
71
72
73
<?xml version="1.0" encoding="UTF-8"?>
<beans xmlns="http://www.springframework.org/schema/beans"
xmlns:xsi="http://www.w3.org/2001/XMLSchema-instance"
xmlns:context="http://www.springframework.org/schema/context" xmlns:tx="http://www.springframework.org/schema/tx"
xsi:schemaLocation="http://www.springframework.org/schema/beans http://www.springframework.org/schema/beans/spring-beans.xsd http://www.springframework.org/schema/context http://www.springframework.org/schema/context/spring-context.xsd http://www.springframework.org/schema/mvc http://www.springframework.org/schema/mvc/spring-mvc.xsd http://www.springframework.org/schema/tx http://www.springframework.org/schema/tx/spring-tx.xsd">

<!--指定扫描包-->
<context:component-scan base-package="com.zhao"/>

<!--关联数据库配置文件-->
<context:property-placeholder location="classpath:database.properties"/>

<!--配置c3p0数据源-->
<bean id="pooledDataSource" class="com.mchange.v2.c3p0.ComboPooledDataSource">
<!--注入四个数据库原属性-->
<!--配置连接池属性-->
<property name="driverClass" value="${jdbc.driver}"/>
<property name="jdbcUrl" value="${jdbc.url}"/>
<property name="user" value="${jdbc.username}"/>
<property name="password" value="${jdbc.password}"/>
</bean>

<!--================== 配置和MyBatis的整合=============== -->

<!--配置Mybatis工厂,同时指定数据源,并与Mybatis完美整合-->
<bean id="sqlSessionFactory" class="org.mybatis.spring.SqlSessionFactoryBean">
<property name="dataSource" ref="pooledDataSource"/>
<!-- 指定mybatis全局配置文件的位置 -->
<property name="configLocation" value="classpath:mybatis-config.xml"/>
<!-- 指定mybatis,mapper文件的位置 -->
<property name="mapperLocations" value="classpath:mapper/*.xml"></property>
</bean>

<!-- 配置扫描器,将mybatis接口的实现加入到ioc容器中, mapper代理开发使用Spring自动扫描Mybatis接口并装配(@Mapper) -->
<bean class="org.mybatis.spring.mapper.MapperScannerConfigurer">
<!--扫描所有dao接口的实现,加入到ioc容器中 -->
<property name="basePackage" value="com.zhao.dao"></property>
<property name="sqlSessionFactoryBeanName" value="sqlSessionFactory"/>
</bean>

<!-- 配置一个可以执行批量的sqlSession -->
<bean id="sqlSession" class="org.mybatis.spring.SqlSessionTemplate">
<constructor-arg name="sqlSessionFactory" ref="sqlSessionFactory"></constructor-arg>
<constructor-arg name="executorType" value="BATCH"></constructor-arg>
</bean>


<!-- ===============事务控制的配置 ================-->

<bean id="transactionManager" class="org.springframework.jdbc.datasource.DataSourceTransactionManager">
<!-- 控制住数据源 -->
<property name="dataSource" ref="pooledDataSource"></property>
</bean>

<!-- 开启基于注解的事务,使用xml配置形式的事务(必要主要的都是使用配置式) -->
<aop:config>
<!-- 切入点表达式 -->
<aop:pointcut expression="execution(* com.atguigu.crud.service..*(..))" id="txPoint"/>
<!-- 配置事务增强 -->
<aop:advisor advice-ref="txAdvice" pointcut-ref="txPoint"/>
</aop:config>

<!--配置事务增强,事务如何切入 -->
<tx:advice id="txAdvice" transaction-manager="transactionManager">
<tx:attributes>
<!-- 所有方法都是事务方法 -->
<tx:method name="*"/>
<!--以get开始的所有方法 -->
<tx:method name="get*" read-only="true"/>
</tx:attributes>
</tx:advice>

</beans>

Spring MVC 相关配置

springmvc-servlet.xml

1
2
3
4
5
6
7
8
9
10
11
12
13
14
15
16
17
18
19
20
21
22
23
24
25
26
27
28
29
30
31
32
33
34
35
36
37
38
39
40
41
42
43
44
45
46
47
48
49
50
51
52
53
54
55
56
57
58
59
<?xml version="1.0" encoding="UTF-8"?>
<beans xmlns="http://www.springframework.org/schema/beans"
xmlns:xsi="http://www.w3.org/2001/XMLSchema-instance"
xmlns:context="http://www.springframework.org/schema/context"
xmlns:p="http://www.springframework.org/schema/p"
xmlns:mvc="http://www.springframework.org/schema/mvc"
xsi:schemaLocation="http://www.springframework.org/schema/beans
http://www.springframework.org/schema/beans/spring-beans.xsd
http://www.springframework.org/schema/context
http://www.springframework.org/schema/context/spring-context.xsd
http://www.springframework.org/schema/mvc
http://www.springframework.org/schema/mvc/spring-mvc.xsd">

<context:component-scan base-package="com.zhao.controller"/>

<!--配置视图解析器,方便页面返回-->
<bean class="org.springframework.web.servlet.view.InternalResourceViewResolver">
<property name="prefix" value="/WEB-INF/"></property>
<property name="suffix" value=".jsp"></property>
</bean>

<!-- 两个标准配置 -->
<!-- 让SpringMVC不处理静态资源,否则静态资源无法找到对应的映射,会报错。将SpringMVC无法处理的请求交给Tomcat默认的Servlet处理 -->
<mvc:default-servlet-handler/>

<!--
支持mvc注解驱动,
1. 映射动态请求
在Spring中一般采用@RequestMapping注解来完成映射关系
要想使@RequestMapping注解生效
必须向上下文中注册DefaultAnnotationHandlerMapping
和一个AnnotationMethodHandlerAdapter实例
这两个实例分别在类级别和方法级别处理。
而annotation-driven配置帮助我们自动完成上述两个实例的注入。
2. 支持SpringMVC更高级的一些功能,如JSR303校验,快捷的AJAX
-->
<mvc:annotation-driven/>

<mvc:resources mapping="/js/**" location="/js/"/>
<mvc:resources mapping="/css/**" location="/css/"/>
<mvc:resources mapping="/img/**" location="/img/"/>

<!--
defaultEncoding="UTF-8" 是请求的编码格式,默认为iso-8859-1
maxUploadSize="5400000" 是允许上传文件的最大值,单位为字节
uploadTempDir="fileUpload/temp" 为上传文件的临时路径
-->
<bean id="multipartResolver" class="org.springframework.web.multipart.commons.CommonsMultipartResolver"
p:defaultEncoding="UTF-8" p:maxUploadSize="5400000" p:uploadTempDir="/img/">
</bean>

<!--拦截器-->
<mvc:interceptors>
<mvc:interceptor>
<mvc:mapping path="/root/**"/>
<bean class="com.zhao.interceptor.AdminInterceptor"/>
</mvc:interceptor>
</mvc:interceptors>
</beans>

web.xml

1
2
3
4
5
6
7
8
9
10
11
12
13
14
15
16
17
18
19
20
21
22
23
24
25
26
27
28
29
30
31
32
33
34
35
36
37
38
39
40
41
42
43
44
45
46
47
48
49
50
51
52
53
54
55
56
57
58
59
60
61
62
63
64
65
66
67
68
69
70
71
72
73
74
<?xml version="1.0" encoding="UTF-8"?>
<web-app xmlns="http://xmlns.jcp.org/xml/ns/javaee"
xmlns:xsi="http://www.w3.org/2001/XMLSchema-instance"
xsi:schemaLocation="http://xmlns.jcp.org/xml/ns/javaee http://xmlns.jcp.org/xml/ns/javaee/web-app_4_0.xsd"
version="4.0">

<!--加载applicationContext.xml配置文件-->
<context-param>
<param-name>contextConfigLocation</param-name>
<param-value>
classpath:applicationContext.xml
</param-value>
</context-param>

<listener>
<listener-class>
org.springframework.web.context.ContextLoaderListener
</listener-class>
</listener>

<!--加载springmvc-->
<servlet>
<servlet-name>dispatcherServlet</servlet-name>
<servlet-class>org.springframework.web.servlet.DispatcherServlet</servlet-class>
<init-param>
<param-name>contextConfigLocation</param-name>
<param-value>classpath:springmvc-servlet.xml</param-value>
<!--若在web.xml同级目录下存在dispatcherServlet-servlet.xml文件则不需在这里显式指定 -->
</init-param>
<load-on-startup>1</load-on-startup>
</servlet>
<servlet-mapping>
<servlet-name>dispatcherServlet</servlet-name>
<url-pattern>/</url-pattern>
</servlet-mapping>

<!-- 字符编码过滤器,一定要放在所有过滤器之前 -->
<filter>
<filter-name>CharacterEncodingFilter</filter-name>
<filter-class>org.springframework.web.filter.CharacterEncodingFilter</filter-class>
<init-param>
<param-name>encoding</param-name>
<param-value>utf-8</param-value>
</init-param>
<init-param>
<!-- 解决响应的乱码问题 -->
<param-name>forceRequestEncoding</param-name>
<param-value>true</param-value>
</init-param>
</filter>
<filter-mapping>
<filter-name>CharacterEncodingFilter</filter-name>
<url-pattern>/*</url-pattern>
</filter-mapping>

<!-- 4、使用Rest风格的URI,将页面普通的post请求转为指定的delete或者put请求 -->
<filter>
<filter-name>HiddenHttpMethodFilter</filter-name>
<filter-class>org.springframework.web.filter.HiddenHttpMethodFilter</filter-class>
</filter>
<filter-mapping>
<filter-name>HiddenHttpMethodFilter</filter-name>
<url-pattern>/*</url-pattern>
</filter-mapping>
<filter>
<filter-name>HttpPutFormContentFilter</filter-name>
<filter-class>org.springframework.web.filter.HttpPutFormContentFilter</filter-class>
</filter>
<filter-mapping>
<filter-name>HttpPutFormContentFilter</filter-name>
<url-pattern>/*</url-pattern>
</filter-mapping>

</web-app>

测试

1
2
3
4
5
6
7
8
9
10
11
12
@RunWith(SpringJUnit4ClassRunner.class)
@ContextConfiguration("classpath:applicationContext.xml")
public class TestMain {
@Autowired
BookMapper bookMapper;

@Test
public void test1() {
List<Books> books = bookMapper.queryAllBook();
System.out.println(books);
}
}
1
2
3
4
5
6
7
8
9
@Controller
public class TestController {
@RequestMapping(value = "/hello")
@ResponseBody
public String index() {
System.out.println("进入controller控制器!");
return "helloController";
}
}

【Spring MVC】Spring MVC

img

回顾 MVC

什么是 MVC

  • MVC是模型(Model)、视图(View)、控制器(Controller)的简写,是一种软件设计规范
  • 是将业务逻辑、数据、显示分离的方法来组织代码
  • MVC主要作用是降低了视图与业务逻辑间的双向偶合
  • MVC不是一种设计模式,MVC是一种架构模式

Model(模型):数据模型,提供要展示的数据,因此包含数据和行为,可以认为是领域模型或JavaBean组件(包含数据和行为),不过现在一般都分离开来:Value Object(数据Dao) 和 服务层(行为Service)。也就是模型提供了模型数据查询和模型数据的状态更新等功能,包括数据和业务。

View(视图):负责进行模型的展示,一般就是我们见到的用户界面,客户想看到的东西。

Controller(控制器):接收用户请求,委托给模型进行处理(状态改变),处理完毕后把返回的模型数据返回给视图,由视图负责展示。 也就是说控制器做了个调度员的工作。

最典型的MVC就是JSP + servlet + javabean的模式。

img

阅读全文

【MyBatis】MyBatis-Plus

img

简介

官方文档:https://baomidou.com/pages/24112f/

MyBatis-Plus(简称 MP)是一个 MyBatis 的增强工具包,只做增强不做改变。为简化开发工作、提高生产率而生。
特性

  • 无侵入:只做增强不做改变,引入它不会对现有工程产生影响,如丝般顺滑
  • 损耗小:启动即会自动注入基本 CURD,性能基本无损耗,直接面向对象操作
  • 强大的 CRUD 操作:内置通用 Mapper、通用 Service,仅仅通过少量配置即可实现单表大部分 CRUD 操作,更有强大的条件构造器,满足各类使用需求
  • 支持 Lambda 形式调用:通过 Lambda 表达式,方便的编写各类查询条件,无需再担心字段写错
  • 支持主键自动生成:支持多达 4 种主键策略(内含分布式唯一 ID 生成器 - Sequence),可自由配置,完美解决主键问题
  • 支持 ActiveRecord 模式:支持 ActiveRecord 形式调用,实体类只需继承 Model 类即可进行强大的 CRUD 操作
  • 支持自定义全局通用操作:支持全局通用方法注入( Write once, use anywhere )
  • 内置代码生成器:采用代码或者 Maven 插件可快速生成 Mapper 、 Model 、 Service 、 Controller 层代码,支持模板引擎,更有超多自定义配置等您来使用
  • 内置分页插件:基于 MyBatis 物理分页,开发者无需关心具体操作,配置好插件之后,写分页等同于普通 List 查询
  • 分页插件支持多种数据库:支持 MySQL、MariaDB、Oracle、DB2、H2、HSQL、SQLite、Postgre、SQLServer 等多种数据库
  • 内置性能分析插件:可输出 SQL 语句以及其执行时间,建议开发测试时启用该功能,能快速揪出慢查询
  • 内置全局拦截插件:提供全表 delete 、 update 操作智能分析阻断,也可自定义拦截规则,预防误操作

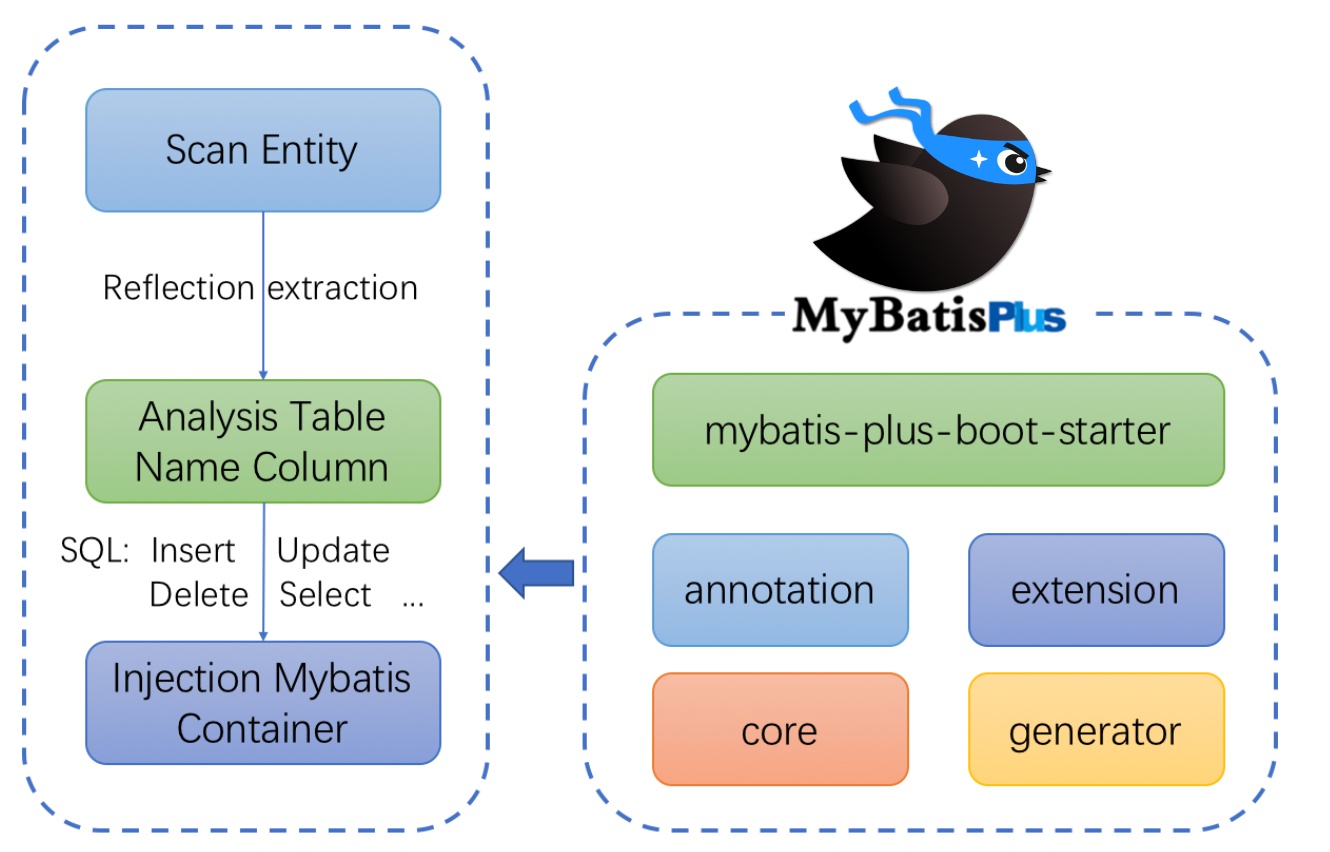
框架结构

framework

阅读全文

【MyBatis】MyBatis

MyBatis简介

img

什么是MyBatis

  • MyBatis 是一款优秀的持久层框架
  • MyBatis 避免了几乎所有的 JDBC 代码和手动设置参数以及获取结果集的过程
  • MyBatis 可以使用简单的 XML 或注解来配置和映射原生信息,将接口和 Java 的 实体类 【Plain Old Java Objects,普通的 Java对象】映射成数据库中的记录。
  • MyBatis 本是apache的一个开源项目ibatis, 2010年这个项目由apache 迁移到了google code,并且改名为MyBatis 。在2013年11月迁移到Github .
  • Mybatis官方文档 : http://www.mybatis.org/mybatis-3/zh/index.html
  • GitHub : https://github.com/mybatis/mybatis-3

持久化

持久化是将程序数据在持久状态和瞬时状态间转换的机制。

  • 即把数据(如内存中的对象)保存到可永久保存的存储设备中(如磁盘)。持久化的主要应用是将内存中的对象存储在数据库中,或者存储在磁盘文件中、XML数据文件中等等。
  • JDBC就是一种持久化机制。文件IO也是一种持久化机制。

MyBatis的优点

  • 简单易学:本身就很小且简单。没有任何第三方依赖,最简单安装只要两个jar文件+配置几个sql映射文件就可以了,易于学习,易于使用,通过文档和源代码,可以比较完全的掌握它的设计思路和实现。
  • 灵活:mybatis不会对应用程序或者数据库的现有设计强加任何影响。 sql写在xml里,便于统一管理和优化。通过sql语句可以满足操作数据库的所有需求。
  • 解除sql与程序代码的耦合:通过提供DAO层,将业务逻辑和数据访问逻辑分离,使系统的设计更清晰,更易维护,更易单元测试。sql和代码的分离,提高了可维护性。
  • 提供xml标签,支持编写动态sql。
阅读全文

【Spring】Spring5 事务

img

Spring 事务管理介绍

事务需要添加到 JavaEE 三层结构里面 Service 层(业务逻辑层)。在 Spring 进行事务管理操作有两种方式:编程式事务管理、声明式事务管理(推荐使用):

  • 编程式事务(需要手动调用事务管理器包裹业务代码进行提交回滚)使用TransactionTemplate或者直接使用底层的PlatformTransactionManager。对于编程式事务管理,Spring推荐使用TransactionTemplate
  • 声明式事务(只用声明一下注解就可以)是建立在AOP之上的。其本质是对方法前后进行拦截,然后在目标方法开始之前创建或者加入一个事务,在执行完目标方法之后根据执行情况提交或者回滚事务。声明式事务最大的优点就是不需要通过编程的方式管理事务,这样就不需要在业务逻辑代码中掺杂事务管理的代码,只需在配置文件中做相关的事务规则声明(或通过基于@Transactional注解的方式),便可以将事务规则应用到业务逻辑中。

显然声明式事务管理要优于编程式事务管理,这正是Spring倡导的非侵入式的开发方式。声明式事务管理使业务代码不受污染,一个普通的POJO对象,只要加上注解就可以获得完全的事务支持。和编程式事务相比,声明式事务唯一不足地方是,它的最细粒度只能作用到方法级别,无法做到像编程式事务那样可以作用到代码块级别。但是即便有这样的需求,也存在很多变通的方法,比如,可以将需要进行事务管理的代码块独立为方法等等。

Spring事务原理与AOP原理十分相似,其详细的源码分析见【Spring】Spring5 事务源码分析

声明式事务——基于注解方式

  1. 导入相关依赖:数据源、数据库驱动、SpringJDBC模块
1
2
3
4
5
6
7
8
9
10
11
12
13
14
15
16
17
<dependency>
<groupId>org.springframework</groupId>
<artifactId>spring-jdbc</artifactId>
<version>5.2.12.RELEASE</version>
</dependency>

<dependency>
<groupId>mysql</groupId>
<artifactId>mysql-connector-java</artifactId>
<version>5.1.47</version>
</dependency>

<dependency>
<groupId>c3p0</groupId>
<artifactId>c3p0</artifactId>
<version>0.9.1.2</version>
</dependency>
  1. 配置数据源、JdbcTemplate操作数据库(Spring提供的简化数据库操作的工具)
  2. 添加 @EnableTransactionManagement 注解开启基于注解的事务管理功能
  3. 配置事务管理器来控制事务(事务管理器操作数据源,进行事务管理)
1
2
3
4
5
6
7
8
9
10
11
12
13
14
15
16
17
18
19
20
21
22
23
24
25
26
27
28
@EnableTransactionManagement
@Configuration
public class TxConfig {

// 向容器中注册数据源
@Bean
public DataSource dataSource() throws PropertyVetoException {
ComboPooledDataSource dataSource = new ComboPooledDataSource();
dataSource.setUser("root");
dataSource.setPassword("123456");
dataSource.setDriverClass("com.mysql.jdbc.Driver");
dataSource.setJdbcUrl("jdbc:mysql://localhost:3306/test");
return dataSource;
}

@Bean
public JdbcTemplate jdbcTemplate() throws PropertyVetoException {
JdbcTemplate jdbcTemplate = new JdbcTemplate(dataSource());
return jdbcTemplate;
}

// 向容器中注册事务管理器
@Bean
public PlatformTransactionManager transactionManager() throws PropertyVetoException {
return new DataSourceTransactionManager(dataSource());
}

}
  1. 在类或方法上添加 @Transactional() 注解表明该方法需要添加事务
  • 添加到类上,这个类里面所有的方法都添加事务
  • 添加到方法上,只有这个方法添加事务
1
2
3
4
@Transactional(propagation = Propagation.REQUIRED)
public void add(){
update();
}

其中,可以在xml中配置数据库并开启事务管理器:

1
2
3
4
5
6
7
8
9
10
11
12
13
14
15
16
17
18
19
20
21
22
23
24
25
26
<!-- 1、在 spring 配置文件,开启事务注解,引入名称空间!-->
<beans xmlns="http://www.springframework.org/schema/beans"
xmlns:xsi="http://www.w3.org/2001/XMLSchema-instance"
xmlns:context="http://www.springframework.org/schema/context"
xmlns:aop="http://www.springframework.org/schema/aop"
xmlns:tx="http://www.springframework.org/schema/tx"
xsi:schemaLocation="http://www.springframework.org/schema/beans
http://www.springframework.org/schema/beans/spring-beans.xsd
http://www.springframework.org/schema/context
http://www.springframework.org/schema/context/spring-context.xsd
http://www.springframework.org/schema/aop
http://www.springframework.org/schema/aop/spring-aop.xsd
http://www.springframework.org/schema/tx
http://www.springframework.org/schema/tx/spring-tx.xsd">

<!--2、在 spring 配置文件配置事务管理器-->
<!--创建事务管理器-->
<bean id="transactionManager" class="org.springframework.jdbc.datasource.DataSourceTransactionManager">
<!--注入数据源-->
<property name="dataSource" ref="dataSource"></property>
</bean>

<!--开启事务注解-->
<tx:annotation-driven transactionmanager="transactionManager"></tx:annotation-driven>

<!--3、在 service 类上面(或者 service 类里面方法上面)添加事务注解-->
1
2
3
4
5
@Transactional(propagation = Propagation.REQUIRED)
public void add(){
//调用update方法
update();
}

声明式事务——基于xml方式

在 Spring 配置文件中进行配置:

  • 第一步:配置事务管理器
  • 第二步:配置通知
  • 第三步:配置切入点和切面
1
2
3
4
5
6
7
8
9
10
11
12
13
14
15
16
17
18
19
20
21
22
23
24
<!--1 创建事务管理器-->
<bean id="transactionManager" class="org.springframework.jdbc.datasource.DataSourceTransactionManager">
<!--注入数据源-->
<property name="dataSource" ref="dataSource"></property>
</bean>

<!--2 配置通知-->
<tx:advice id="txadvice" transaction-manager="transactionManager">
<!--配置事务参数-->
<tx:attributes>
<!--指定哪种规则的方法上面添加事务-->
<tx:method name="accountMoney" propagation="REQUIRED"/>
<tx:method name="account*"/>
</tx:attributes>
</tx:advice>

<!--3 配置切入点和切面-->
<aop:config>
<!--配置切入点-->
<aop:pointcut id="pt" expression="execution(*
com.atguigu.spring5.service.UserService.*(..))"/>
<!--配置切面-->
<aop:advisor advice-ref="txadvice" pointcut-ref="pt"/>
</aop:config>

事务细节参数

  • read-only:设置事务为只读事务,不需要增删改操作。可以提高查询速度。
  • timeout:超时,事务超出指定执行时长后自动终止并回滚。
  • isolation:设置隔离级别

运行时异常(非检查异常)发生时默认回滚,编译时异常(检查异常)默认不回滚

  • rollBackFor:可以让原来默认不回滚的异常回滚
  • noRollBackFor:可以让原来默认回滚的异常不回滚

事务和线程的关系

当一个新的事务创建时,就会被绑定到当前线程上

TransactionAspectSupport类中的ThreadLocal<TransactionInfo>在当前线程保存了一个事务的信息TransactionInfo

image-20210818103221467

该线程会伴随着这个事务整个生命周期,直到事务提交、回滚或挂起(临时解绑)时该线程才会取消与该事务的绑定。

同时一个线程只能绑定一个事务,若当前线程原本正绑定的事务还未执行完毕就被新的事务所挂起,则该线程与该事务进行临时解绑,并绑定到新创建的事务上;直到新建的事务提交或回滚后,该线程才会结束与该新建事务的绑定,再次重新绑定之前的事务。

上述过程实现的原理为使用链表结构:创建一张TransactionInfo链表,将新创建的事务TransactionInfo链接到旧的事务TransactionInfo的尾部,待新事务执行完毕后再指回旧的事务TransactionInfo

image-20210818104726262

image-20210818105411421

当新创建的事务结束时恢复旧的事务状态:

image-20210818105517020

什么是事务挂起,如何实现挂起

对事务的配置在Spring内部会被封装成TransactionInfo,线程绑定了事务,自然也绑定了事务相关的TransactionInfo挂起事务时,把TransactionInfo取出临时存储,等待执行完成后,把之前临时存储的TransactionInfo重新绑定到该线程上

关于事务挂起的举例:(某事务挂起之后,任何操作都不在该事务的控制之下)

https://blog.csdn.net/xiaoshuo566/article/details/83929465

例如: 方法A支持事务,方法B不支持事务,即PROPAGATION_NOT_SUPPORTED。方法A调用方法B:

  • 在方法A开始运行时,系统为它建立Transaction,方法A中对于数据库的处理操作,会在该Transaction的控制之下。
  • 这时,方法A调用方法B,方法A打开的Transaction将挂起,方法B中任何数据库操作,都不在该Transaction的管理之下。
  • 当方法B返回,方法A继续运行,之前的Transaction恢复,后面的数据库操作继续在该Transaction的控制之下提交或回滚。

声明式事务传播特性

事务传播行为就是多个事务方法相互调用时,事务如何在这些方法间传播。Spring支持7种事务传播行为:

  • propagation_required(需要事务,有就加入,没有就新建):如果当前没有事务,就新建一个事务,如果已存在一个事务中,加入到这个事务中,这是最常见的选择。(如果设置为required,则事务的其他属性继承于大事务)好男人。
  • propagation_supports(支持事务,有就加入,没有就非事务):支持当前事务,如果没有当前事务,就以非事务方法执行。懒男人
  • propagation_mandatory(强制使用当前事务,有就加入,没有就抛异常):使用当前事务,如果没有当前事务,就抛出异常。

上述三种类型都支持当前事务,当前如果有事务就加入。

  • propagation_required_new(必须新建事务,当前有就挂起):新建事务,如果当前存在事务,把当前事务挂起。挑剔男
  • propagation_not_supported(不支持事务,当前有就挂起):以非事务方式执行操作,如果当前存在事务,就把当前事务挂起挂起指自己新建一个数据库连接,不再使用之前的数据库连接,在代码中体现为两个方法的connection不相同,详细介绍见上文)。减肥男
  • propagation_never(强制非事务,当前有就抛异常):以非事务方式执行操作,如果当前事务存在则抛出异常IllegalTransactionStateException,该方法内的代码无法运行。神经病

上述三种类型都不支持当前事务,当前如果有事务,要么挂起,要么抛异常。

  • propagation_nested:如果当前存在事务,则在嵌套事务内执行。如果当前没有事务,则执行与propagation_required类似的操作

Spring 默认的事务传播行为是 PROPAGATION_REQUIRED,它适合于绝大多数的情况。

假设 ServiveX#methodX() 都工作在事务环境下(即都被 Spring 事务增强了),假设程序中存在如下的调用链:Service1#method1()->Service2#method2()->Service3#method3(),那么这 3 个服务类的 3 个方法通过 Spring 的事务传播机制都工作在同一个事务中。

示例

1
2
3
4
5
6
7
8
9
10
11
12
13
@Service
public class AccountServiceImpl implements AccountService {
@Autowired
JdbcTemplate jdbcTemplate;

@Override
@Transactional(propagation = Propagation.REQUIRED_NEW)
public void addAccount(String name, int initMoney) {
String accountId = new SimpleDateFormat("yyyyMMddhhmmss").format(new Date());
jdbc.Template.update("INSERT INTO `account` (accountName, user, money) VALUES(?,?,?)", accountId, name, initMoney);
int i = 1 / 0; // 制造异常
}
}
1
2
3
4
5
6
7
8
@Autowired
AccountService accountService;

@Transactional(propagation = Propagation.REQUIRED)
public void createUser(String name) {
jdbc.Template.update("INSERT INTO `user` (name) VALUES(?)", name);
accountService.addAccount(name, 10000);
}

使用过上述案例进行实验,1代表插入成功,2代表插入失败:

image-20210817144253822

  • 场景1:两个方法都没事务,都是普通方法,因此就算抛出异常,也不影响插入数据
  • 场景2:createUser()没有事务,其仍然能插入数据;addAccount()有事务,其出现异常不能成功插入数据
  • 场景3:createUser()有事务,出现异常后其不能插入数据;addAccount()没有声明事务,但其被createUser()调用,仍然会被事务包裹,出现异常不能成功插入数据。若某个方法包含事务,其调用的其他方法也会包含事务
  • 场景4:addAccount()createUser()的事务挂起,挂起指自己新建一个数据库连接,不再使用之前的数据库连接,在代码中体现为两个方法的connection不相同,详细介绍见上文。因此addAccount()插入成功(因为没有事务,异常也能插入),createUser()插入失败(因为addAccount()抛出了异常,被重新恢复的事务所捕获从而插入失败)
  • 场景5:addAccount()不支持事务,直接抛出IllegalTransactionStateException。所以直接无法运行该方法内插入的语句,所以插入失败;createUser()因为有事务,所以捕获到addAccount()抛出的异常后回滚,插入失败
  • 场景6:见下文场景分析

场景6详细分析:假设Spring IoC中有组件AccountServiceImpl,该组件中的addAccount()方法被@Transactional注解修饰,代表该方法将开启事务。

Spring容器启动时将使用事务后置处理器AutoProxyRegistrar会为该组件创建一个动态代理对象accountProxy(类似于 Spring AOP 原理),该对象将被注入到容器中,其他程序在调用getBean()获取该类的对象时,将获取到该类的动态代理对象,而非原始对象。此时在调用该代理对象accountProxyaddAccount()时,将有事务包裹。

而若不调用该代理对象的addAccount(),而是将该方法直接写在本类中,直接调用本类里的该方法,则不会交由Spring事务管理器拦截,此时的方法和普通方法一样。如果直接 new 一个对象也无法使用事务管理。

结论:只有Spring事务代理对象的方法才能被事务拦截器所拦截。直接调用方法无法被拦截(即使该方法被@Transactional注解修饰)。

@Transactional 失效情况

  • 不通过代理对象的方式调用,而是直接 new 一个目标对象,此时会失效。只有使用 Spring IoC 容器中管理的动态代理对象才可以使得事务生效
  • 若某个方法是 private 修饰的,也会失效。因为 Spring AOP 底层是基于 CGLIB 实现的动态代理,而 CGLIB 是通过字节码生成被代理类的子类的方式(继承)生成代理类的,因此 private 方法无法被代理类访问,也就无法被代理
  • 若抛出的异常不符合 rollbackFor 里定义的异常类型,也会失效(运行时异常(非检查异常)发生时默认回滚,编译时异常(检查异常)默认不回滚)

事务失效情况

  • 抛出检查异常导致事务不能正确回滚。
    • 原因:Spring 默认只会回滚非检查异常。
    • 解法:配置 rollbackFor 属性@Transactional(rollbackFor = Exception.class)
  • 业务方法内自己 try-catch 异常导致事务不能正确回滚
    • 原因:事务通知只有捉到了目标抛出的异常,才能进行后续的回滚处理,如果目标自己处理掉异常,事务通知无法知悉
    • 解法1:异常原样抛出:在 catch 块添加 throw new RuntimeException(e);
    • 解法2:手动设置 TransactionStatus.setRollbackOnly():在 catch 块添加 TransactionInterceptor.currentTransactionStatus().setRollbackOnly();
  • aop 切面顺序导致导致事务不能正确回滚
    • 原因:事务切面优先级最低,但如果自定义的切面优先级和他一样,则还是自定义切面在内层,这时若自定义切面没有正确抛出异常…
    • 解法1、2:同情况2 中的解法:1、2
    • 解法3:调整切面顺序,在 MyAspect 上添加 @Order(Ordered.LOWEST_PRECEDENCE - 1) (不推荐)
  • 非 public 方法导致的事务失效
  • 原因:Spring 为方法创建代理、添加事务通知、前提条件都是该方法是 public 的
  • 解法1:改为 public 方法
  • 解法2:添加 bean 配置如下(不推荐)
  • 父子容器导致的事务失效
    • 原因:子容器扫描范围过大,把未加事务配置的 service 扫描进来
    • 解法1:各扫描各的,不要图简便
    • 解法2:不要用父子容器,所有 bean 放在同一容器
  • 调用本类方法导致传播行为失效
    • 原因:本类方法调用不经过代理,因此无法增强
    • 解法1:依赖注入自己(代理)来调用
    • 解法2:通过 AopContext 拿到代理对象,来调用
    • 解法3:通过 CTW,LTW 实现功能增强
  • @Transactional 没有保证原子行为
    • 原因:事务的原子性仅涵盖 insert、update、delete、select … for update 语句,select 方法并不阻塞
  • @Transactional 方法导致的 synchronized 失效
    • 原因:synchronized 保证的仅是目标方法的原子性,环绕目标方法的还有 commit 等操作,它们并未处于 sync 块内
    • 解法1:synchronized 范围应扩大至代理方法调用
    • 解法2:使用 select … for update 替换 select

编程式事务

编程式事务指需要手动调用事务管理器包裹业务代码进行提交回滚。其需要使用TransactionTemplate或者直接使用底层的PlatformTransactionManager。对于编程式事务管理,Spring推荐使用TransactionTemplate

Spring事务与JDBC事务的关系:上中下三个框分别代表基于AOP的声明式事务、编程式事务、JDBC事务。其中基于AOP的声明式事务原理见文章【Spring】Spring5 事务源码分析

编程式事务中的两个重要类:

  • TransactionManager:事务管理器,用于控制事务的提交和回滚
  • TransactionStatus:事务状态,保存了事务的各种状态,例如保存点等;其可创建保存点并利用其回滚到保存点。使用TransactionManager创建该对象。

image-20210818101801840

编程式事务使用示例:

image-20210818100033643

可利用TransactionAspectSupport获取当前线程方法栈中的事务状态,在不同的事务中该状态对象不同:

1
TransactionStatus status = TransactionAspectSupport.currentTransactionStatus();

声明式事务原理

@EnableTransactionManagement 注解向容器中添加AutoProxyRegistrarProxyTransactionManagementConfiguration组件,二者作用分别为:

  • AutoProxyRegistrar:类似于AOP中的AspectJAutoProxyRegistrar,用于向容器中注册InfrastructureAdvisorAutoProxyCreator组件(类似于AOP里的自动代理器,一种后置处理器)来为普通组件进行代理包装,创建代理对象
  • ProxyTransactionManagementConfiguration:用于注册事务增强器,该增强器内设置有事务拦截器,将在代理对象执行目标方法时进行拦截,并调用其invoke()方法,由事务管理器控制事务的提交与回滚

Spring事务原理与AOP原理十分相似,都包含有后置处理器拦截器思想,在组件创建后包装出代理对象、在代理对象执行目标方法时进行拦截,使用事务管理器控制事务的提交与回滚

详细的源码分析见文章【Spring】Spring5 事务源码分析

【Spring】Spring5 AOP

img

AOP 基本概念

AOP(Aspect Oriented Programming)意为:面向切面编程,通过预编译方式和运行期动态代理实现程序功能的统一维护的一种技术。AOP是OOP的延续,是软件开发中的一个热点,也是Spring框架中的一个重要内容,是函数式编程的一种衍生范型。利用AOP可以对业务逻辑的各个部分进行隔离,从而使得业务逻辑各部分之间的耦合度降低,提高程序的可重用性,同时提高了开发的效率。

Spring AOP的源码分析见【Spring】Spring5 AOP源码分析

img

  • 面向切面编程(方面),利用 AOP 可以对业务逻辑的各个部分进行隔离,从而使得业务逻辑各部分之间的耦合度降低,提高程序的可重用性,同时提高了开发的效率;

  • 通俗描述:不通过修改源代码方式,在主干功能里面添加新功能。

  • 使用登录例子说明 AOP:

img

AOP 底层原理

AOP 底层使用动态代理 ,动态代理有两种情况:

第一种 有接口情况,使用JDK 动态代理 ;创建接口实现类代理对象,增强类的方法
在这里插入图片描述

第二种 没有接口情况,使用CGLIB 动态代理创建子类的代理对象,增强类的方法(该方法不需要实现接口,由CGLIB创建代理对象)
在这里插入图片描述

阅读全文

【JavaWeb】Servlet

Servlet

Servlet是Sun公司开发动态web的一门技术。Sun在这些API中提供了一个接口:Servlet。开发Servlet程序需要完成两个步骤:

  • 编写一个Java类,实现Servlet接口
  • 把开发好的Java类部署到web服务器中

把实现了Servlet接口的Java程序叫做Servlet

HelloServlet

Sevlet接口Sun公司提供有两个默认的实现类:HttpServlt,GenericServlet

  1. 构建一个普通的Maven项目(不带模板),删掉里面的src目录,这个空的工程就是Maven的主工程。之后在这个项目里建立Module,新建的Module均为Maven父项目的子项目。

  2. 关于Maven父子工程的理解:在父项目中会有

    1
    2
    3
    <modules>
    <module>servlet-01</module>
    </modules>

    父项目中的Maven依赖环境Jar包子项目可以直接使用

  3. Maven环境优化:修改web.xml(与本地Tomcat中的内容一致)

1
2
3
4
5
6
7
8
<web-app xmlns="http://xmlns.jcp.org/xml/ns/javaee"
xmlns:xsi="http://www.w3.org/2001/XMLSchema-instance"
xsi:schemaLocation="http://xmlns.jcp.org/xml/ns/javaee
http://xmlns.jcp.org/xml/ns/javaee/web-app_4_0.xsd"
version="4.0"
metadata-complete="true">

</web-app>
  1. 编写一个Servlet程序
    • 编写一个普通类
    • 实现Servlet接口,这里继承HttpServlet
1
2
3
4
5
6
7
8
9
10
11
12
13
14
15
16
17
18
19
20
21
22
package com.zhao.servlet;

import javax.servlet.ServletException;
import javax.servlet.http.HttpServlet;
import javax.servlet.http.HttpServletRequest;
import javax.servlet.http.HttpServletResponse;
import java.io.IOException;
import java.io.PrintWriter;

public class HelloServlet extends HttpServlet {
// 由于get或者post只是请求实现的不同方式,可以互相调用,业务逻辑都一样
@Override
protected void doGet(HttpServletRequest req, HttpServletResponse resp) throws ServletException, IOException {
PrintWriter writer = resp.getWriter();
writer.print("Hello Servlet");
}

@Override
protected void doPost(HttpServletRequest req, HttpServletResponse resp) throws ServletException, IOException {
doGet(req, resp);
}
}
  1. 编写Servlet映射:写的Java程序要通过浏览器访问,浏览器需要连接web服务器,所以需要在web服务中注册我们写的Servlet,还需要给他一个浏览器能访问到的路径。
1
2
3
4
5
6
7
8
9
10
<!-- 注册Servlet -->
<servlet>
<servlet-name>HelloServlet</servlet-name>
<servlet-class>com.zhao.servlet.HelloServlet</servlet-class>
</servlet>
<!-- Servlet的请求路径 -->
<servlet-mapping>
<servlet-name>HelloServlet</servlet-name>
<url-pattern>/hello</url-pattern>
</servlet-mapping>
  1. 配置Tomcat,注意配置项目发布的路径
  2. 启动测试
阅读全文

【Spring】Spring5 IoC

kuangstudyf90849ac-8a55-459f-846b-6382d38d6a4d

Spring IoC容器

1、什么是IoC

  • 把对象创建和对象之间的调用过程,交给Spring进行管理
  • 使用IoC目的:为了降低耦合度

2、IoC底层

xml解析、工厂模式、反射

3、Spring提供的IoC容器实现的两种方式(两个接口)

  • BeanFactory接口:IoC容器基本实现是Spring内部接口的使用接口,不提供给开发人员进行使用(加载配置文件时候不会创建对象,在获取对象时才会创建对象。)
  • ApplicationContext接口:BeanFactory接口的子接口,提供更多更强大的功能,提供给开发人员使用(加载配置文件时候就会把在配置文件对象进行创建)推荐使用!

4、ApplicationContext接口的实现类

image-20210523201040536

5、管理Bean的方式有两种

  • 基于xml的方式
  • 基于注解的方式
阅读全文

【Node.js】Node.js

Node.js

Node 是一个让 JavaScript 运行在服务端的开发平台(让前端项目独立运行在服务端),它让 JavaScript 成为与 PHP、Python、Perl、Ruby 等服务端语言平起平坐的脚本语言。 发布于2009年5月,由 Ryan Dahl 开发,实质是对 Chrome V8 引擎进行了封装。

简单的说 Node.js 就是运行在服务端的 JavaScript。 Node.js 是一个基于 Chrome JavaScript 运行时建立的一个平台。底层架构是:javascript。 文件后缀:.js

前后端分离项目中的前端项目通常基于 Node.js 开发,使得前端项目能独立部署在服务器端(而不像后端程序需要 Tomcat 来部署)

Node.js 是脱离浏览器环境运行的 JavaScript 程序

Node.js 是一个事件驱动 I/O 服务端 JavaScript 环境,基于 Google 的 V8 引擎,V8 引擎执行Javascript 的速度非常快,性能非常好。

img

下载地址:https://nodejs.org/zh-cn/download

如果想开发更复杂的基于 Node.js 的应用程序后台,需要进一步学习 Node.js 的 Web 开发相关框架 express,art-template、koa等。

Node.js 实现请求响应

  1. 创建 httpserver.js
1
2
3
4
5
6
7
8
9
10
11
12
13
14
// 导入模块是require 就类似于import java.io 
const http = require('http');
// 1: 创建一个httpserver服务
http.createServer(function(request,response){
// 浏览器怎么认识hello server!!!
response.writeHead(200,{'Content-type':'text/plain'}); //这句话的含义是:告诉浏览器将
// 以text-plain去解析hello server 这段数据。
// 给浏览器输出内容
response.end("<strong>hello server!!!</strong>");
}).listen(8888);
console.log("你启动的服务是:http://localhpst:8888以启动成功!!");
// 2: 监听一端口8888
// 3: 启动运行服务 node httpserver.js
// 4: 在浏览器访问http://localhost:8888
  1. 运行服务器程序
1
node httpserver.js
  1. 服务器启动成功后,在浏览器中输入:http://localhost:8888/ 查看webserver成功运行,并输出html页面

Node.js 操作 MySQL 数据库

  1. 安装 mysql 依赖
1
npm install mysql
  1. 创建 db.js
1
2
3
4
5
6
7
8
9
10
11
12
13
14
15
16
17
18
19
20
21
22
23
//1: 导入mysql依赖包,  mysql属于第三方的模块就类似于 java.sql一样的道理
var mysql = require("mysql");
// 1: 创建一个mysql的Connection对象
// 2: 配置数据连接的信息
var connection =mysql.createConnection({
host:"127.0.0.1",
port:3306,
user:"root",
password:"mkxiaoer",
database:"testdb"
});
// 3:开辟连接
connection.connect();
// 4: 执行curd
connection.query("select * from kss_user",function(error,results,fields){
// 如果查询出错,直接抛出
if(error)throw error;
// 查询成功
console.log("results = ",results);
});
// 5: 关闭连接
connection.end();
// 最后一步:运行node db.js 查看效果
  1. 运行 db.js
1
node db
阅读全文