
简介
官方文档:https://baomidou.com/pages/24112f/
MyBatis-Plus(简称 MP)是一个 MyBatis 的增强工具包,只做增强不做改变。为简化开发工作、提高生产率而生。
特性
- 无侵入:只做增强不做改变,引入它不会对现有工程产生影响,如丝般顺滑
- 损耗小:启动即会自动注入基本 CURD,性能基本无损耗,直接面向对象操作
- 强大的 CRUD 操作:内置通用 Mapper、通用 Service,仅仅通过少量配置即可实现单表大部分 CRUD 操作,更有强大的条件构造器,满足各类使用需求
- 支持 Lambda 形式调用:通过 Lambda 表达式,方便的编写各类查询条件,无需再担心字段写错
- 支持主键自动生成:支持多达 4 种主键策略(内含分布式唯一 ID 生成器 - Sequence),可自由配置,完美解决主键问题
- 支持 ActiveRecord 模式:支持 ActiveRecord 形式调用,实体类只需继承 Model 类即可进行强大的 CRUD 操作
- 支持自定义全局通用操作:支持全局通用方法注入( Write once, use anywhere )
- 内置代码生成器:采用代码或者 Maven 插件可快速生成 Mapper 、 Model 、 Service 、 Controller 层代码,支持模板引擎,更有超多自定义配置等您来使用
- 内置分页插件:基于 MyBatis 物理分页,开发者无需关心具体操作,配置好插件之后,写分页等同于普通 List 查询
- 分页插件支持多种数据库:支持 MySQL、MariaDB、Oracle、DB2、H2、HSQL、SQLite、Postgre、SQLServer 等多种数据库
- 内置性能分析插件:可输出 SQL 语句以及其执行时间,建议开发测试时启用该功能,能快速揪出慢查询
- 内置全局拦截插件:提供全表 delete 、 update 操作智能分析阻断,也可自定义拦截规则,预防误操作
框架结构
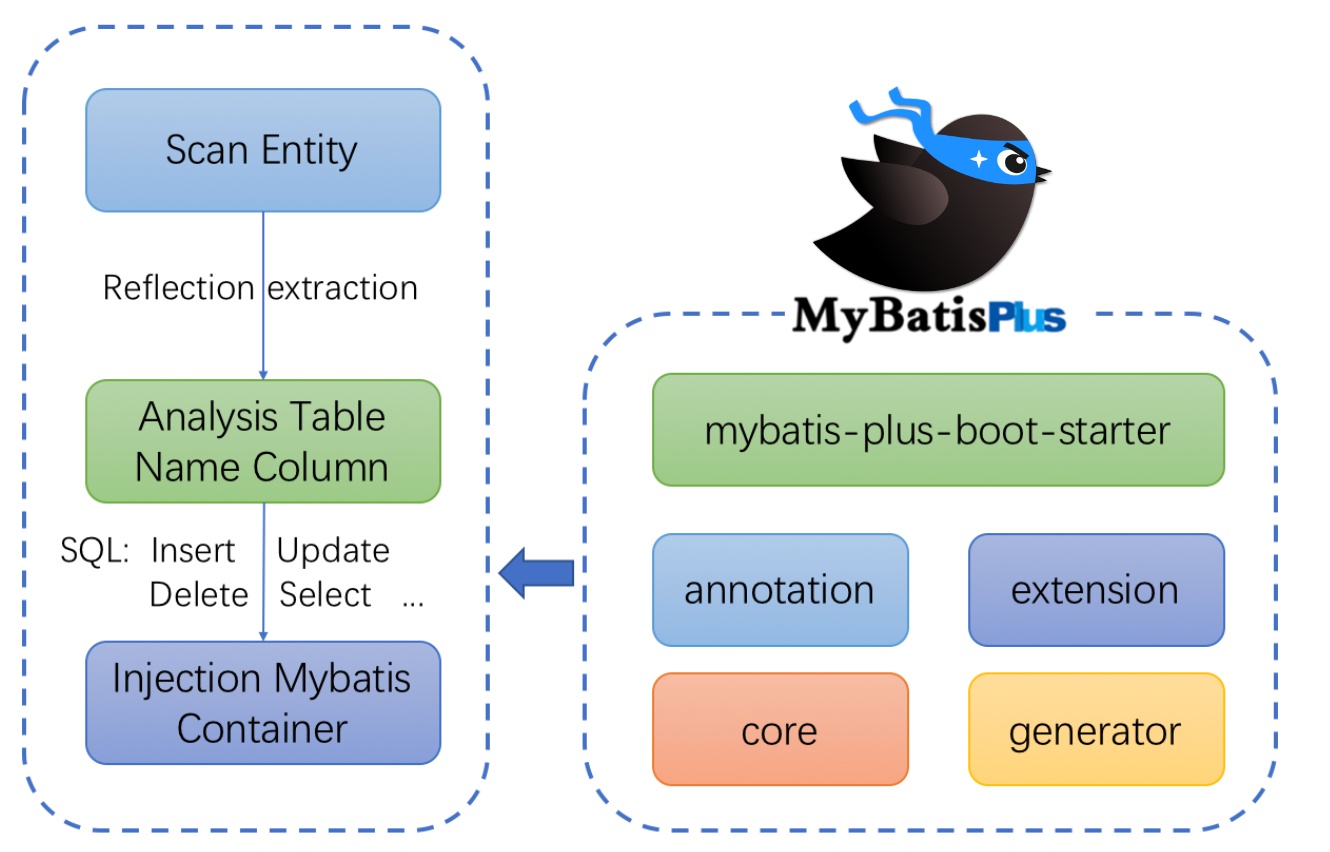
快速入门
- 导入 Maven 依赖:
1
2
3
4
5
6
7
8
9
10
11
12
13
14
15
| <dependencies>
<dependency>
<groupId>mysql</groupId>
<artifactId>mysql-connector-java</artifactId>
<version>8.0.22</version>
</dependency>
<dependency>
<groupId>com.baomidou</groupId>
<artifactId>mybatis-plus-boot-starter</artifactId>
<version>3.2.0</version>
</dependency>
</dependencies>
|
- 配置文件:
1
2
3
4
5
6
7
8
9
10
11
12
13
14
15
16
17
18
19
20
21
22
| spring:
application:
name: yunmall-product
datasource:
username: root
password: xxx
url: jdbc:mysql://yuyunzhao.cn:3306/yunmall_pms?useUnicode=true&characterEncoding=UTF-8&useSSL=false&serverTimezone=Asia/Shanghai
driver-class-name: com.mysql.cj.jdbc.Driver
mybatis-plus:
mapperLocations: classpath:mapper/**/*.xml
global-config:
db-config:
id-type: auto
logic-delete-value: 1
logic-not-delete-value: 0
configuration:
log-impl: org.apache.ibatis.logging.stdout.StdOutImpl
|
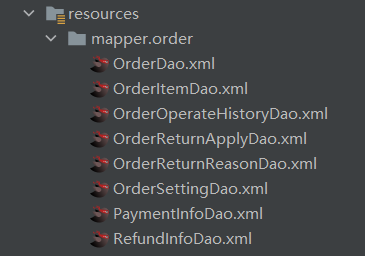
mapper.xml 文件存放在 classpath:mapper/**/*.xml:
- 编写实体类
User:
1
2
3
4
5
6
7
8
9
10
11
12
13
14
15
16
17
18
19
20
21
22
23
24
25
26
27
28
29
30
31
32
33
34
35
36
37
38
39
40
41
42
43
44
45
46
47
48
49
| @Data
@TableName("pms_category")
public class CategoryEntity implements Serializable {
private static final long serialVersionUID = 1L;
@TableId(type = IdType.AUTO)
private Long catId;
private String name;
private Long parentCid;
private Integer catLevel;
@TableLogic(value = "1", delval = "0")
private Integer showStatus;
private Integer productCount;
@TableField(fill = FieldFill.INSERT)
private Date createTime;
@TableField(fill = FieldFill.INSERT_UPDATE)
private Date updateTime;
@TableField(exist = false)
private List<CategoryEntity> children;
}
|
- 编写实体类对应的
CategoryDao 接口,其需要继承 MP 的 BaseMapper 接口,这样就直接拥有了基础 CRUD 的接口方法,在之后创建动态代理对象时就可以拥有这些基础 CRUD 方法了:
1
2
3
4
5
6
|
@Mapper
public interface CategoryDao extends BaseMapper<CategoryEntity> {
}
|
注意:标注 @Mapper 注解后就不需要在主启动类上添加 @MapperScan("com.zhao.mapper") 了。
- 测试
CategoryDao :
1
2
3
4
5
6
7
8
9
10
11
12
| @SpringBootTest
class MybatisPlusApplicationTests {
@Autowired
private CategoryDao categoryDao;
@Test
void contextLoads() {
List<CategoryDao> categoryList = categoryDao.selectList(null);
categoryList.forEach(System.out::println);
}
}
|
- 创建 Service 层接口
CategoryService:
1
2
3
4
5
| public interface CategoryService extends IService<CategoryEntity> {
PageUtils queryPage(Map<String, Object> params);
List<CategoryEntity> getCategoryLevel1();
}
|
- 实现该接口
CategoryServiceImpl:
1
2
3
4
5
6
7
8
9
10
11
12
13
14
15
16
17
18
19
20
21
22
23
24
| @Service("categoryService")
public class CategoryServiceImpl extends ServiceImpl<CategoryDao, CategoryEntity>
implements CategoryService {
@Override
public PageUtils queryPage(Map<String, Object> params) {
IPage<CategoryEntity> page = this.page(
new Query<CategoryEntity>().getPage(params),
new QueryWrapper<CategoryEntity>()
);
return new PageUtils(page);
}
@Override
public List<CategoryEntity> getCategoryLevel1() {
return this.baseMapper.selectList(new QueryWrapper<CategoryEntity>()
.eq("parent_cid", 0));
}
}
|
注意,可以直接在 Service 层使用继承自其父类 ServiceImpl 的 baseMapper 对象进行增删改查。
- Controller 层
1
2
3
4
5
6
7
8
9
10
11
12
13
| @RestController
@RequestMapping("product/category")
public class CategoryController {
@Autowired
private CategoryService categoryService;
@RequestMapping("/list/tree")
public R list(){
List<CategoryEntity> entities = categoryService.getCategoryLevel1();
return R.ok().put("data", entities);
}
}
|
要想使用分页功能需要配置分页插件
注解
更多注解介绍见 https://baomidou.com/pages/223848/#tablelogic
MP 提供了许多注解,用于标注在实体类上,指定实体类属性与表中字段间的关系。例如:
1
2
3
4
5
6
7
8
9
10
11
12
13
14
15
16
17
18
19
20
21
22
23
24
25
26
27
28
29
30
31
32
33
34
35
36
37
38
39
40
41
42
43
44
45
46
47
48
49
| @Data
@TableName("pms_category")
public class CategoryEntity implements Serializable {
private static final long serialVersionUID = 1L;
@TableId(type = IdType.AUTO)
private Long catId;
private String name;
private Long parentCid;
private Integer catLevel;
@TableLogic(value = "1", delval = "0")
private Integer showStatus;
private Integer productCount;
@TableField(fill = FieldFill.INSERT)
private Date createTime;
@TableField(fill = FieldFill.INSERT_UPDATE)
private Date updateTime;
@TableField(exist = false)
private List<CategoryEntity> children;
}
|
逻辑删除需要在配置文件中设置 logic-delete-value: 1
通用 CRUD
Dao 层 BaseMapper<T>
BaseMapper<T> 是 Dao 层的接口
MyBatis-Plus 提供的 BaseMapper<T> 提供了基础的 CRUD 接口:
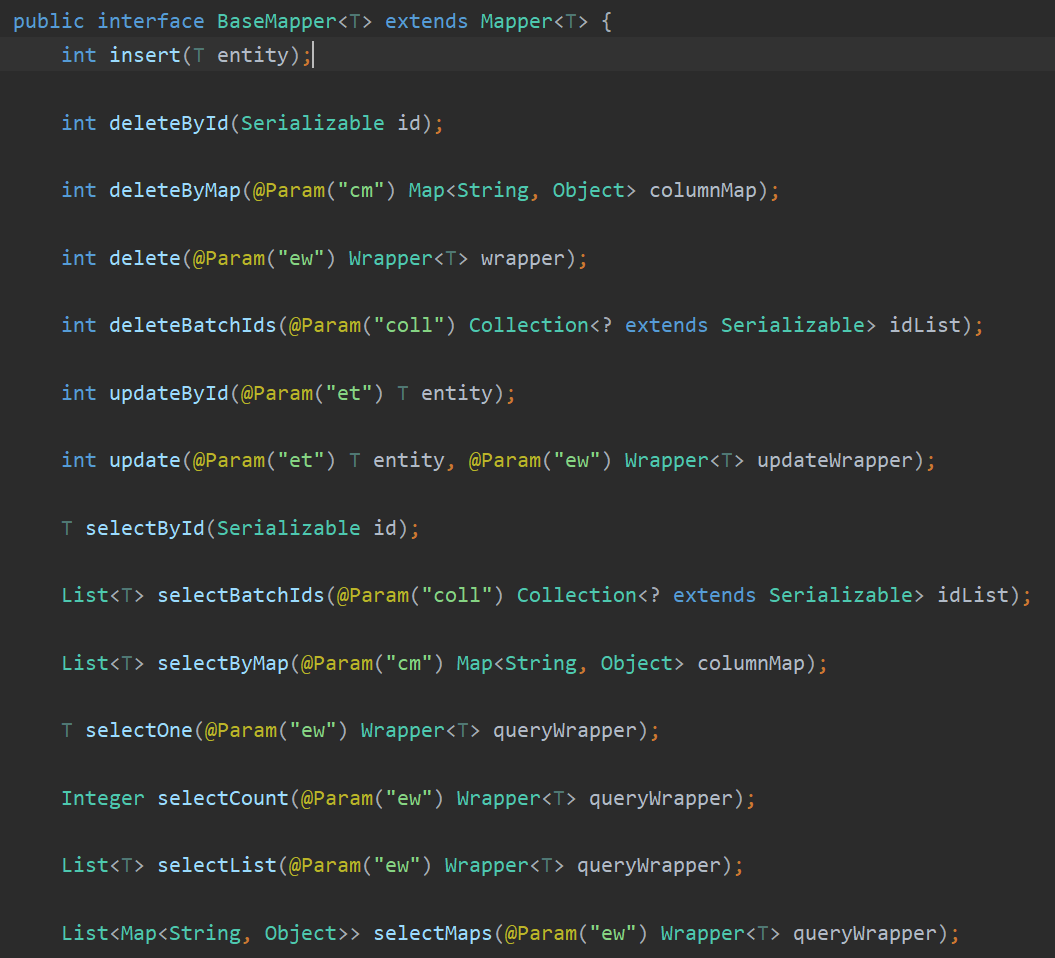
Mybatis-Plus 启动时自动解析实体表关系映射转换为 Mybatis 内部对象注入容器(代理对象)。无需开发人员自己手动实现。开发人员只需要继承自该接口,并指定自己的泛型。当然开发人员也可以在其内自定义自己的方法:
1
2
3
4
5
6
|
@Mapper
public interface UserMapper extends BaseMapper<User> {
}
|
该 mapper 将被注入到 Spring 容器中,通过 @Autowired 注解可以获取到。
更多 Mapper CRUD 接口的介绍见 https://baomidou.com/pages/49cc81/#mapper-crud-接口
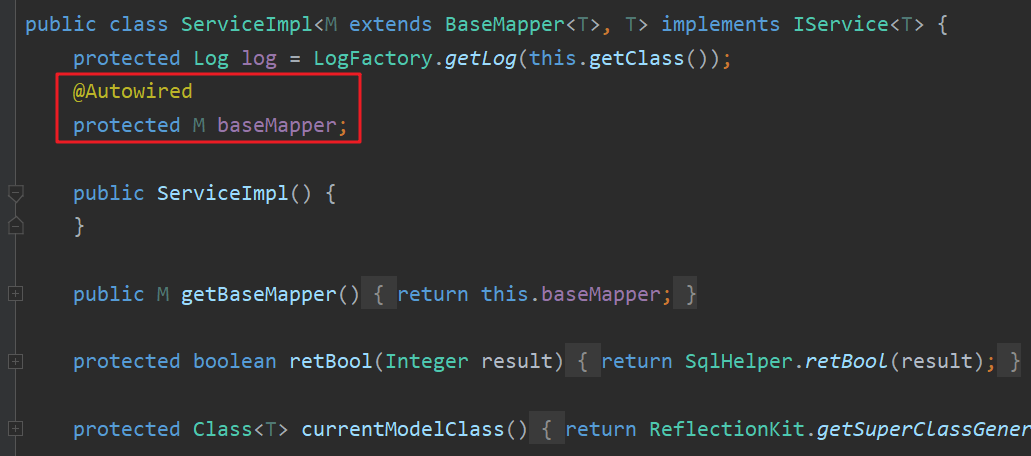
在 Service 层可以直接获取到 baseMapper 对象,其就代表对应的 BaseMapper<User> 对象:
Service 层 IService<T>
IService<T> 是 Service 层的接口
MyBatis-Plus 还提供了 Service 层的接口 IService<T>,其底层调用了 Dao 层的 Mapper。
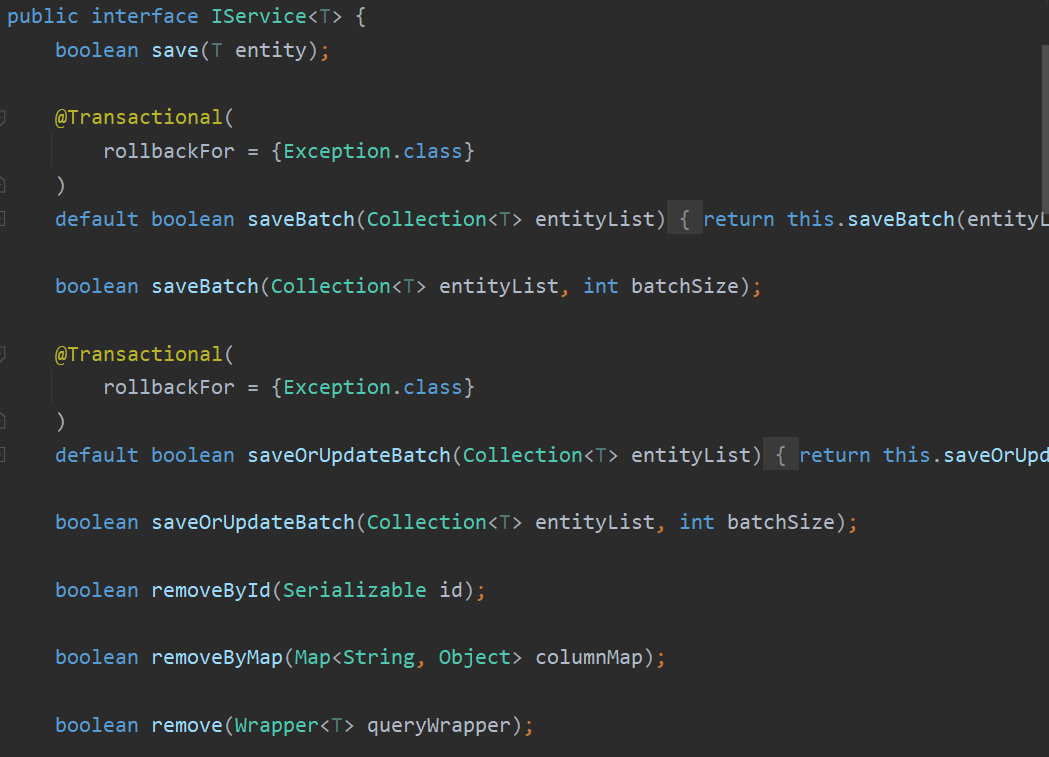
通用 Service CRUD 封装 IService<T> 接口,进一步封装 CRUD 采用以下前缀命名方式区分 Mapper 层避免混淆:
get 查询单行list 查询集合page 分页查询remove 删除save 插入update 更新
并且对插入和修改操作添加 Spring 声明式事务。
更多 Service CRUD 接口的介绍见 https://baomidou.com/pages/49cc81/#service-crud-接口
主键值自动回显
在插入操作时,由于数据库中主键 id 设置为了自增类型,所以代码中不应该指定实体类对象的主键值,而应该交由 MyBatis-Plus 自动实现自增。即代码中主键值都设置为 null。
1
2
3
4
5
|
skuInfoService.saveSkuInfo(skuInfoEntity);
Long skuId = skuInfoEntity.getSkuId();
|
在插入到数据库后 MyBatis-Plus 会为该对象自动回显自增后的主键 id 值。
条件构造器
条件构造器 Wrapper<T> 的作用就是在 SQL 语句中添加 WHERE 设置限制条件。其可以用在 Dao Mapper 中,可以以用在 Service 中。常用方法:
1
2
3
4
5
6
7
8
9
10
| new QueryWrapper<SkuInfoEntity>()
.eq("sku_id", key)
.or()
.like("sku_name", key)
.and().
.eq("catalog_id", catelogId)
.ge("price", min)
.le("price", max)
.orderByDesc("price")
.last("limit 1,3"));
|
复合条件查询:
1
2
3
4
5
6
7
8
9
10
11
12
13
14
15
16
17
18
19
20
21
22
23
24
25
26
27
28
29
30
31
32
33
34
35
36
37
38
39
40
41
42
43
44
45
46
47
48
49
50
| @Override
public PageUtils queryPageByCondition(Map<String, Object> params) {
QueryWrapper<SkuInfoEntity> queryWrapper = new QueryWrapper<>();
String key = (String) params.get("key");
if (!StringUtils.isEmpty(key)) {
queryWrapper.and((wrapper) -> {
wrapper.eq("sku_id", key).or().like("sku_name", key);
});
}
String catelogId = (String) params.get("catelogId");
if (!StringUtils.isEmpty(catelogId) && !"0".equalsIgnoreCase(catelogId)) {
queryWrapper.eq("catalog_id", catelogId);
}
String brandId = (String) params.get("brandId");
if (!StringUtils.isEmpty(brandId) && !"0".equalsIgnoreCase(catelogId)) {
queryWrapper.eq("brand_id", brandId);
}
String min = (String) params.get("min");
if (!StringUtils.isEmpty(min)) {
queryWrapper.ge("price", min);
}
String max = (String) params.get("max");
if (!StringUtils.isEmpty(max)) {
try {
BigDecimal bigDecimal = new BigDecimal(max);
if (bigDecimal.compareTo(new BigDecimal("0")) == 1) {
queryWrapper.le("price", max);
}
} catch (Exception e) {
}
}
IPage<SkuInfoEntity> page = this.page(
new Query<SkuInfoEntity>().getPage(params),
queryWrapper
);
return new PageUtils(page);
}
|
QueryWrapper(条件查询构造器)
1
2
3
4
5
6
7
8
9
10
11
12
13
14
15
16
17
18
19
20
21
22
23
24
25
26
27
28
29
30
31
32
33
34
35
36
37
38
39
40
41
42
43
44
45
46
47
48
| public Employee testQueryWrapperSelect(){
IPage<Employee> employeeIPage = employeeMapper
.selectPage(new Page<Employee>(1, 2),
new QueryWrapper<Employee>()
.between("age", 18, 50)
.eq("gender", 1)
.eq("last_name", "Tom"));
List<Employee> employees1=employeeIPage.getRecords();
employees1.forEach((value)-> System.out.println(value));
List<Employee> employees2 = employeeMapper
.selectList(new QueryWrapper<Employee>()
.eq("gender", 0)
.like("last_name", "Tom")
.or()
.like("email", "a")
);
employees2.forEach(value -> System.out.println(value));
List<Employee> employees3 = employeeMapper
.selectList(new QueryWrapper<Employee>()
.eq("gender", 0)
.orderByDesc("age")
.last("limit 1,3"));
employees3.forEach(value -> System.out.println(value));
Page<Map<String,Object>> page = employeeMapper
.selectMapsPage(new Page<Map<String,Object>>(1,3),
new QueryWrapper<Employee>().lambda()
.between(Employee::getAge,15,50)
.eq(Employee::getGender,1)
.eq(Employee::getLastName,"MP"));
List<Map<String,Object>> emps = page.getRecords();
for(Map<String,Object> map:emps){
for(String key:map.keySet()){
System.out.print(key+"--->"+map.get(key)+"; ");
}
System.out.println();
}
}
|
UpdateWrapper(修改构造器)
1
2
3
4
5
6
7
8
9
10
11
| @Test
public void testUpdateWrapperSelect(){
Employee employee = new Employee();
employee.setLastName("Jack");
employee.setEmail("Jack@sina.com");
employee.setGender(0);
Integer update = employeeMapper.update(employee, new UpdateWrapper<Employee>()
.eq("last_name","Tom")
.eq("age",44));
System.out.println(update);
}
|
UpdateWrapper(删除构造器)
1
2
3
4
5
6
7
| @Test
public void testDeleteWrapper(){
Integer delete = employeeMapper.delete(new UpdateWrapper<Employee>()
.eq("last_name", "Tom")
.eq("age", 20));
System.out.println(delete);
}
|
ActiveReccord
ActiveReccord(活动记录),是一种领域模型模式,特点是一个模型类对应关系型数据库中的一个表,而模型类的一个实例对应表中的一行记录。
ActiveRecord 一直广受动态语言( PHP 、 Ruby 等)的喜爱,而 Java 作为准静态语言,对于 ActiveRecord 往往只能感叹其优雅,所以 MP 也在 AR 道路上进行了一定的探索。
AR 模式提供了一种更加便捷的方式实现 CRUD 操作,其本质还是调用的 Mybatis 对应的方法,类似于语法糖。指计算机语言中添加的某种语法,这种语法对原本语言的功能并没有影响。可以更方便开发者使用,可以避免出错的机会,让程序可读性更好。
- 使用 AR:继承
Model<实体类>
1
2
3
| public class Employee extends Model<Employee> {
}
|
- AR 插入操作
1
2
3
4
5
6
7
8
9
10
| @Test
public void testARInsert(){
Employee employee = new Employee();
employee.setLastName("Jack");
employee.setEmail("Jack@qq.com");
employee.setGender(1);
employee.setAge(20);
boolean insert = employee.insert();
System.out.println("Result="+insert);
}
|
- AR 修改操作
1
2
3
4
5
| @Test
public void testARUpdate(){
Employee employee = new Employee(16,"JKL","JKL@qq.com",0,15);
System.out.println(employee.updateById());
}
|
- AR 删除操作
1
2
3
4
5
6
7
8
9
| @Test
public void testARDelete(){
Employee employee = new Employee();
System.out.println("通过ID删除结果="+employee.deleteById(4));
System.out.println("通过条件删除结果="+employee.delete(new QueryWrapper<Employee>().eq("last_name","jack")));
}
|
- AR 查询操作
1
2
3
4
5
6
7
8
9
10
11
12
| @Test
public void testARSelect(){
Employee employee = new Employee();
System.out.println(employee.selectById(16));
System.out.println(employee.selectAll());
employee.selectList(new QueryWrapper<Employee>().like("last_name","J")).forEach(value -> {
System.out.println(value);
});
}
|
- AR 分页复杂操作
1
2
3
4
5
6
7
8
9
| @Test
public void testARPage(){
Employee employee = new Employee();
IPage<Employee> employeeIPage = employee.selectPage(new Page<>(1, 1), new QueryWrapper<Employee>().like("last_name", "T"));
employeeIPage.getRecords().forEach(value -> {
System.out.println(value);
});
}
|
代码生成器
关于代码生成器的介绍可以参考博客 https://blog.csdn.net/qq_41049371/article/details/113630391 与官方文档。
IDEA 中 EasyCode 插件
可以使用 IDEA 中的 EasyCode 插件实现快速代码生成。使用方法参考博客:https://blog.csdn.net/qq_41049371/article/details/113630391
插件
关于插件的介绍可以参考博客 https://blog.csdn.net/qq_41049371/article/details/113630391 与官方文档。
本文只介绍最常用的分页插件:
1
2
3
4
5
6
7
8
9
10
11
12
13
14
15
16
17
18
19
| @Configuration
@EnableTransactionManagement
@MapperScan("com.zhao.yunmall.product.dao")
public class MyBatisConfig {
@Bean
public PaginationInterceptor paginationInterceptor() {
PaginationInterceptor paginationInterceptor = new PaginationInterceptor();
paginationInterceptor.setOverflow(true);
paginationInterceptor.setLimit(500);
paginationInterceptor.setCountSqlParser(new JsqlParserCountOptimize(true));
return paginationInterceptor;
}
}
|
这样就可以使用分页功能:
1
2
3
4
5
6
7
| @Test
public void testPage(){
Page<User> page = new Page<>(2,5);
userMapper.selectPage(page, queryWrapper);
}
|


