【Spring Boot】Spring Boot2 源码分析
自动配置原理
依赖管理
当前新建的Spring Boot项目的父项目:
1 | <parent> |
其父项目又依赖spring-boot-dependencies.pom:
1 | <parent> |
该文件中声明了开发中常用的jar包版本,因此其子项目中不需要给依赖写上版本号,会自动导入父项目里版本的jar包。该特性被称为版本仲裁。
1 | <properties> |
自定义依赖版本
若想自定义修改依赖的版本,则只需要在当前项目里指定配置版本号,其会覆盖父项目中的默认版本号。
1 | <properties> |
场景启动器
spring-boot-starter-* 代表某种场景,只要引入了该starter,这个场景的所有依赖都会自动引入。第三方提供的简化开发的场景启动器命名格式:*-spring-boot-starter。官方所有支持的Starter
所有场景启动器最底层的依赖,SpringBoot自动配置的核心依赖:spring-boot-starter
1 | <dependency> |
该starter场景将导入Spring Boot提供的127种自动配置类xxxAutoConfiguration,这些自动配置类将导入许多常用的组件用于简化开发(例如DispatcherServlet等),无需开发人员手动添加这些组件。
spring-boot-starter.pom的主要内容:
1 |
|
场景启动器starter工作原理
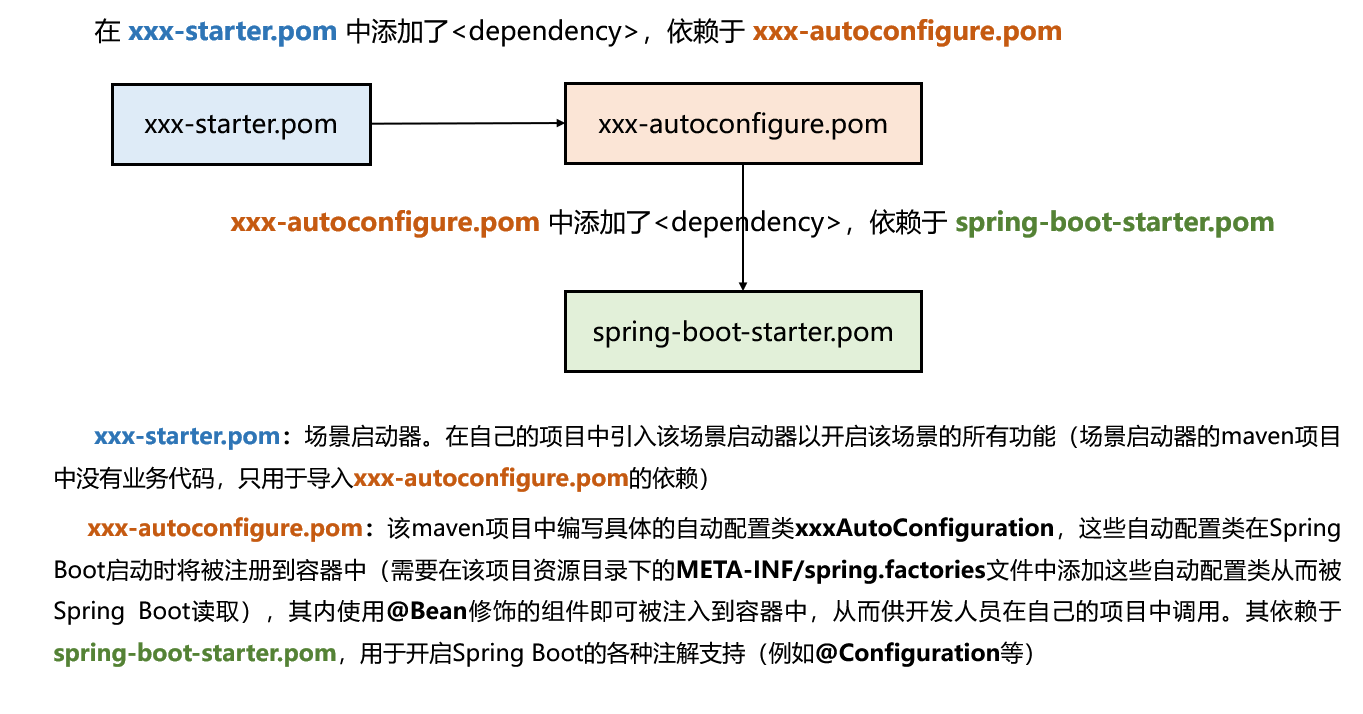
场景启动器工作原理的本质:调用的xxx-starter项目导入的所有xxx-autoconfigure项目中编写了许多自动配置类xxxAutoConfiguration,这些自动配置类将在Spring Boot启动时被注册到容器中,从而将其内编写的组件按照条件注册到容器中,因此开发人员可以在自己的项目中调用到这些组件。
自动配置原理
SpringBoot的主程序类(标有 @SpringBootApplication注解的类)所在包及其下面的所有子包里面的组件都会被默认扫描进来,这些组件不再需要额外指定扫描路径。而若想要扫描其他路径下的组件,则可以在主程序类上添加:
@SpringBootApplication(scanBasePackages="com.zhao.xxx")@ComponentScan("com.zhao.xxx")
@SpringBootApplication是一个合成注解,其效果等同于下面三个注解的组合。
1 |
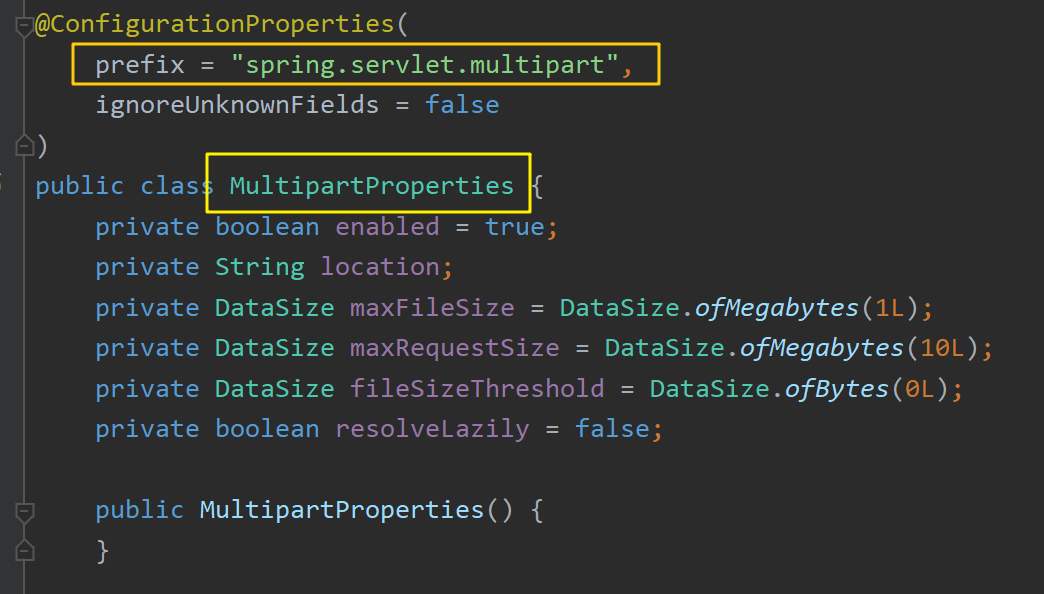
Spring Boot的各种配置都拥有默认值。这些默认配置最终都是映射到某个类上,如:MultipartProperties。配置文件的值最终会绑定在某个类上,这个类会在容器中创建对象。
Spring Boot所有的自动配置功能都在 spring-boot-autoconfigure 包里面(第三方的starter场景也有相应的xxx-autoconfigure包)。
@SpringBootApplication是一个合成注解,其效果等同于下面三个注解的组合:
1 |
|
@SpringBootConfiguration 是一个组合注解,由 @ComponentScan、@EnableAutoConfiguration 和 @SpringBootConfiguration 组成
-
@SpringBootConfiguration与普通@Configuration相比,唯一区别是前者要求整个 app 中只出现一次 -
@ComponentScanexcludeFilters- 用来在组件扫描时进行排除,也会排除自动配置类
-
@EnableAutoConfiguration也是一个组合注解,由下面注解组成@AutoConfigurationPackage– 用来记住扫描的起始包@Import(AutoConfigurationImportSelector.class)用来加载META-INF/spring.factories中的自动配置类
为什么不使用 @Import 直接引入自动配置类
有两个原因:
- 让主配置类和自动配置类变成了强耦合,主配置类不应该知道有哪些从属配置
- 直接用
@Import(自动配置类.class),引入的配置解析优先级较高,自动配置类的解析应该在主配置没提供时作为默认配置
因此,采用了 @Import(AutoConfigurationImportSelector.class)
- 由
AutoConfigurationImportSelector.class去读取META-INF/spring.factories中的自动配置类,实现了弱耦合。 - 另外
AutoConfigurationImportSelector.class实现了 DeferredImportSelector 接口,让自动配置的解析晚于主配置的解析
下面逐一分析上述三者的作用。
1、@SpringBootConfiguration
表明被 @SpringBootApplication 修饰的类本质上也是一个 @Configuration 配置类
1 |
|
2、@ComponentScan
指定要扫描的组件(按照@Filter里设置的类型过滤一些组件)
3、@EnableAutoConfiguration
重点,自动配置是通过该注解实现的。
1 |
|
3.1、@AutoConfigurationPackage:自动配置包,将MainApplication主程序类所在包下的所有组件注册到容器中
1 |
|
该注解通过@Import注解向容器中导入了一个Registrar组件,该组件实现了ImportBeanDefinitionRegistrar接口(【Spring】Spring5 源码中常用接口的底层原理),其作用是将MainApplication主程序类所在包下的所有组件都注册到容器中。这也解释了默认的扫描包路径为MainApplication所在包的路径。
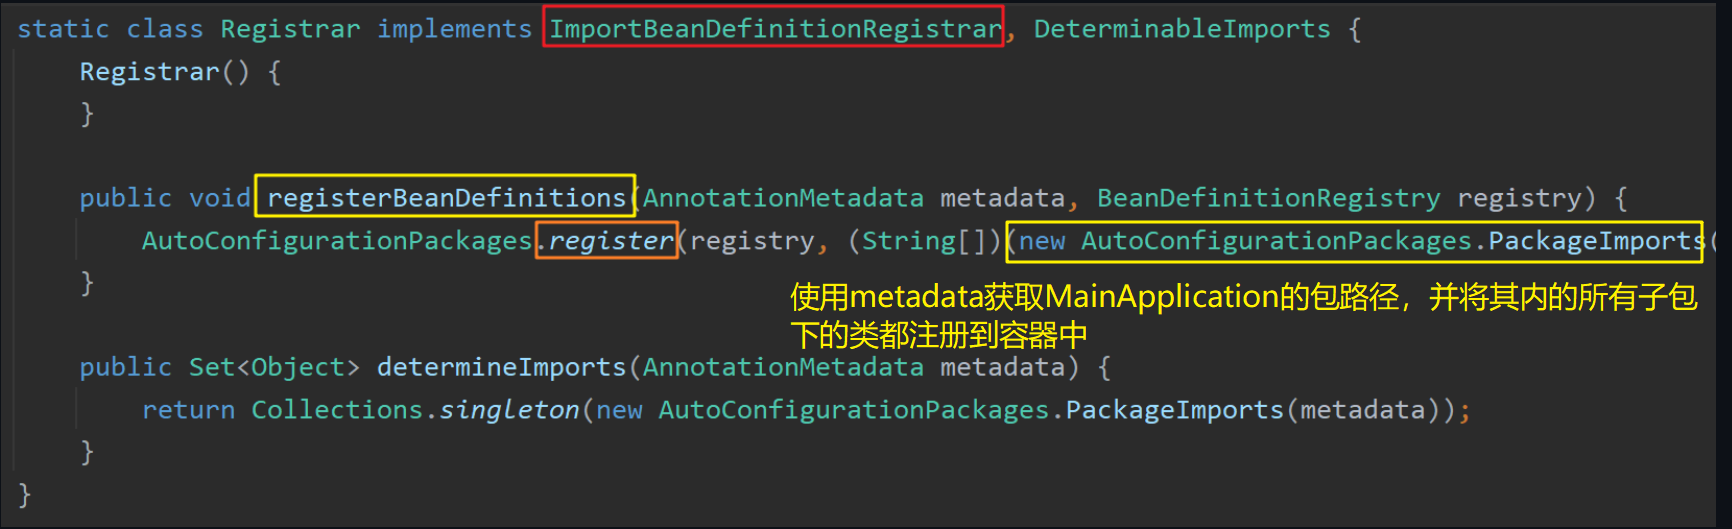
其中传入的参数AnnotationMetadata metadata是指SpringBoot主程序类MainApplication的注解元信息,用于获取其所在的包路径,从而将该包下的所有子包下的类都注册到容器中。
3.2、@Import({AutoConfigurationImportSelector.class}):向容器中注册自动配置类
第一步:引导加载自动配置类
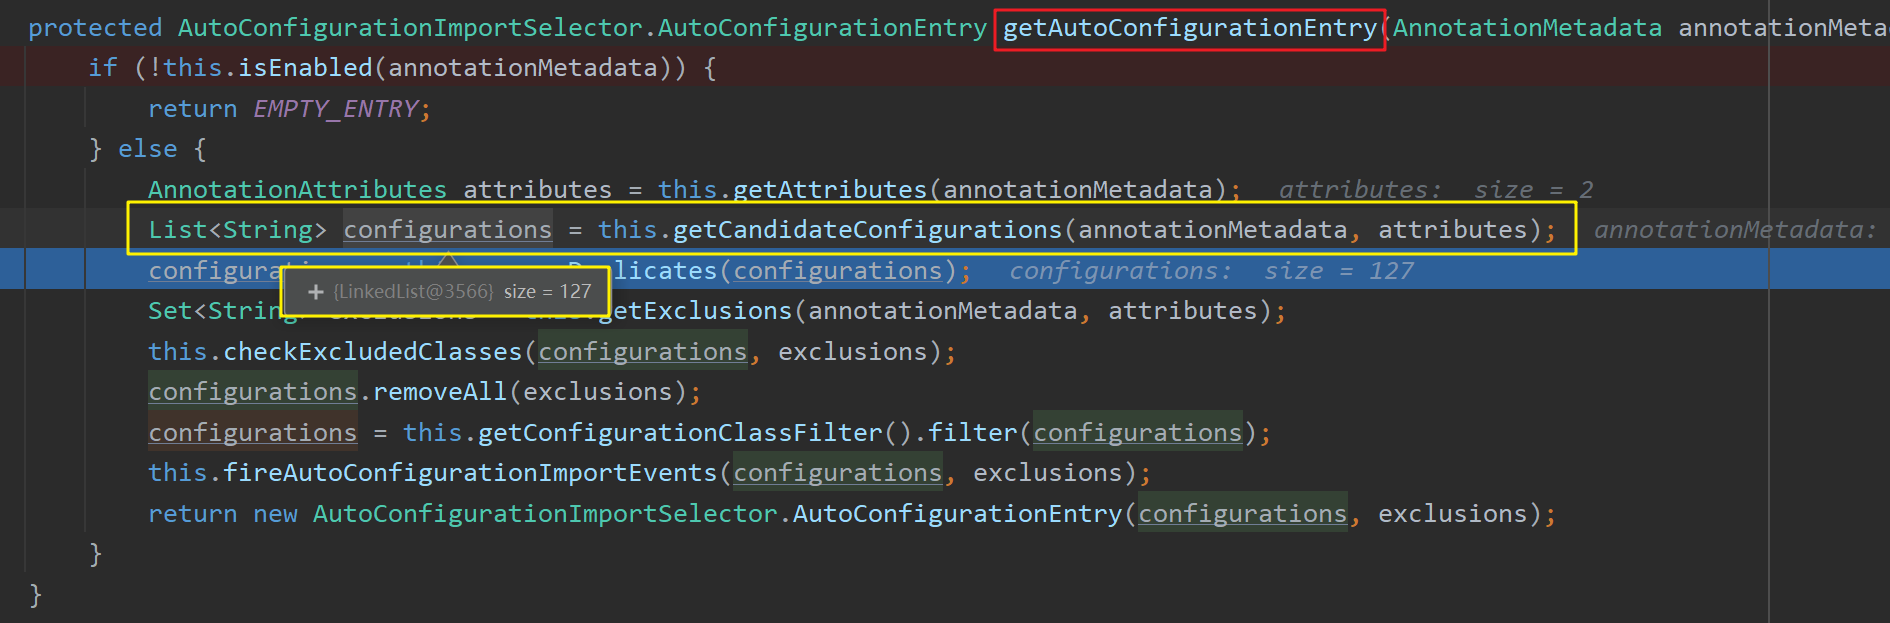
该注解向容器中注册了AutoConfigurationImportSelector类型的组件,该类的重要方法 selectImports() 中利用 getAutoConfigurationEntry(annotationMetadata) 方法向容器中导入一些自动配置类组件(先获取所有的自动配置类,再根据实际情况筛选出符合条件的自动配置类注册到容器中)。

进入getAutoConfigurationEntry(annotationMetadata)方法后,首先调用getCandidateConfigurations()方法获取所有候选的自动配置类组件(AutoConfiguration),共有127个。并在后续进行删选后按需开启自动配置项(即用不到的自动配置类无需开启)。
获取这些AutoConfiguration的具体过程:
在getCandidateConfigurations()方法内通过SpringFactoriesLoader工厂加载器加载一些组件。

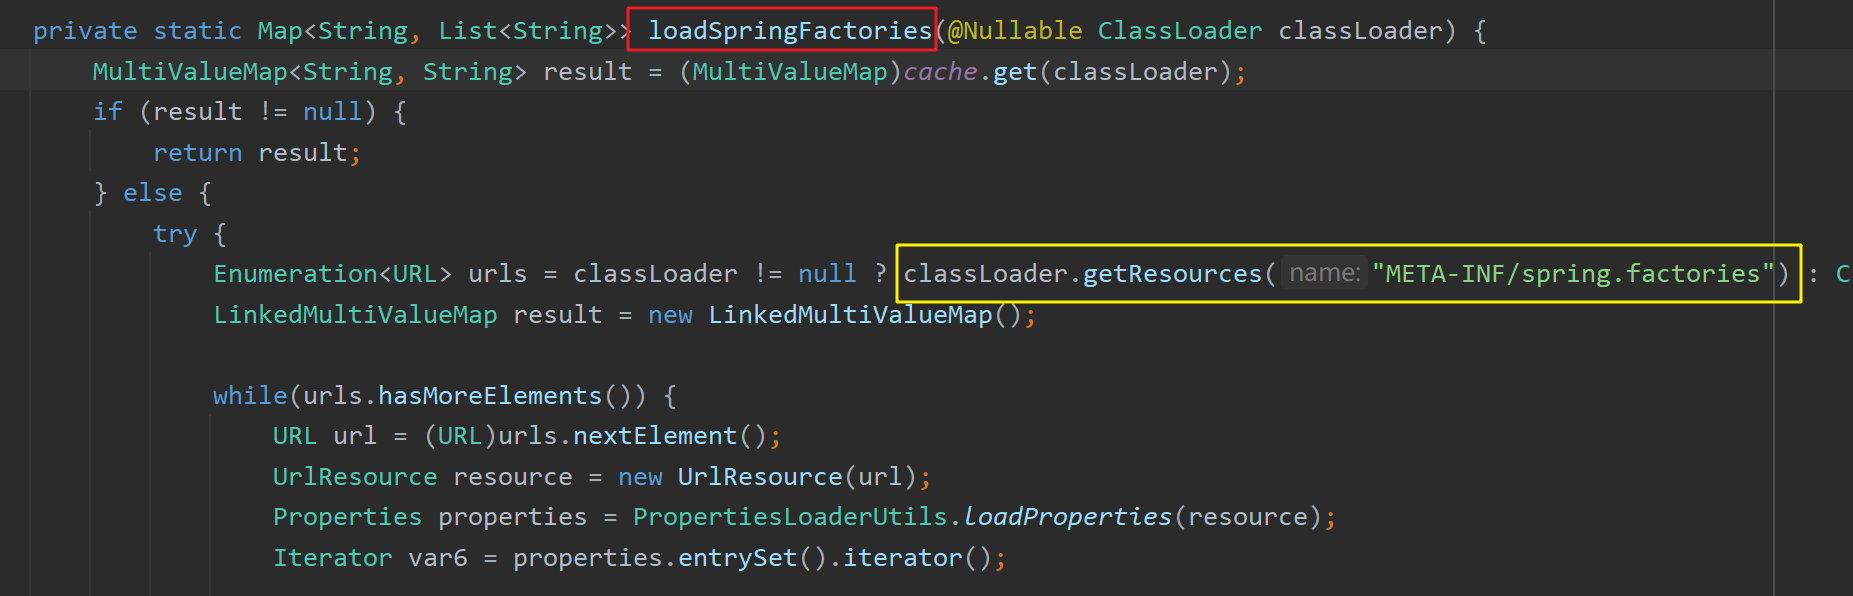
在该方法内使用类加载器读取"META-INF/spring.factories"位置处的资源文件。有些包下有这个文件,比如最关键的spring-boot-autoconfigure-2.3.4.RELEASE.jar包(导入的其他第三方包中也可以会含有"META-INF/spring.factories"文件,例如MyBatis的mybatis-spring-boot-autoconfigure-2.1.4.jar包也会有该文件,Spring Boot启动时也会加载该包下的xxxAutoConfiguration类):
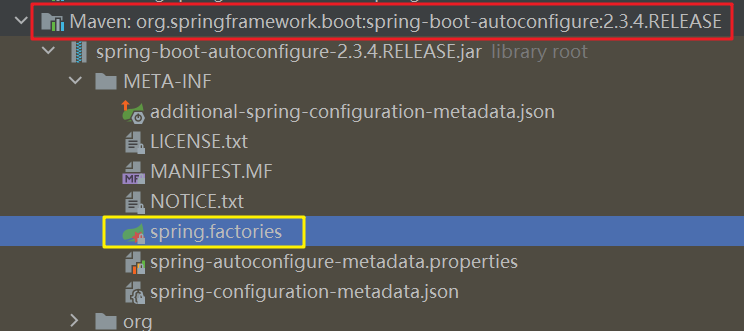
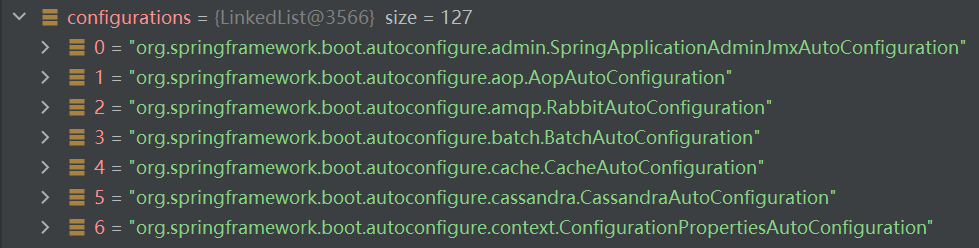
该文件内配置了Spring Boot启动时就要向容器中加载的所有自动配置类(xxxAutoConfiguration)(共127个,正好对应上文中的127个自动配置类组件):
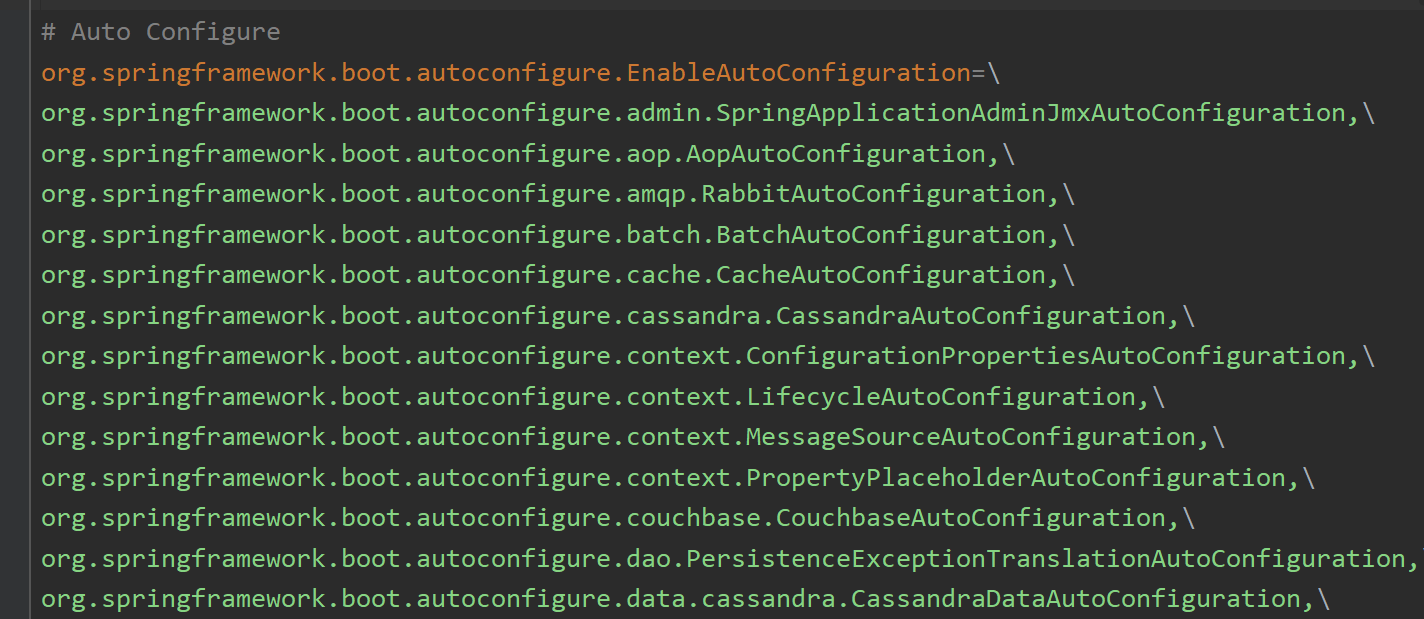
上文中注册到容器中的127个自动配置类组件configurations:

但这127个自动配置类并不会都注册到容器中,而会按需开启。
第二步:按需开启自动配置项
虽然上述127个自动配置类在启动的时候会默认全部加载,但每个xxxAutoConfiguration会按照条件装配规则(@Conditional)按需配置。
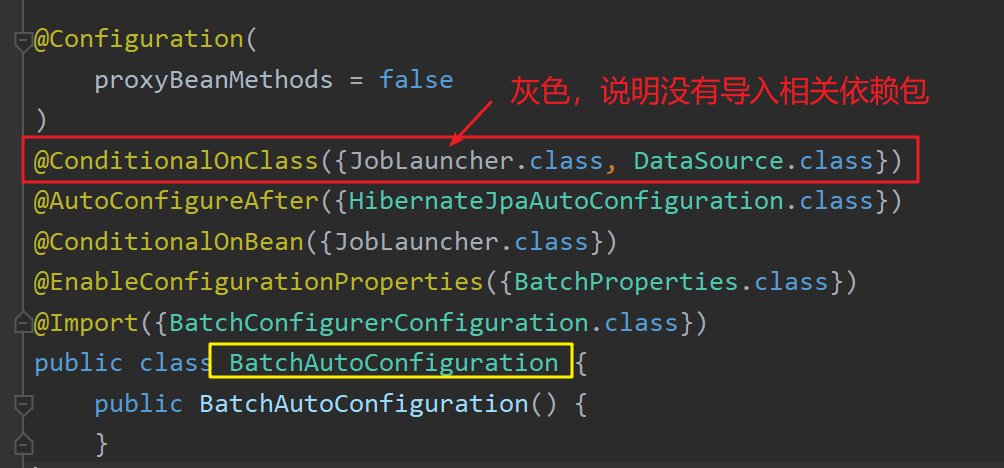
以BatchAutoConfiguration类为例,该类因@ConditionalOnClass({JobLauncher.class, DataSource.class})的存在,若想被注册到容器中,需要满足当前项目中有JobLauncher类的存在,但若开发人员没有导入该类相关的maven依赖,则无法找到该类,因此该自动配置类将不会被注册到容器中。因此上述127个自动配置类会按照实际容器中配置组件的情况按需注册到容器中,不需要的配置类将不会被注册。
同时这些自动配置类里的配置属性通过 @EnableConfigurationProperties 注解从xxxProperties组件中获取(xxxProperties组件和相应的配置文件绑定在了一起)
以AOP自动配置器AopAutoConfiguration为例:
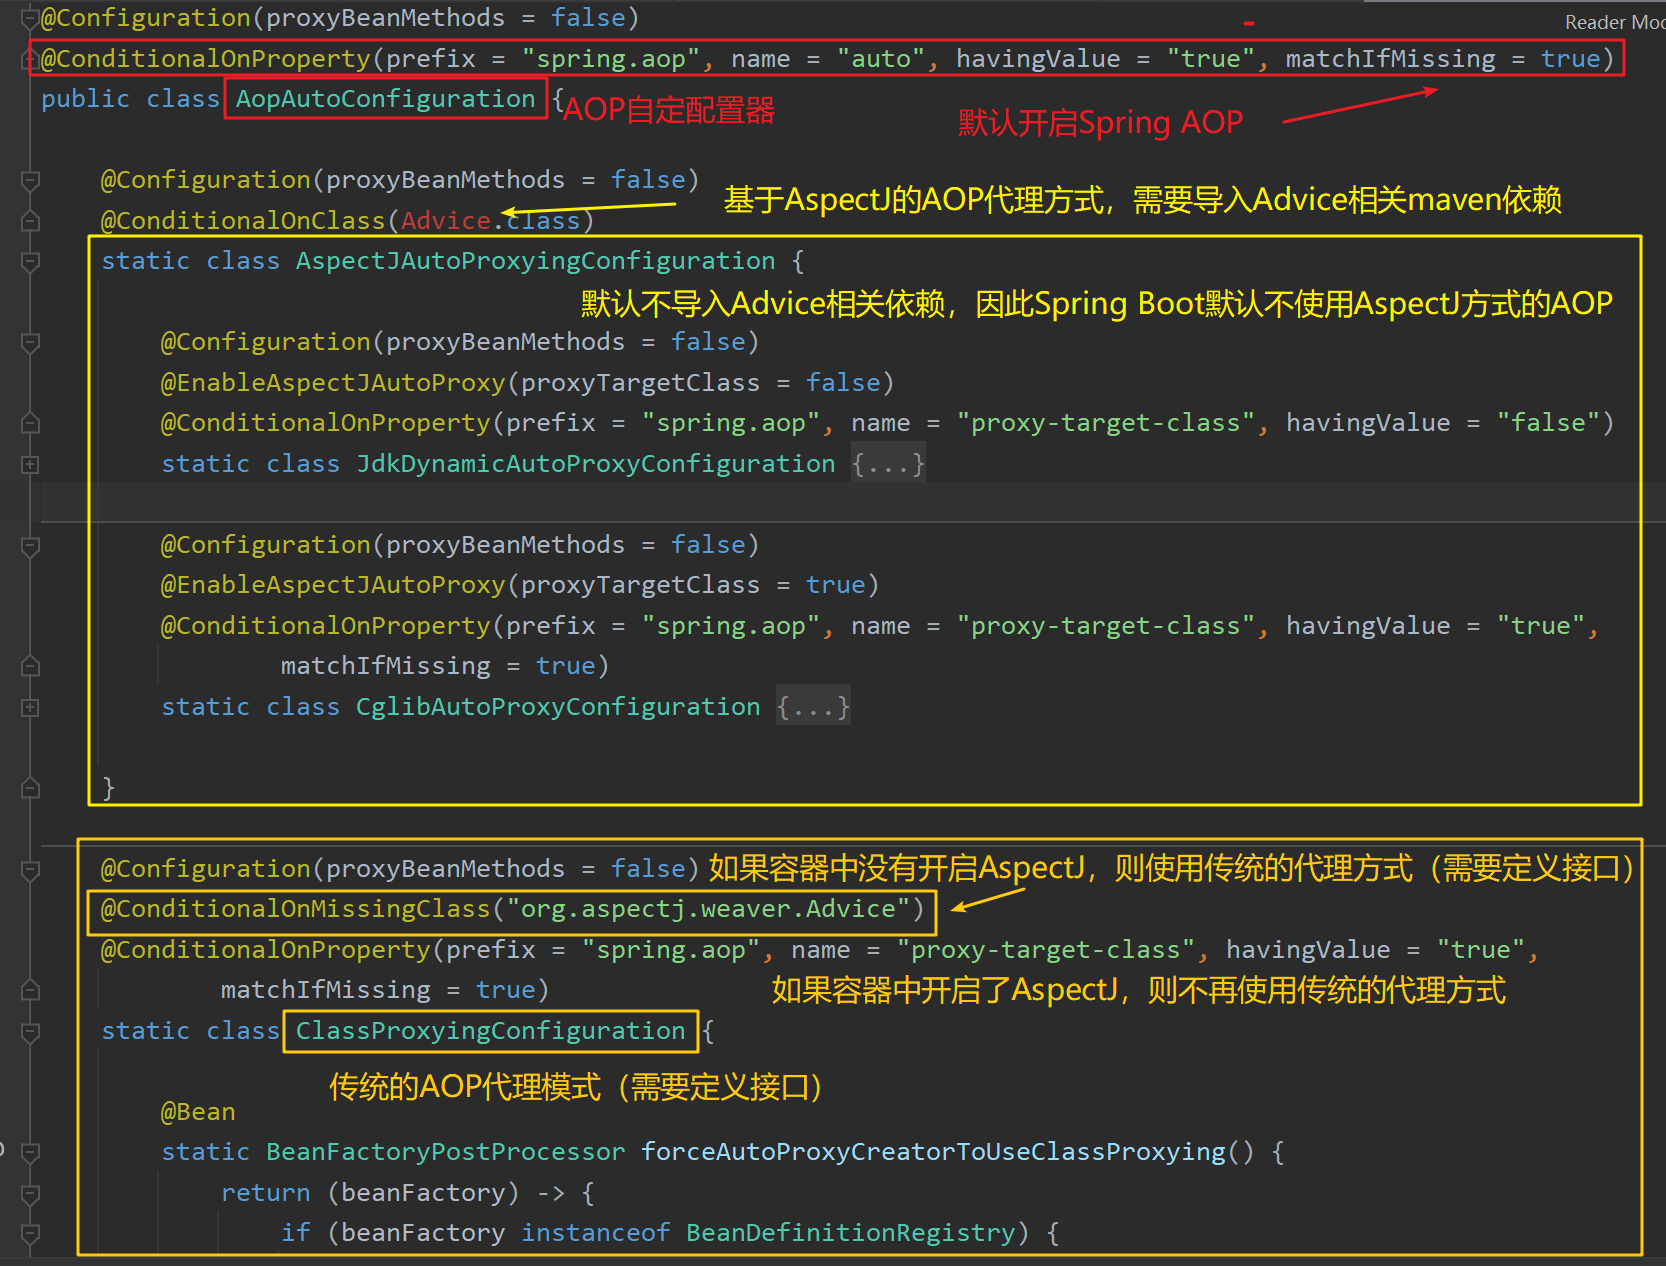
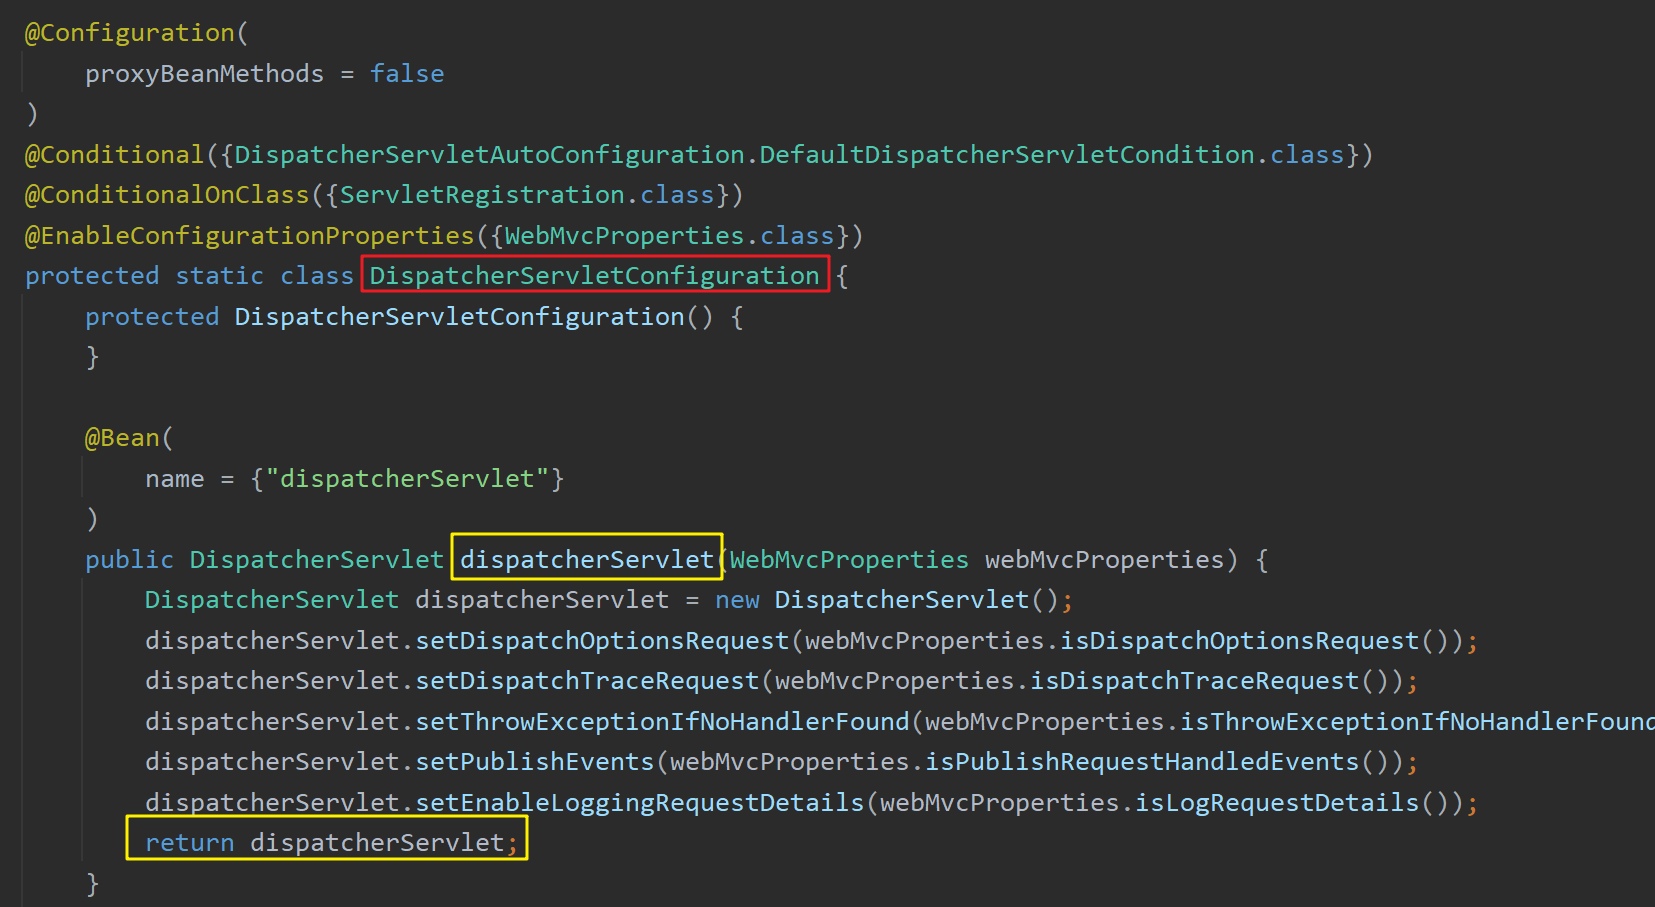
举例:上文描述了如何向容器中注册常用的自动配置类,下面以web开发必须的自动配置类DispatcherServletAutoConfiguration为例:
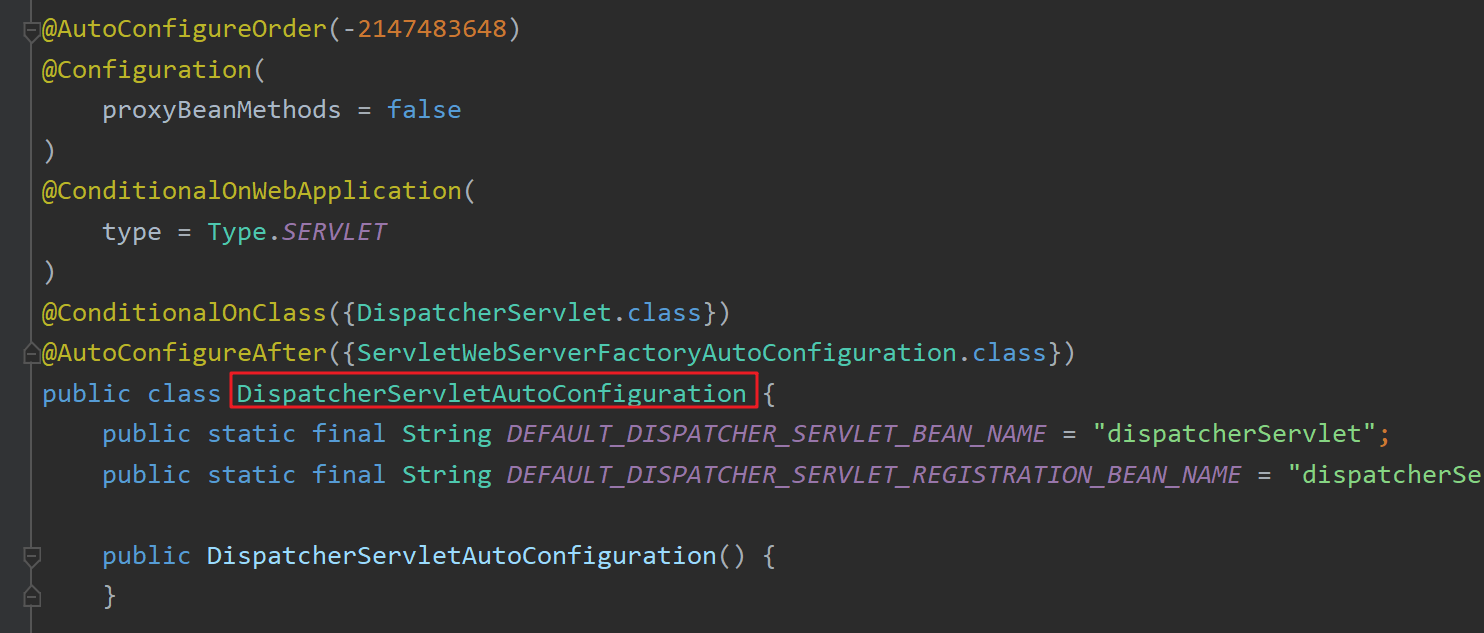
该自动配置类满足@Conditional的条件,因此会在程序加载时被注册到容器中。同时该自动配置类中会向容器中注册DispatcherServlet组件,这正是Spring MVC开发时需要的转发器组件。
也就是说Spring Boot在启动时,会将传统SSM中开发人员配置在xml中的必备组件自动地注册到容器中,无需开发人员再手动注册。
第三步:修改默认配置
以自动配置类DispatcherServletAutoConfiguration中的MultipartResolver组件为例,该组件为Spring MVC中的文件上传组件,其会被DispatcherServletAutoConfiguration注册到容器中。
其依赖于MultipartResolver组件(该组件默认存在于容器中,但开发人员可以再手动注册一个),同时判断该组件的名称是否为指定的MULTIPART_RESOLVER_BEAN_NAME = multipartResolver。
若不是,可能的情况为开发人员自己手动注册了一个,但名称不符合规范。此时容器通过调用multipartResolver()方法注册了该组件,同时注册的组件名就是方法名multipartResolver,因此起到组件名规范化的效果。
1 |
|
SpringBoot默认会在底层配好所有的组件。但是如果用户自己配置了以用户的优先:
1 |
|
总结
- Spring Boot首先加载所有的自动配置类 xxxxxAutoConfiguration(127个)
- 每个自动配置类按照条件判断进行生效,默认都会绑定配置文件指定的值。(从xxxxProperties组件里面读取,xxxProperties组件和配置文件进行了绑定)
- 生效的配置类就会向容器中注册响应的组件
定制化配置:
- 开发人员手动使用
@Bean替换容器中默认注册的组件; - 在配置文件中修改相应配置属性以修改默认组件的属性值
xxxxxAutoConfiguration —> 注册组件 —> 组件属性通过xxxxProperties从配置文件application.properties中取值
Spring Boot 常用自动配置类
Spring Boot 中常用的自动配置类xxxAutoConfiguration:
- AopAutoConfiguration:AOP自动配置类
- DispatcherServletAutoConfiguration:
DispatcherServlet自动配置类 - WebMvcAutoConfiguration:
WebMVC相关自动配置类 - ServletWebServerFactoryAutoConfiguration:
ServletWebServerFactory自动配置类 - MultipartAutoConfiguration:文件上传自动配置类
- ErrorMvcAutoConfiguration:异常处理自动配置类
- DataSourceAutoConfiguration:数据源自动配置类
- MybatisAutoConfiguration:MyBatis自动配置类(第三方)
- RedisAutoConfiguration:Redis自动配置类
静态资源原理
SpringBoot在启动时会默认加载许多xxxAutoConfiguration自动配置类,其中包括SpringMVC功能的自动配置类:WebMvcAutoConfiguration。
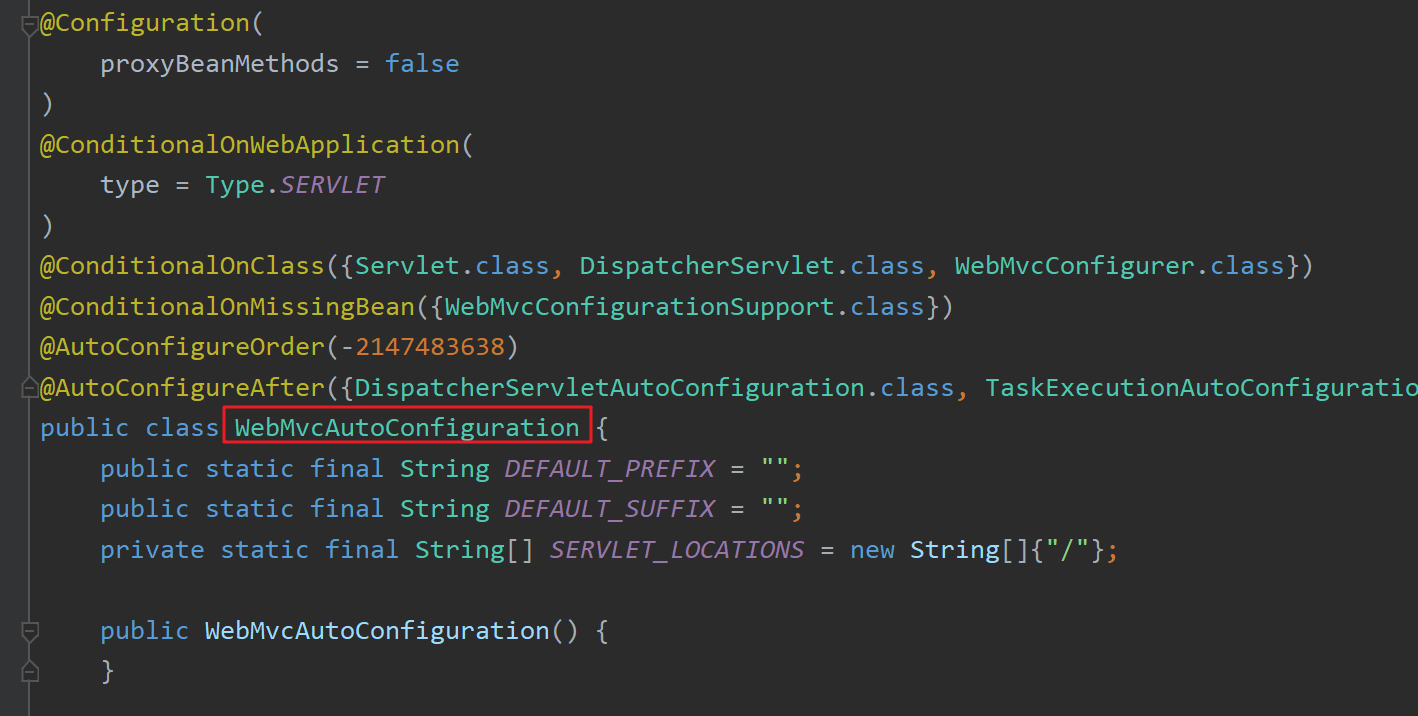
该配置类向容器中添加了许多组件,例如WebMvcAutoConfigurationAdapter。
WebMvcAutoConfigurationAdapter
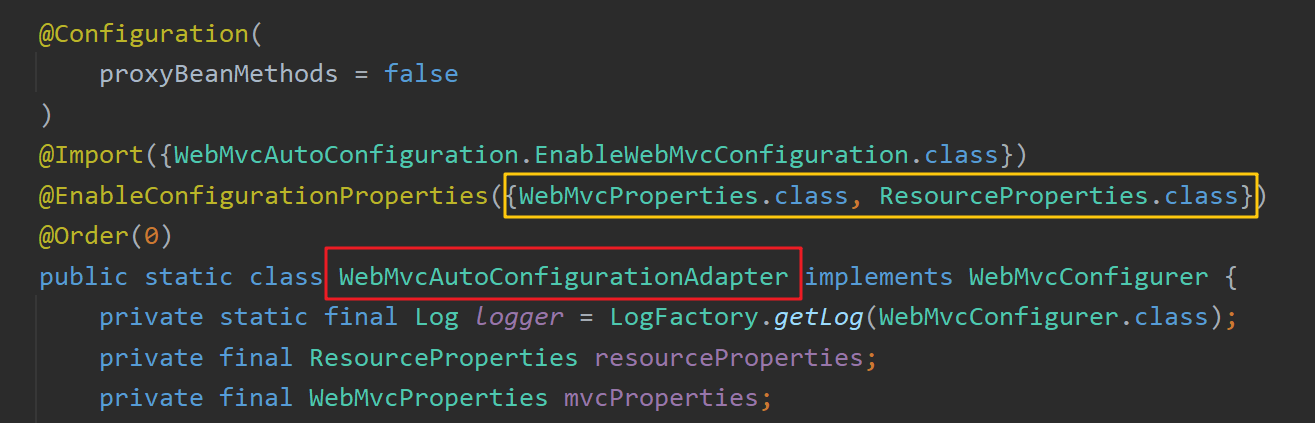
该类用于解析配置文件中与mvc和resources相关的配置信息。其中WebMvcProperties配置类与spring.mvc属性绑定,ResourceProperties配置类与spring.resources属性绑定。
同时WebMvcAutoConfigurationAdapter只有一个有参构造器,该构造器中的所有参数值都将从容器中获取,因此将获取到配置文件中与mvc和resources相关的配置信息:
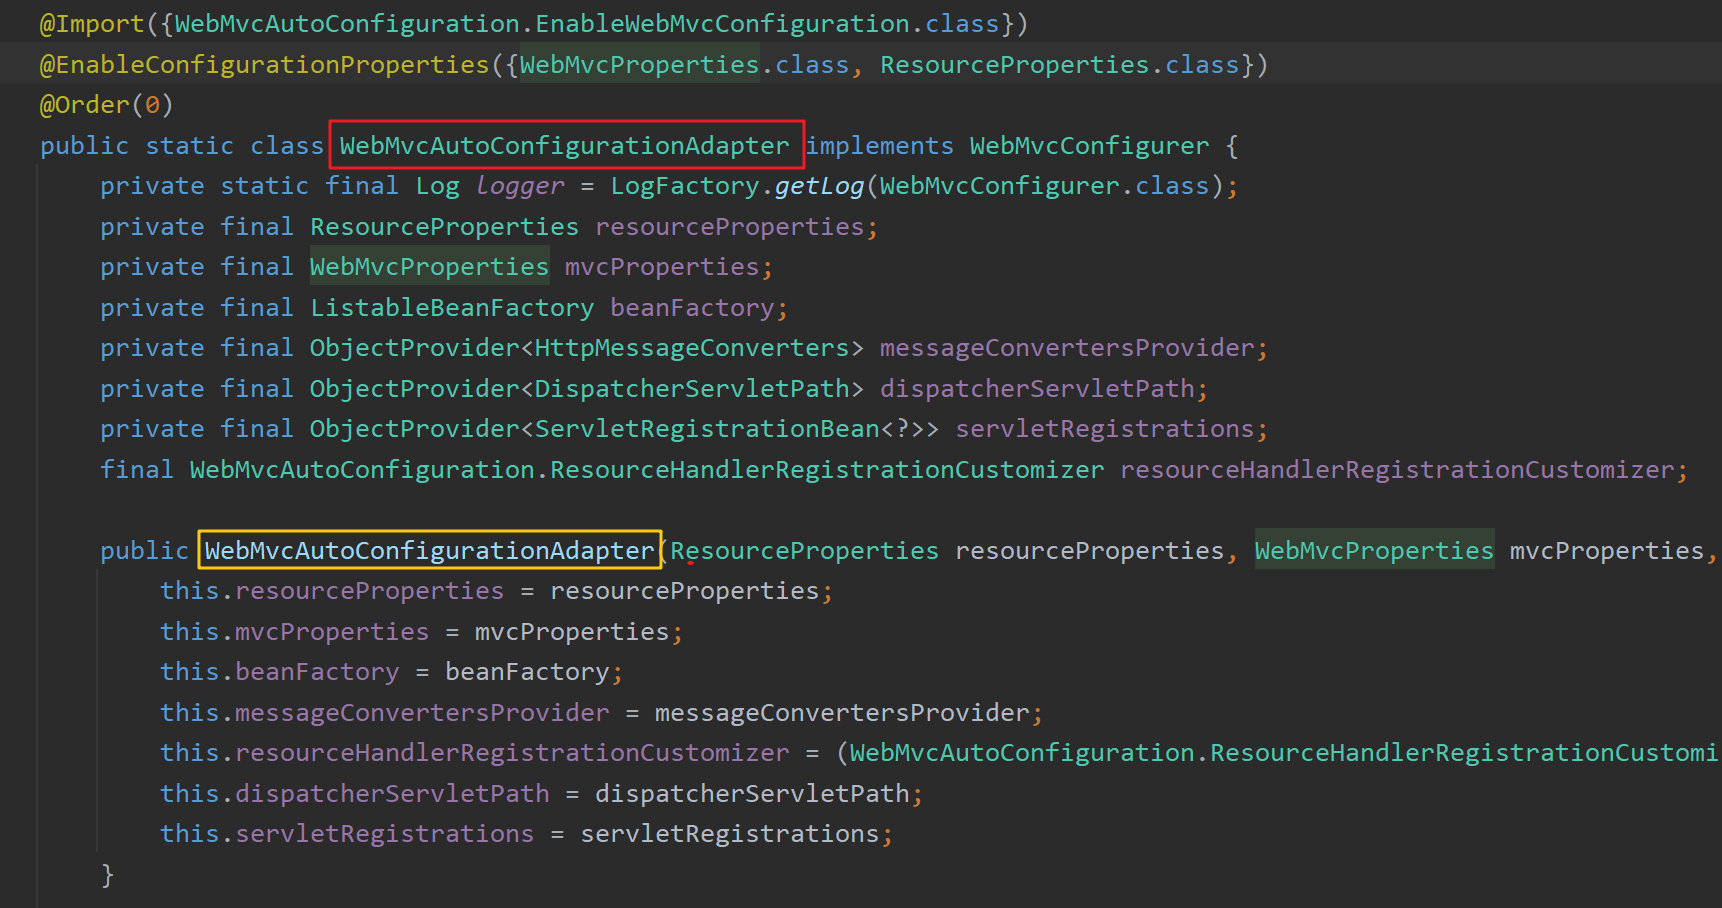
其参数有以下几种,都是从容器中获取:
- ResourceProperties:获取和
spring.resources绑定的所有的值的对象 - WebMvcProperties:获取和
spring.mvc绑定的所有的值的对象 - ListableBeanFactory:获取Spring的
beanFactory - HttpMessageConverters:找到所有的
HttpMessageConverters - ResourceHandlerRegistrationCustomizer:找到资源处理器的自定义器。
- DispatcherServletPath
- ServletRegistrationBean:给应用注册Servlet、Filter等组件
资源路径映射原理
WebMvcAutoConfigurationAdapter配置类里的addResourceHandlers方法完成静态资源路径映射的功能:
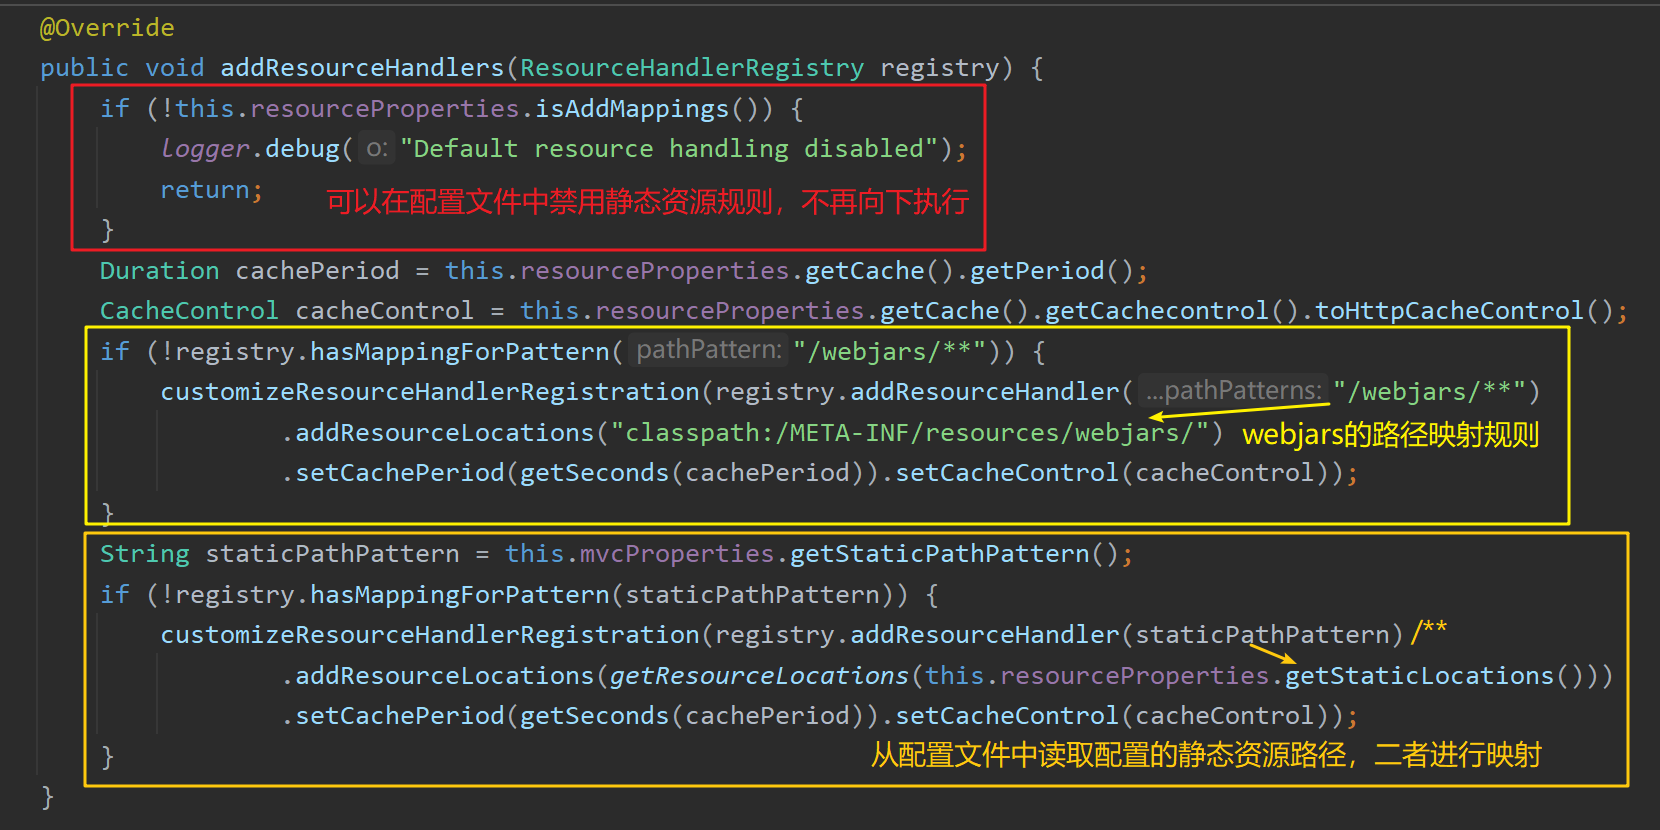
红色框:通过配置add-mappings属性可以禁止所有静态资源规则(红色框)。
1 | spring: |
黄色框:设置webjars的路径映射规则,即从"/webjars/**" 映射成 "classpath:/META-INF/resources/webjars/",浏览器收到的满足规则的请求都会映射到指定的路径下。
橙色框:设置静态资源的路径映射规则,即从staticPathPattern 映射成 .getStaticLocations() 的值,浏览器收到的满足规则的请求都会映射到指定的路径下。
其中staticPathPattern值为配置文件中指定的静态资源路径访问前缀(默认为/**):
1 | spring: |
this.resourceProperties.getStaticLocations() 的值为配置文件中指定的静态资源路径(默认为/static or/public or/resources or /META-INF/resources):
1 | resources: |
欢迎页的处理规则
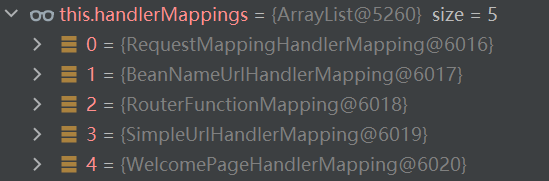
Spring MVC中的handlerMapping:处理器映射器,其内保存了每一个处理器能处理哪些方法的映射信息。
WelcomePageHandlerMapping是SpringBoot中自动注册到容器中的一个处理器映射器。在浏览器传来的url为"/",且其他已存在的HandlerMapping无法处理该请求时,其会将该请求转发到欢迎页面。下图中展示了Spring Boot在启动时容器中存在的五个HandlerMapping,可以看到WelcomePageHandlerMapping排在最后,即其只会在其他四个处理器映射器都无法处理请求时工作。
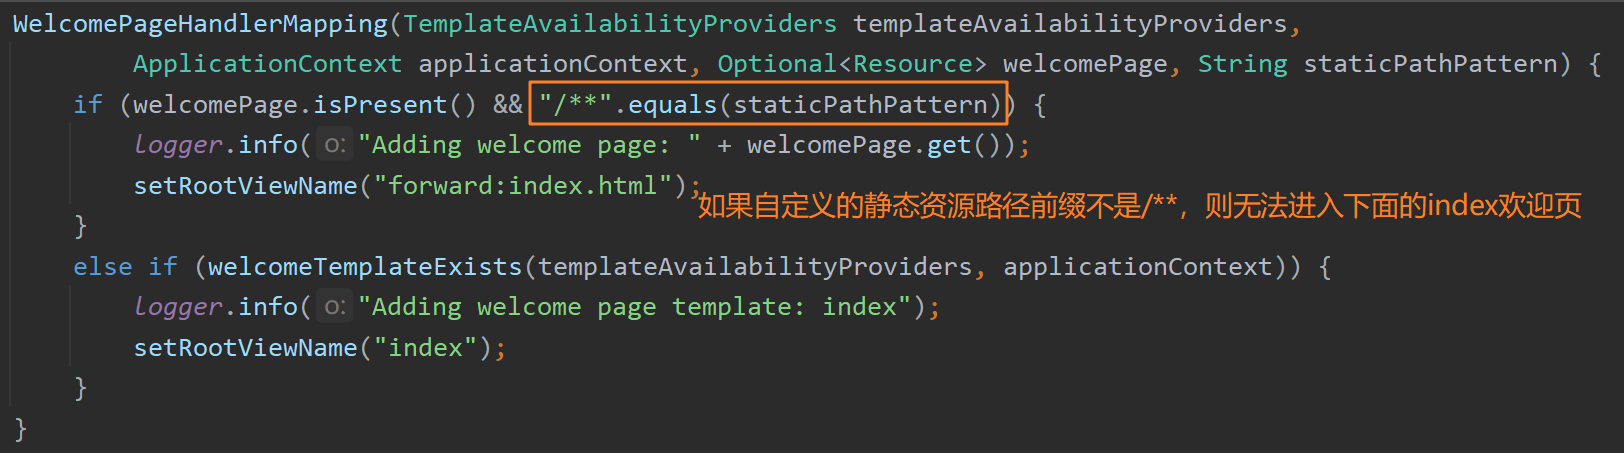
其在转发到欢迎页面前会先判断mvcProperties中的staticPathPattern属性值是否为/**,若是,则转发到欢迎页index.html
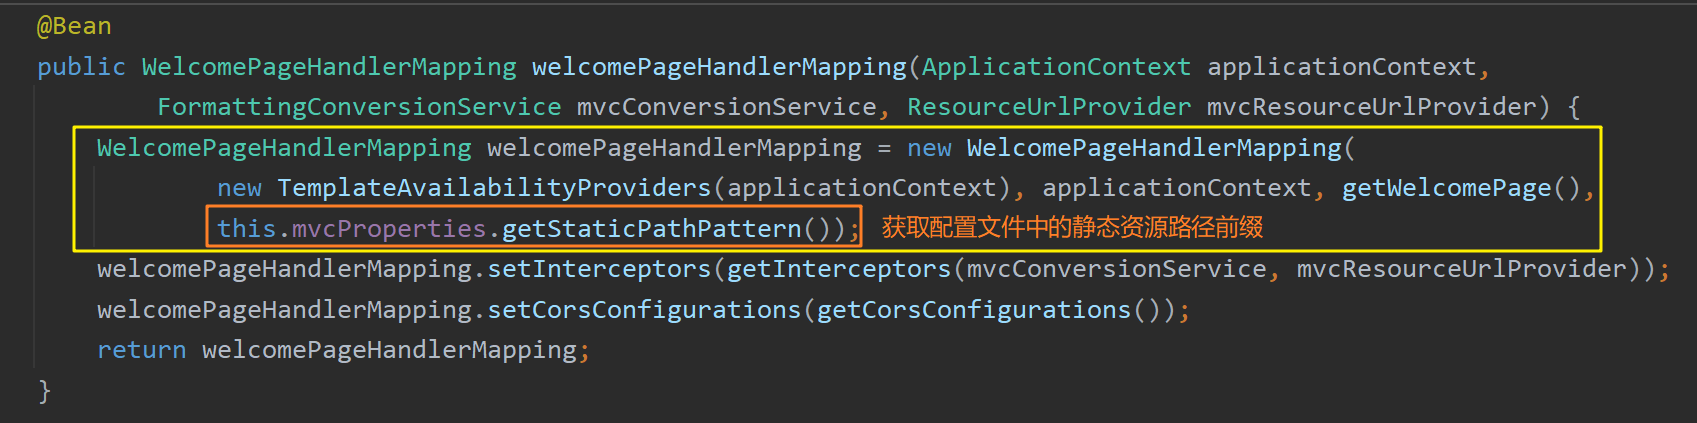
默认情况下static-path-pattern = /**,但若开发人员在配置文件中配置了自定义的static-path-pattern,则WelcomePageHandlerMapping无法工作,欢迎页面和小图标将失效。
Rest 映射实现原理
实现Rest风格支持的核心Filter:HiddenHttpMethodFilter。其本质是一个过滤器,因此会在所有请求响应前进行拦截过滤,将DELETE请求和PUT请求进行包装后放行到后续过滤器。
1 | spring: |
开启HiddenHttpMethodFilter后,若想发送DELETE或PUT请求,则需要创建一个表单,在表单项中携带一个_method参数,这个参数的值可以设置为DELETE或PUT。
1 | <form action="/user" method="get"> |
1 |
|
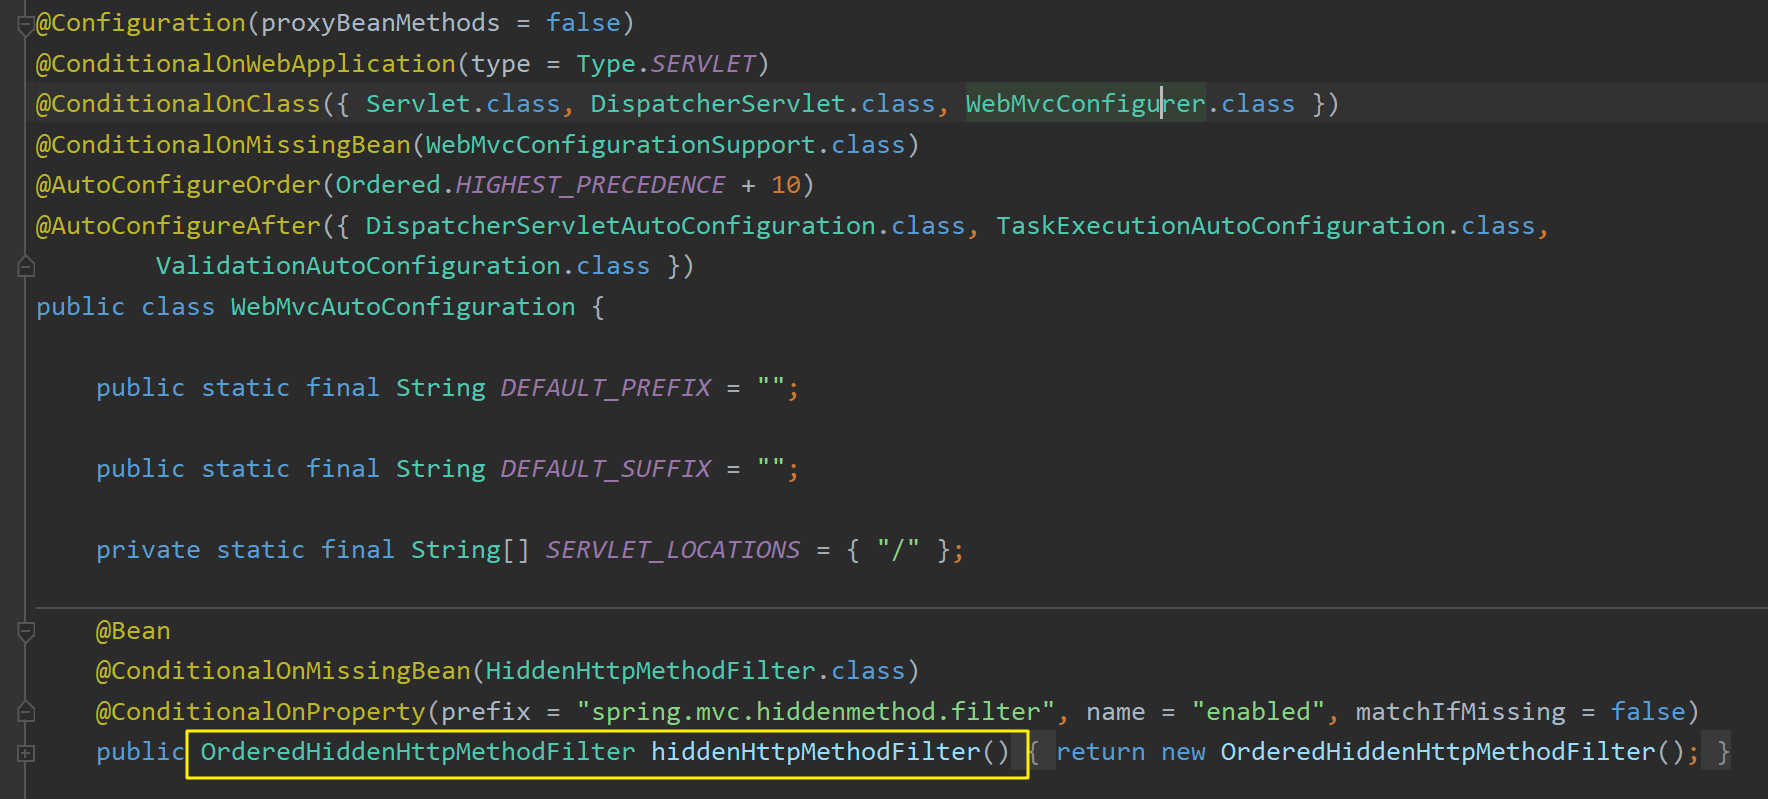
容器在启动时,自动配置类WebMvcAutoConfiguration会向容器中注册一个继承了HiddenHttpMethodFilter的过滤器组件OrderedHiddenHttpMethodFilter,其本质上是一个过滤器,因此会在所有请求响应前进行拦截过滤,将DELETE请求和PUT请求进行包装后放行到后续过滤器。
HiddenHttpMethodFilter源码分析
HiddenHttpMethodFilter类里的拦截方法具体如下:
1 | protected void doFilterInternal(HttpServletRequest request, HttpServletResponse response, FilterChain filterChain) throws ServletException, IOException { |
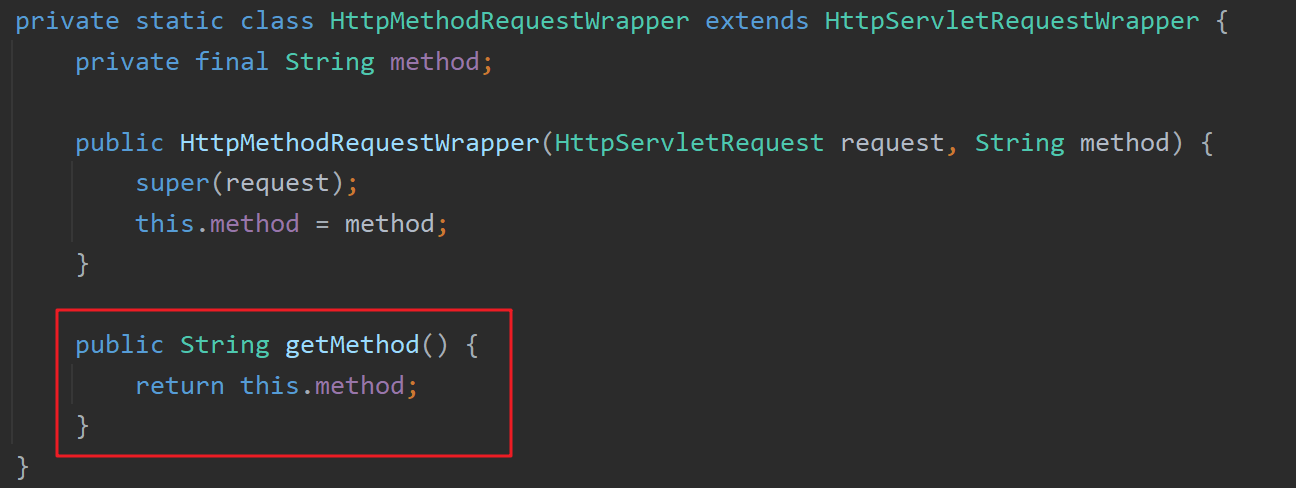
wrapper对象被重写的getMethod()方法将直接返回_method里的值DELETE。并且包装后的wrapper对象被传递到了拦截器链中,从而后续的拦截器在调用此wrapper对象的getMethod()时将获取到DELETE,因此实现了Rest风格的映射。
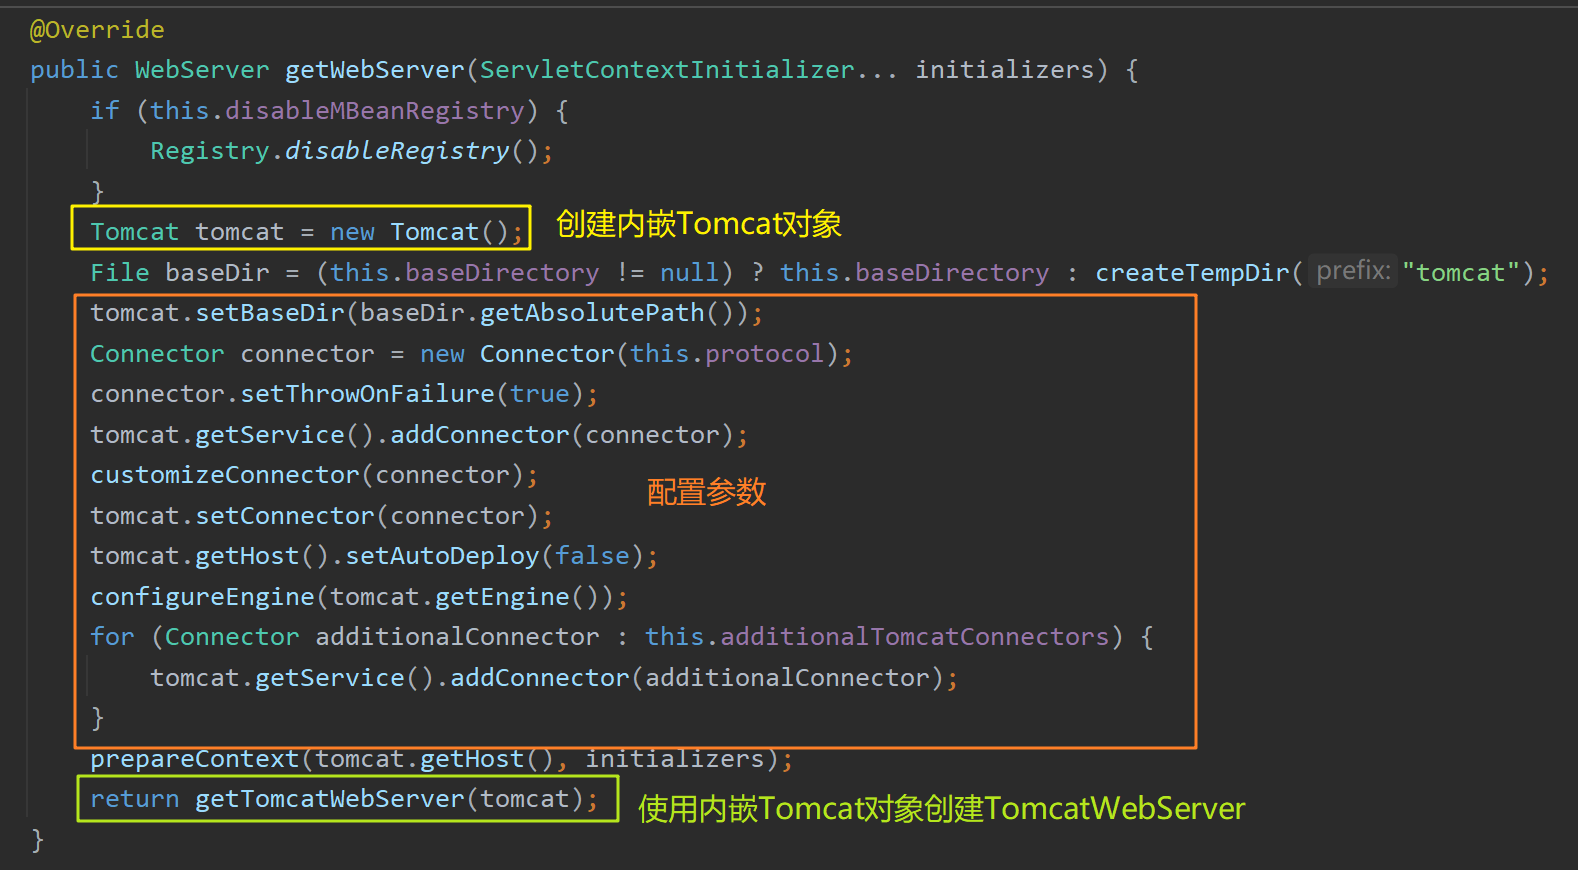
内嵌 Servlet 容器工作原理
内嵌服务器工作原理:手动调用要启动的服务器的 start() 方法开启服务。
在Spring Boot启动时,发现当前项目是Web应用(因为引入了Web场景包和Tomcat场景包),则将创建一个Web版的IoC容器:ServletWebServerApplicationContext。在该容器启动时,通过TomcatServletWebServerFactory创建出一个Tomcat服务器tomcatWebServer并调用其 start() 方法启动了Tomcat服务。
ServletWebServerApplicationContext实现了ApplicationContext接口,本质上也是一个IoC容器。
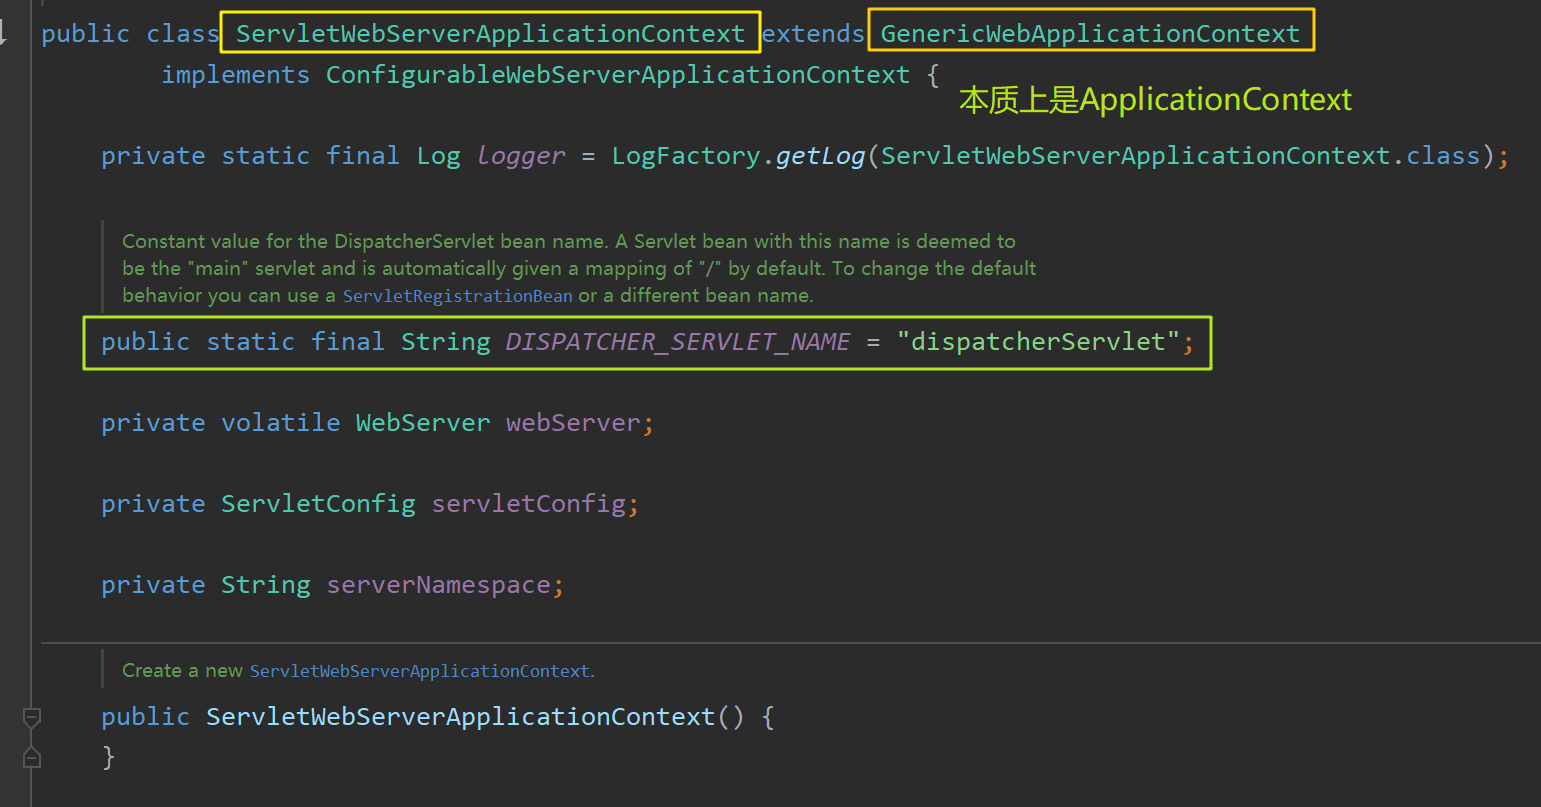
ServletWebServerApplicationContext将在启动时搜索ServletWebServerFactory(ServletWeb服务器工厂,用于生产ServletWeb服务器)
Spring Boot底层默认有很多的ServletWebServerFactory:
TomcatServletWebServerFactoryJettyServletWebServerFactoryUndertowServletWebServerFactory
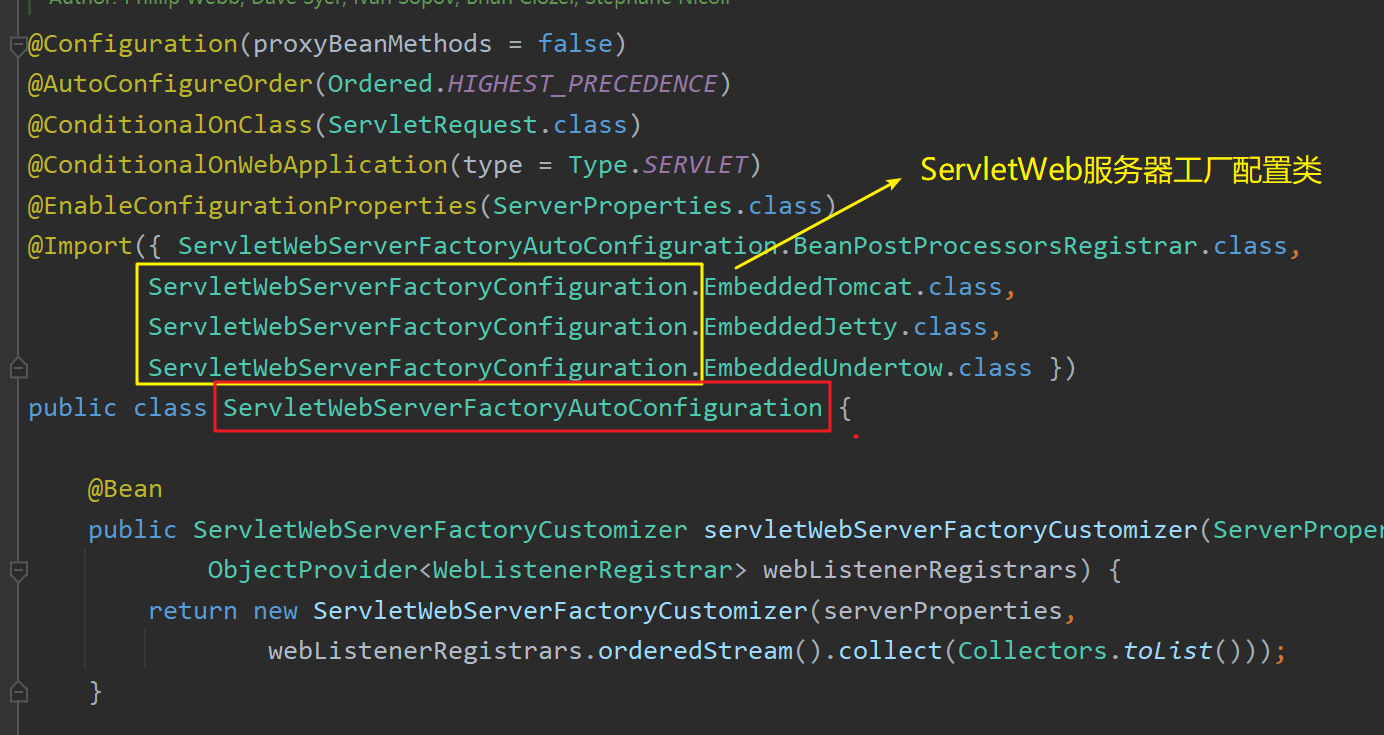
这些工厂由ServletWebServerFactoryAutoConfiguration导入的ServletWebServerFactoryConfiguration(ServletWeb服务器工厂配置类)自动注册到容器中:
因此,在ServletWebServerApplicationContext启动时:
- 注册ServletWebServerFactoryAutoConfiguration自动配置类;
- 该自动配置类将导入ServletWebServerFactoryConfiguration工厂配置类;
- 该工厂配置类根据动态判断系统中到底导入了哪个Web服务器的包(默认导入Tomcat的包),注册相应的WebServlet服务器:
TomcatServletWebServerFactoryJettyServletWebServerFactoryUndertowServletWebServerFactory
- 使用默认导入的TomcatServletWebServerFactory创建出Tomcat服务器并启动。
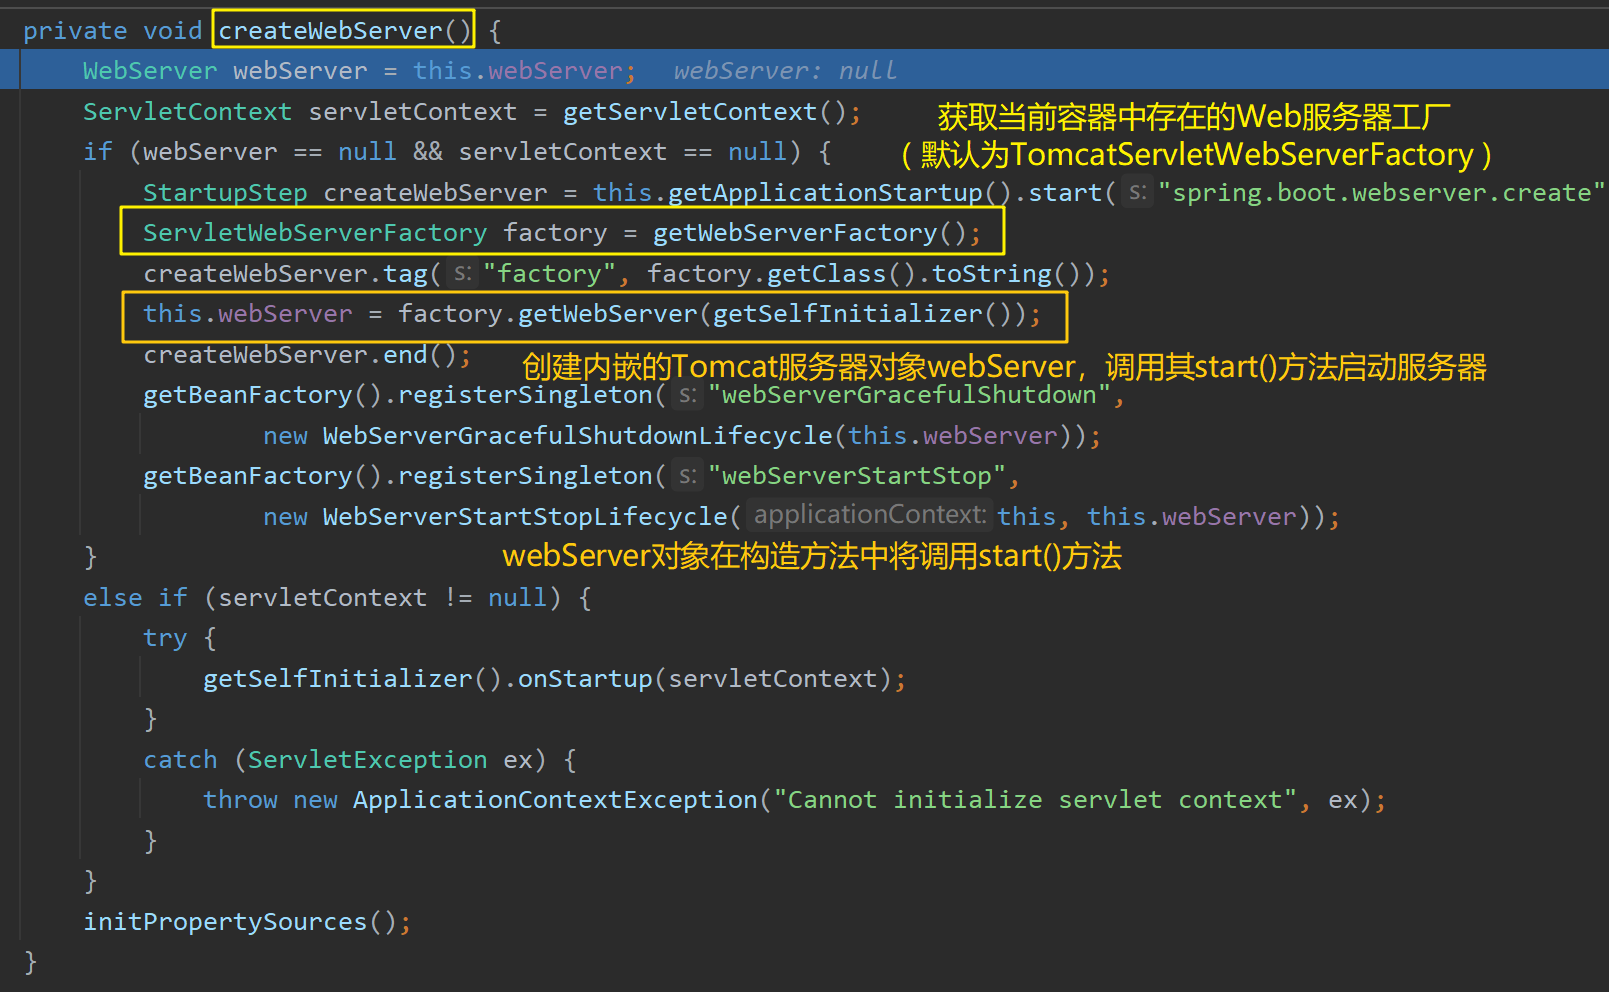
ServletWebServerApplicationContext在启动时,将调用其重写的 onRefresh() 方法,用于创建Web服务器webServer:
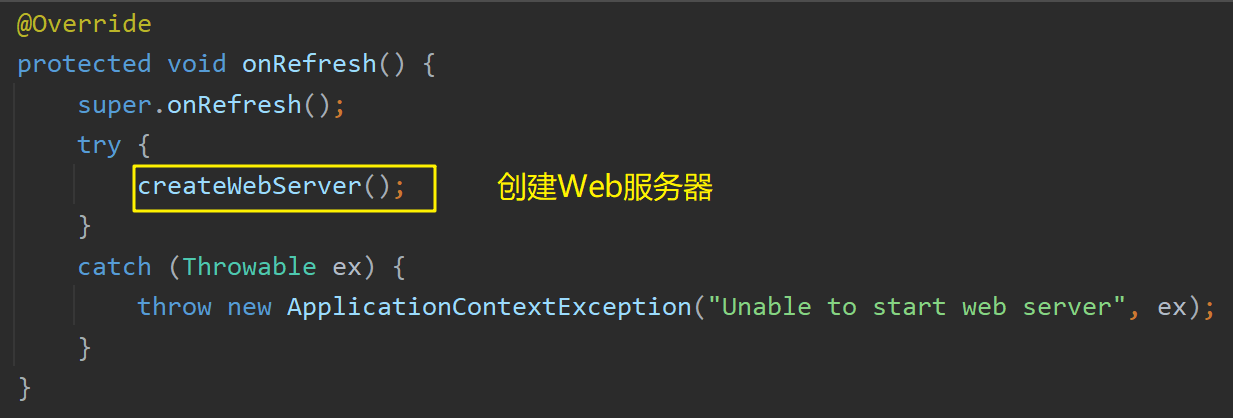
创建webServer的流程:
- 获取当前场景支持的Web服务器工厂,默认为TomcatServletWebServerFactory
- 使用该工厂创建Tomcat的Web服务器对象webServer,并在该对象构造器中调用 start() 方法开启Tomcat服务
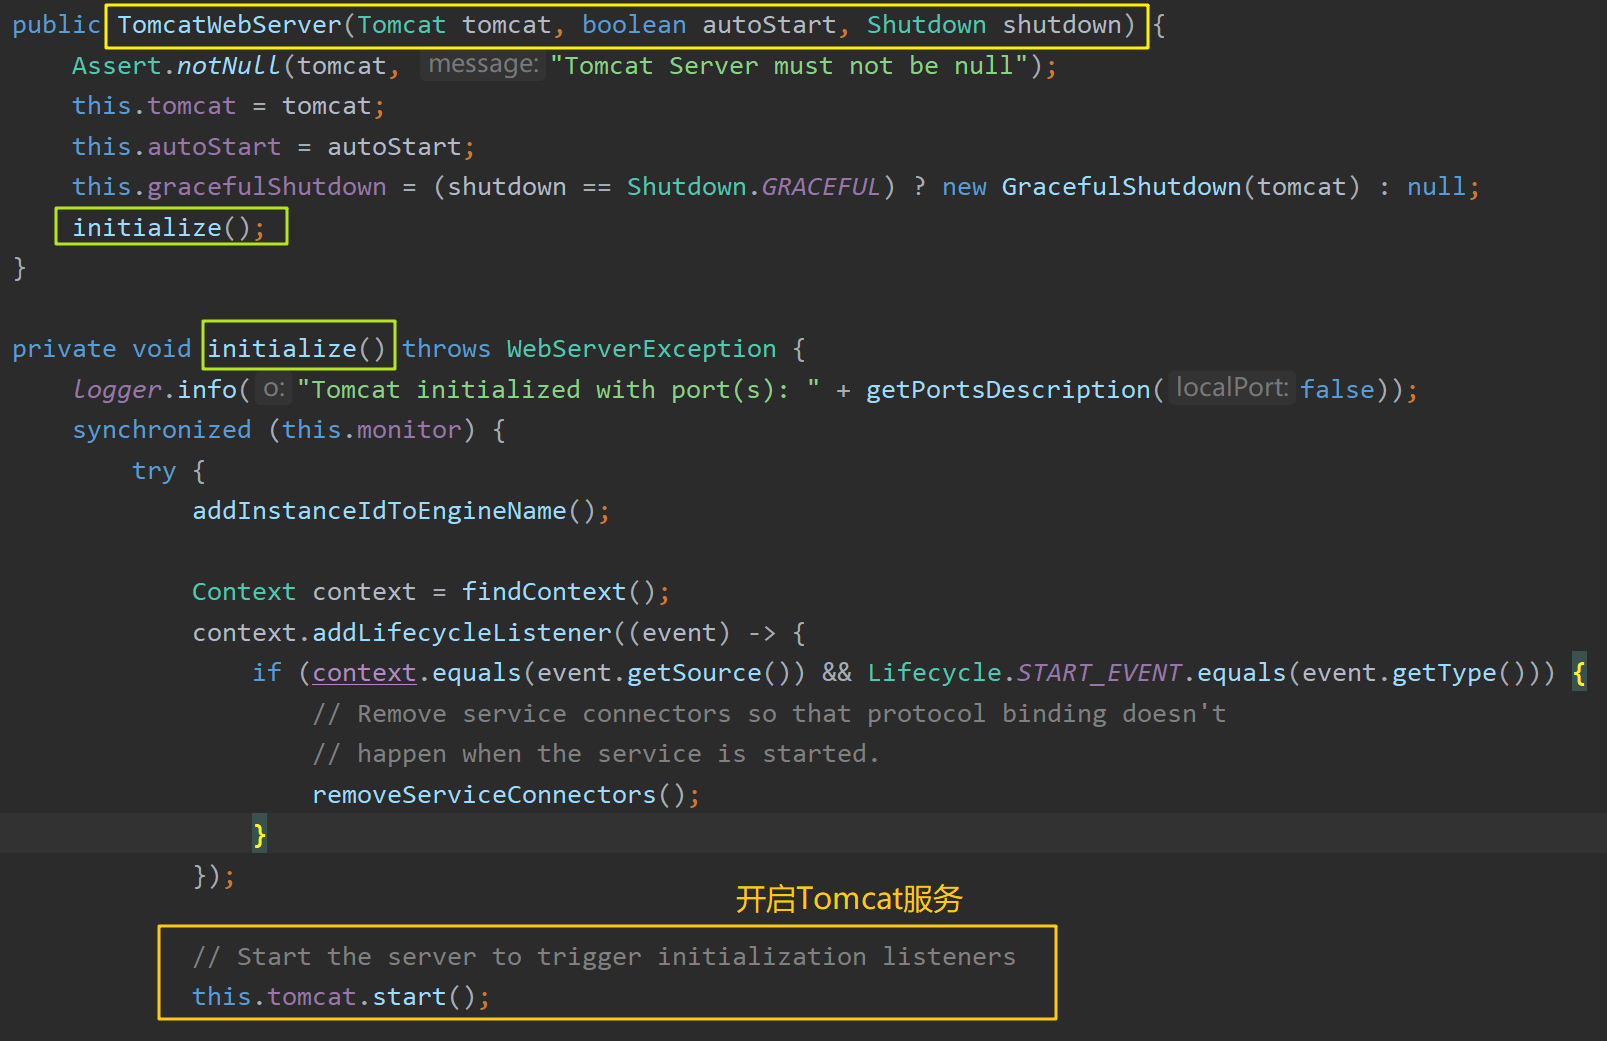
内嵌服务器工作原理:手动调用要启动的服务器的 start() 方法开启服务。
切换Servlet容器
要想切换服务器,则导入相应的starter场景即可:
1 | <dependency> |
定制Servlet容器
- 修改配置文件中的
server.xxx属性(最方便) - 自定义ConfigurableServletWebServerFactory代替TomcatServletWebServerFactory,并将其注册到容器中
- 实现
WebServerFactoryCustomizer<ConfigurableServletWebServerFactory>,把配置文件的值和ServletWebServerFactory进行绑定(xxxCustomizer:定制化器,可以改变xxx的默认规则):
1 |
|
定制化原理
Spring Boot定制化的四种方式
- 修改配置文件中的属性值以定制化;
- 编写自定义的配置类 xxxConfiguration,通过使用 @Bean 注解向容器中添加自定义的组件(例如视图解析器等);
- 编写 xxxCustomizer,重写其方法以实现定制化;
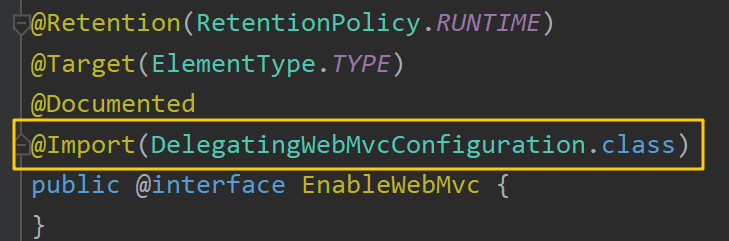
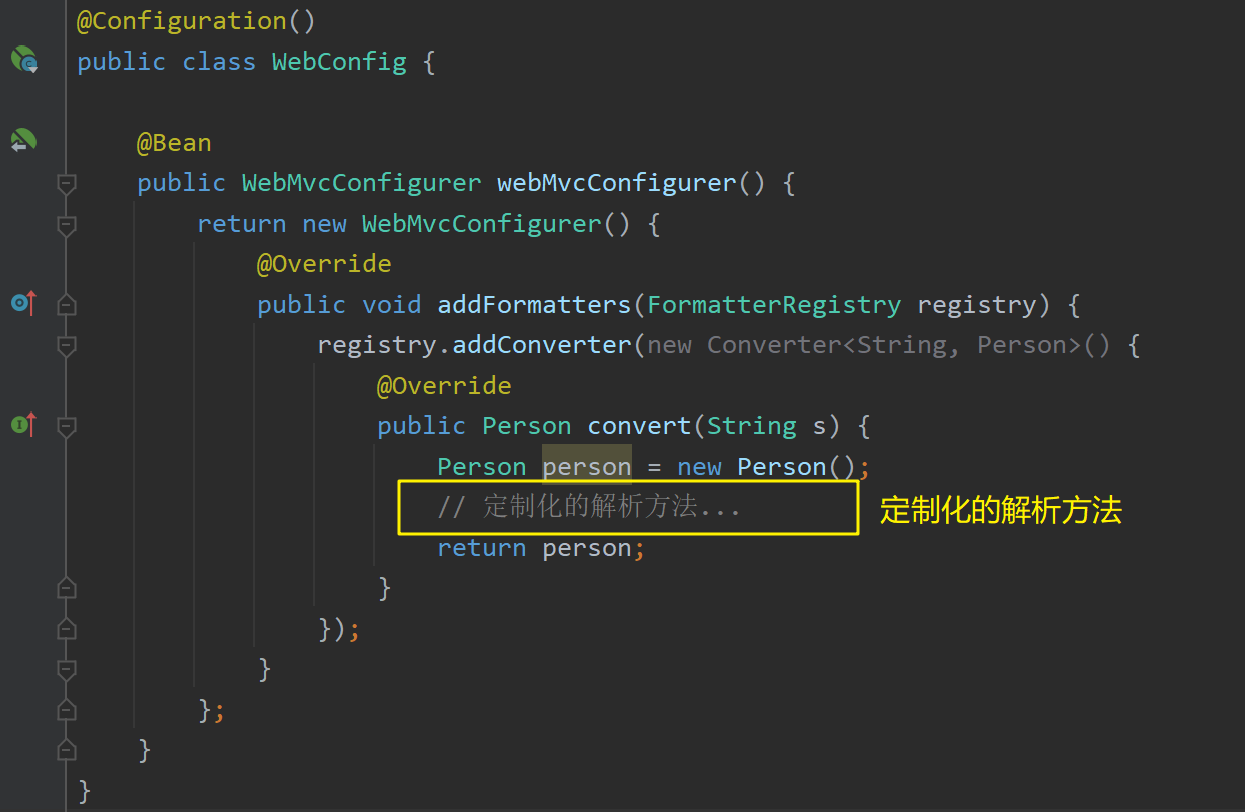
- 常用:编写一个实现了WebMvcConfigurer某些接口的配置类,并添加@Configuration注解。在该配置类中添加各种功能(例如添加拦截器,消息转换器,内容协商策略等)。注意这时不能标注 @EnableWebMvc 注解(若开启,则变成全面接管Spring MVC,就需要把所有Spring MVC配置好的规则全部自定义实现)
方式4使用示例:
1 |
|
定制化原理
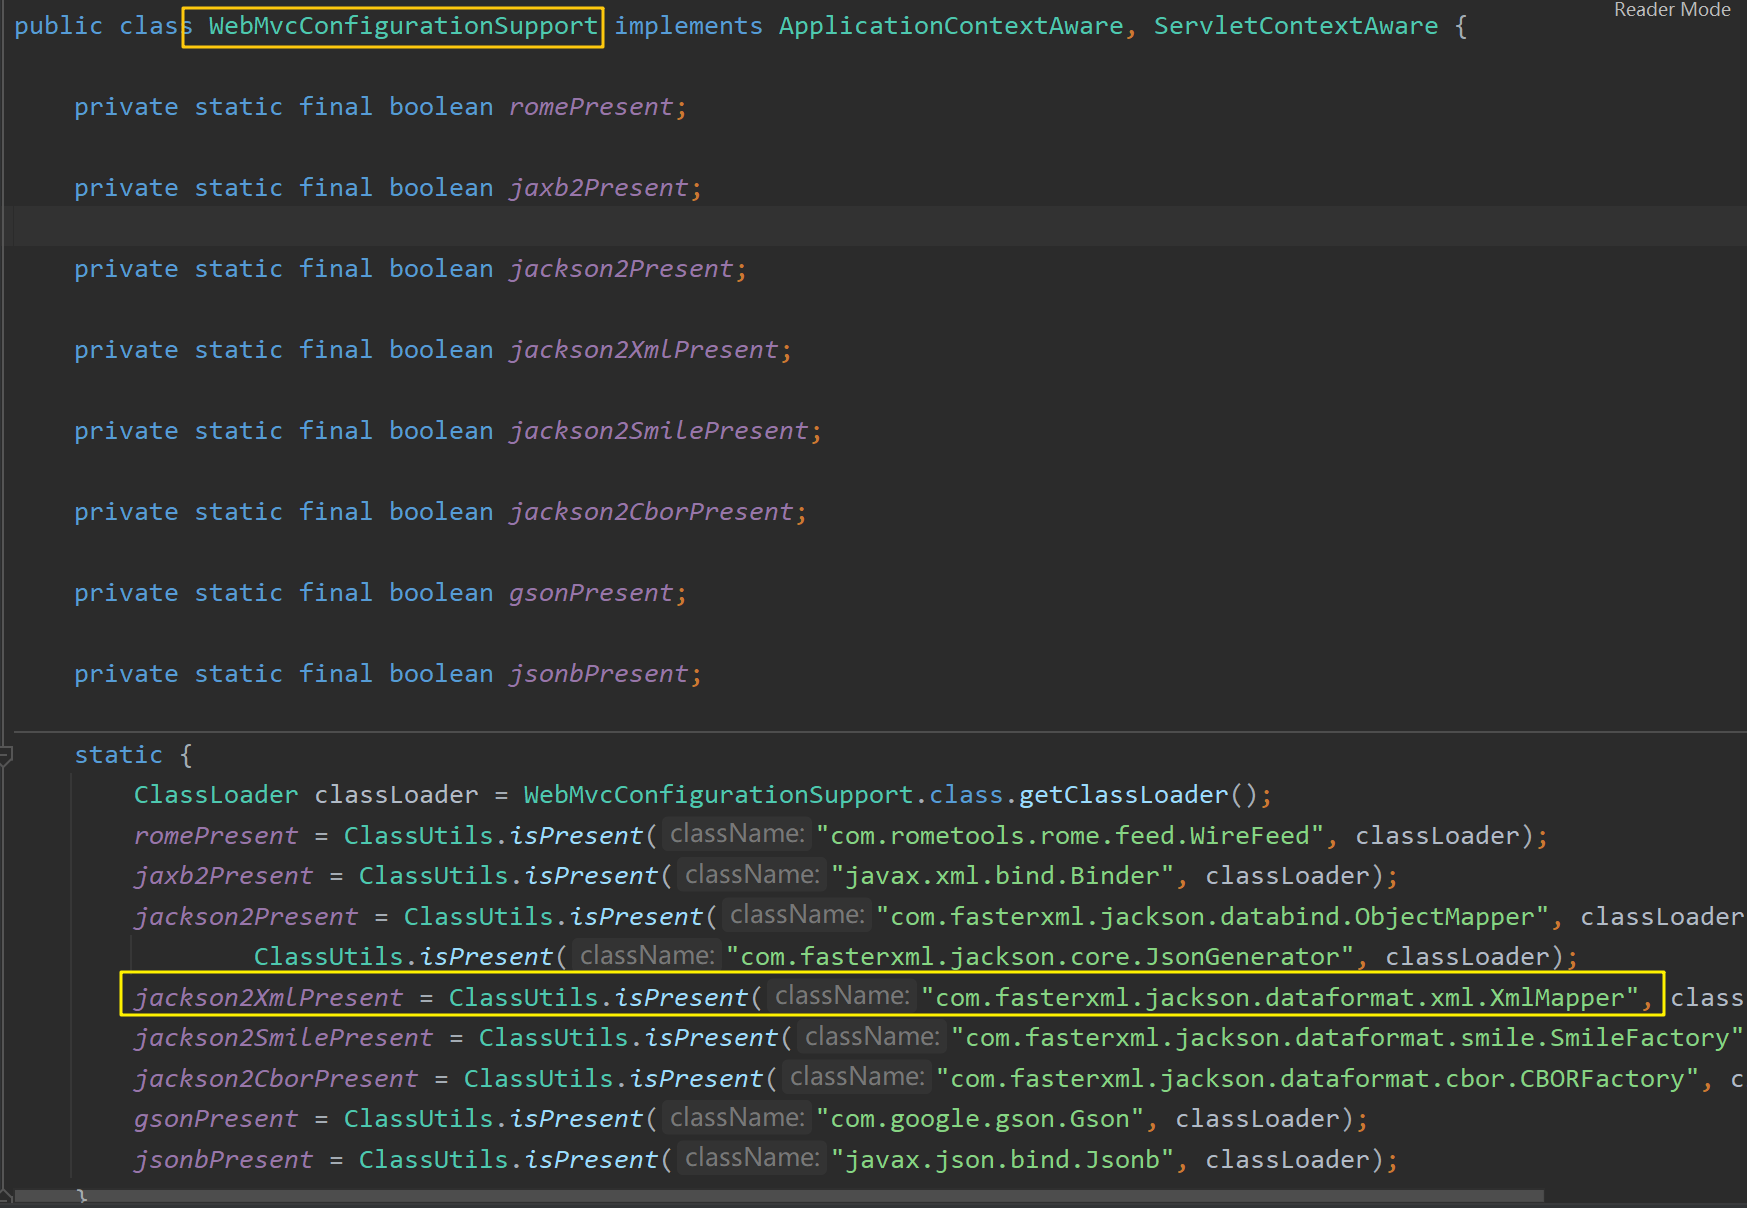
@EnableWebMvc 注解会向容器中导入一个DelegatingWebMvcConfiguration,其作用是:
- 向容器中添加一些最基础的组件,例如映射器等
- 添加系统中所有的WebMvcConfigurer(包括自定义的),令这些定制的功能都生效
DelegatingWebMvcConfiguration继承自WebMvcConfigurationSupport,用于添加所有的WebMvcConfigurer:
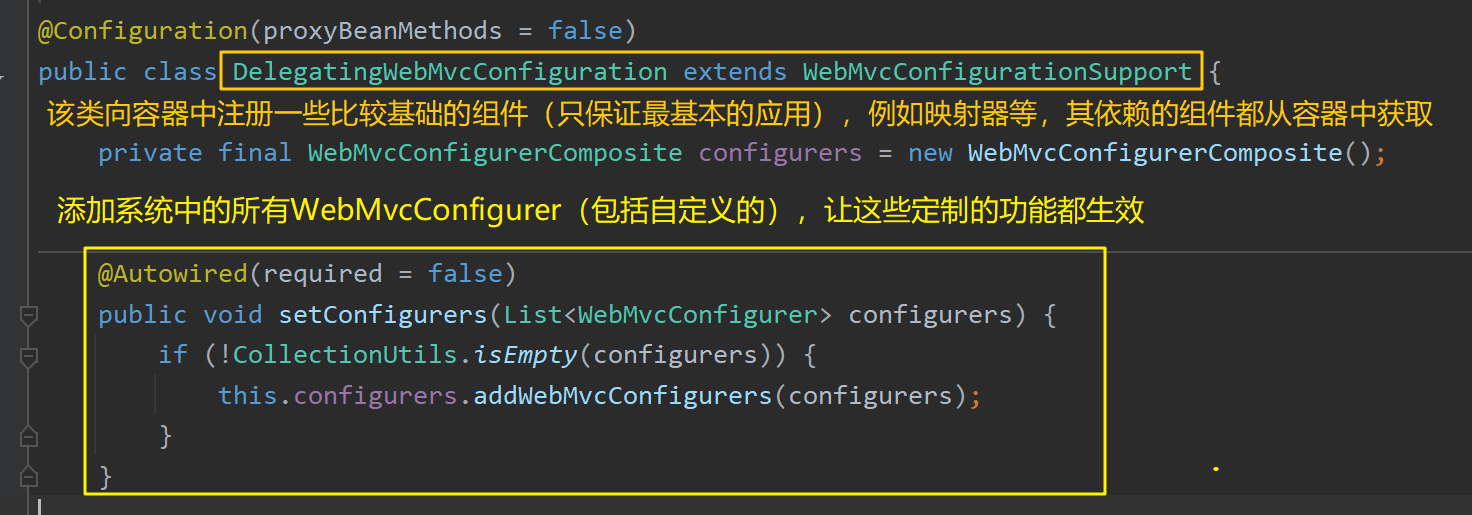
DelegatingWebMvcConfiguration只能向容器中添加比较基础的组件(只保证最基础的应用,静态资源映射解析等功能均无法实现)。
即开启了 @EnableWebMvc 注解,将向容器中添加DelegatingWebMvcConfiguration,其只能实现最基础的应用(以及开发人员自己添加的应用),无法实现Spring Boot中默认配置的许多高级功能(例如静态资源映射解析等)
而这些更高级的功能,都由WebMvcAutoConfiguration完成注册:
WebMvcAutoConfiguration是Spring Boot中默认的Spring MVC自动配置类:
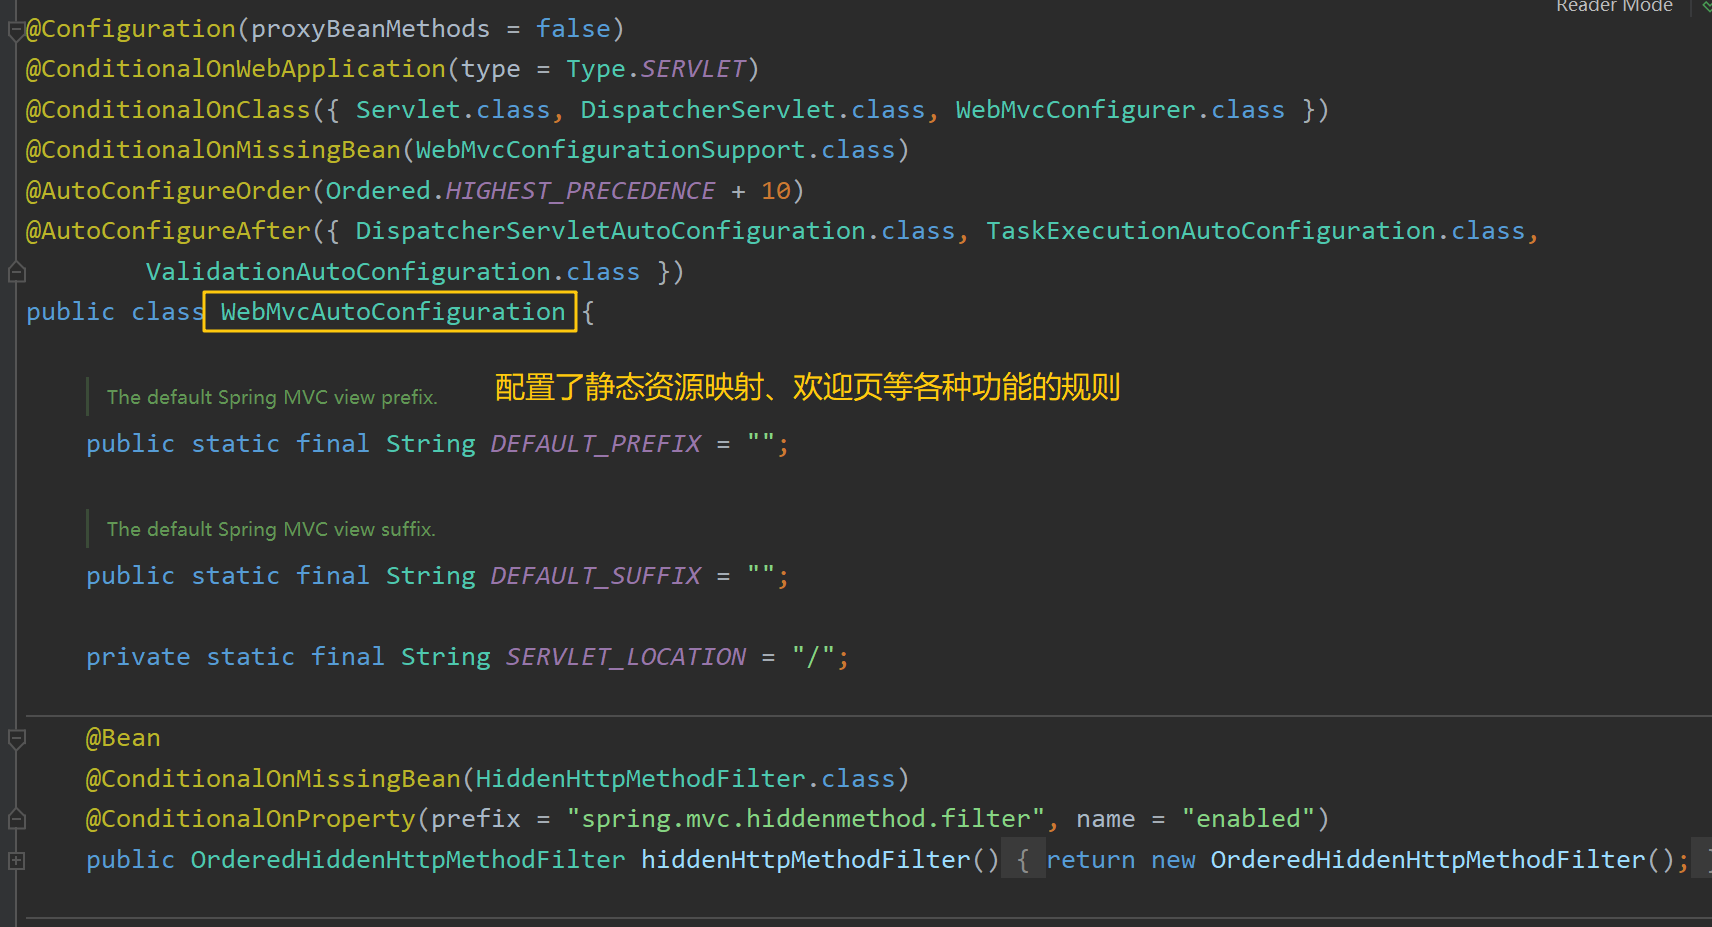
其向容器中注册了许多Spring MVC相关的高级功能组件:例如Rest风格过滤器,消息转换器等。其若想生效,需要满足 @ConditionalOnMissingBean(WebMvcConfigurationSupport.class) ,即容器中不能存在WebMvcConfigurationSupport类型的组件。
而DelegatingWebMvcConfiguration类正是继承自WebMvcConfigurationSupport。因此若使用了 @EnableWebMvc 注解,则其 @Import 导入的DelegatingWebMvcConfiguration将使得功能更加完善的WebMvcAutoConfiguration失效,从而导致许多高级功能(如静态资源映射解析)无法生效。
因此使用了 @EnableWebMvc 注解就无法再开启WebMvcAutoConfiguration中的功能,就需要开发人员全面接管Spring MVC。
总结:若想定制化功能,则编写一个实现了WebMvcConfigurer某些接口的配置类,并添加 @Configuration 注解。注意这时不能标注 @EnableWebMvc 注解。
Spring Boot 启动原理
Spring Boot程序从主程序配置类的main方法开始执行:
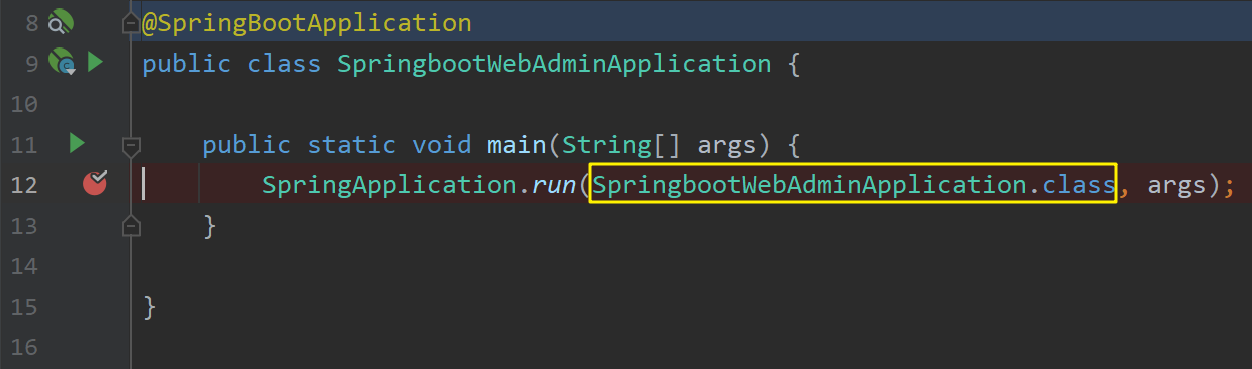
调用SpringApplication类的静态方法run(),将Spring Boot主程序配置类传入:


Spring Boot整个启动过程分为两个阶段:
- 创建SpringApplication
- 运行SpringApplication.run()
创建 SpringApplication

调用有参构造器初始化SpringApplication,从spring.factories文件中读取:
- bootstrappers:初始化启动引导器
- ApplicationContextInitializer:应用容器初始化器
- ApplicationListener:应用容器监听器
这些组件会在后续的run()方法中使用,用于向IoC容器中配置相应的环境
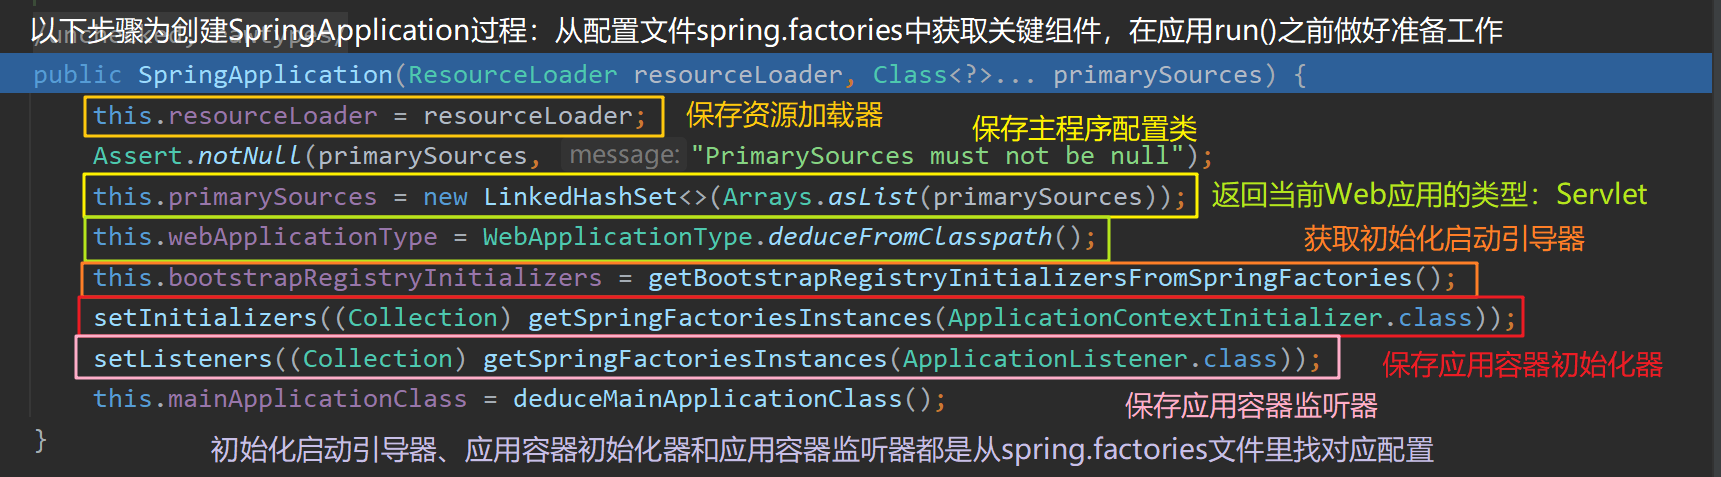
上述getSpringFactoriesInstances()方法用于从spring.factories中读取配置属性。spring.factories:
1 | ... |
运行SpringApplication.run()
在SpringApplication创建完毕后,将调用其run()方法以启动SpringApplication。
1 | public class SpringApplication { |
SpringApplication(primarySources).run(args) 最后返回的IoC容器context:
1 | public interface ConfigurableApplicationContext extends ApplicationContext, Lifecycle, Closeable { |
上文源码中的SpringApplicationRunListeners运行监听器需要配置在spring.factories文件里,例如EventPublishingRunListener事件发布运行监听器:
1 | # Run Listeners |
SpringApplicationRunListeners运行监听器:
1 | class SpringApplicationRunListeners { |
自定义事件监听组件
MyApplicationContextInitializer.java
1 | import org.springframework.context.ApplicationContextInitializer; |
MyApplicationListener.java
1 | import org.springframework.context.ApplicationEvent; |
MyApplicationRunner.java
1 | import org.springframework.boot.ApplicationArguments; |
MyCommandLineRunner.java
1 | import org.springframework.boot.CommandLineRunner; |
MySpringApplicationRunListener.java
1 | import org.springframework.boot.ConfigurableBootstrapContext; |
注册MyApplicationContextInitializer,MyApplicationListener,MySpringApplicationRunListener到当前项目的resources / META-INF / spring.factories中:
1 | org.springframework.context.ApplicationContextInitializer=\ |
Spring MVC 执行流程
下面将详细分析Spring MVC的执行流程,分别分析请求映射原理、参数解析原理、内容协商原理、视图解析原理等。并在其中穿插Spring MVC执行过程中的几大主线:
- 主线1. 获取请求处理器:this.getHandler()
- 主线2. 获取目标处理器的适配器:this.getHandlerAdapter()
- 主线3. 使用适配器执行目标方法:ha.handle()
- 主线4. 使用ModelAndView进行视图解析:processDispatchResult()
DispatcherServlet
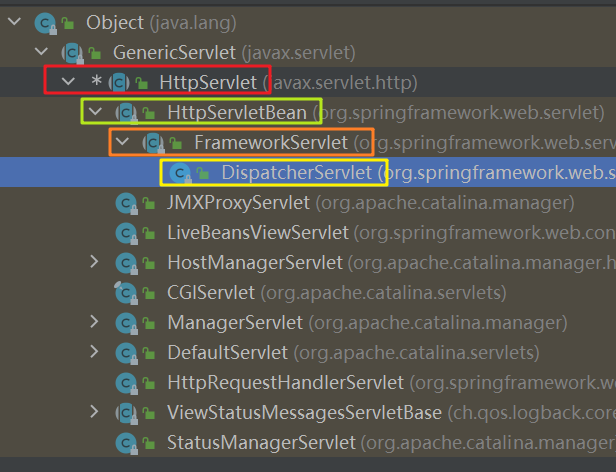
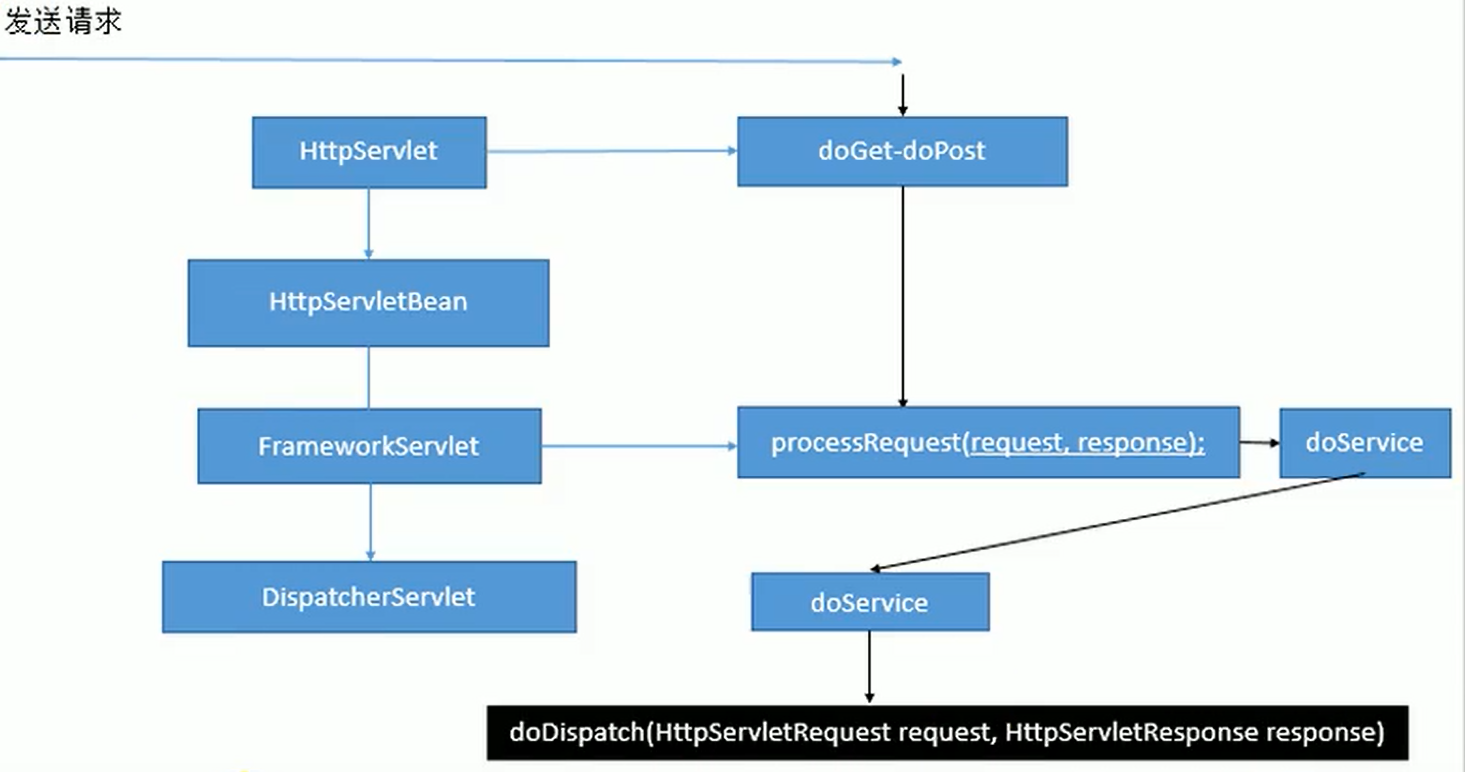
DispatcherServlet类继承自FrameworkServlet类,该类最终继承自HttpServlet类。其本质上也是一个Servlet,也需要注册到Tomcat中才能响应到客户端传来的请求。
FrameworkServlet类中有多个处理请求的方法(doGet/doPost/doPut/doDelete),他们都调用了同一个方法this.processRequest(request, response)。(DispatcherServlet类中并没有重写这些doXxx方法和processRequest()方法,因此调用的是FrameworkServlet类里的这些方法)
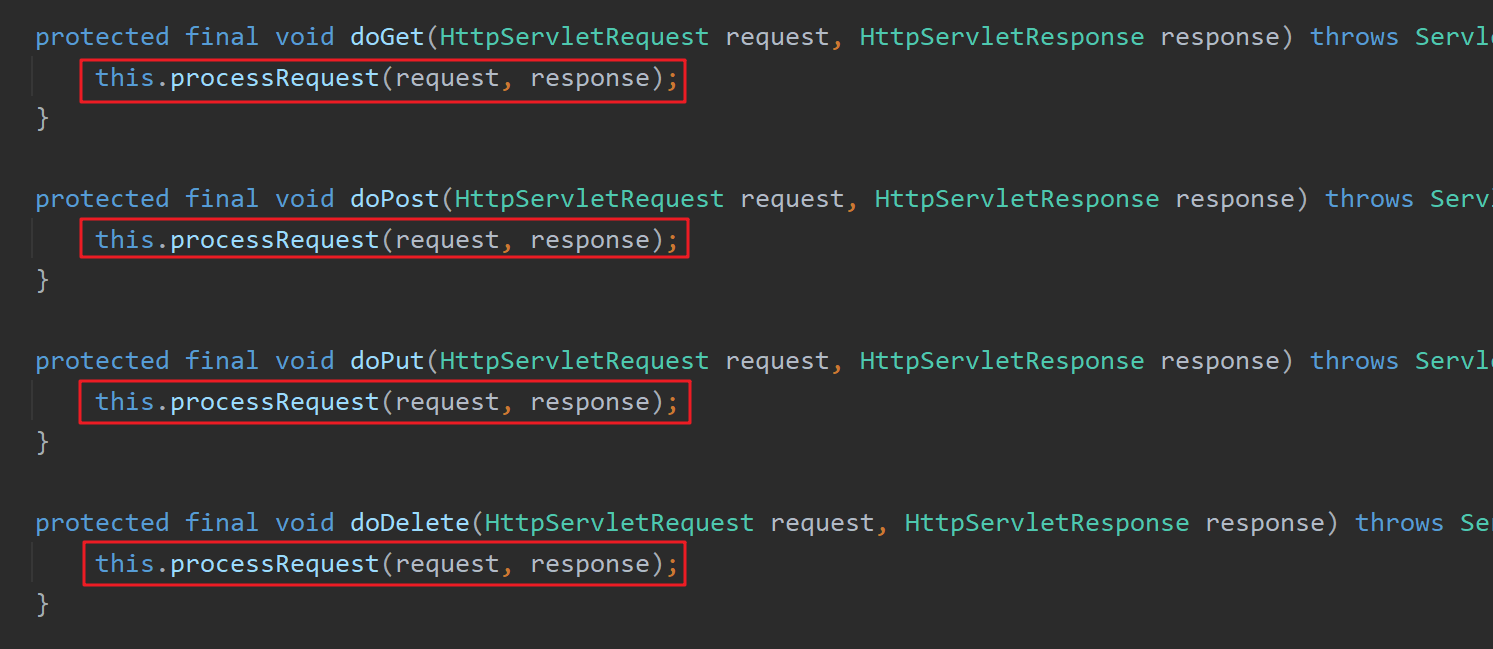
processRequest(request, response)方法中最关键的一步为调用this.doService(request, response)方法。但该方法在FrameworkServlet类中为抽象方法,需要子类实现,因此调用的是DispatcherServlet类里的 this.doService(request, response) 方法。

FrameworkServlet类重写的 doService() 方法:
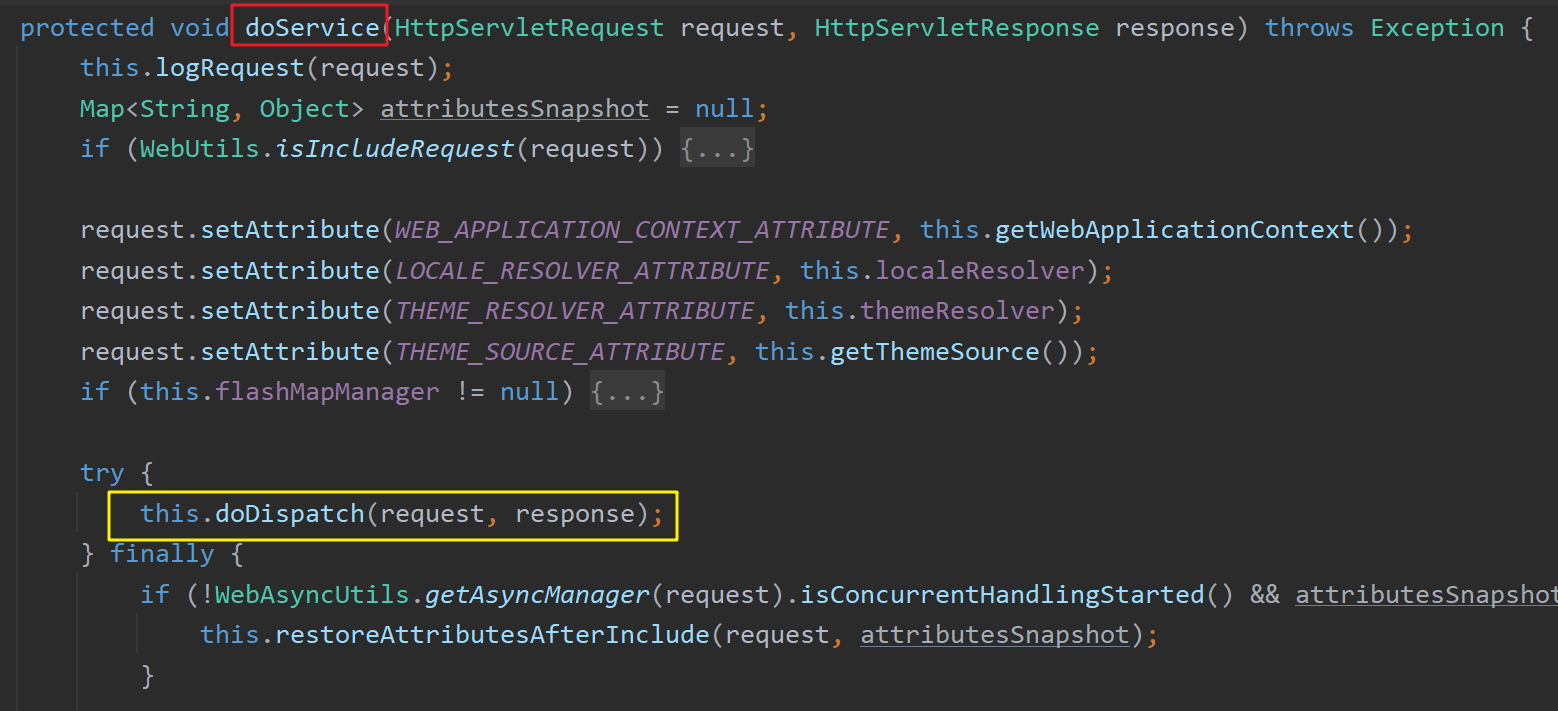
该方法调用了FrameworkServlet中的 doDispatch(request, response) 方法:
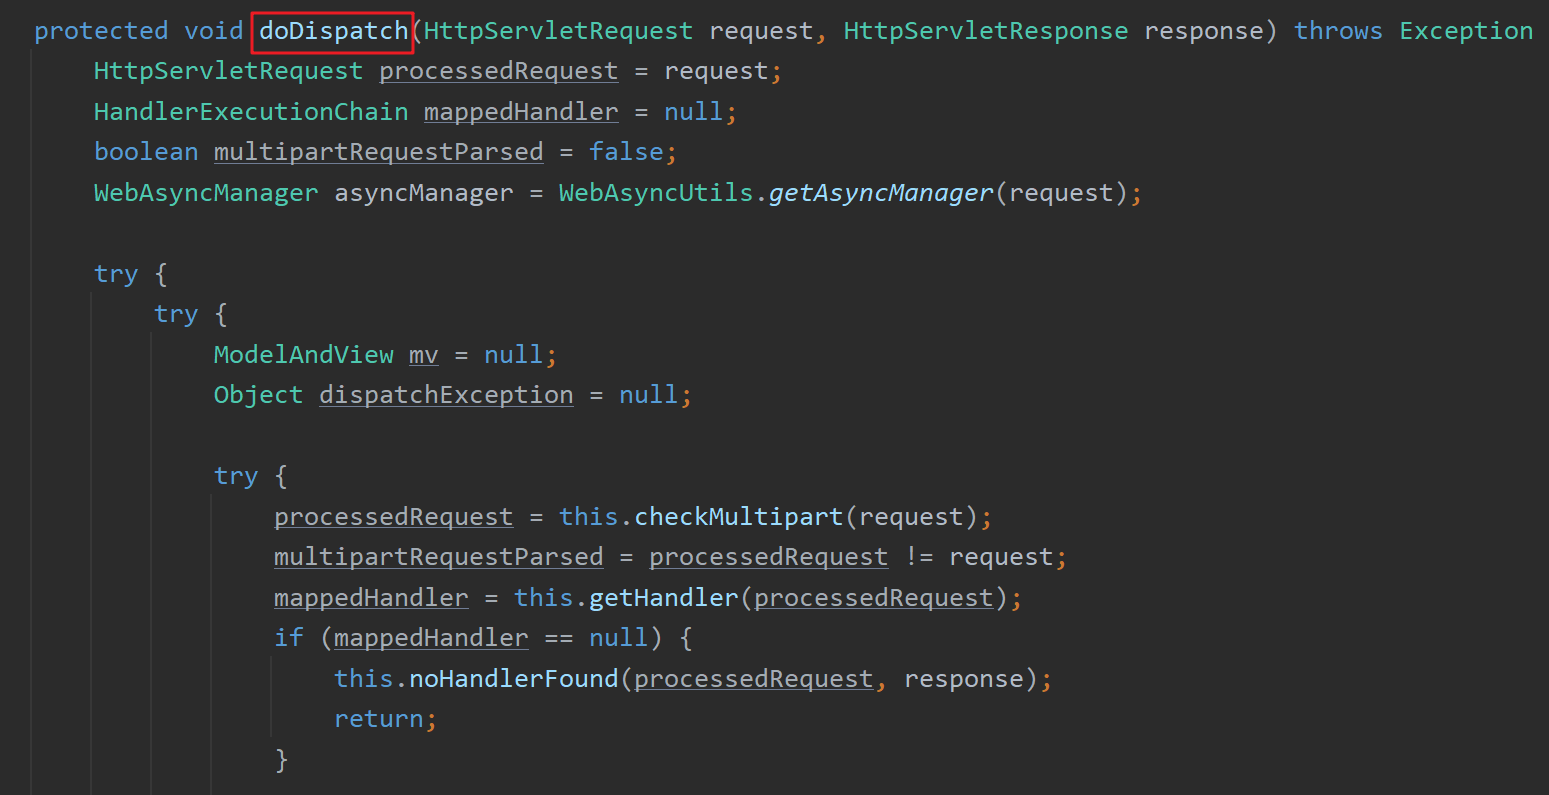
因此分析清楚 doDispatch(request, response) 方法即可理解Spring MVC的原理。上述关系树见下图:
在Tomcat中注册DispatcherServlet
Spring Boot中有一个自动配置类:DispatcherServletAutoConfiguration。其用于进行DispatcherServlet的自动注册和配置。
DispatcherServlet将在Spring Boot启动时添加到容器中,该组件绑定了WebMvcProperties配置类,其对应的配置文件前缀为 “spring.mvc” ,修改该前缀下的属性即可自定义功能。
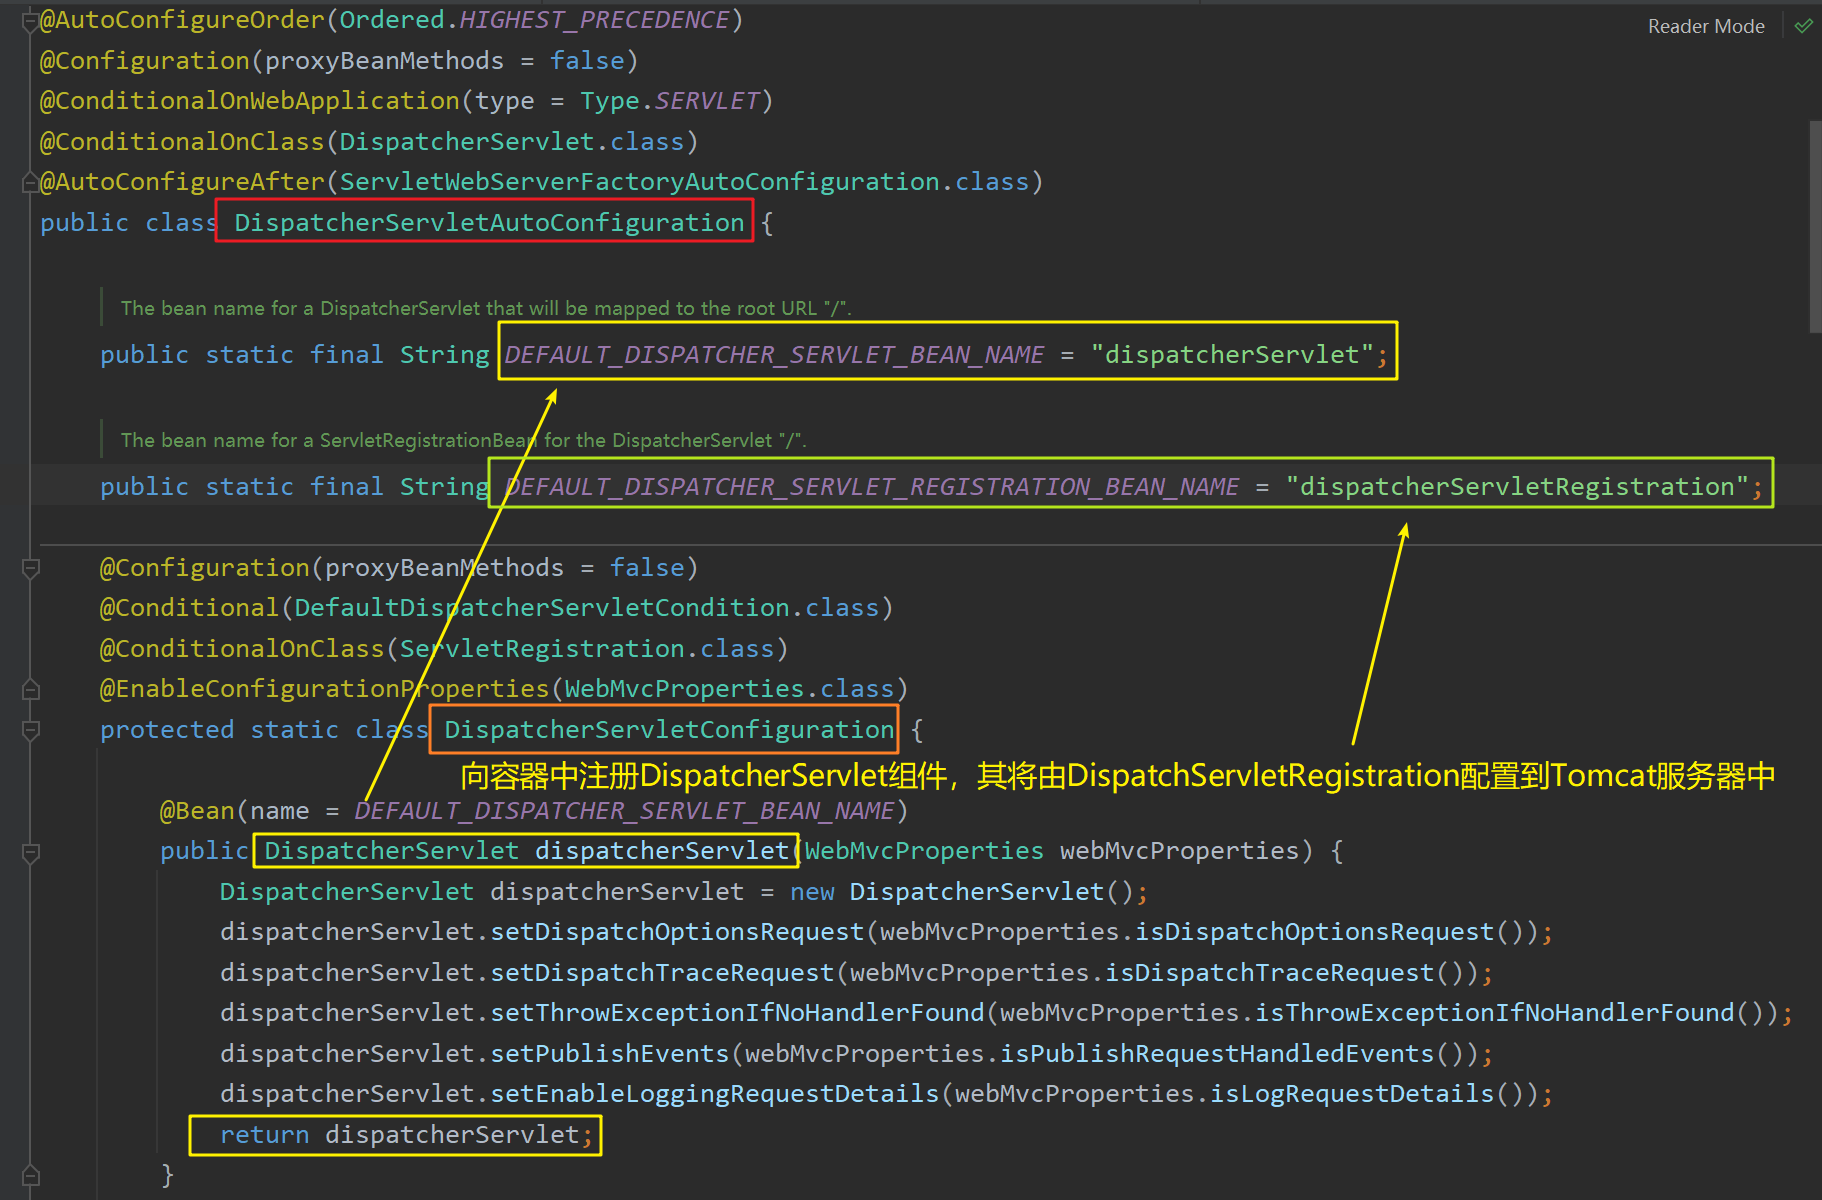
但仅仅将DispatcherServlet注册到容器中还不够,此时该组件尚未与Tomcat服务器产生联系,Tomcat服务器并不能使用该Servlet进行请求映射(即此时客户端发来的请求 “/” 并不能被DispatcherServlet获取到,而会有Tomcat中存在的其他Servlet获取进行请求映射)。因此需要将DispatcherServlet注册到Tomcat中才能响应到客户端传来的请求。
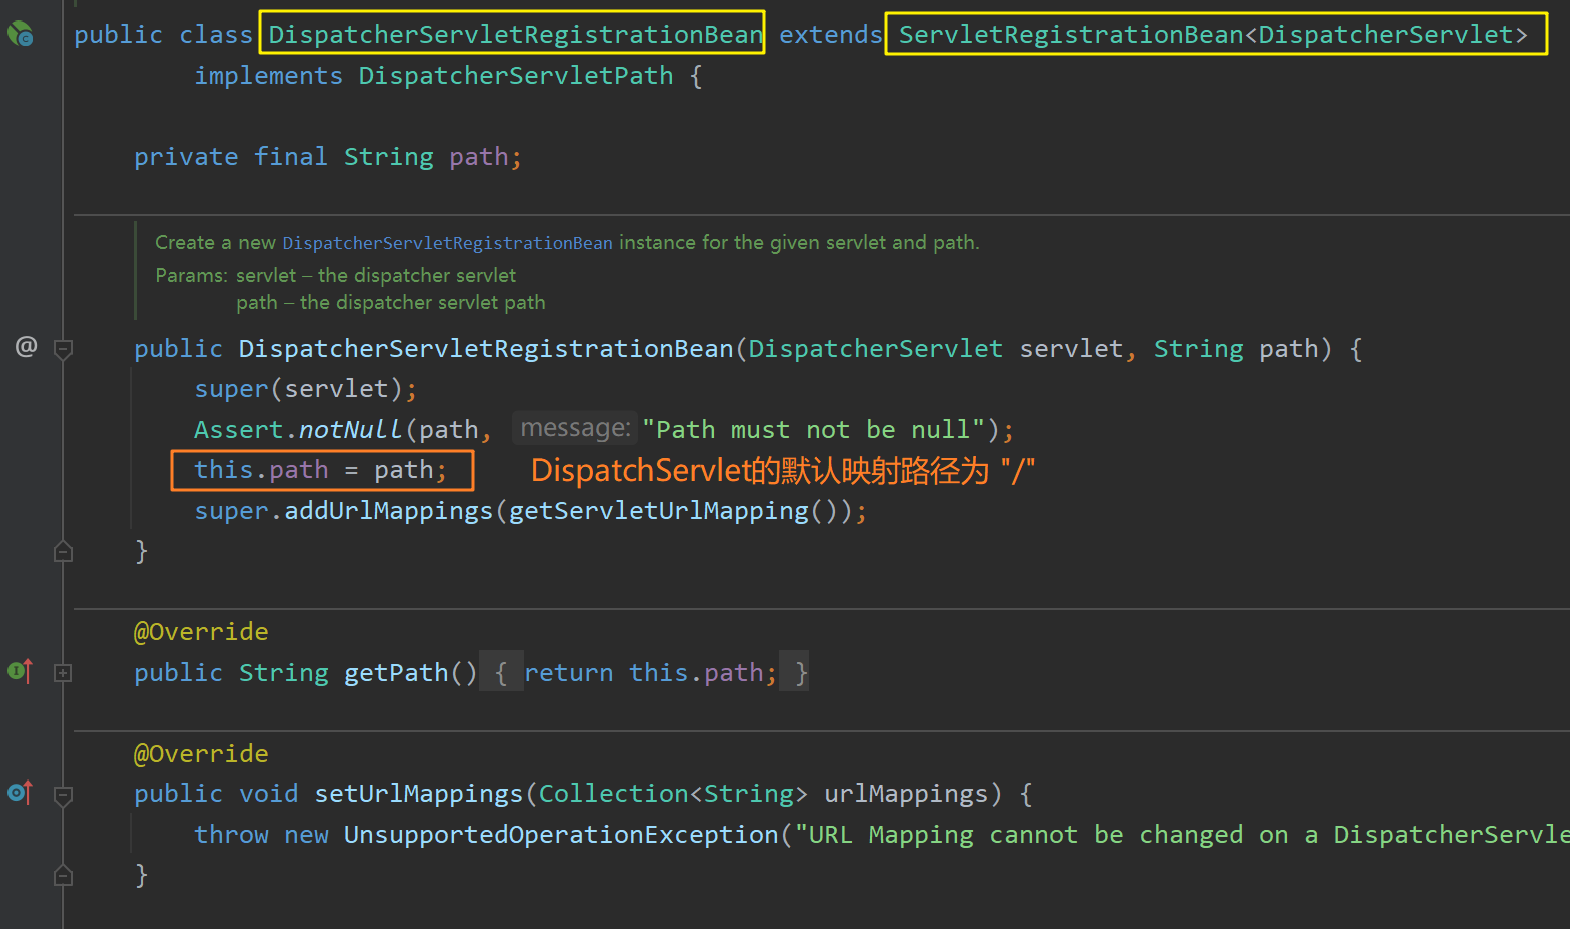
使用DispatcherServletRegistrationBean将DispatcherServlet注册到Tomcat中:
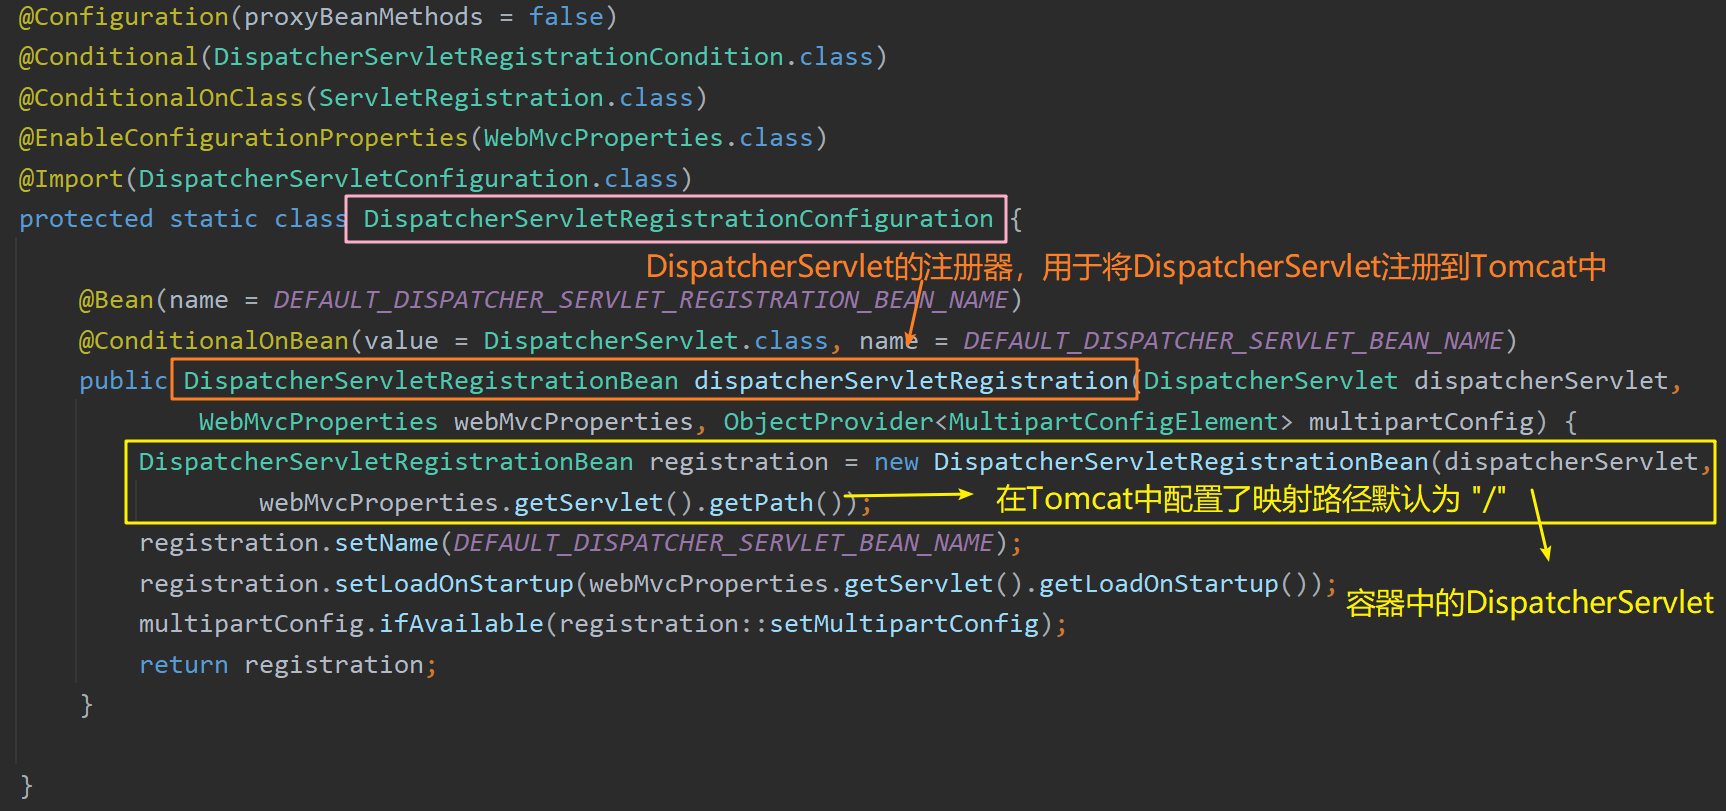
DispatcherServletRegistrationBean用于向Tomcat服务器中注册配置DispatcherServlet,并为其指定映射路径webMvcProperties.getServlet().getPath(),该值默认为 “/” ,开发人员也可以自定义该路径:
1 | ="/my/" |
DispatcherServletRegistrationBean继承自 ServletRegistrationBean<DispatcherServlet> ,其是一种Servlet注册组件,用于向Tomcat服务器中注册配置Web原生Servlet组件,此时的泛型为DispatcherServlet类型,因此会向Tomcat服务器中注册配置DispatcherServlet。
总结:使用DispatcherServletRegistrationBean向Tomcat中注册了DispatcherServlet后,Tomcat即可将符合 “/” 的请求映射到DispatcherServlet。之后客户端发来符合要求的请求时,即可执行DispatcherServlet的 doDispatch() 方法,从而进行后续的请求映射、参数解析、数据响应和视图解析等步骤(见下文分析)。
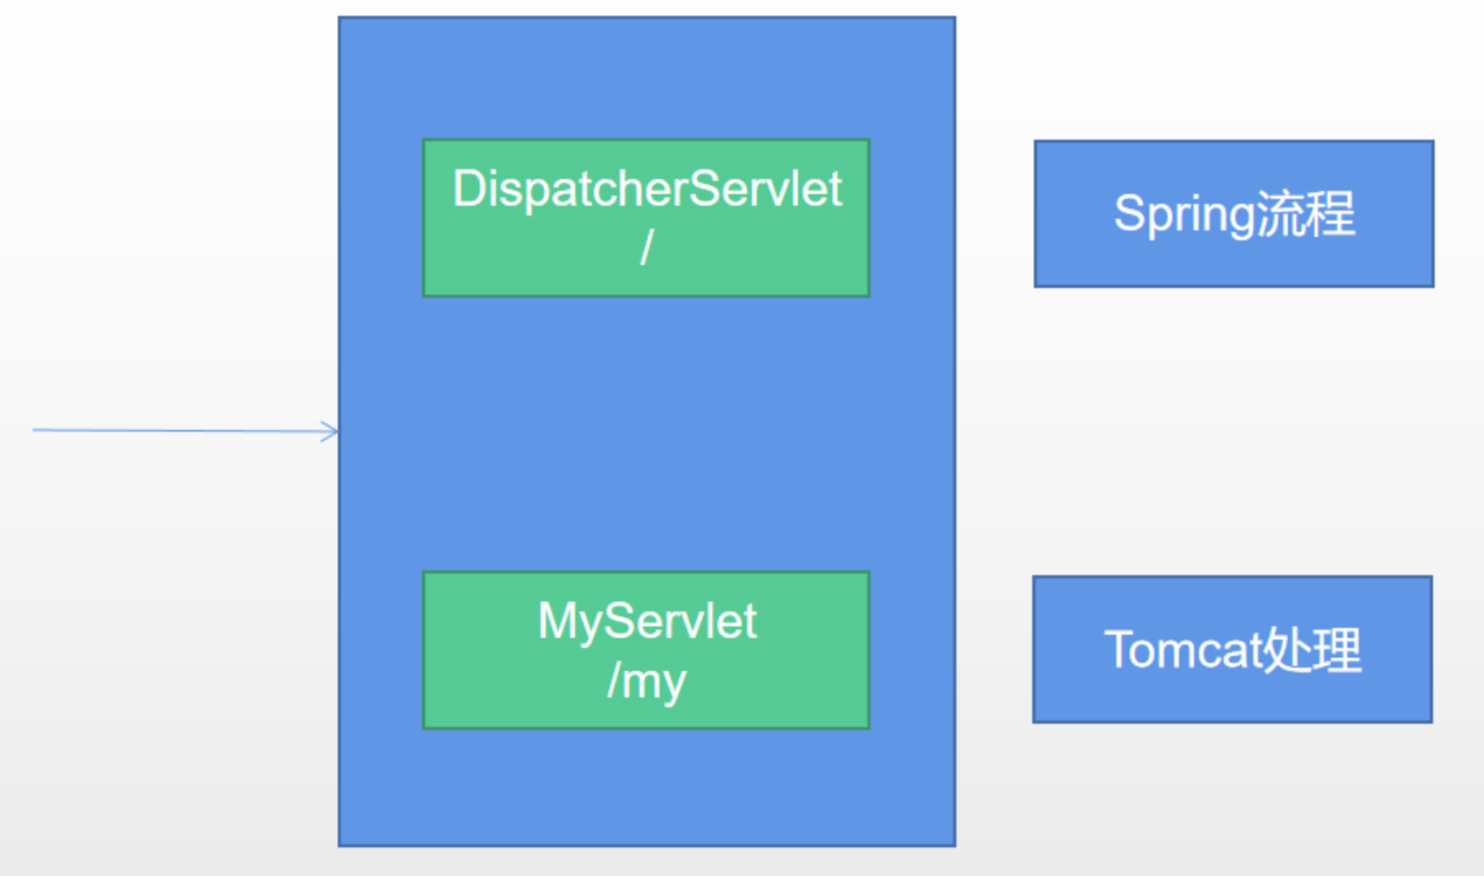
补充:Tomcat路径的优先精确匹配原则
在Tomcat中若配置了多个Servlet,则将优先匹配更精确的路径,例如DispatcherServlet的匹配路径为"/",自定义的其他Servlet的匹配路径为"/my/",则Tomcat将优先匹配到更精确的Servlet,而不会匹配到DispatcherServlet。此时该请求将不再被容器中配置的拦截器所拦截,也不能使用DispatcherServlet的页面转发等功能,只能使用原生的Servlet方法。
文件上传原理
标准文件上传解析器StandardServletMultipartResolver由MultipartAutoConfiguration注册到容器中:
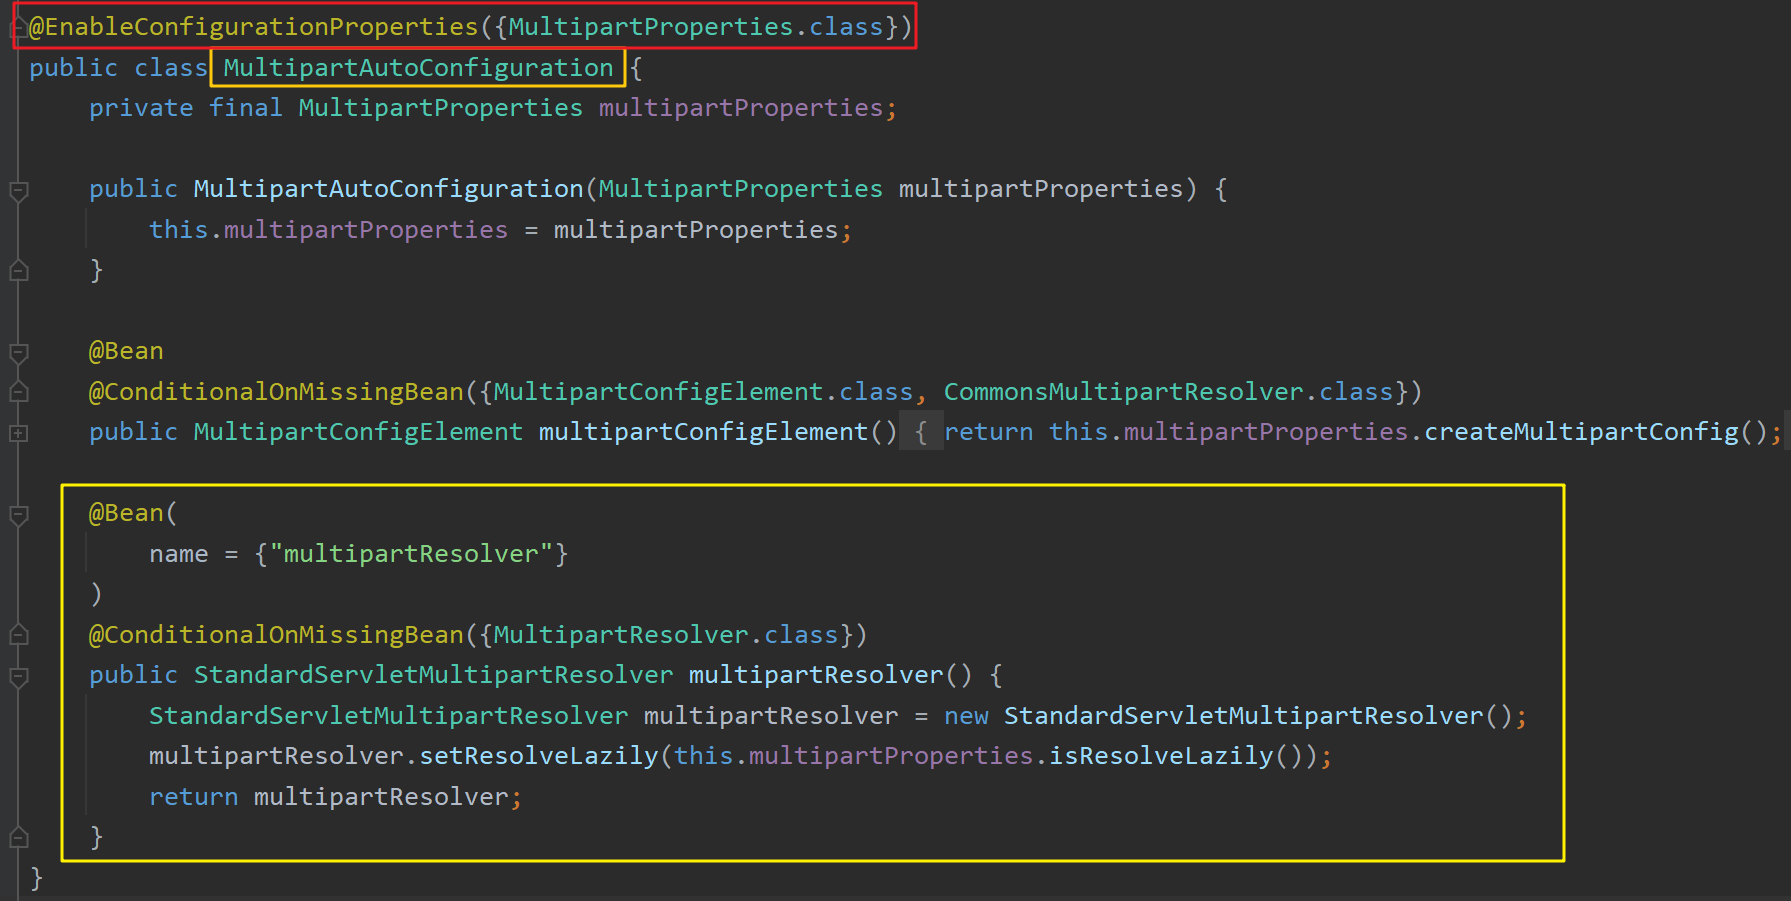
其绑定了MultipartProperties属性:
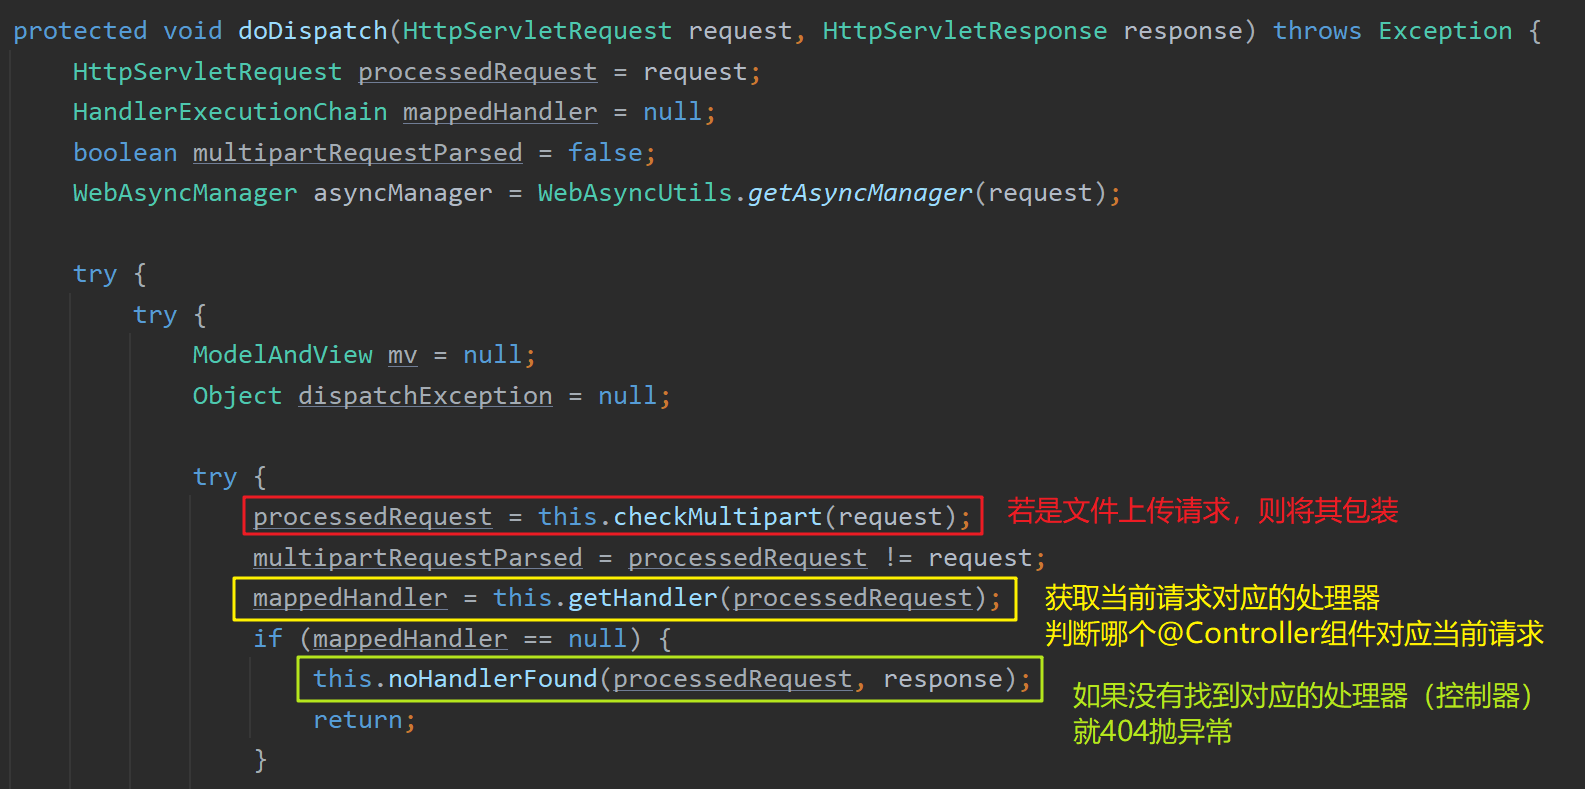
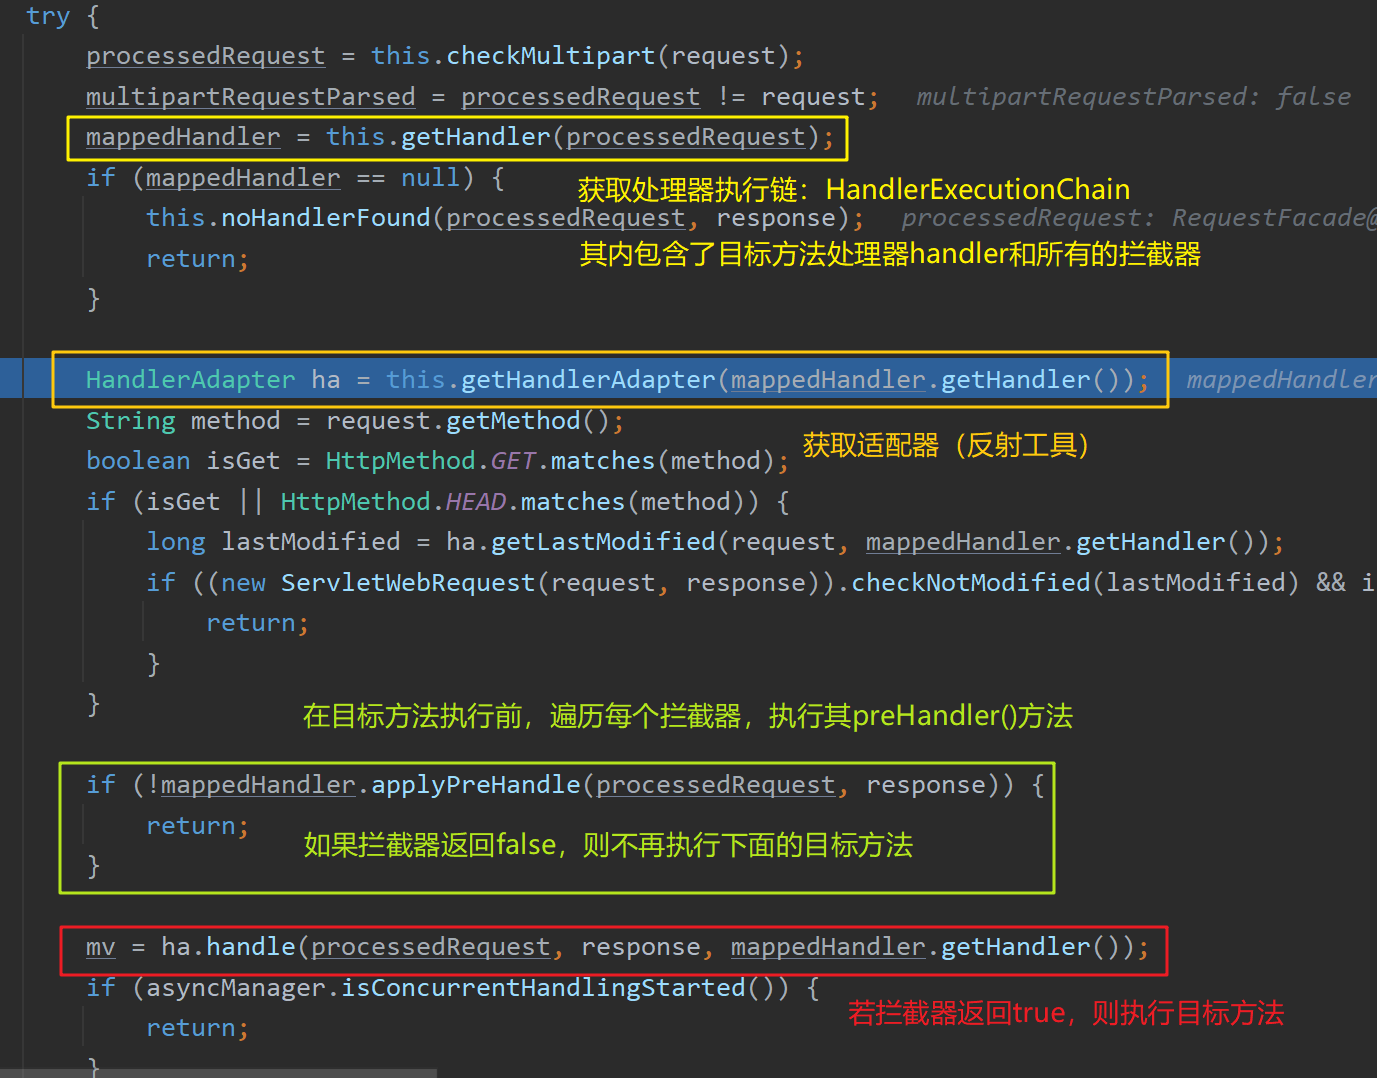
包装原始请求:this.checkMultipart(request)
此处开始分析 doDispatch() 方法:
进入 doDispatch() 方法后,首先进行文件上传请求包装: this.checkMultipart(request)
进入this.checkMultipart(request) 方法后,将调用唯一的一个参数解析器StandardServletMultipartResolver判断当前请求是否是文件上传请求:
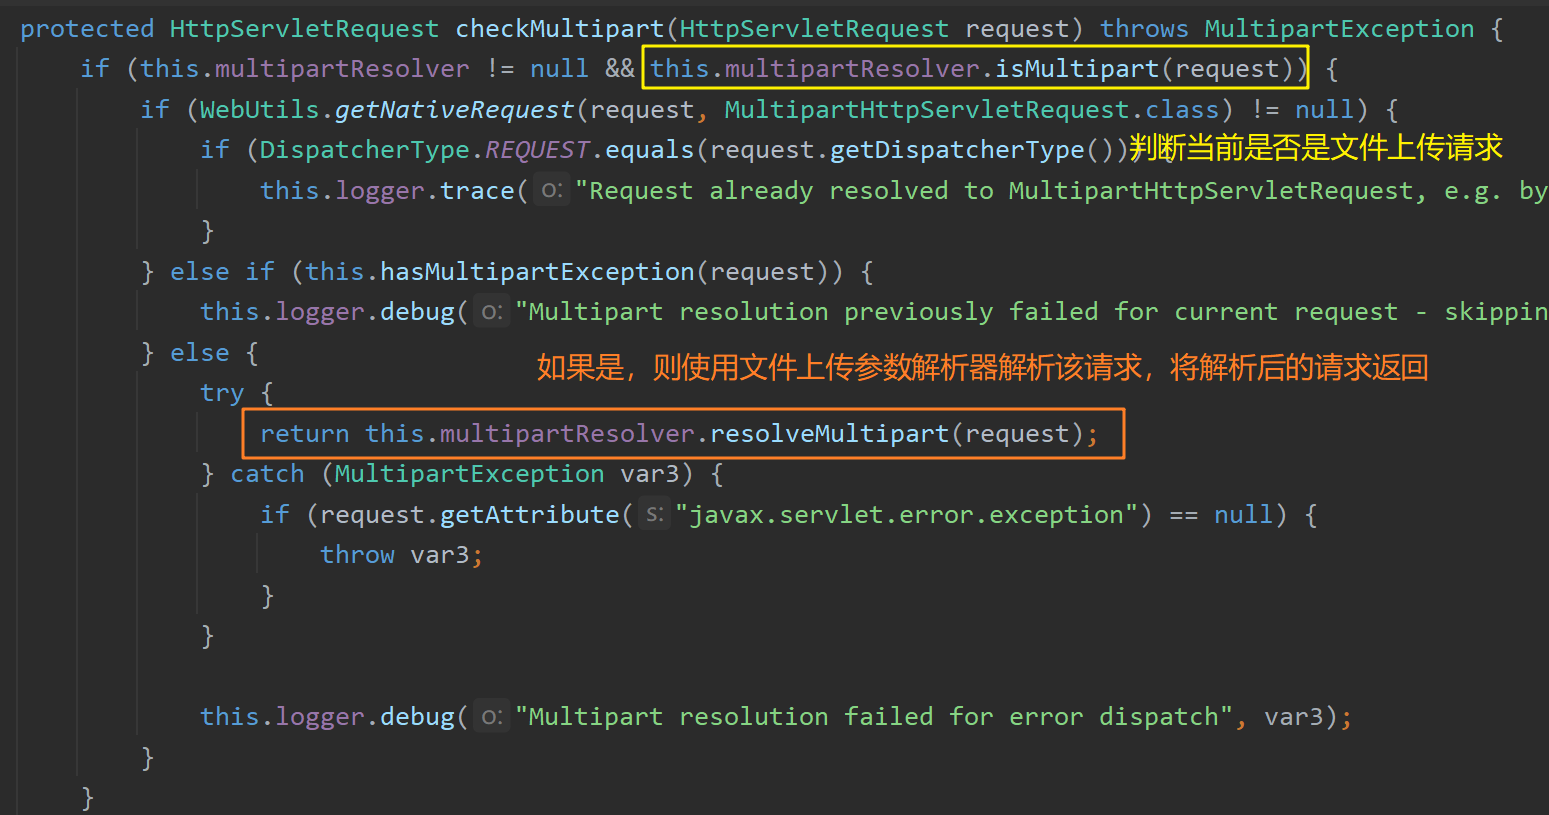
参数解析器StandardServletMultipartResolver判断的方式 **isMultipart() **为:

如果当前请求是文件上传请求,则将当前请求封装成一个StandardMultipartHttpServletRequest类型的请求:

后续分析使用的请求就是这个已经被封装后的StandardMultipartHttpServletRequest请求。
解析文件内容
获得包装后的请求后,该请求中包含的文件内容将在 ha.handle() 方法中进行解析:
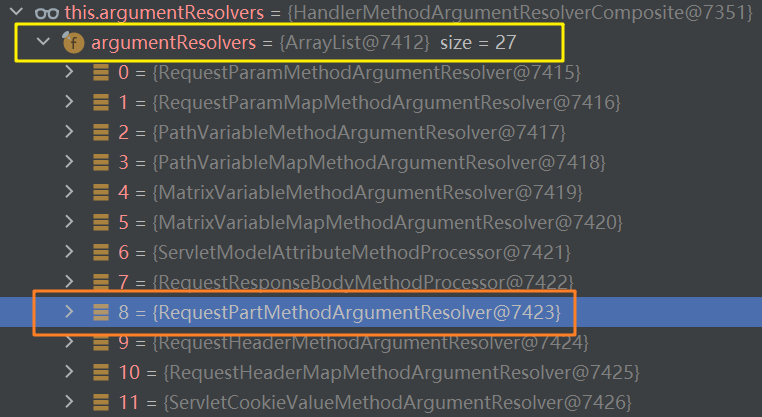
在所有的参数解析器中有一个请求文件参数解析器RequestPartMethodArgumentResolver,Spring MVC将使用该解析器将请求中的文件内容封装成一个MultipartFile对象。
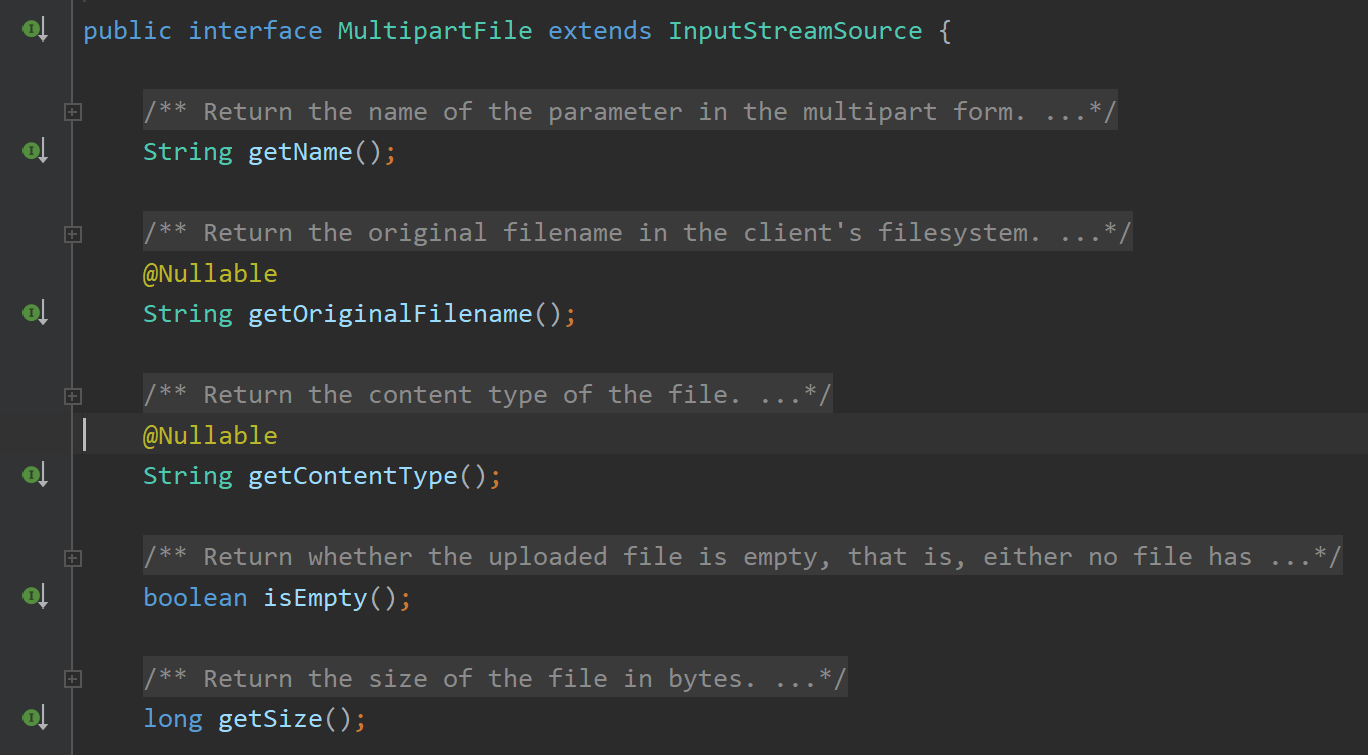
解析得到的文件类型MultipartFile:
关于文件上传参数解析器的具体细节见文件上传参数解析器
请求映射原理
经过文件上传的封装后,即开始进行请求映射:
主线1. 获取请求处理器:this.getHandler()
this.getHandler():根据当前的url请求地址("/hello")判断哪个控制器(@Controller)里的目标方法(@RequestMapping("/hello"))与之对应:
url:"/hello" ——> HelloController#handle01() 方法
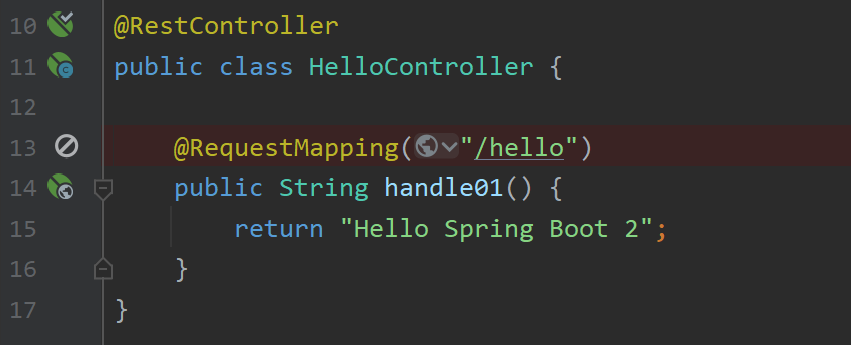
this.getHandler() 方法返回的mappedHandler对象的类型为HandlerExecutionChain,即目标方法处理器的执行链,其内保存了与当前请求地址"/hello"匹配的目标方法HelloController#handle01() (这个请求信息在容器启动时就添加到了RequestMappingHandlerMapping中,因此可以在后续匹配到):

this.getHandler() 方法内部细节:
this.getHandler() 方法传入了HttpServletRequest类型的请求对象,其内包含了响应的url等信息:
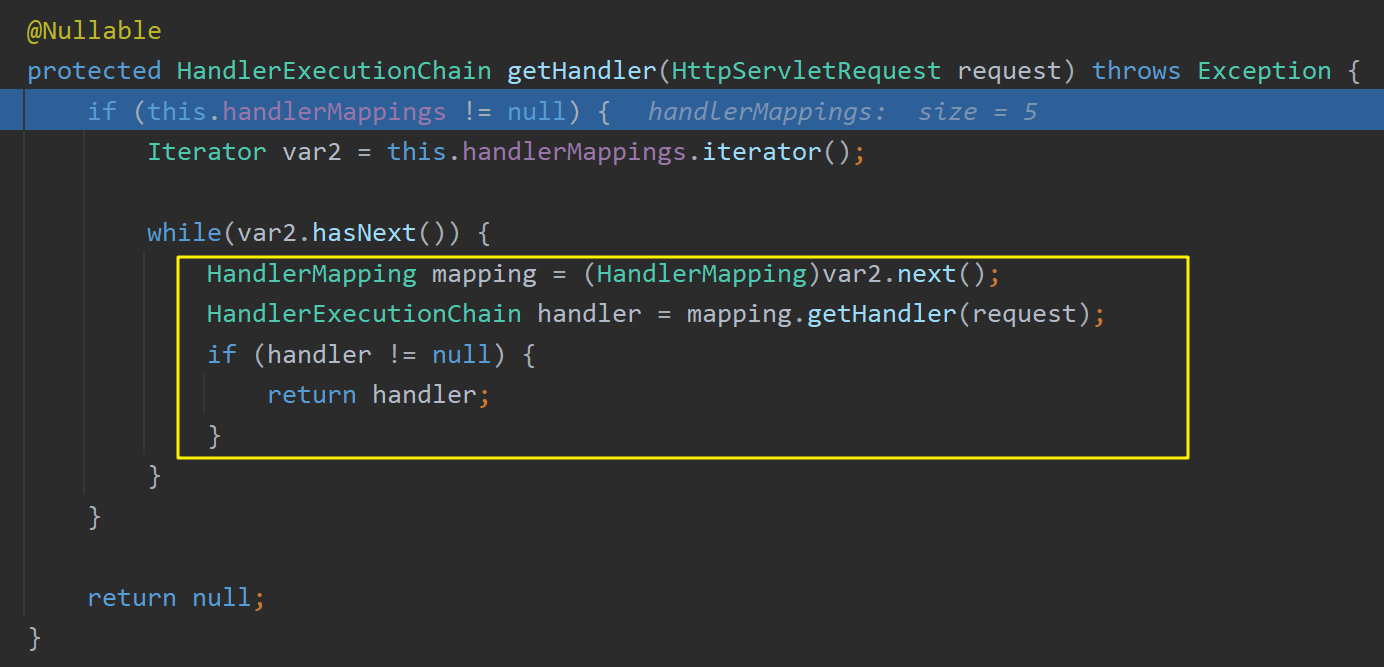
this.handlerMappings:处理器映射器,其内保存了每一个处理器能处理映射的方法信息。(以下为Spring Boot中存在的映射器,纯Spring MVC工程中只有两个handlerMapping,分别为基于xml方式的BeanNameUrlHandlerMapping和基于注解方式的RequestMappingHandlerMapping)

RequestMappingHandlerMapping里保存了所有 @RequestMapping 与 handler 的映射规则,为基于注解方式的处理器映射器,其内包含了所有开发人员自定义的@RequestMapping方法,mappingRegistry属性保存了所有的映射信息:
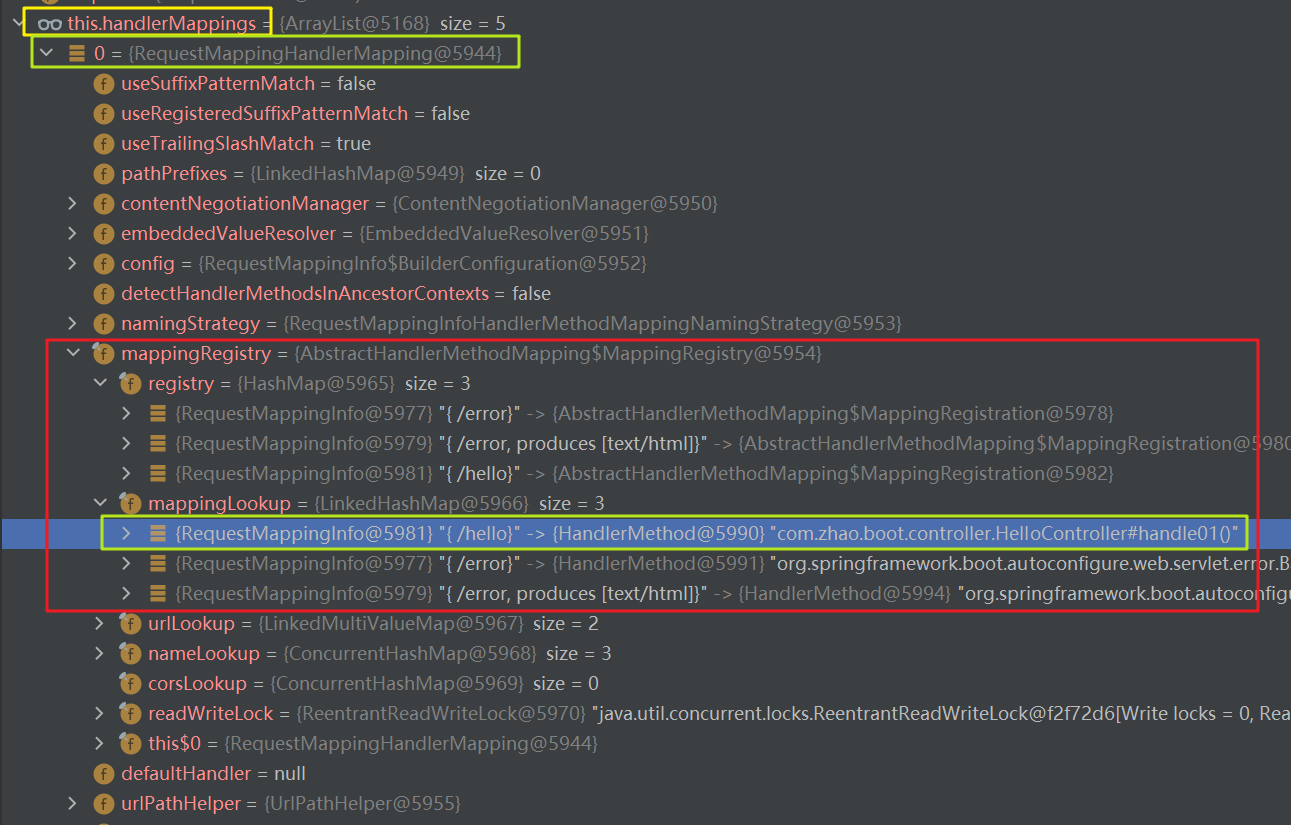
IoC容器在启动创建@Controller对象时扫描每个控制器的方法能响应什么请求,并保存在RequestMappingHandlerMapping对象的mappingRegistry属性中(该属性中保存了所有开发人员自定义的基于注解的控制器信息)。下一次请求过来,判断handlerMapping中有无存在匹配的映射关系。
在getHandler() 方法中,依次遍历所有的handlerMapping对象,其会解析当前传入的request对象,判断哪个handlerMapping对象符合当前的url请求信息,将符合信息的返回一个HandlerExecutionChain对象。下图为匹配到的handler,该handler内保存了该url请求对应的目标 HelloController#handle01() 方法:

this.getHandler() 总结
在this.getHandler() 方法内遍历每个HandlerMapping,判断哪个HandlerMapping能处理当前的请求地址(开发人员自定义的方法将由RequestMappingHandlerMapping处理),并返回一个HandlerExecutionChain对象。
其中IoC容器在启动时就会向HandlerMapping内保存每个@RequestMapping("xxx")信息,以在后续收到浏览器的url请求时能够匹配到对应的RequestMappingHandlerMapping处理器信息。
主线2. 获取目标处理器的适配器:this.getHandlerAdapter()
将上一步得到的请求映射处理器mappedHandler传入到 this.getHandlerAdapter() 方法中,返回该处理器所对应的适配器adapter:
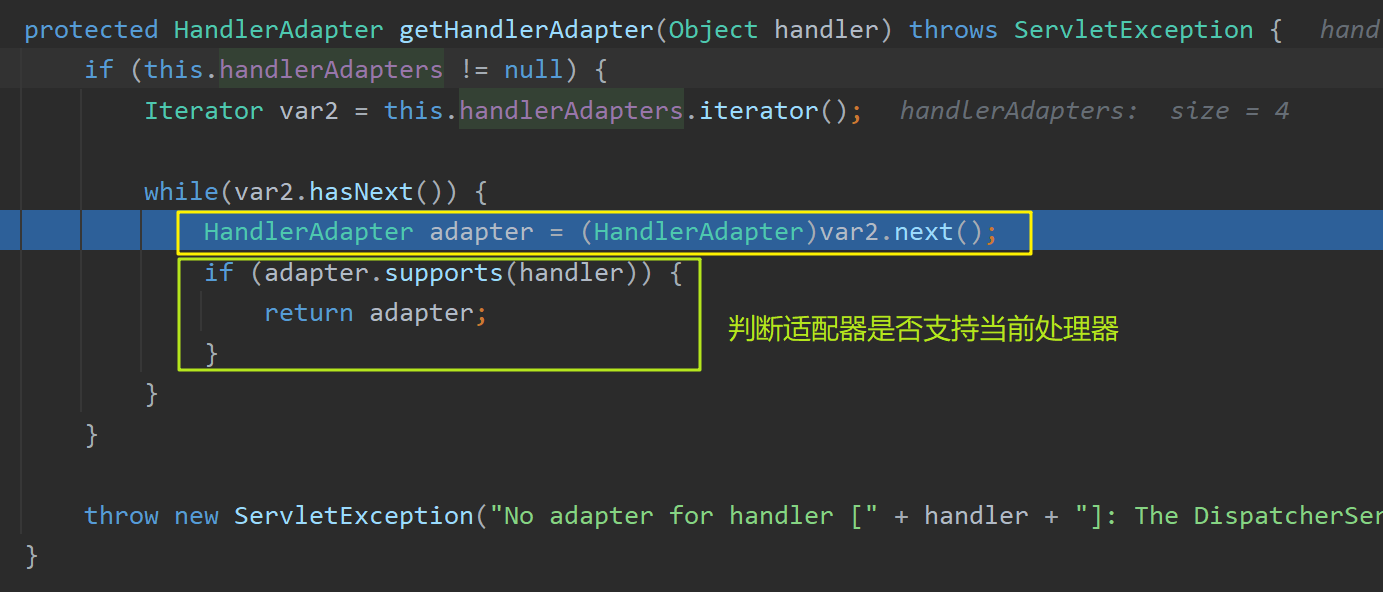
共有四种类型的适配器:
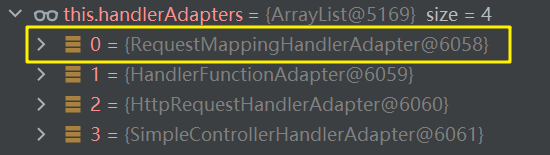
其中RequestMappingHandlerAdapter是基于注解方式的适配器,对应于RequestMappingHandlerMapping。后续步骤将使用该适配器执行目标方法(基于反射机制)。
至此,分析了请求映射原理,即根据请求url的不同映射得到相应的请求处理器与适配器,接着使用该适配器 ha.handle() 执行目标方法(基于反射机制)。
拦截器
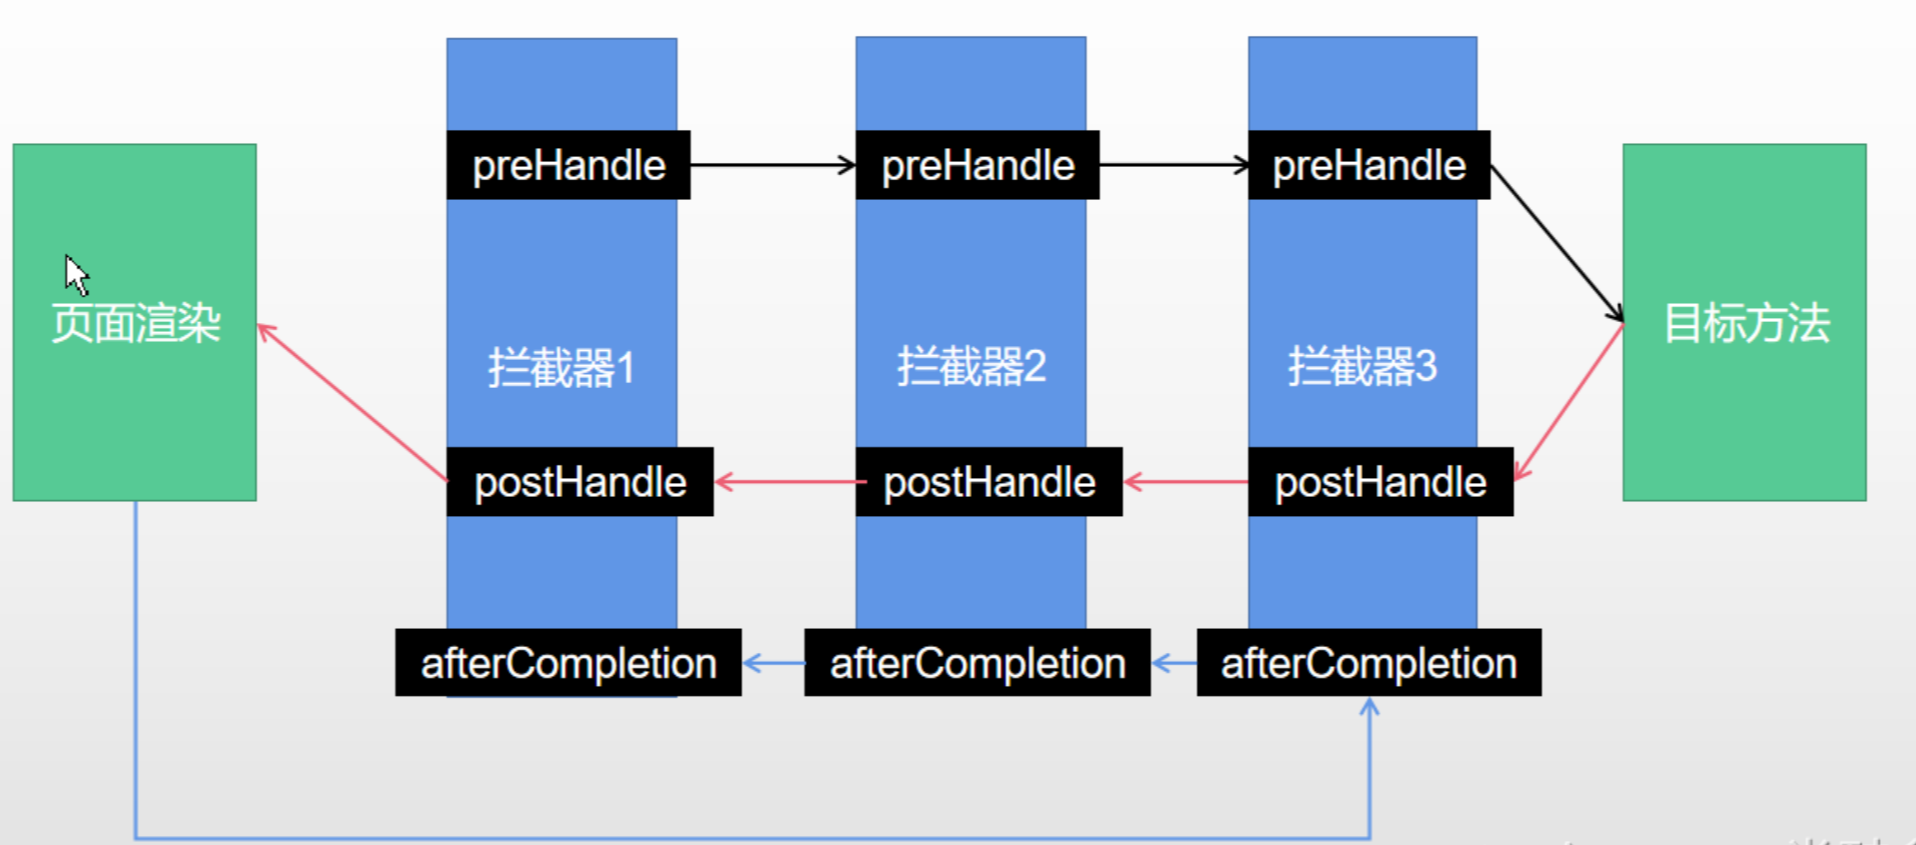
拦截器的大致工作流程为:
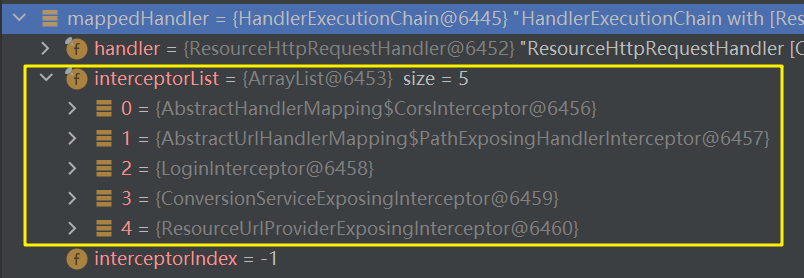
- 根据当前url请求,获取到目标方法对应的处理器执行链HandlerExecutionChain,其内包含了目标方法处理器handler以及容器中所有的拦截器interceptorList
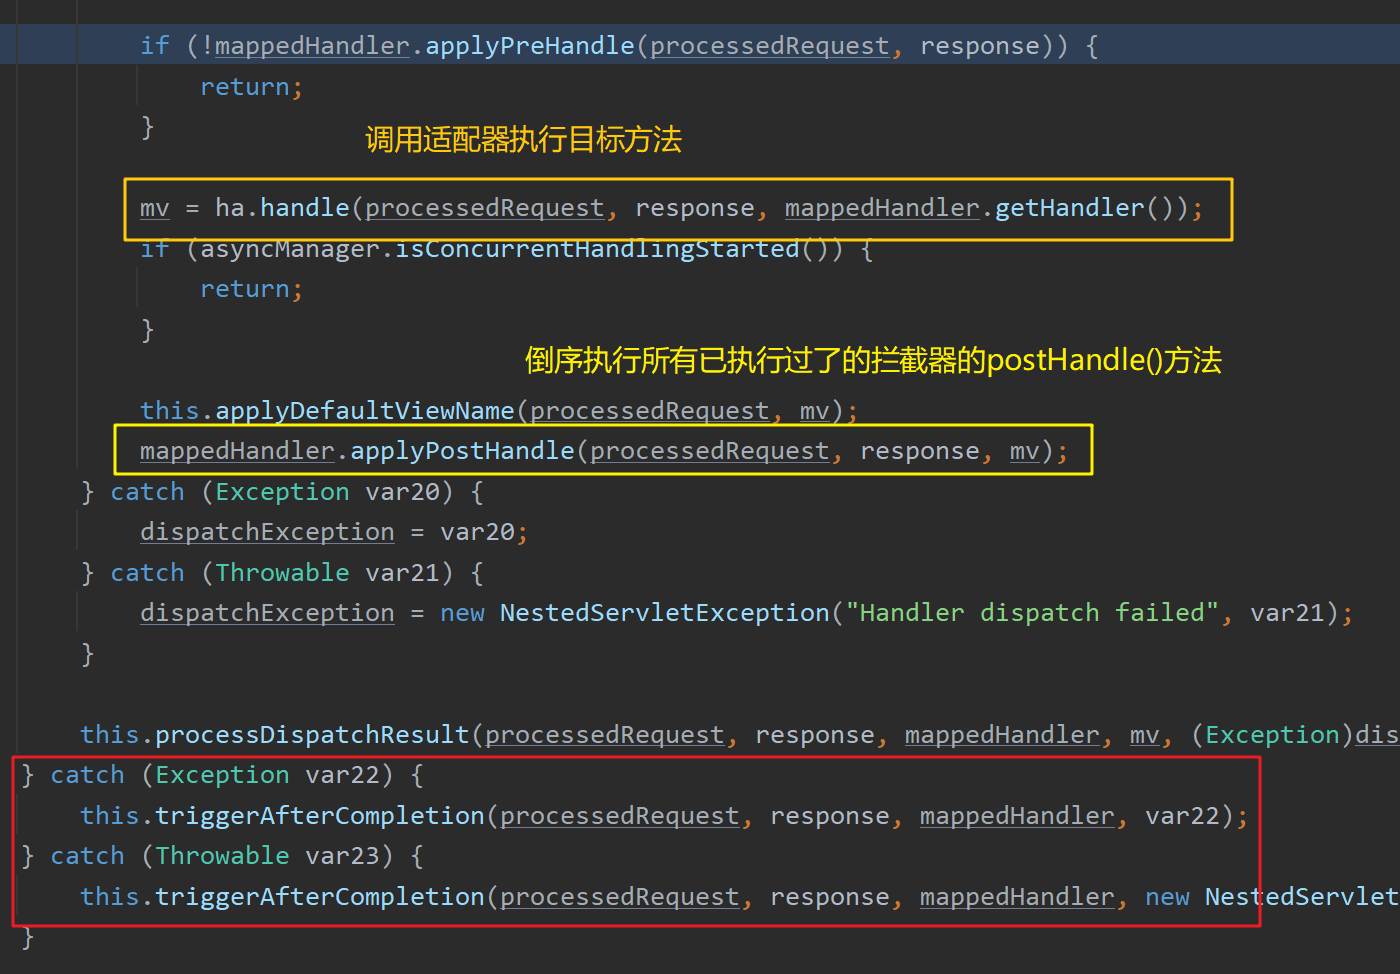
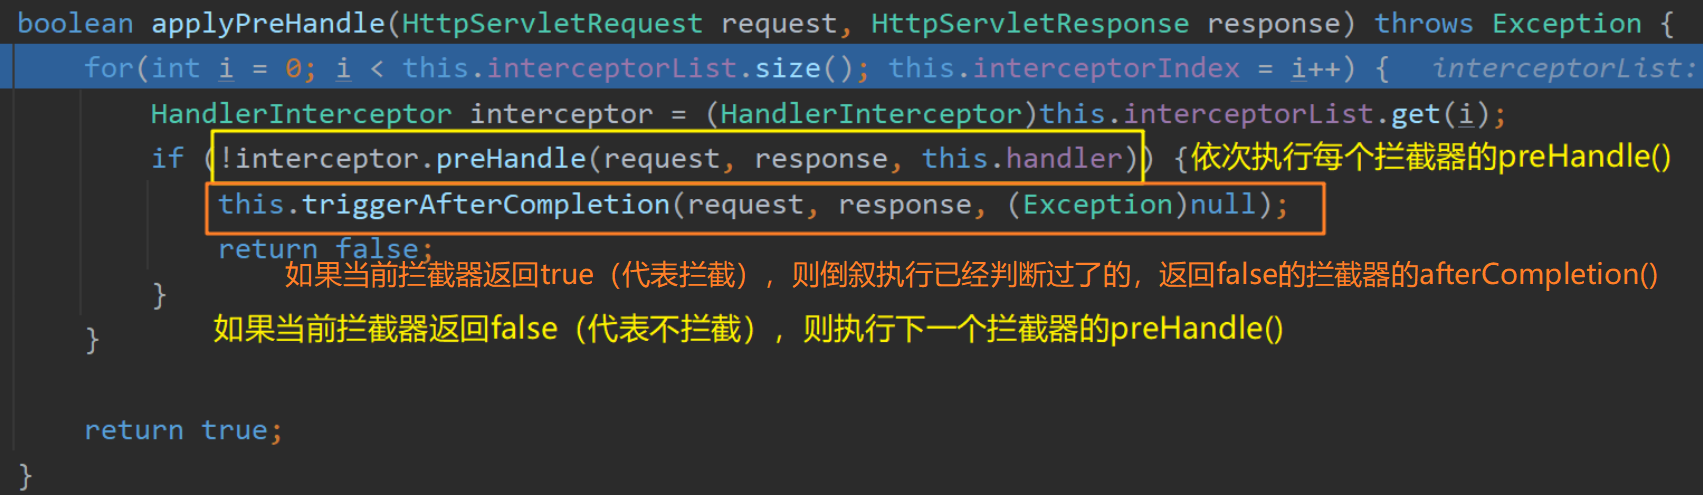
- 在目标方法执行前,调用 mappedHandler.applyPreHandle() 方法顺序遍历容器中的所有拦截器,依次执行其 preHandle() 方法:
- 如果当前遍历到的拦截器的 preHandle() 方法返回true,则执行下一个拦截器的 preHandle() 方法
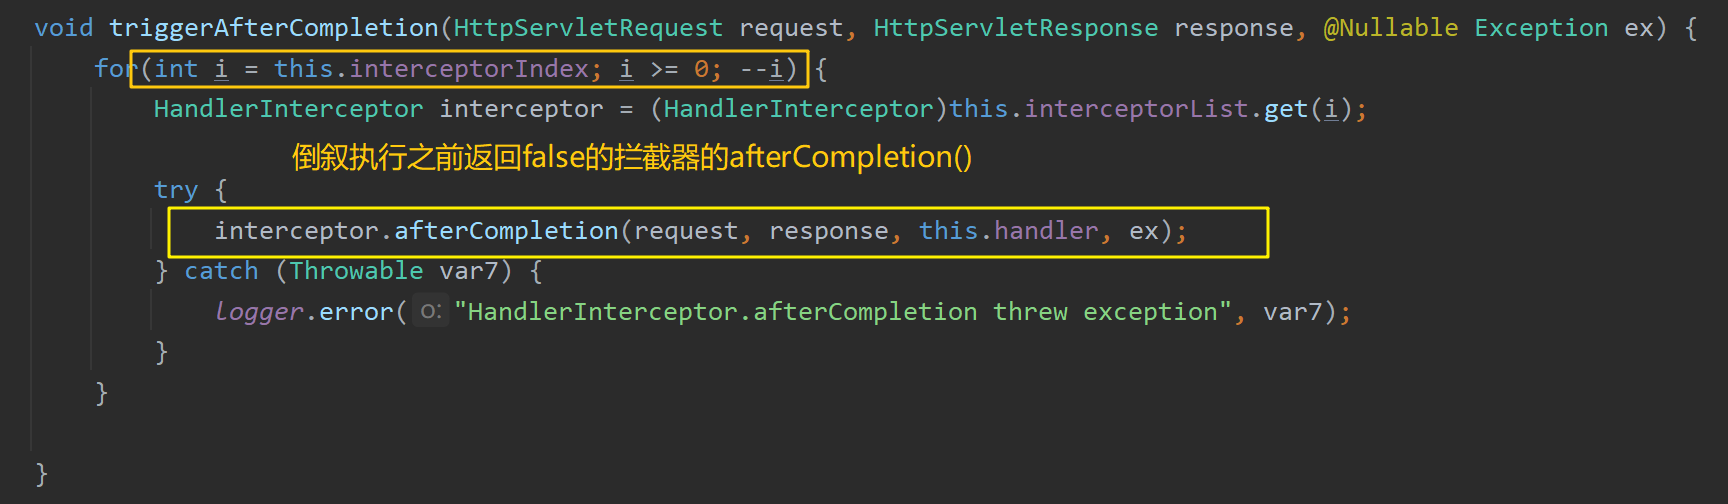
- 如果当前拦截器返回false,则倒序执行所有已执行过了的拦截器的 afterCompletion() 方法
- 如果任意一个拦截器返回了false,则 doDispatch(request, response) 方法直接return,不再向下执行目标方法等代码
- 如果所有拦截器都返回true,则继续向下执行目标方法等代码
- 调用 ha.handle() 方法执行完目标方法后调用 mappedHandler.applyPostHandle() 方法倒序执行所有已执行过了的拦截器的 postHandle() 方法
- 页面成功渲染后( processDispatchResult() 方法内),倒序执行所有已执行过了的拦截器的 afterCompletion() 方法
- 之前步骤中有任何地方发生异常都会倒序执行所有已执行过了的拦截器的 afterCompletion() 方法
上述流程截图:
拦截器链的执行顺序:
上述方法内细节
返回的mappedHandler即处理器执行链HandlerExecutionChain,其内包含了目标方法处理器handler以及容器中所有的拦截器interceptorList,其内包含了自定义的拦截器:
mappedHandler.applyPreHandle() 方法内顺序遍历容器中的所有拦截器,依次执行其 preHandle() 方法:
mappedHandler.applyPostHandle() 方法内倒序执行所有已执行过了的拦截器的 postHandle() 方法:

afterCompletion() 方法的触发时机:
- 目标方法执行前,遍历所有拦截器,执行其preHandle()方法,若某个拦截器该方法返回false,则倒序执行所有在该拦截器之前执行的(即在之前判断过的,拦截器返回true的)拦截器的 afterCompletion() 方法
- 页面渲染完成之前的所有步骤有任何地方出现异常,就会倒序触发所有已执行过的拦截器的 afterCompletion() 方法
- 页面成功渲染之后,倒序触发所有已执行过的拦截器的 afterCompletion() 方法
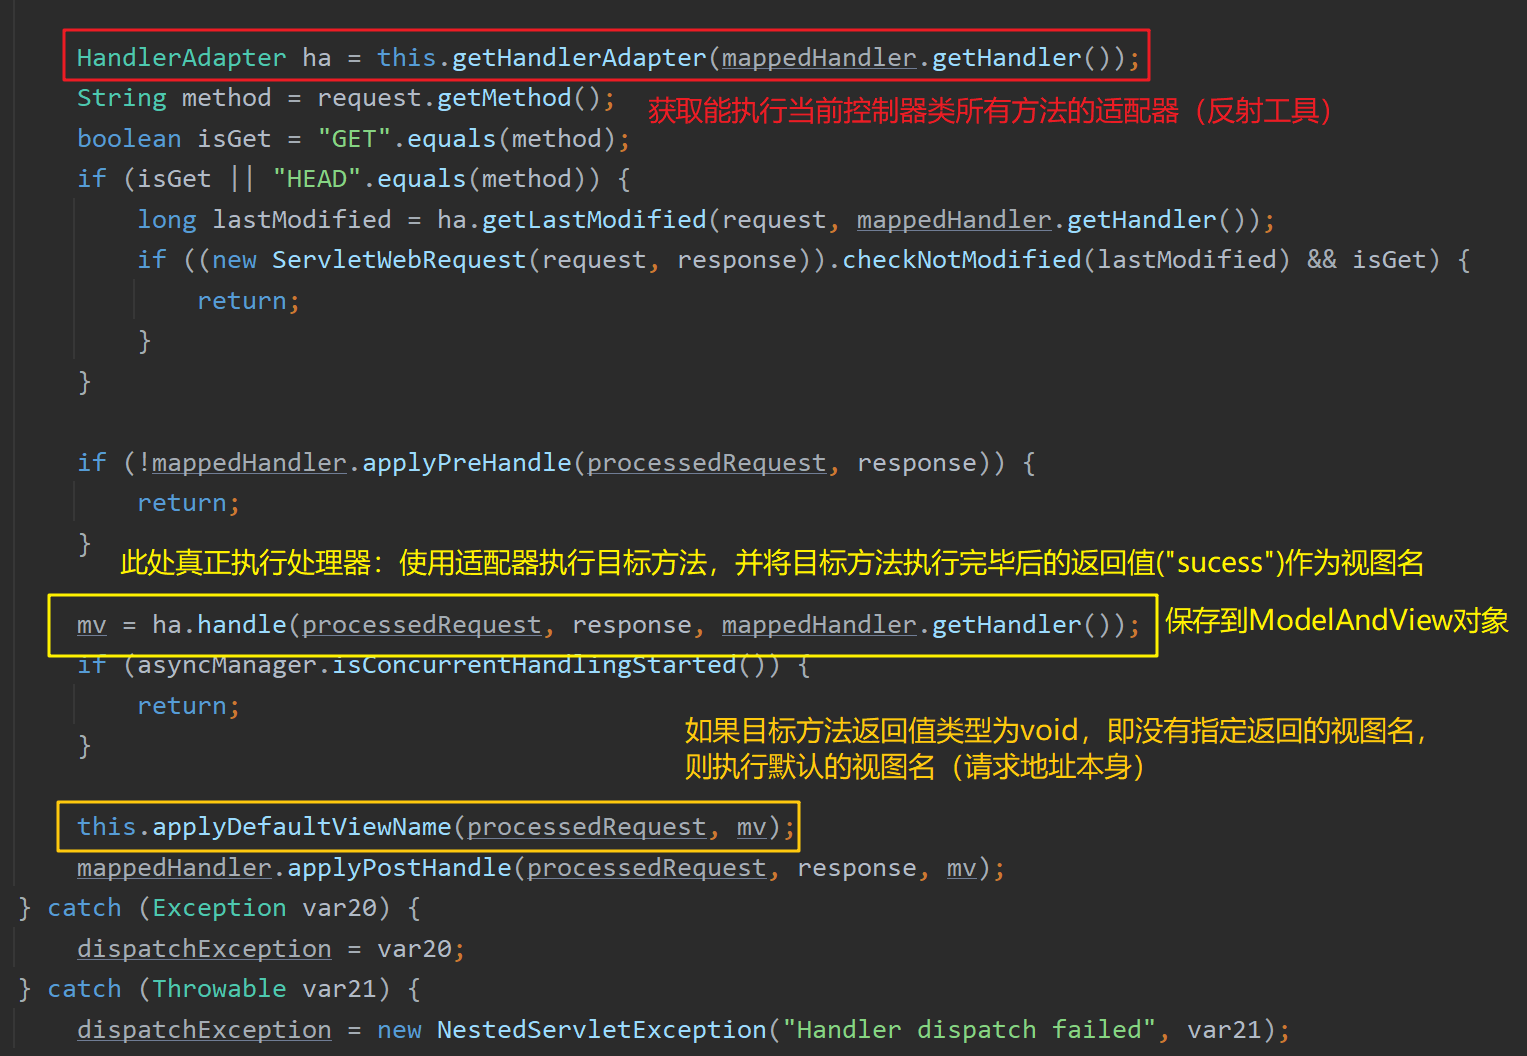
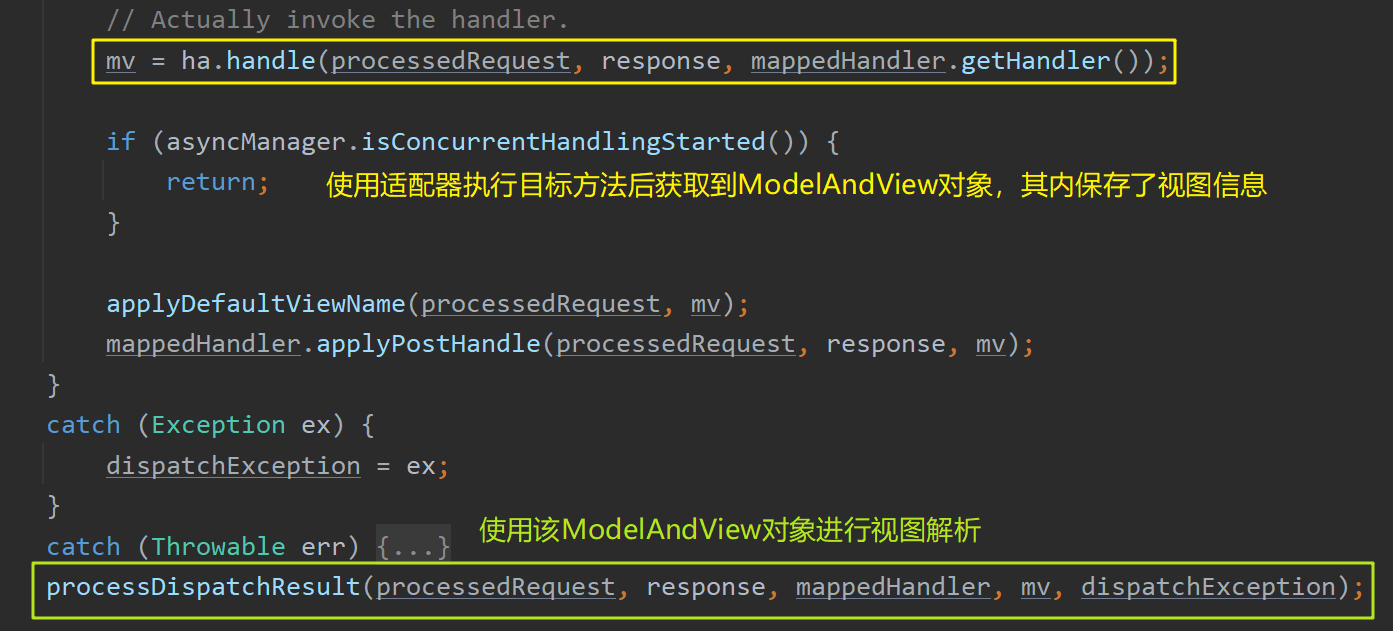
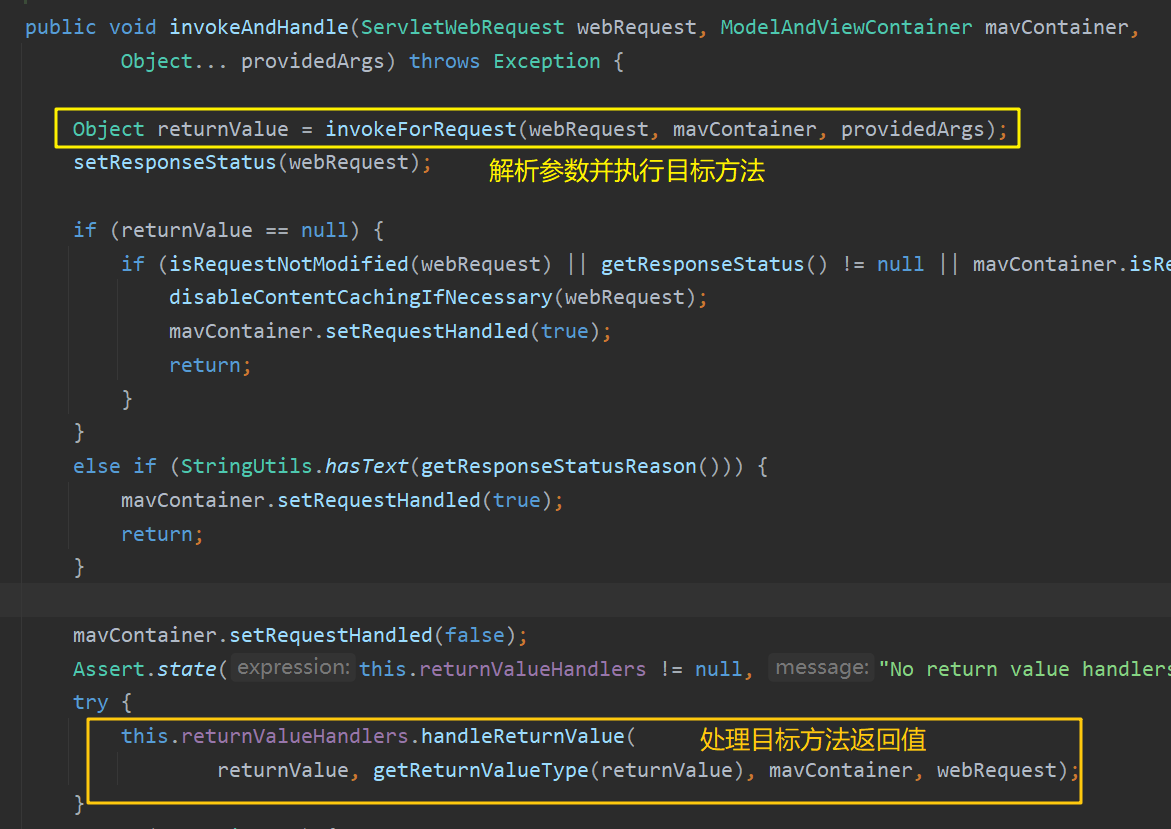
主线3. 使用适配器执行目标方法:ha.handle()
在主线2中得到处理器适配器HandlerAdapter后,调用其 ha.handler() 方法执行目标方法。
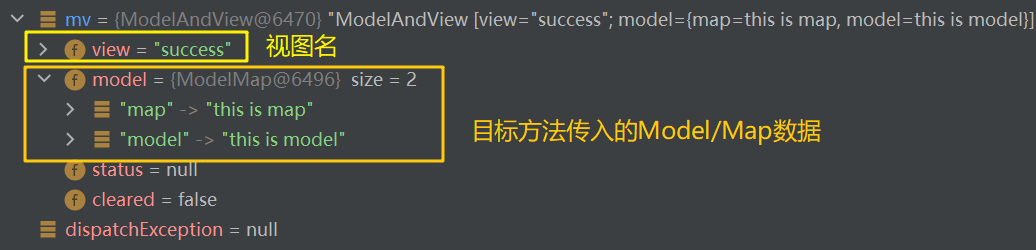
ha.handler() 方法最终返回的ModelAndView对象mv,其中既包括了要转发的目标页面视图名,又包括了目标方法保存在Model/Map中的数据:
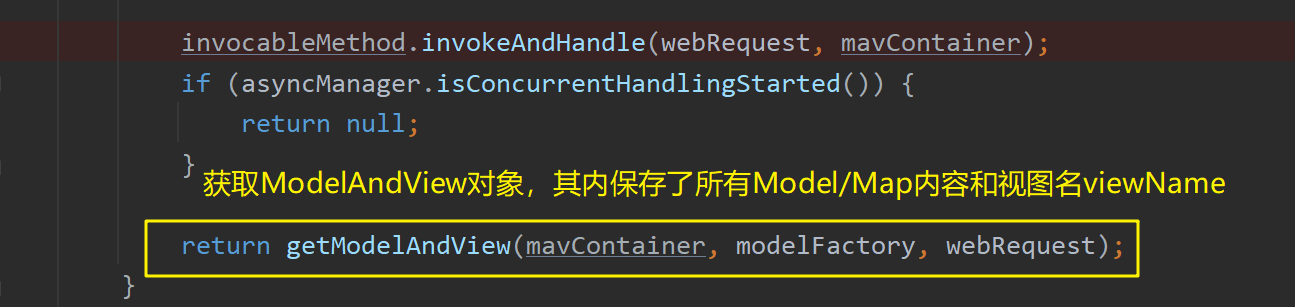
进入 ha.handler() 方法后,将通过调用 this.invokeHandlerMethod() 执行目标方法,得到的mav即为 ha.handler() 方法返回的ModelAndView对象mv:
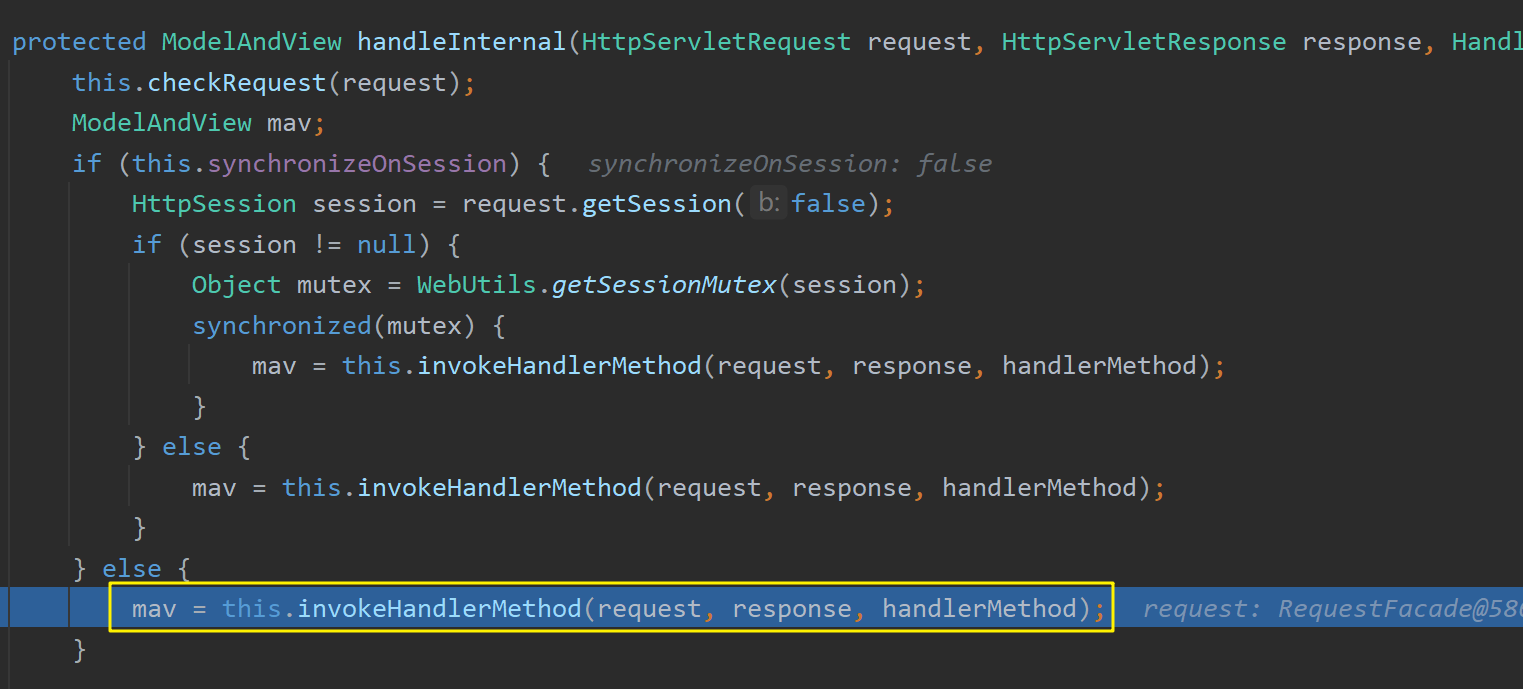
this.invokeHandlerMethod() 方法内部细节:
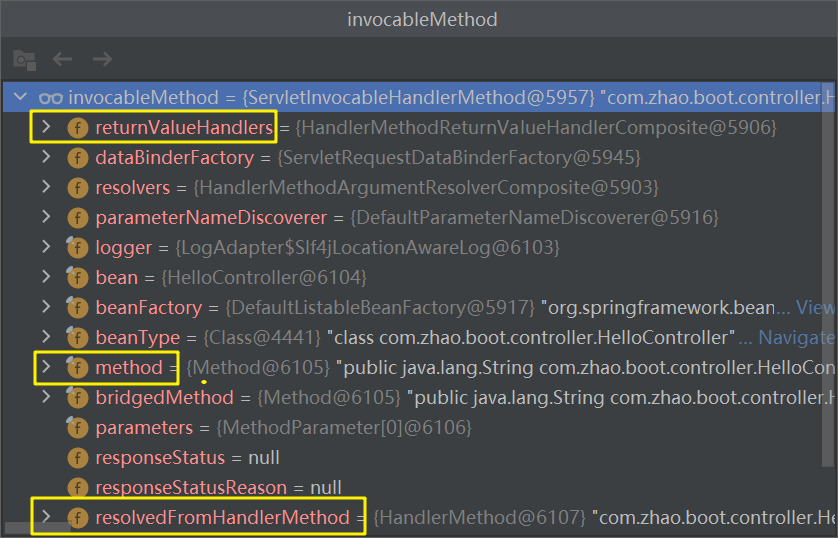
上述方法运行完后invocableMethod内的信息:截图带上getModelAndVIew
全部分析完后修改,重新截图带上文件上传流程图
大致流程如下:
准备工作:
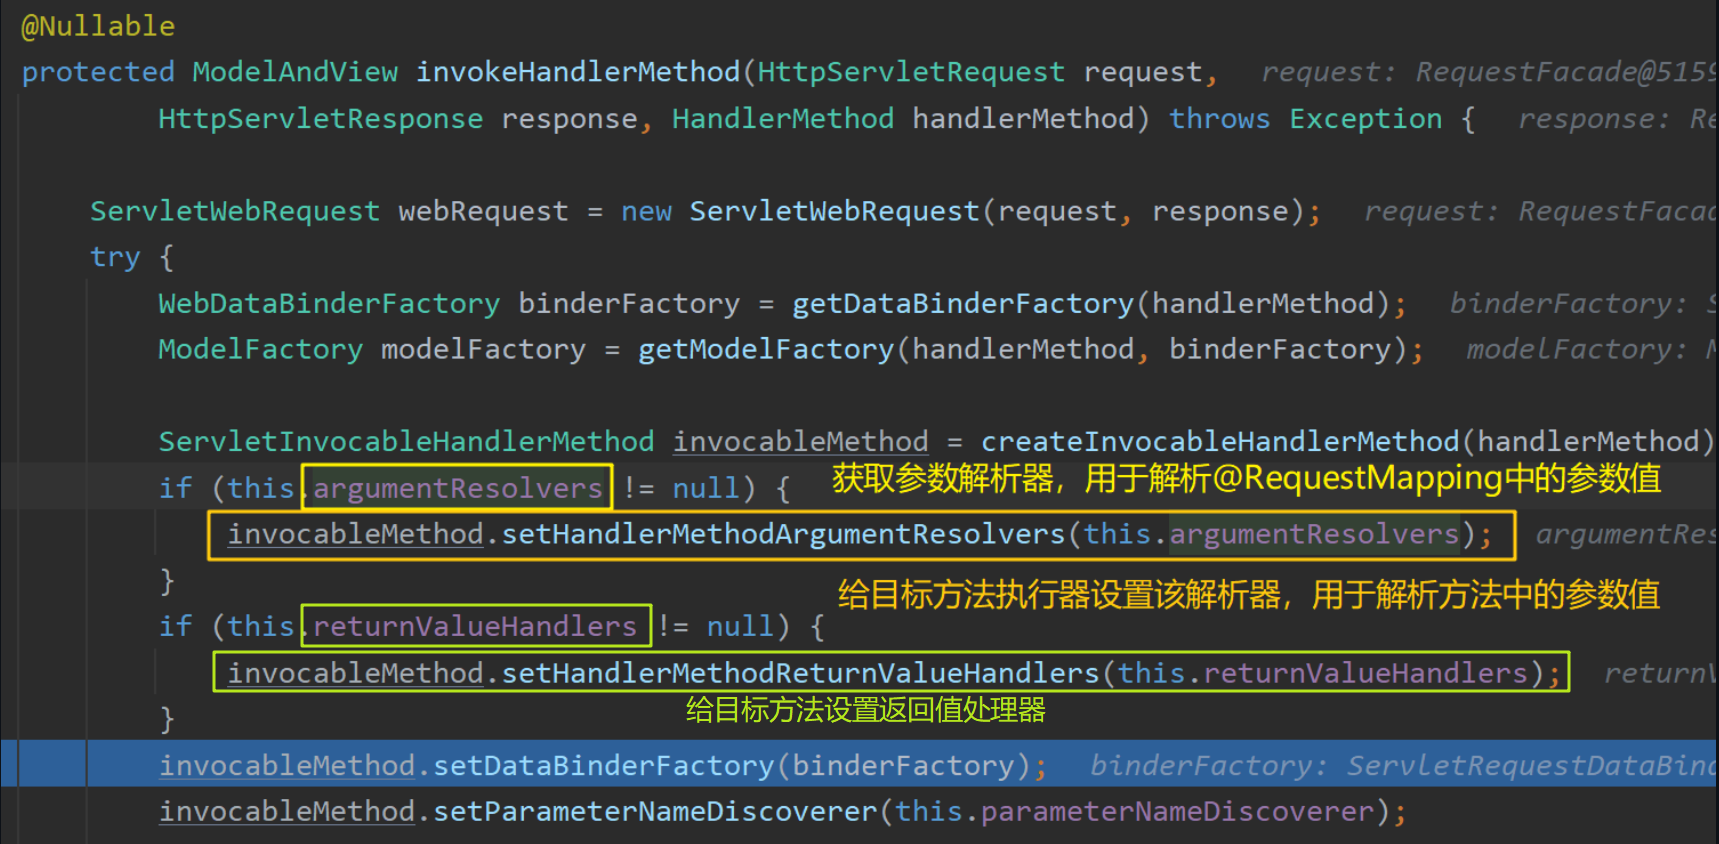
- 首先将传入的目标方法处理器handlerMethod(其内保存了HelloController#handle01() 的信息)封装成一个可执行的处理器方法invocableMethod,后续使用该对象执行目标方法;
- 为invocableMethod设置参数解析器argumentResolvers,用于解析目标方法传来的所有参数值;为invocableMethod设置返回值处理器returnValueHandlers,用于定义方法的返回值支持的类型;为invocableMethod设置其他信息;
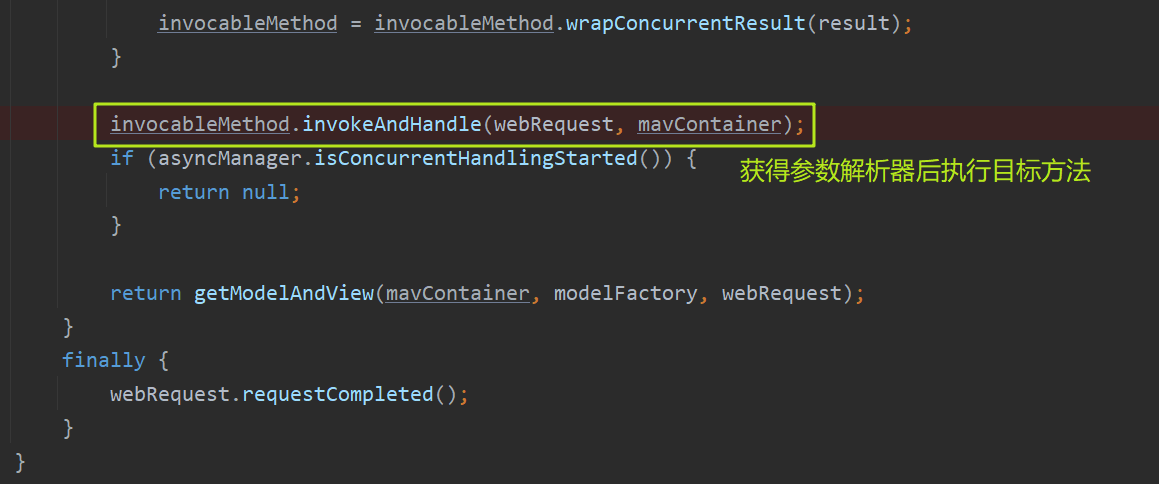
准备工作完成后,即可调用该对象的 invokeAndHandle() 方法,利用反射机制真正执行目标方法:
- 目标方法执行前,先使用参数解析器argumentResolver解析目标方法传入的所有参数,得到
Object[] args,其内保存了所有解析后的参数对象信息,例如解析完毕后已赋值的POJO以及内容尚且为空的Model/Map对象。【详细分析见参数解析原理章节】Model/Map均为接口,程序运行时实际上是通过多态性质创建的是唯一的一个BindingAwareModelMap类型的对象;- 该对象此时内容为空,因为还未给其赋值,将在目标方法执行时为其赋值。
- 得到参数后,基于反射机制执行目标方法 HelloController#handle01() 。【详细分析见参数解析原理章节】
- 目标方法使用参数解析器解析出的
args[]执行业务逻辑代码; - 经过目标方法的执行,BindingAwareModelMap中保存的内容将被保存到ModelAndViewContainer类型的对象
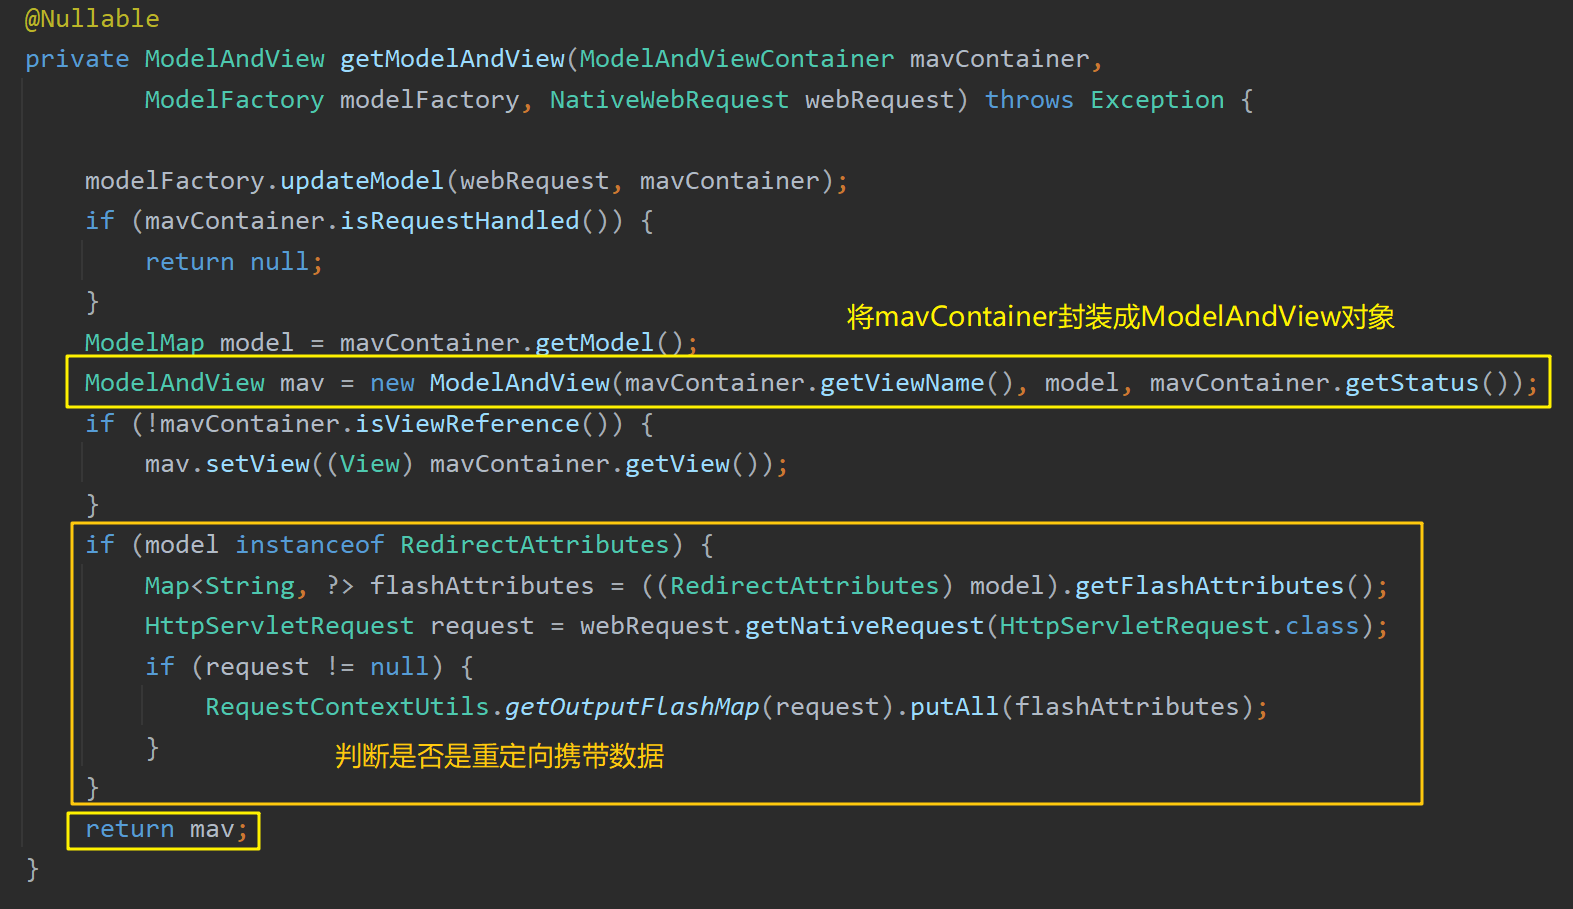
mavContainer中,同时目标方法参数中的POJO(从请求参数中确定值)也会被保存到mavContainer中; mavContainer中保存的Model/Map数据将在 getModelAndView() 方法执行后保存到ModelAndView类型对象mv中,并作为返回值返回给上一侧 ha.handle() ;- 在主线4里使用该ModelAndView类型对象进行视图解析等操作。其内容最终都会被保存到request域中。【详细分析见视图解析原理章节】
- 目标方法使用参数解析器解析出的
- 目标方法执行完毕后,使用返回值处理器returnValueHandlers处理目标方法的返回值,此时根据返回值类型的不同分为多种情况【详细分析见数据响应与内容协商原理章节】:
- 若目标方法使用 @ResoponseBody 注解,即要返回JSON等格式的数据,则进行内容协商,使用转换器Converters将POJO数据内容转换为指定格式(如JSON、XML等)
- 若返回值为要跳转的页面视图名,则将返回值
"/sucess"作为视图名viewName保存到ModelAndView对象mv中,主线4将使用该对象进行页面转发
- 处理完返回值后,将执行 getModelAndView() 方法将
mavContainer对象转换成ModelAndView对象mv,返回给 ha.handle() 方法,用于后续的视图解析。
下文将详细分析上述流程。
参数解析原理
在this.invokeHandlerMethod() 方法内,首先将传入的目标方法处理器handlerMethod(其内保存了HelloController#handle01() 的信息)封装成一个可执行的处理器方法invocableMethod,后续使用该对象执行目标方法;
接着为invocableMethod设置参数解析器argumentResolvers,用于解析目标方法传来的所有参数值(橙色框):
为invocableMethod设置完参数解析器和返回值处理器后,将调用其 invokeAndHandle() 方法:
该方法将先后完成解析目标方法参数、基于反射机制执行目标方法、处理目标方法返回值:

invocableMethod.invokeAndHandle() 方法内逻辑:
- invokeForRequest():解析参数并执行目标方法
- Object[] args = getMethodArgumentValues() :解析获取目标方法的所有参数值(例如解析POJO内容,解析原生Servlet API,解析Model/Map)
- doInvoke(args) :利用反射机制执行目标方法(该方法返回
mavContainer对象,其中保存Model/Map中的内容、目标方法参数中的POJO内容(从请求参数中确定值)以及要跳转的视图名viewName)
- returnValueHandlers.handleReturnValue():处理目标方法返回值,分两种情况【详细分析见数据响应与内容协商原理章节】:
- 若目标方法使用 @ResoponseBody 注解,即要返回JSON等格式的数据,则进行内容协商,使用转换器Converters将POJO数据内容转换为指定格式(如JSON、XML等)
- 若返回值为要跳转的页面视图名,则将返回值
"/sucess"作为视图名viewName保存到ModelAndView对象mv中,主线4将使用该对象进行页面转发
本章节将分析 invokeForRequest() 方法内的细节:
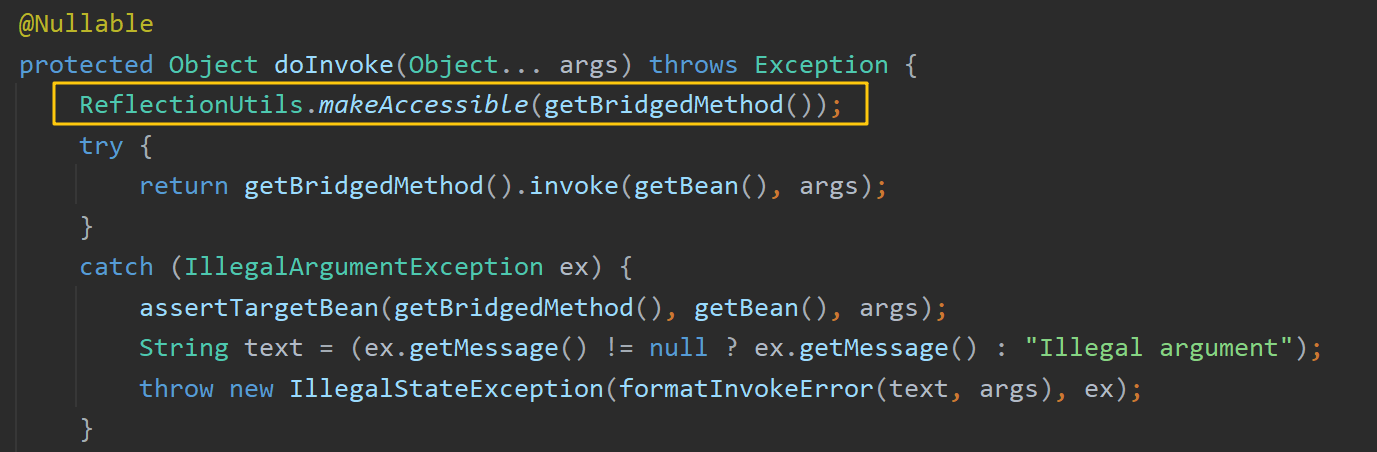
解析参数:getMethodArgumentValues()
getMethodArgumentValues() 方法(上图黄色框)用于进行目标方法的参数解析,将参数解析完毕后,返回的args[]中存储了所有参数信息(Model/Map里的内容还都为空,因为此时还未执行目标方法),之后调用 doInvoke(args) 执行目标方法,将Model/Map中的内容保存到mavContainer对象中。 getMethodArgumentValues() 方法内的逻辑如下:

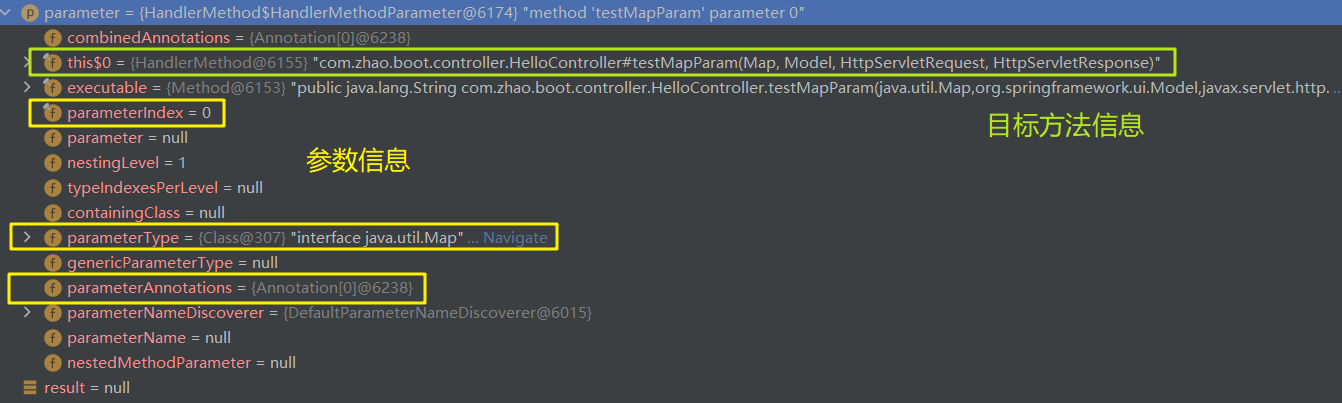
首先获取所有参数parameters,然后逐一遍历每一个参数,寻找能解析该参数的参数解析器。其中最关键的两处 this.resolvers.supportsParameter() 和 this.resolvers.resolveArgument() (黄色框和绿色框):
- this.resolvers.supportsParameter() :遍历每个参数解析器,判断参数解析器是否支持当前参数
- this.resolvers.resolveArgument() :若支持当前参数,则使用该解析器解析参数,返回解析得到的参数
args[i]
this.resolvers.supportsParameter() :遍历每个参数解析器,判断参数解析器是否支持当前参数,若找不到符合的参数解析器,则抛出异常:

其中,传入的parameter为目标方法中的每一个参数:
this.resolvers.resolveArgument() :在该方法内首先调用 getArgumentResolver() 方法获取到匹配的参数解析器(遍历每一个参数解析器,寻找到符合的),再调用匹配到的参数解析器的 resolveArgument() 方法解析当前参数:
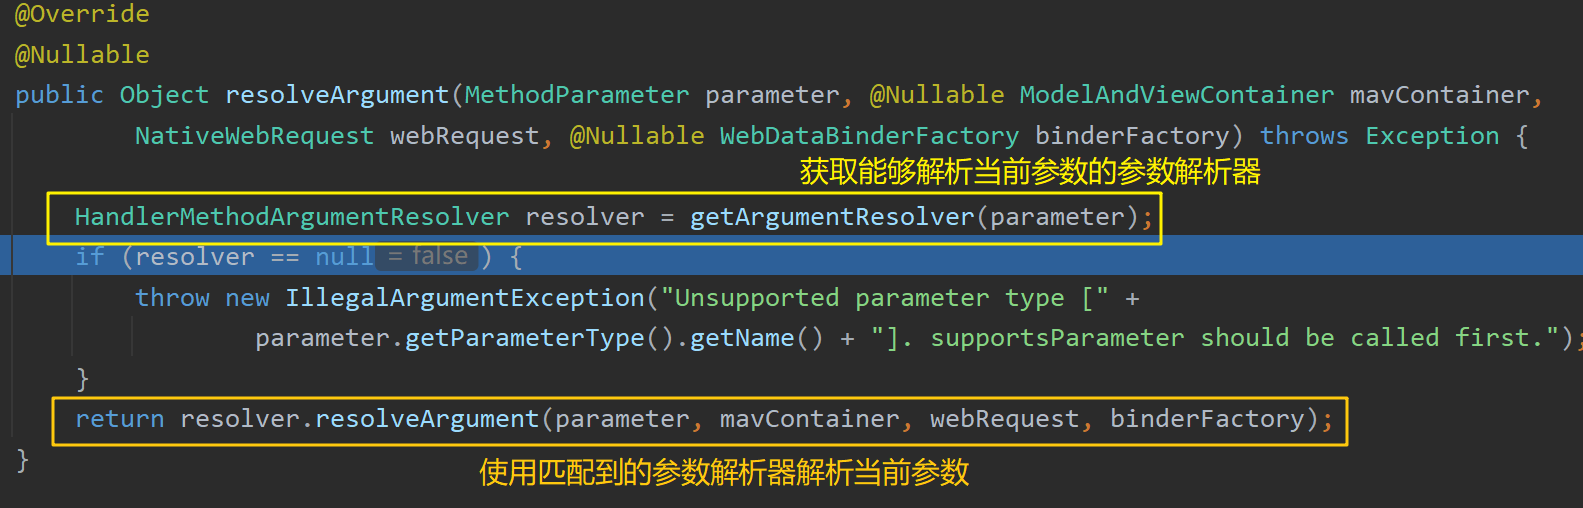
getArgumentResolver() 方法内遍历每一个参数解析器,寻找到匹配的参数解析器:
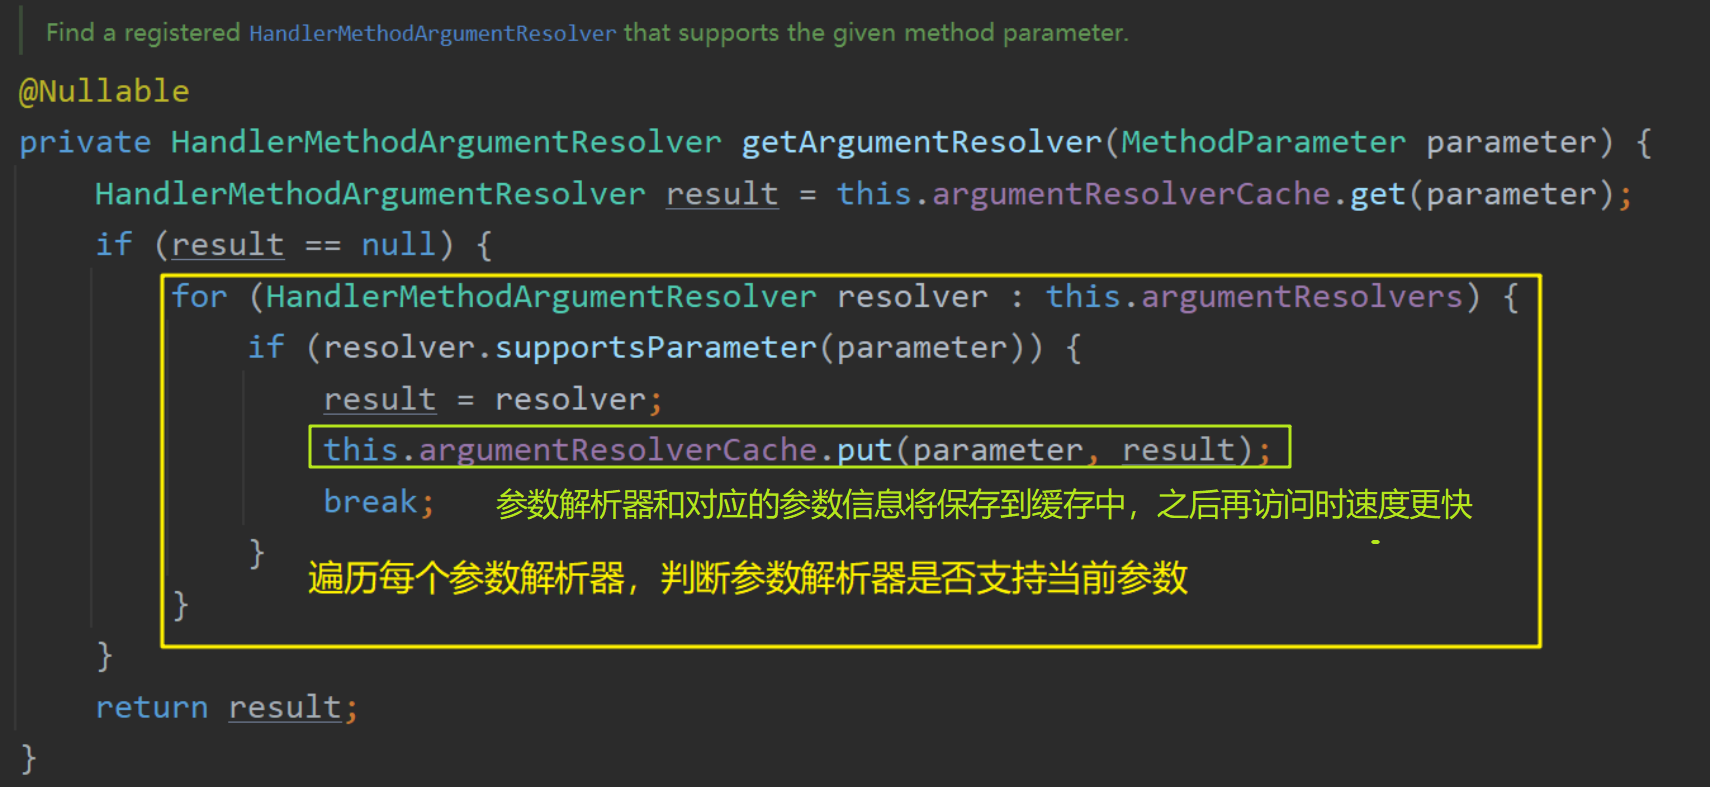
若支持当前参数,则使用该解析器解析参数,返回解析得到的参数args[i]。示例:获取要解析的参数名,并使用servlet原生API解析该值:
遍历所有参数并解析后,得到Object[] args,接着调用 doInvoke(args) 执行目标方法,该方法返回mavContainer对象,其中保存Model/Map中的内容以及要跳转的视图名viewName,供后续返回值处理使用。
至此目标方法执行完毕,得到了mavContainer对象用于后续的返回值处理操作【详细分析见数据响应与内容协商原理章节】
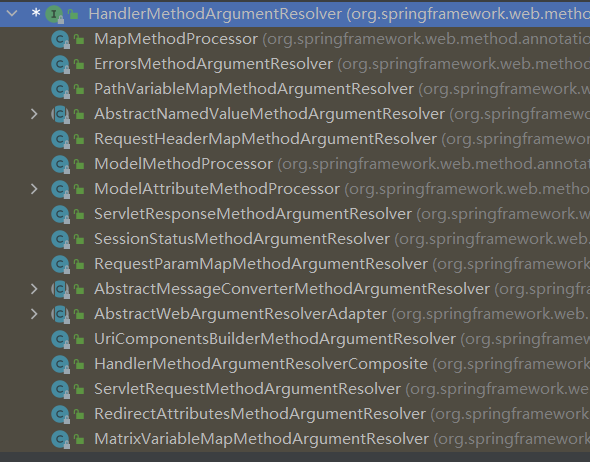
参数解析器:argumentResolvers
argumentResolvers内存储了所有Spring MVC支持的参数解析器,每个参数注解都对应了一个参数解析器,如 @RequestParam 注解对应RequestParamMethodArgumentResolver解析器:

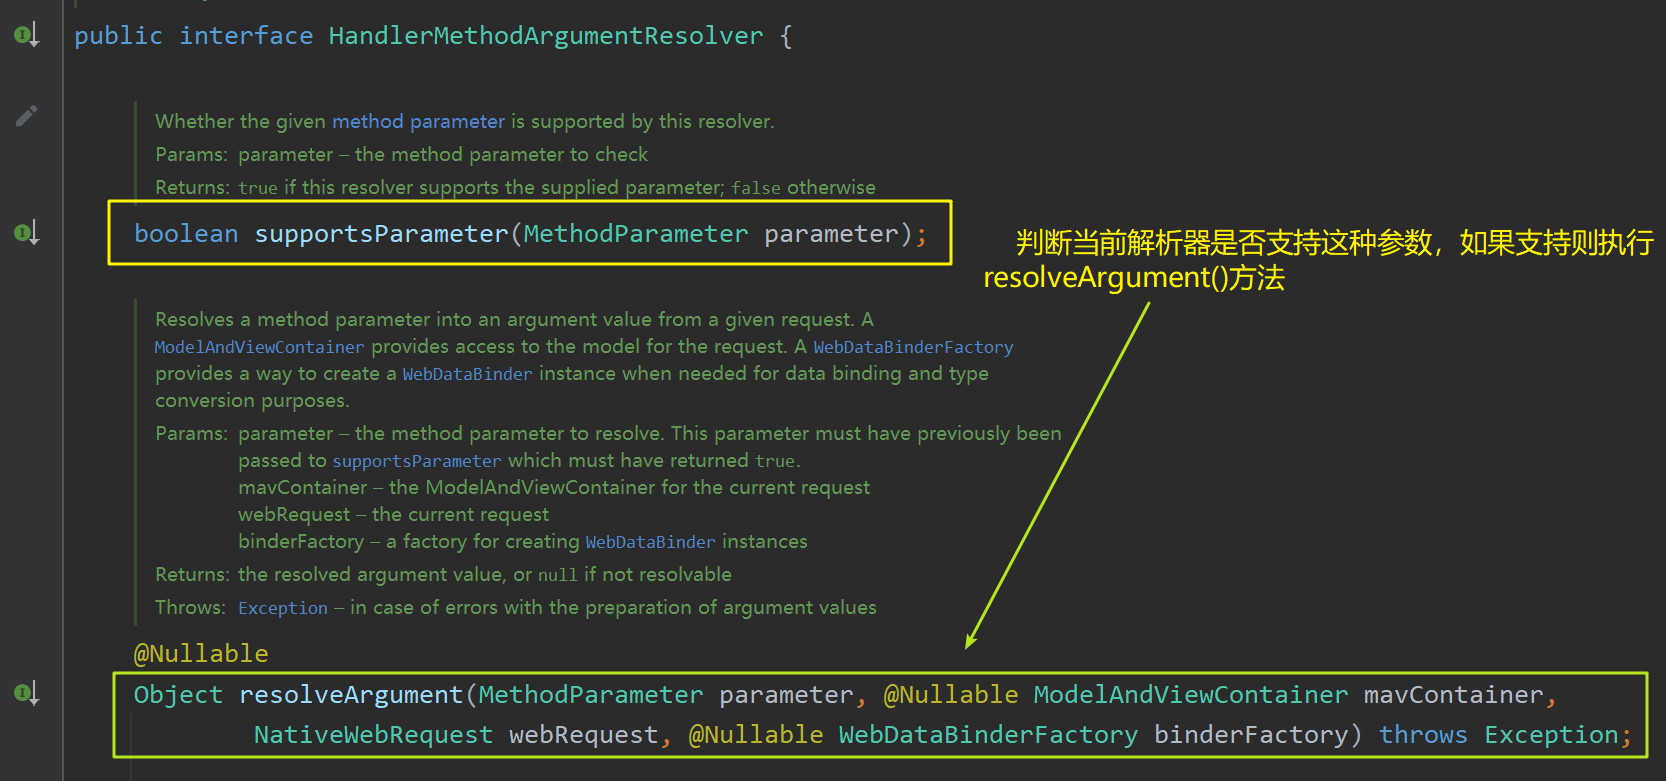
这些参数解析器都实现了HandlerMethodArgumentResolver接口,将首先调用supportsParameter() 方法判断是否能够解析传入的参数类型,若可以则执行参数解析方法resolveArgument() 解析参数:
常用参数解析器
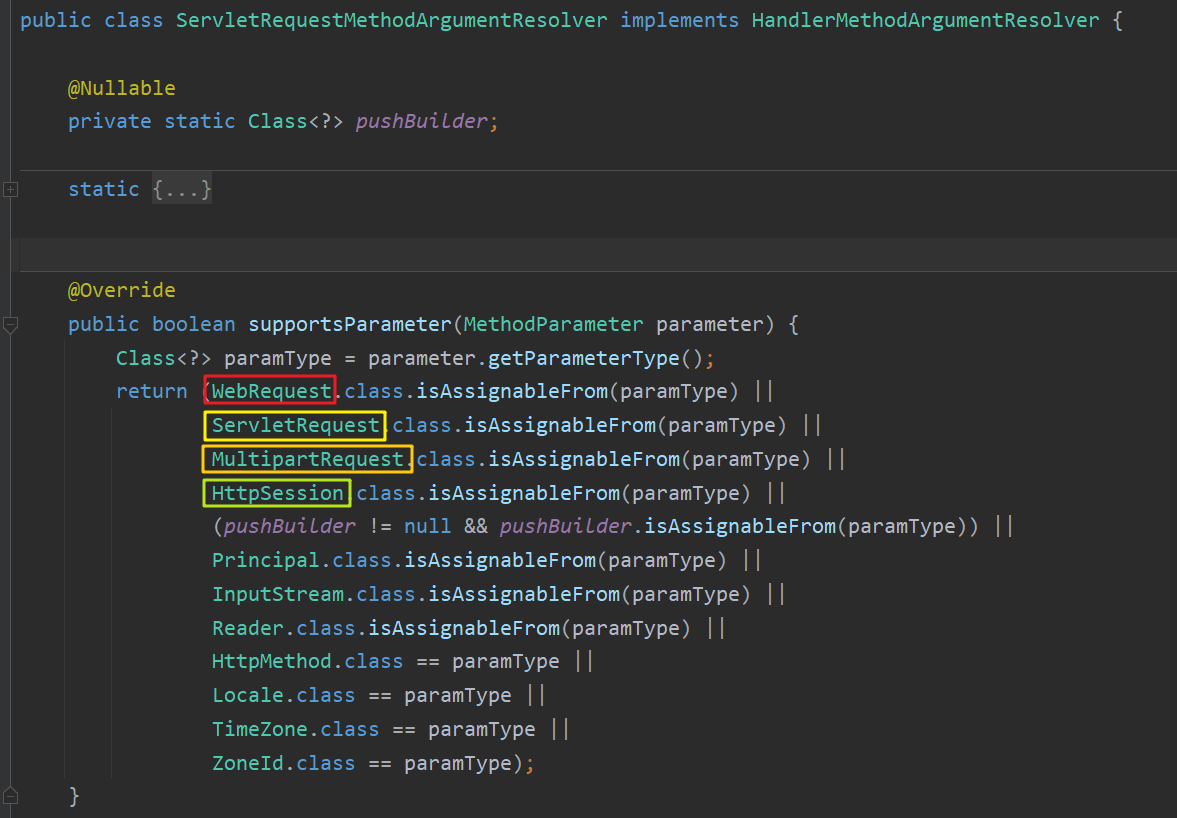
原生Servlet-API解析器
ServletRequestMethodArgumentResolver用于解析原生的Servlet API,例如ServletRequest、HttpSession等:
文件上传参数解析器
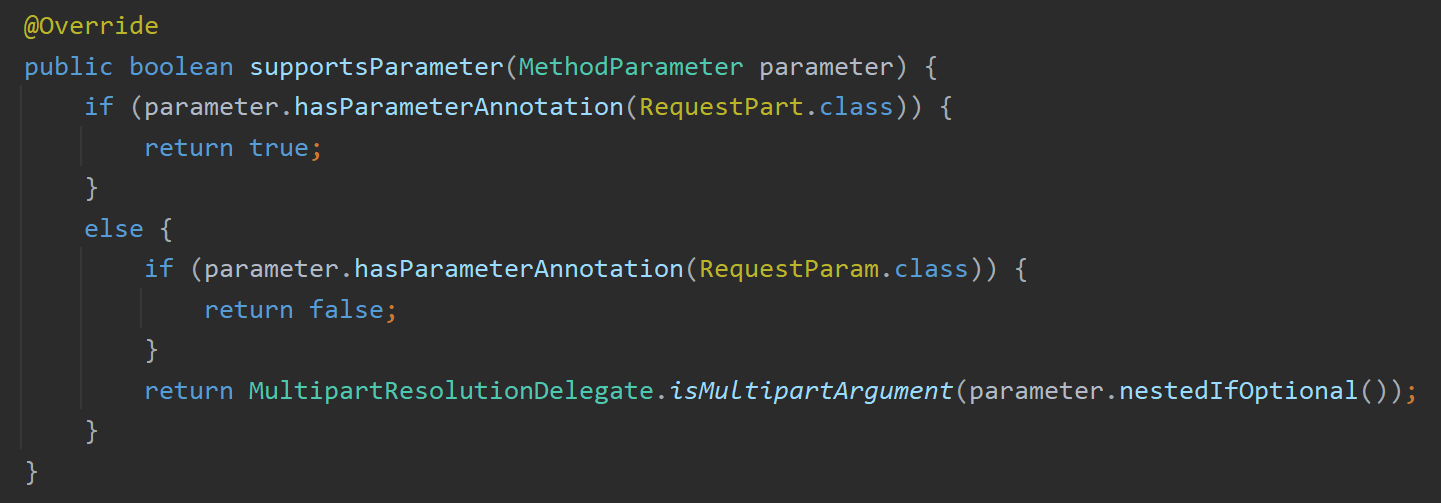
文件上传参数解析器为RequestPartMethodArgumentResolver,该解析器重写的 supportParameter() 方法(其会判断当前参数是否标有 @RequestPart 注解):
该解析器重写的 resolveArgument() 方法:
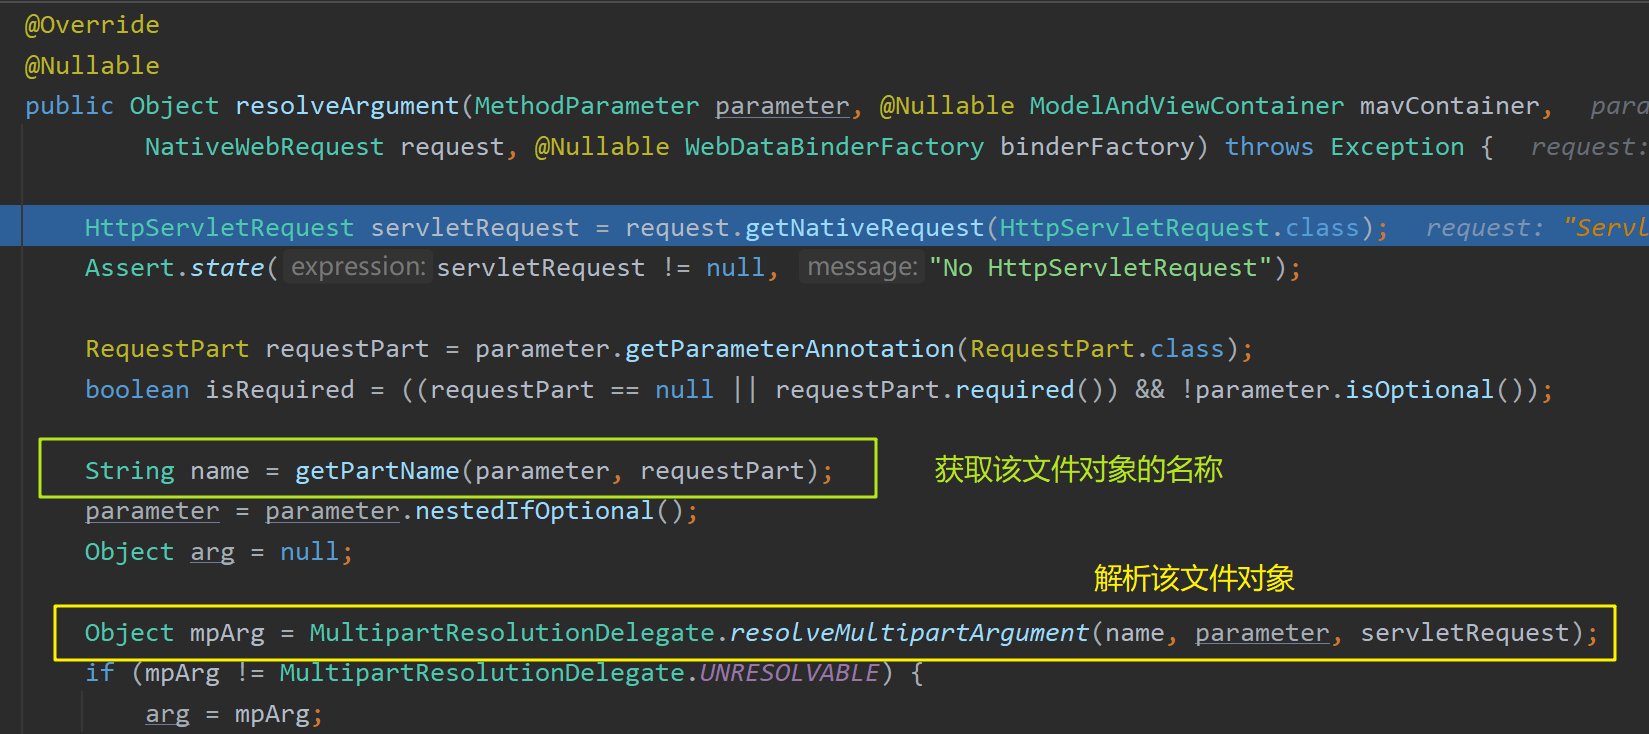
返回的 Object mpArg 即为解析得到的MultipartFile类型的对象或数组:
解析参数时,将标注有 @RequestPart 注解的参数都存放到了一个 MultiValueMap<String, MultipartFile> 中,之后获取值的时候直接从该map中 get(name) 即可。
Model/Map参数解析器
Model和Map的参数解析器在解析完毕后都会返回同一个BindingAwareModelMap对象,但此对象中还没有保存内容(size=0),因为此时目标方法还未执行,还没有向Model/Map中存放内容。在目标方法执行时才为其赋值,并保存到ModelAndViewContainer对象mavContainer中,其内容最终都会被保存到request域中。示例:
1 |
|
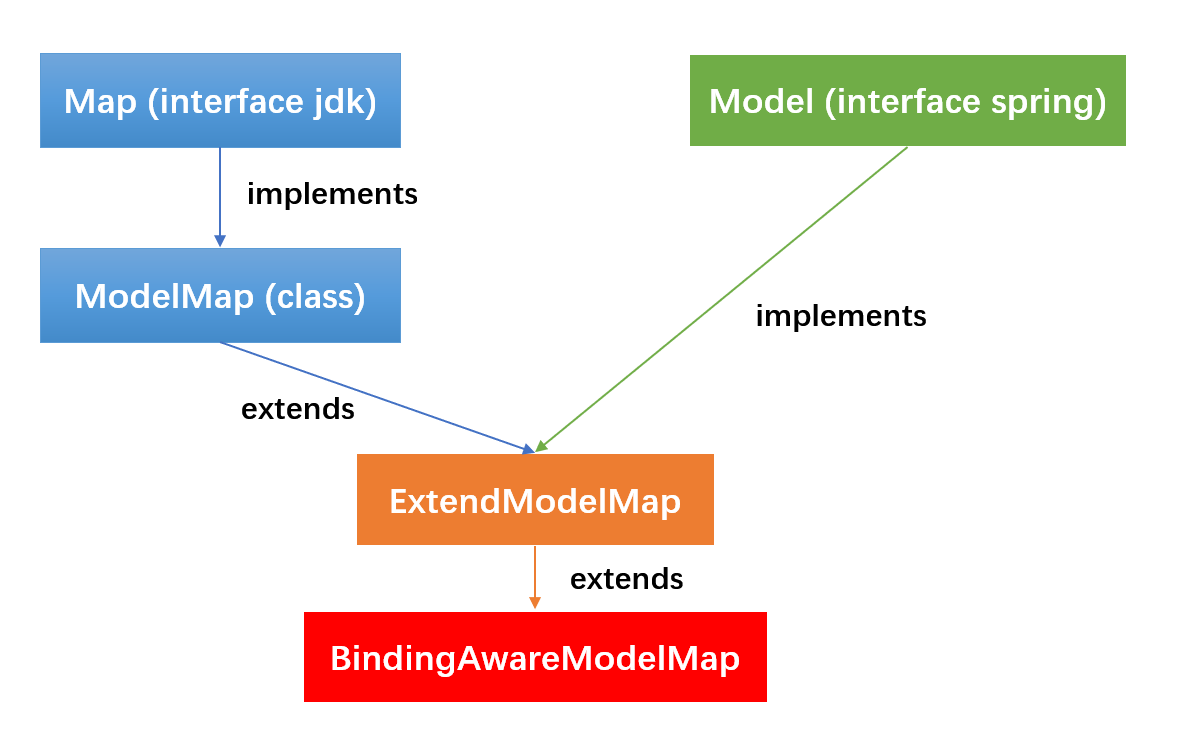
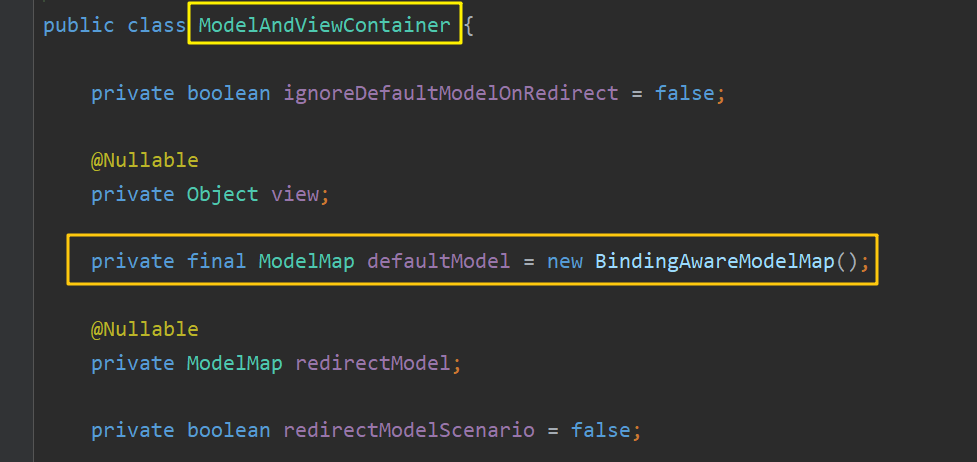
补充:使用Map,Model和ModelMap本质上是使用了Spring的BindingAwareModelMap在工作,相当于在BindingAwareModelMap中保存的数据都会放到请求域中。Spring MVC在运行时拥有唯一的一个BindingAwareModelMap对象,各个方法中获取到的Map/ModelMap都会被转换成同一个该对象,从而可以做到多个方法中的数据共享。
- Map解析器:MapMethodProcessor

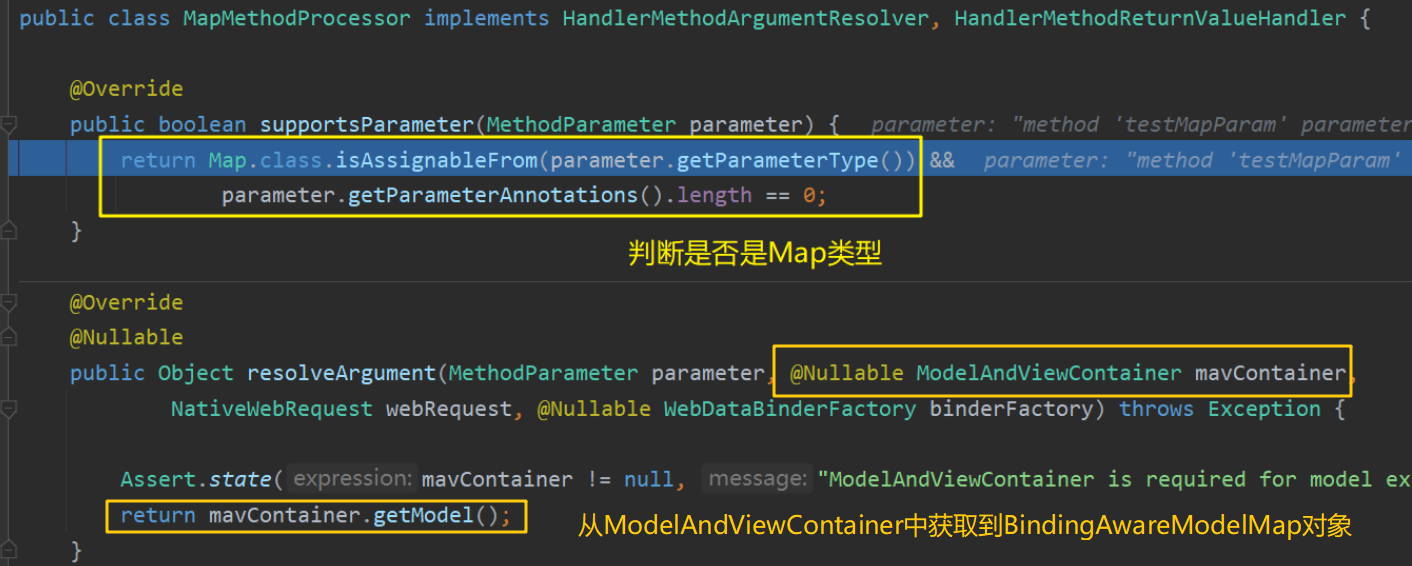
该解析器会从ModelAndViewContatiner对象中获取到BindingAwareModelMap对象。注意此时解析方法返回的BindingAwareModelMap对象中还没有保存内容(size=0),因为此时目标方法还未执行,还没有向map中存放属性值,将在后续赋值并将内容存放到request域中。

ModelAndViewContatiner对象中的BindingAwareModelMap:
- Model解析器:ModelMethodProcessor
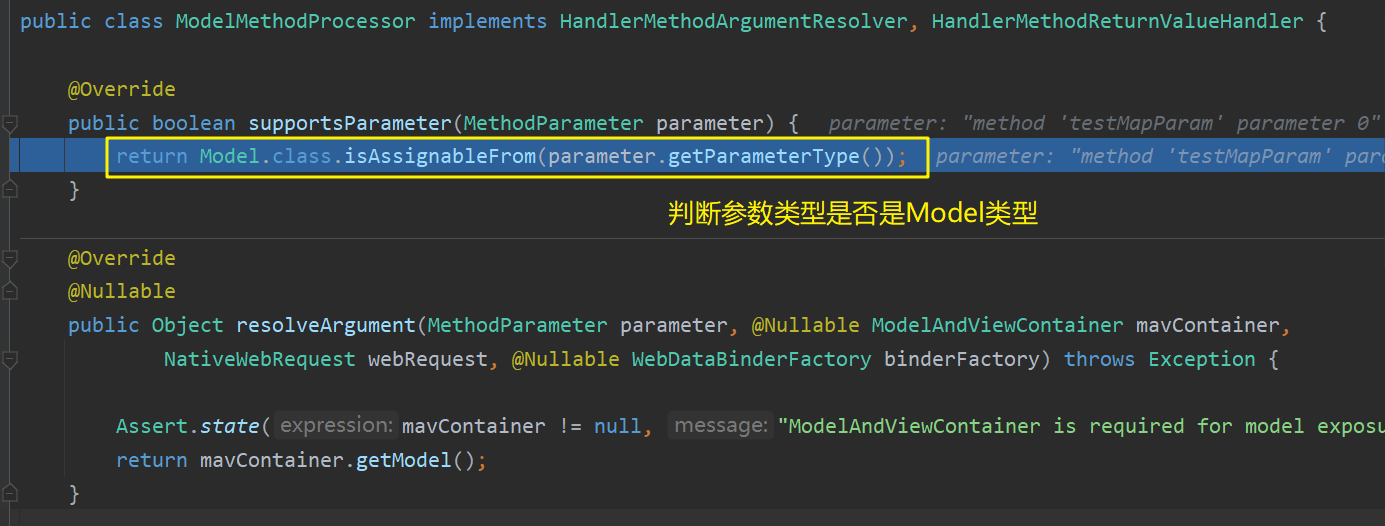
该解析器逻辑与Map解析器相同,会返回同一个BindingAwareModelMap对象。
经过Map和Model解析器后,返回的两个BindingAwareModelMap对象是同一个对象,说明Spring MVC在运行时拥有唯一的一个BindingAwareModelMap对象,各个方法中获取到的Model/Map/ModelMap内容都会转换成同一个BindingAwareModelMap对象中,其内容最终都会被保存到request域中。
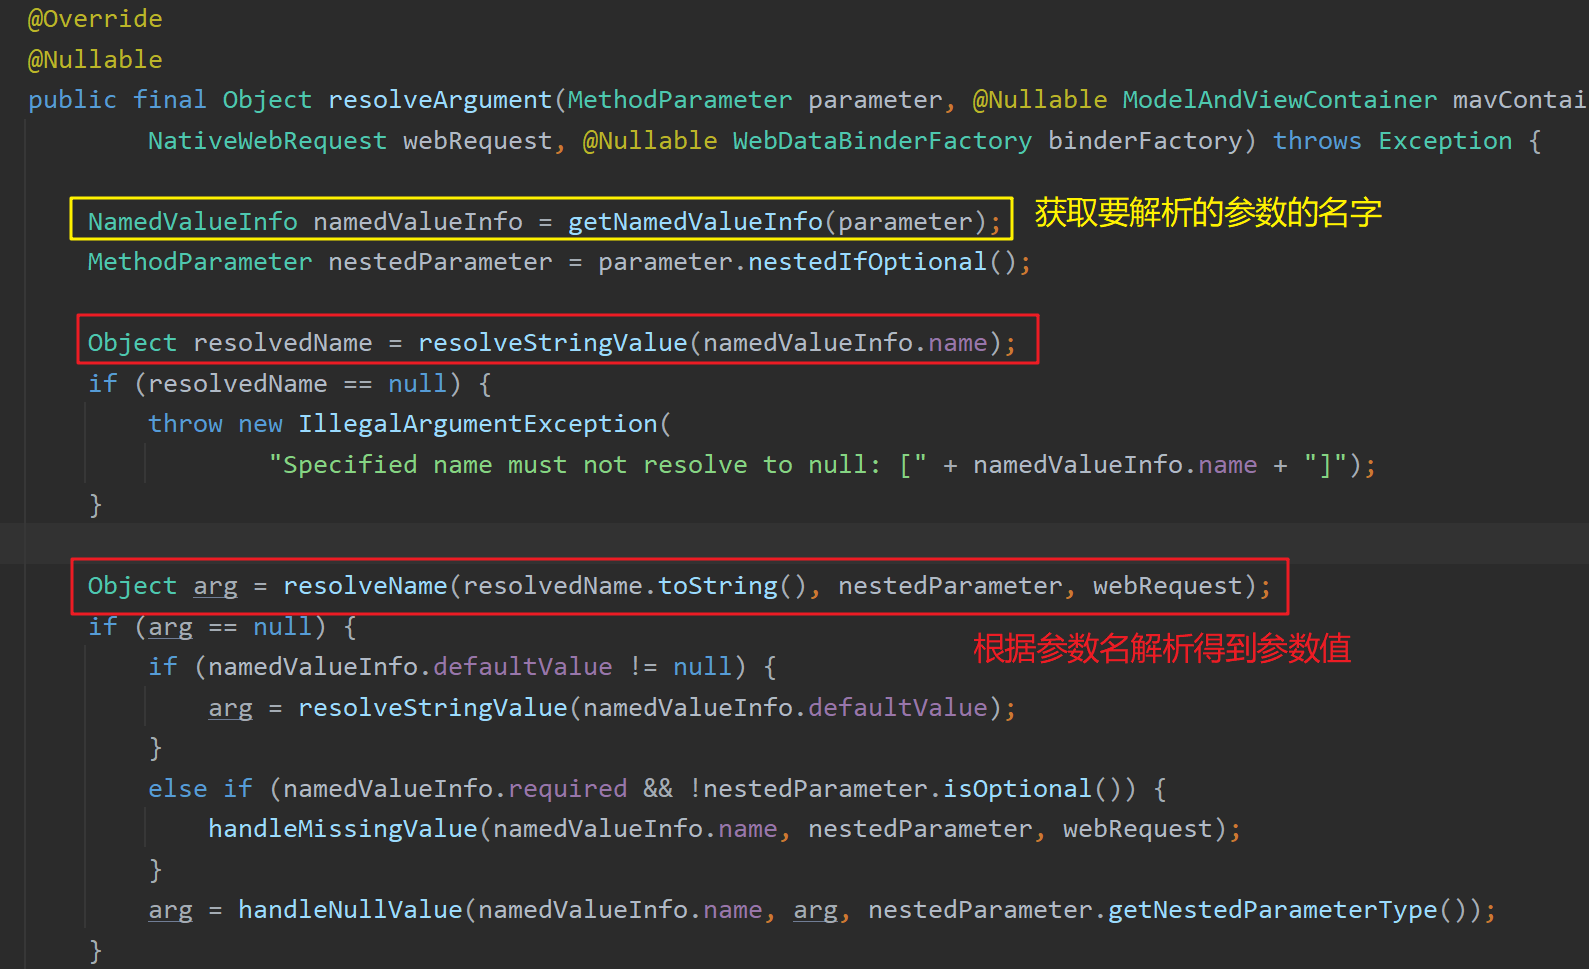
POJO参数解析器
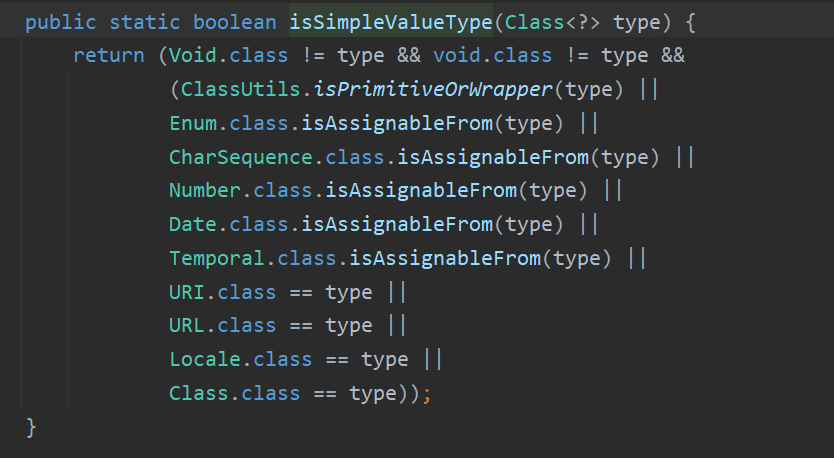
自定义类型参数使用ServletModelAttributeMethodProcessor参数解析器解析。其会先判断传入的参数是否是简单类型,自定义类型不是简单类型,因此黄色框整体返回true,该解析器将进行解析:

简单类型如下:
在解析时首先创建一个空的POJO组件(其内属性值都为Null),之后再将request域中的数据和POJO封装成一个WebDataBinder数据绑定器。该绑定器内有许多转换器Converters(见下文),用于将HTTP协议中的数据进行转换解析(例如将String转换成Integer):
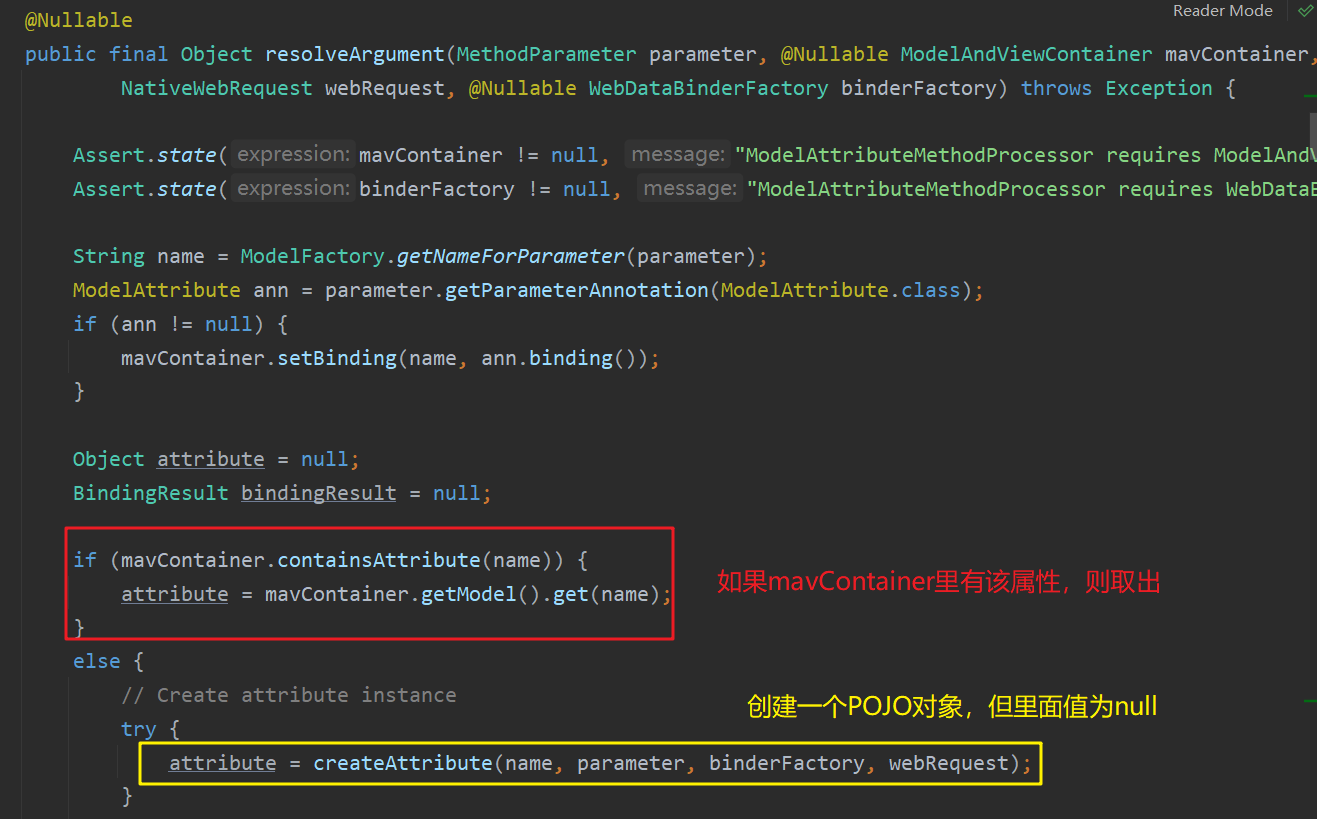
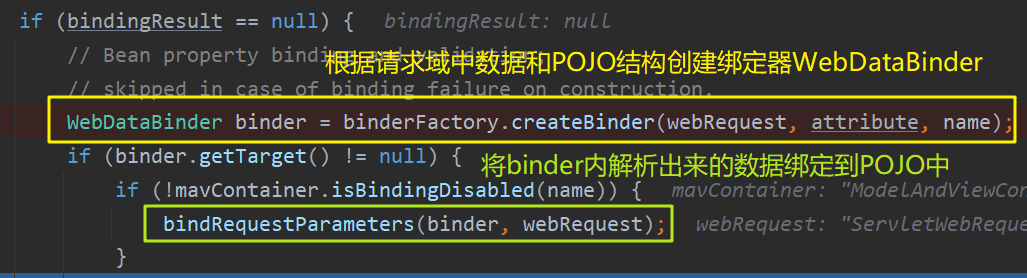
- binderFactory.createBinder() 方法将
request域中的值保存到POJO中,并封装返回了一个WebDataBinder类型变量,即web数据绑定器。该绑定器内不仅有POJO的所有属性,也有许多conversionService转换服务器(其内有许多converters转换器),用于将HTTP请求传来的数据进行解析转换(例如将String转换成Integer)。 - bindRequestParameters(binder, webRequest) 方法将解析转换后的值绑定到POJO的属性中。
即WebDataBinder利用它里面的converters将请求数据转换成指定的数据类型,并绑定到POJO属性中,从而完成了POJO的创建
binder中的内容:
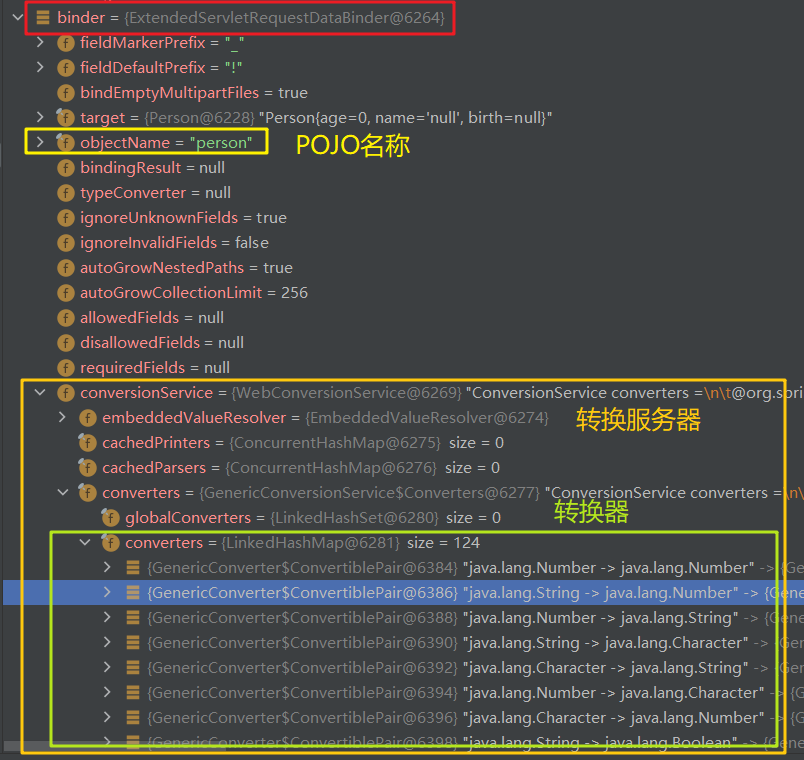
在绑定每一个属性值时,遍历所有的Converter转换当前属性,并将其绑定到POJO的属性上。解析完毕后返回该参数对象加入到args[]中,开发人员可以自定义Converter接口的实现类,实现自定义的参数解析功能:
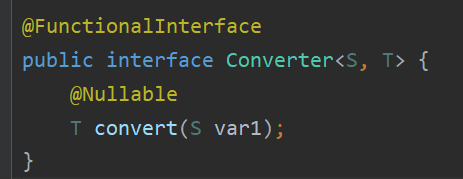
补充:自定义Converter解析请求中的参数:
数据响应与内容协商原理
上一章参数解析原理分析了参数解析和目标方法执行的细节(下图中黄色框),本章将分析后续的数据响应与内容协商原理(处理目标方法返回值,下图中橙色框):returnValueHandlers.handleReturnValue()
在上一章节分析的目标方法执行完毕后,获得了ModelAndViewContainer类型的对象mavContainer,其内保存了要跳转的视图页面viewName和Model/Map中的内容。将该参数和返回值、webRequest参数传入到 returnValueHandlers.handleReturnValue() 方法中,下面详细分析该方法内的细节:
处理返回值:handleReturnValue()
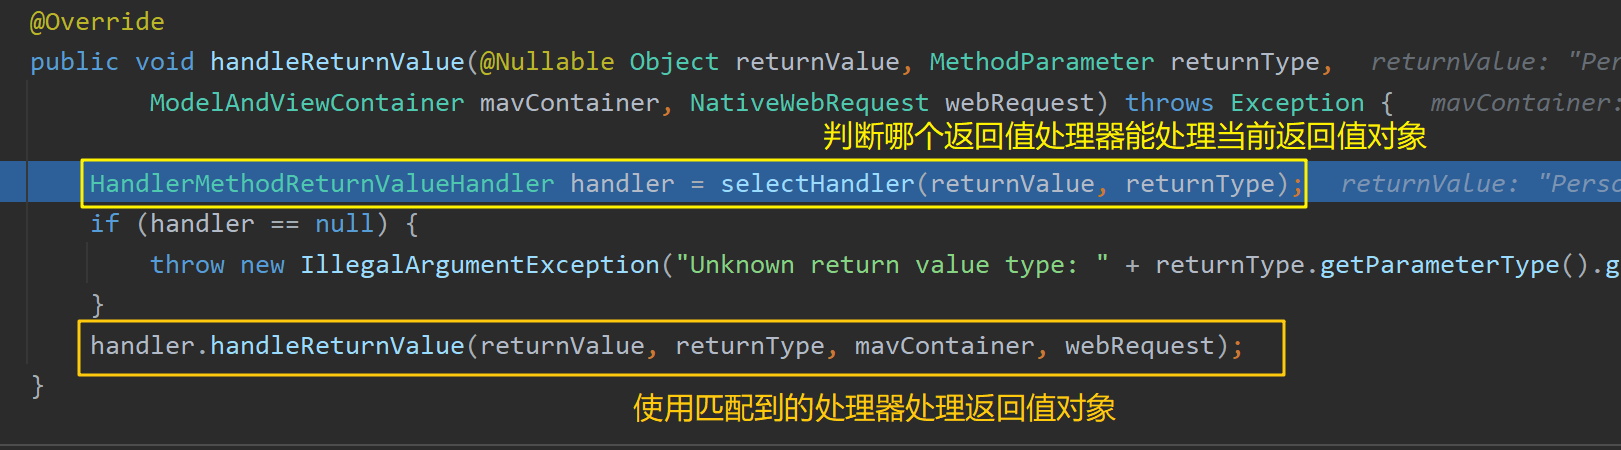
进入该方法后,首先调用selectHandler() 方法:遍历所有的返回值处理器returnValueHandlers判断哪个处理器能处理目标方法的返回值(使用 supportsReturnType() 方法):
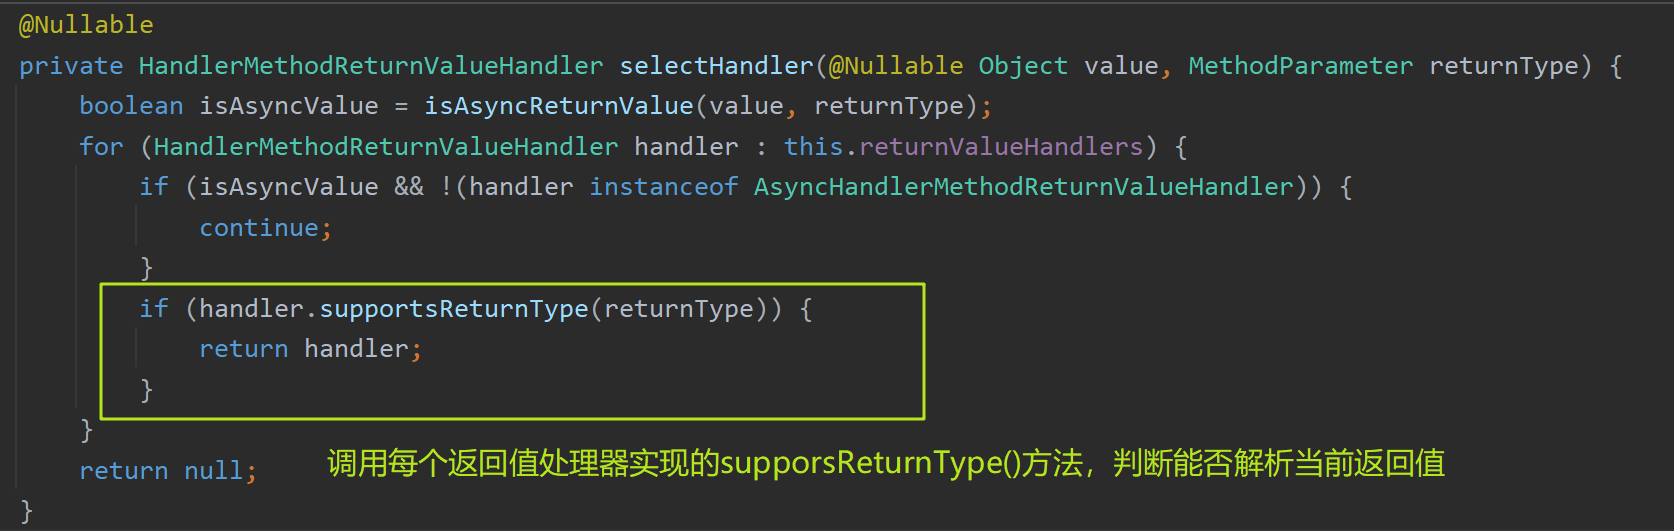
返回值处理器:returnValueHandlers
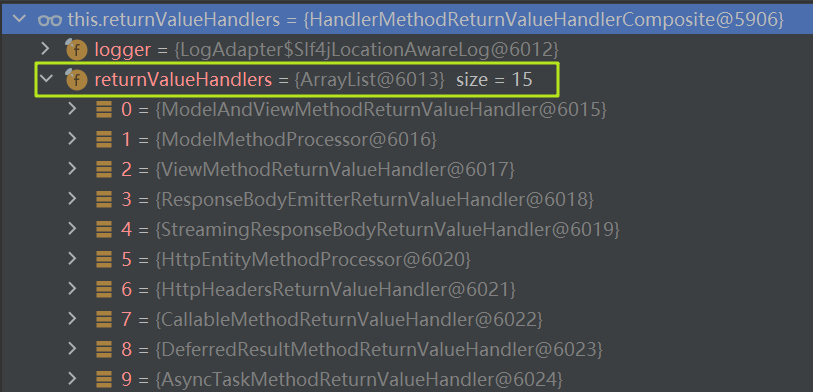
returnValueHandlers的作用为处理目标方法的返回值,不同的处理器用于处理不同类型的目标方法返回值
Spring MVC支持的返回值类型:
- ModelAndView
- Model
- View
- ResponseEntity
- ResponseBodyEmitter
- StreamingResponseBody
- HttpEntity
- HttpHeaders
- Callable
- DeferredResult
- ListenableFuture
- CompletionStage
- WebAsyncTask
- 标注了**@ModelAttribute**注解且为对象类型的
- 标注了**@ResponseBody注解,对应RequestResponseBodyMethodProcessor**
每种类型都对应着一个返回值处理器returnValueHandler:
如果找到支持的返回值处理器,则执行其 handler.handleReturnValue() 方法。其中,handleReturnValue() 方法会根据返回值处理器handler类型的不同而执行不 同的重写方法:
- 如果目标方法返回
String类型对象,代表要跳转到某个页面 - 如果目标方法标注了 @ResponseBody 注解,则代表默认要返回JSON类型数据(也可以自定义其他类型
下面逐一分析两种情况的细节。
1. 目标方法返回String类型对象
如果目标方法返回String类型对象,代表要跳转到某个页面。此时的返回值处理器类型为:ViewNameMethodReturnValueHandler。
此时返回值类型是字符串序列,则handleReturnValue()方法将要跳转的视图名viewName保存到了ModelAndViewContainer对象mavContainer中,此时其内既保存了Model/Map中的数据,又保存了要跳转的视图名viewName,之后会将该对象转换成一个ModelAndView对象,并利用其进行页面转发(见视图解析原理):

2. 目标方法标注了@ResponseBody注解
如果目标方法标注了 @ResponseBody 注解,则代表默认要返回JSON类型数据(也可以自定义其他媒体类型)。此时返回值处理器为:RequestResponseBodyMethodProcessor。
该处理器将遍历所有的 消息转换器MessageConverters,使用匹配的消息转换器将数据转换成 客户端指定的媒体类型格式 (如JSON/XML):
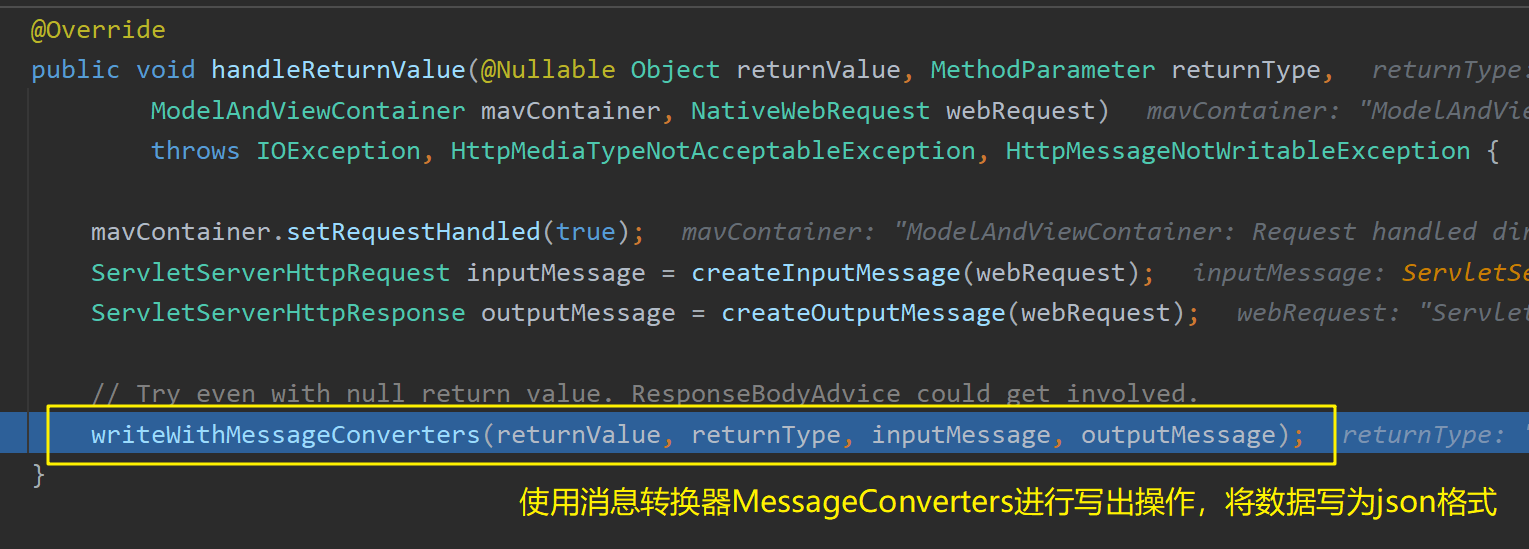
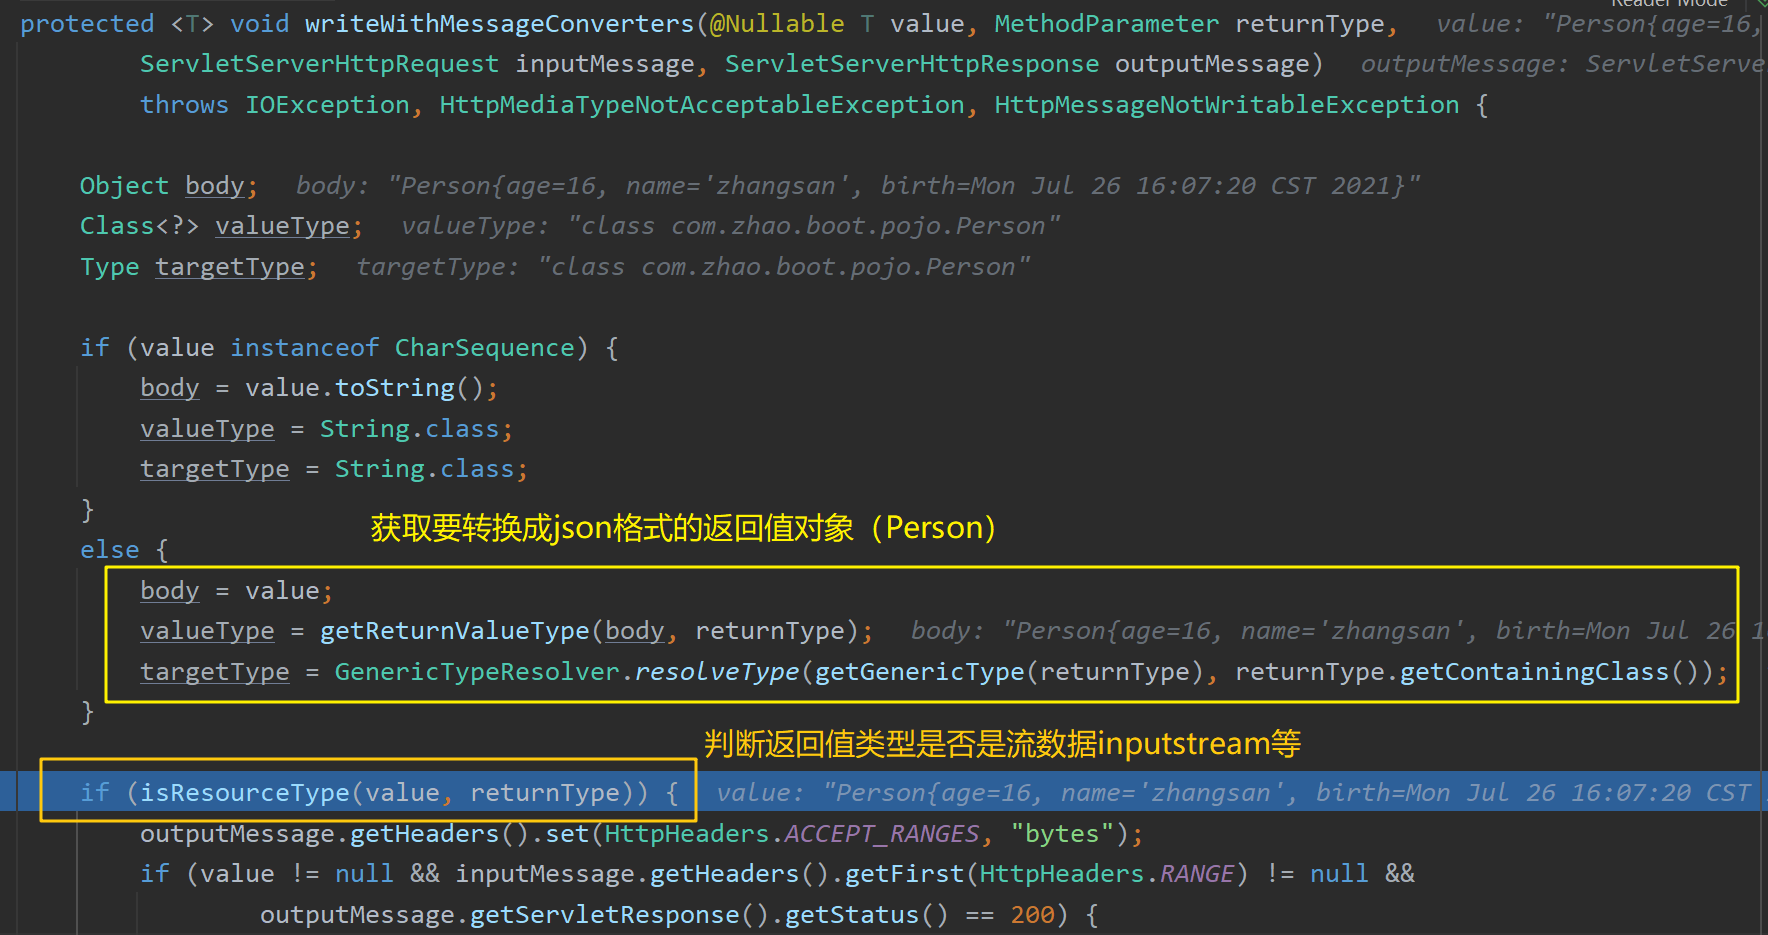
writeWithMessageConverters() :使用消息转换器MessageConverters将返回值对象写成指定的媒体类型数据,此处以JSON举例(也可以自定义媒体类型):
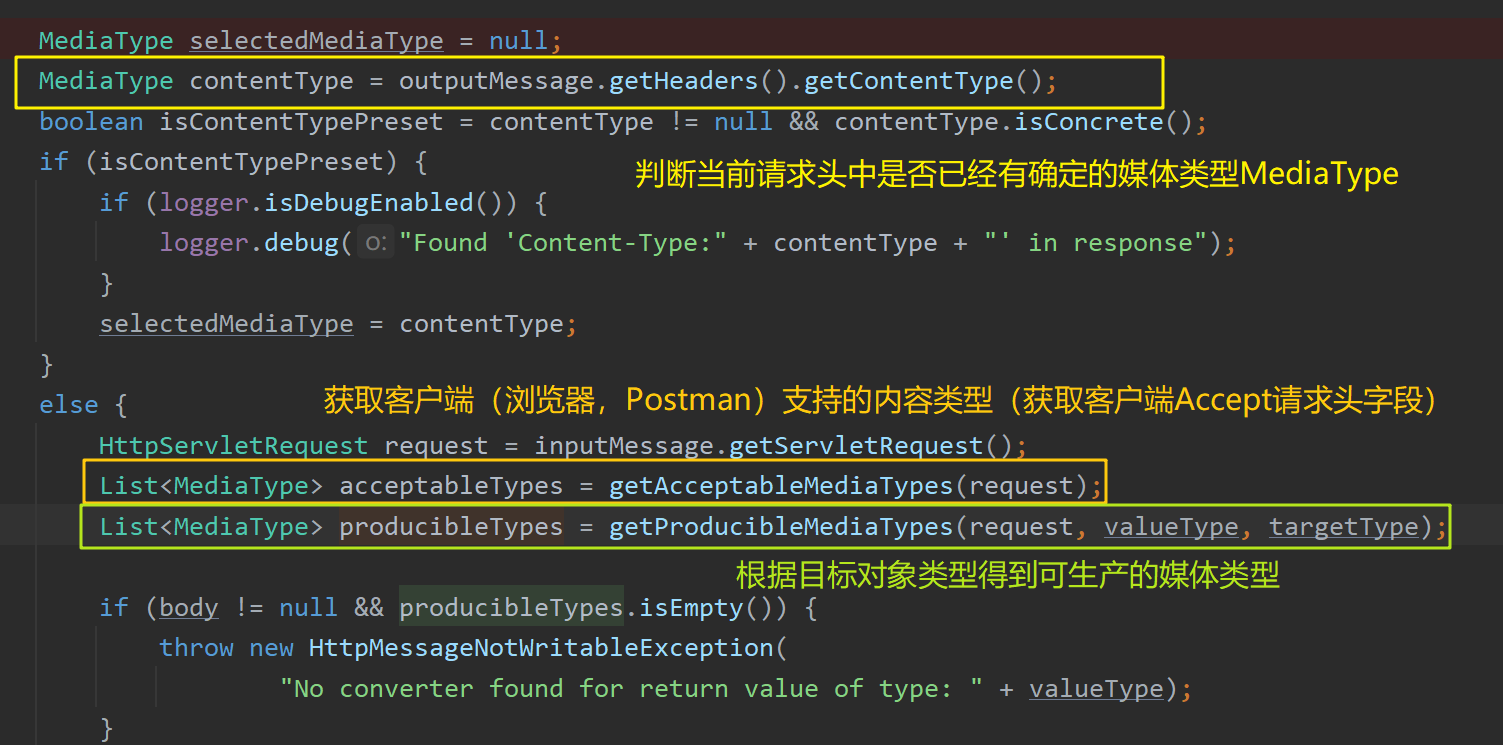
此情况大致执行流程:
- 获取目标方法返回值对象
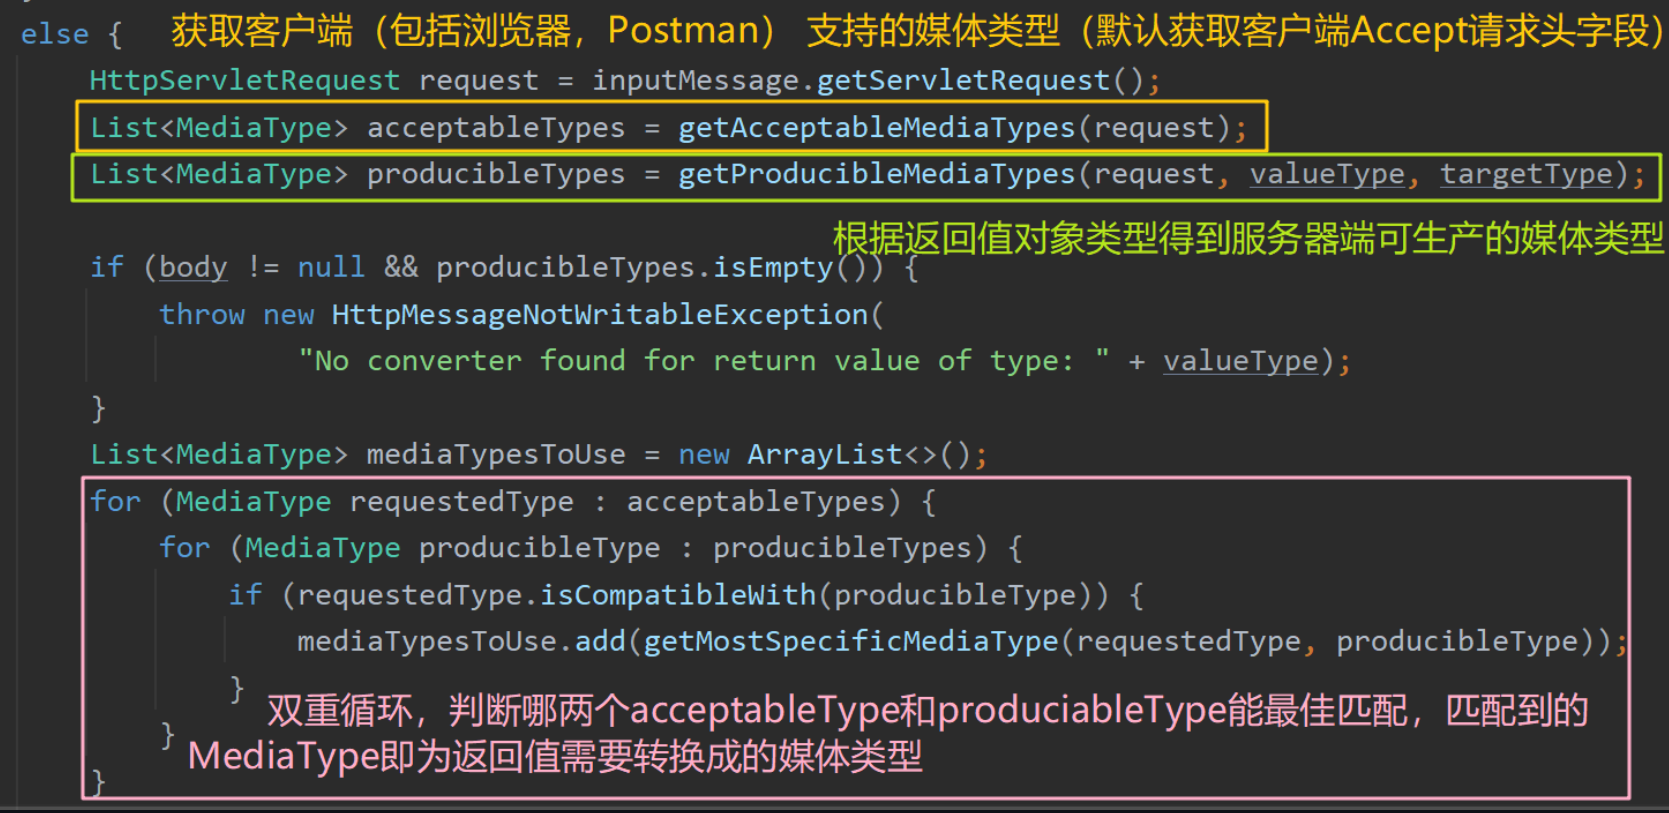
- 判断当前请求头(或者请求参数format属性值)是否已经有确定的媒体类型MediaType
- 获取客户端(包括浏览器,Postman)支持的媒体类型acceptableTypes:获取客户端发来请求中请求头
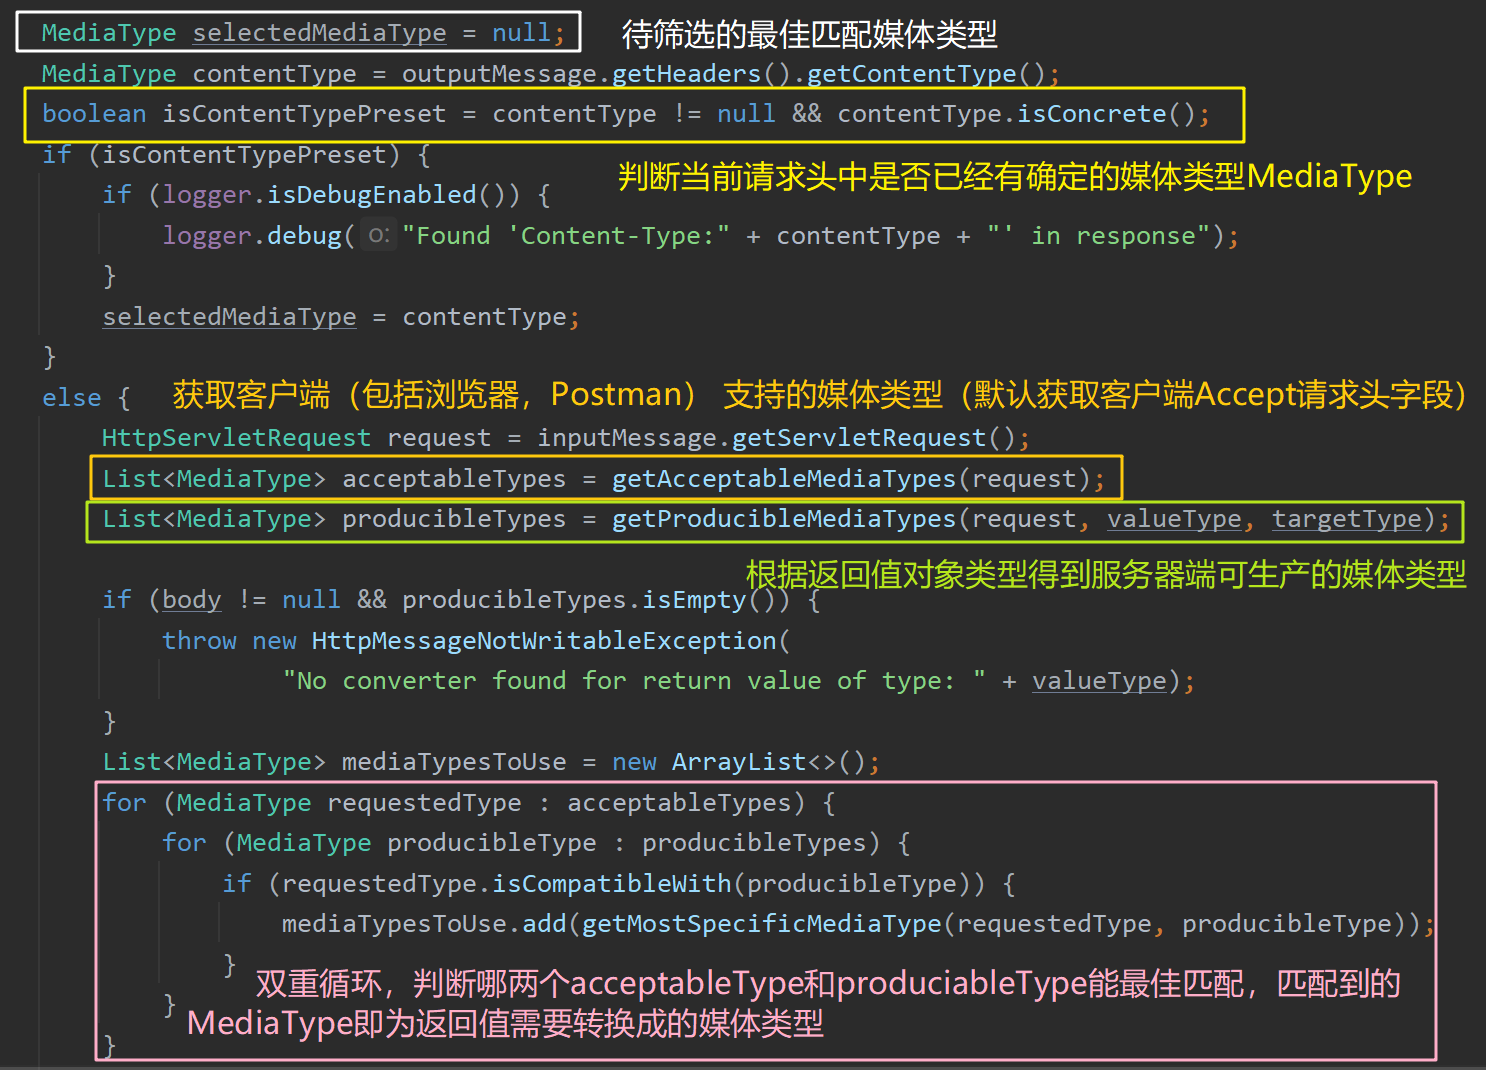
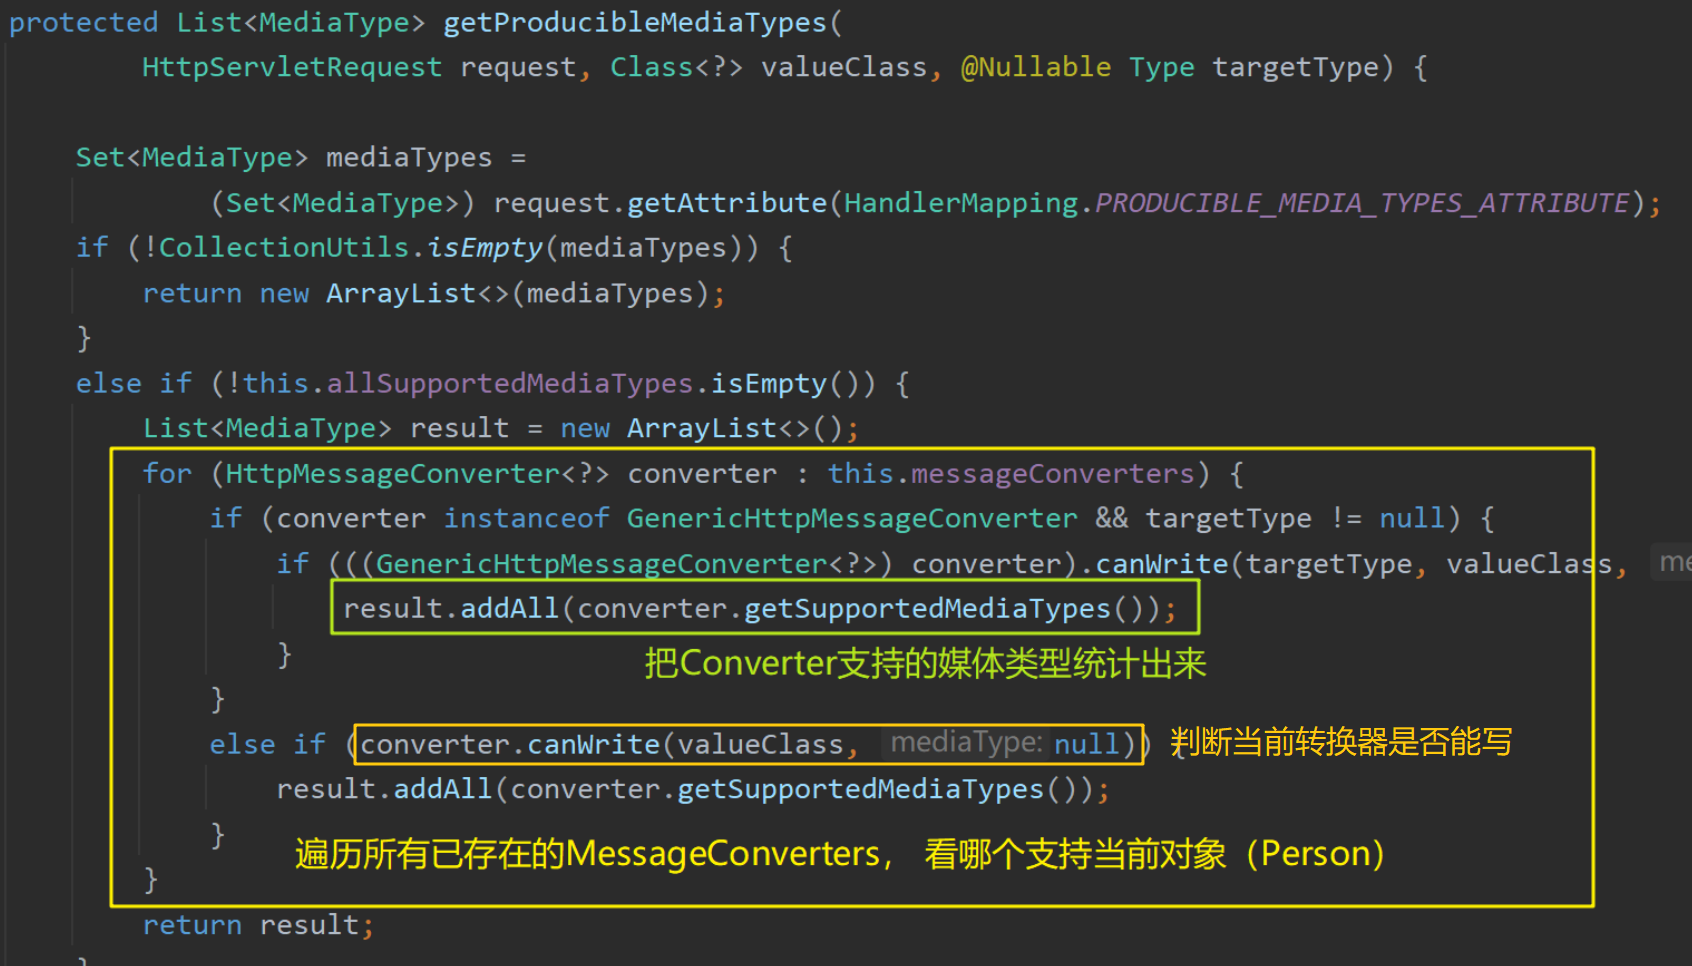
Request Headers里的Accept字段):默认使用基于请求头的内容协商策略,从Request Headers中获取Accept里的内容,也可以自定义添加其他内容协商策略。具体细节见内容协商原理和内容协商策略 - 根据返回值对象类型得到服务器端可生产的媒体类型produciableTypes:遍历所有的消息转换器HttpMessageConverter,判断当前的返回值对象类型能转换成什么类型的媒体类型produciableTypes
- 双重循环,判断哪两个acceptableTypes和produciableTypes能最佳匹配,即寻找服务器端能提供的媒体类型和客户端能接收的媒体类型之间的最佳匹配,匹配到的
MediaType即为返回值需要转换成的媒体类型【此过程即为内容协商,具体细节见内容协商原理】 - 再次遍历所有的消息转换器HttpMessageConverter,判断哪个转换器能将当前的返回值类型转换成上文中匹配到的最佳媒体类型MediaType(如JSON/XML),在找到符合的转换器后,将其转换成指定的媒体类型。具体细节见消息转换原理
内容协商原理
内容协商:将客户端能接收的媒体数据类型和服务器能转换的媒体数据类型协商到二者能最佳匹配统一。从而根据客户端接收能力的不同,返回不同媒体类型MediaType的数据(例如JSON,XML,自定义类型等)。借助此原理,可以实现将不同客户端平台发来的数据转换成不同的媒体类型数据(例如PC端转换成JSON,手机端转换成XML,或转换成自定义类型等)。大致流程:
- 判断当前响应头
Request Headers(或者url请求参数format属性值)中是否已经有确定的媒体类型MediaType(如JSON/XML) - 获取客户端(浏览器,Postman)支持的媒体类型acceptableTypes(获取客户端发来请求中
Request Headers里的Accept字段):默认使用基于请求头的内容协商策略,从Request Headers中获取Accept里的内容,也可以自定义添加其他内容协商策略。 - 遍历循环所有当前消息转换器HttpMessageConverters,看哪个支持转换当前返回值对象类型(
Person),返回服务器端可以支持将返回值类型转换成的媒体类型producibleTypes
浏览器支持的媒体类型(在浏览器请求头信息里。默认XML类型权重更大):

这些媒体类型携带在浏览器的请求头信息里。请求头Request Headers告诉服务器,客户端具有接收什么类型数据的能力(Accept),其中XML媒体类型权重更大:

在使用Postman改变请求头中的
Accpet字段后(Http协议中规定的字段),服务器可以得知客户端可以接收的数据类型,就能根据客户端能够接收的媒体类型返回不同的数据格式。
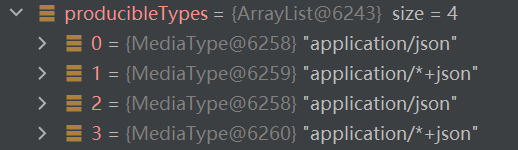
服务端针对当前类型Person能处理的媒体类型(默认只处理JSON媒体类型,开发人员也可以添加XML类型和自定义类型,具体分析见后文):
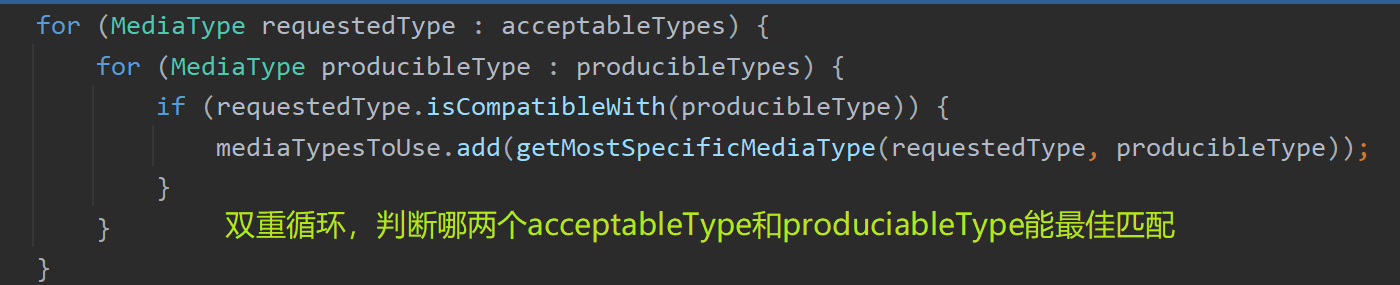
之后进行内容协商:遍历acceptableTypes和producibleTypes,看哪两个能最佳匹配:
在匹配到合适的转换器Converter后,就继续向下执行:
消息转换原理
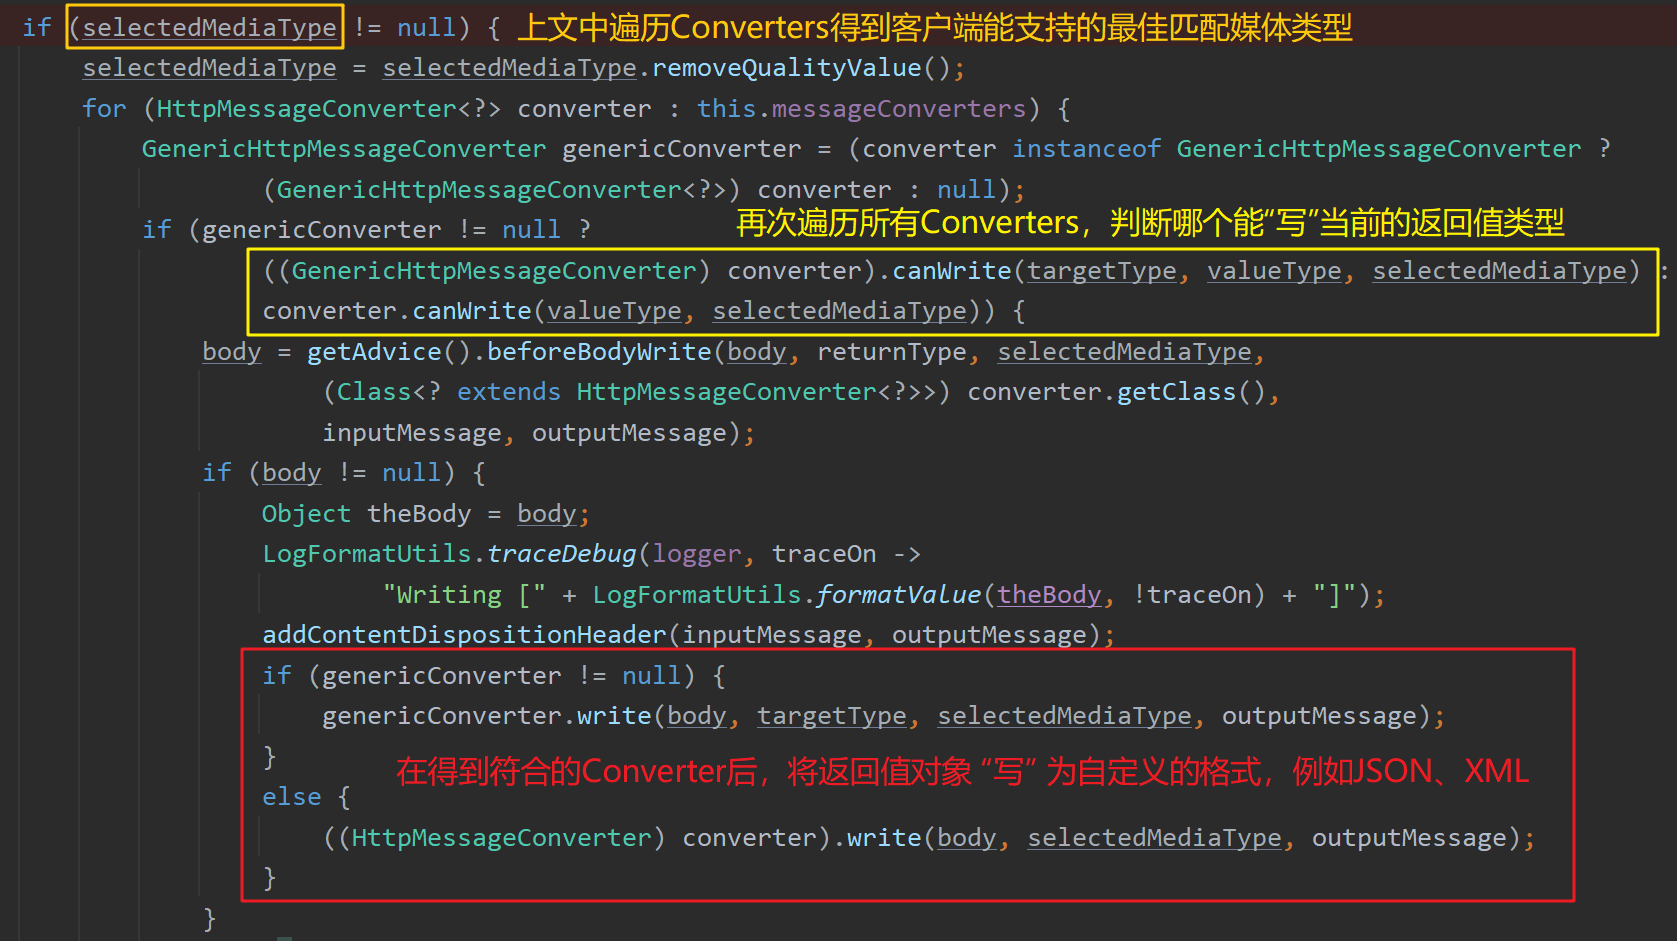
经过内容协商后,选出了客户端能接收的媒体类型selectedMediaType,之后根据该媒体类型和返回值对象类型遍历所有消息转换器HttpMessageConverter,判断哪个转换器能写canWrite() 当前对象,并使用其将返回值对象转换成指定的媒体类型selectedMediaType(例如JSON/XML)。
注意:HttpMessageConverter先后使用了两次,第一次遍历所有的Converters,找到能处理客户端响应的最佳匹配媒体类型(此过程为内容协商),此时即知道了客户端能接收哪种媒体类型;第二次遍历所有的Converters,根据已经得知的媒体类型,判断哪个Converter能将目标方法返回值对象(Person)转换成该媒体类型,从而进行转换。
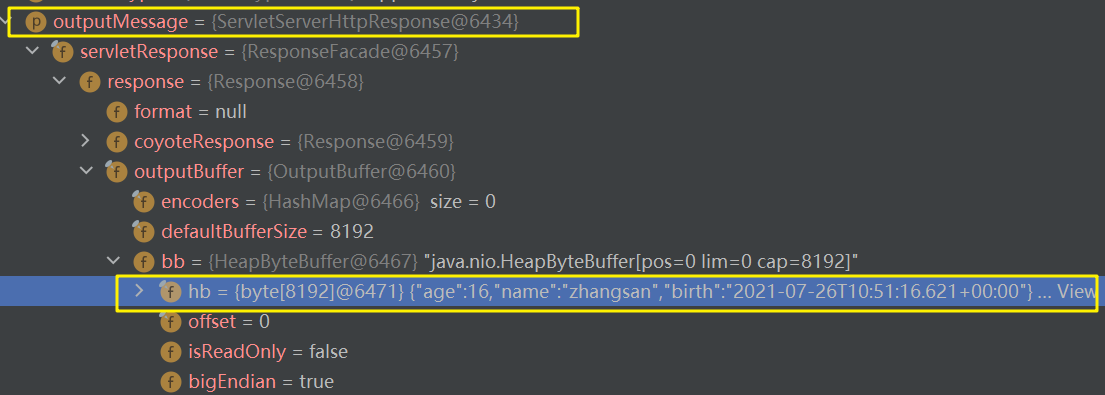
其中不同的Converter有不同的 write() 方法:
1 |
|
消息转换器:HttpMessageConverter
消息转换器HttpMessageConverter:判断是否支持转换某类型的对象,并将其转成媒体类型MediaType类型的数据,例如将Person对象转换成JSON格式;或者将JSON格式转换成Person对象。
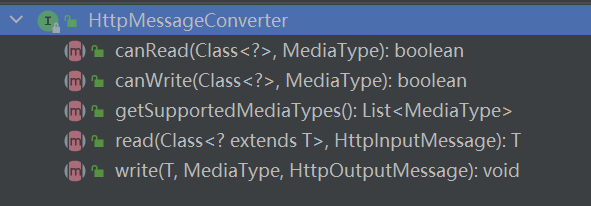
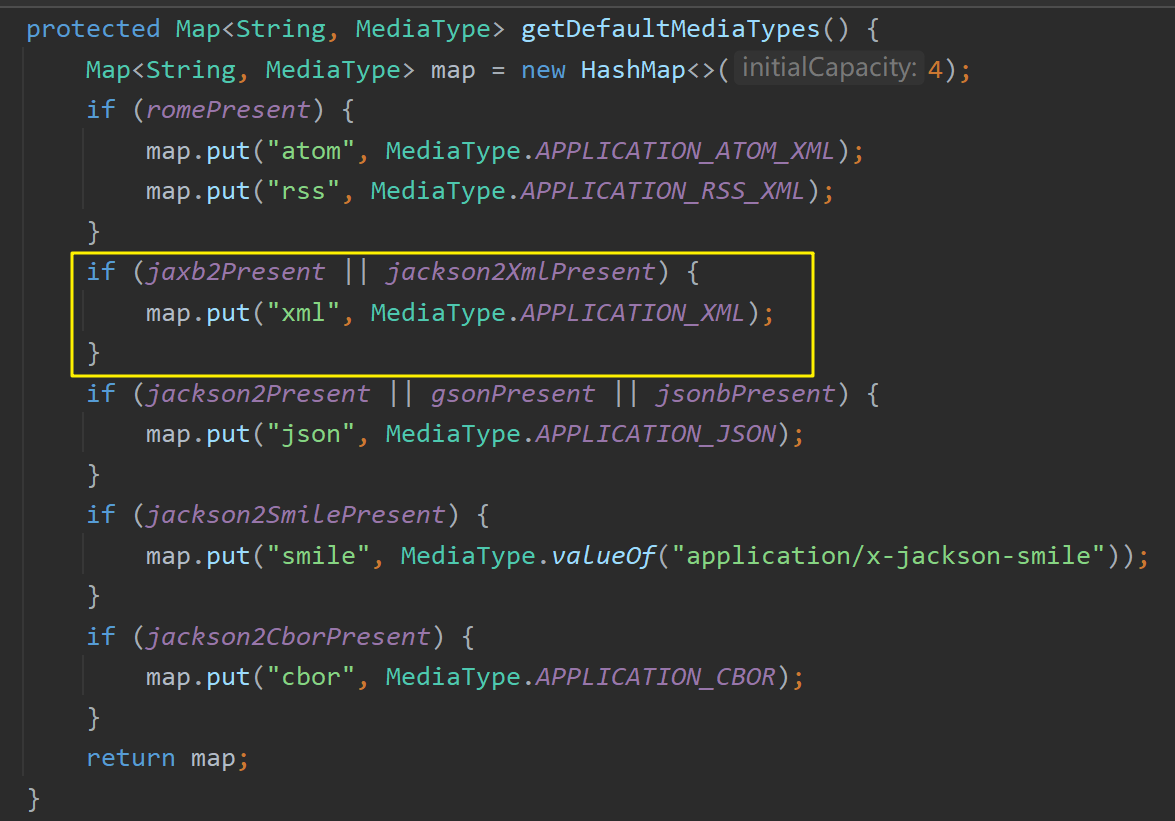
容器中默认存在10个消息转换器,每个消息转换器都有自己支持的媒体类型MediaType,用来转换不同类型的返回值对象(此时容器中没有):
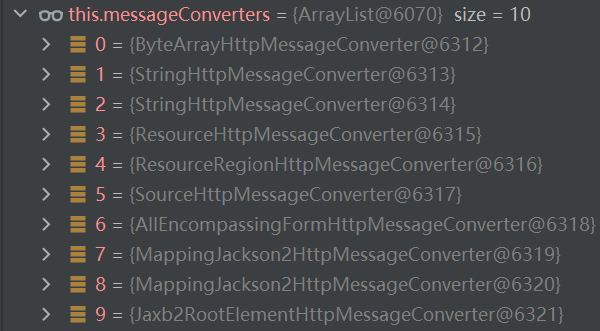
- 0 - 支持
Byte类型 - 1 - 支持
String类型 - 3 - 支持
Resource类型 - …
- 7 - 直接返回true,说明它可以处理任何类型的对象(用于将任意对象转换成JSON格式)
MappingJackson2HttpMessageConverter消息转换器放在最后使用,其 canWrite() 方法直接返回true,代表其可以处理任何类型的对象。该转换器可以将任意的引用类型对象转换成JSON类型(利用底层jackson的objectMapper转换)。其中hb属性中保存了转换后的JSON内容。
自定义HttpMessageConverter
所有的HttpMessageConverter合起来可以支持各种媒体类型的操作(读和写),开发人员可以自定义消息处理器:
1 | public class MyMessageConverter implements HttpMessageConverter<Person> { |
1 |
|
XML转换器:MappingJackson2XmlHttpMessageConverter
服务器端默认只能将客户端传来的数据转换成JSON媒体类型,若开发人员希望能够转换成其他类型的媒体数据(如XML或自定义类型数据),则可以向容器中添加相应的消息转换器。例如向容器中添加XML消息转换器:MappingJackson2XmlHttpMessageConverter,只需在pom.xml中添加依赖:
1 | <dependency> |
此时XML消息转换器就会自动注入到容器中:
在导入了XML消息转换器后,再次使用浏览器发送请求访问服务器端,此时服务器端可支持转换的媒体类型producibleTypes增加了XML类型和自定义类型(浏览器端可接收的媒体类型仍然不变):
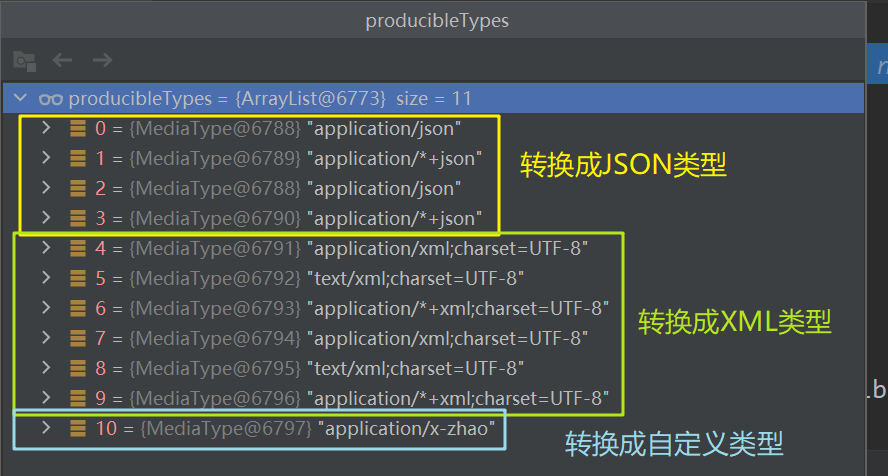
这是因为此时容器中有了XML消息转换器,即下图中的9和10(11为自定义的消息转换器):
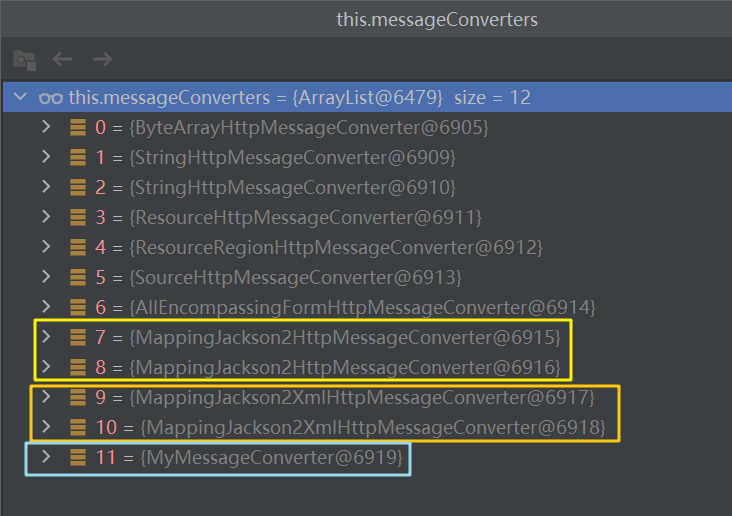
浏览器支持的媒体类型acceptableTypes(在浏览器请求头信息里。默认xml类型权重更大):
此时经过双重循环匹配acceptableTypes和producibleTypes后,得到的mediaTypesToUse集合的内容为:
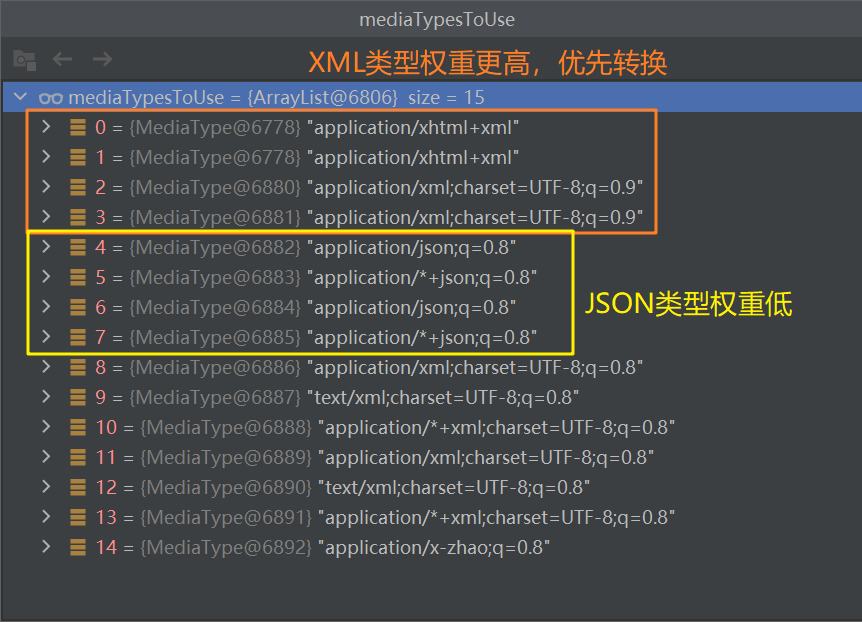
此时已经将优先级权重体现了出来,橙色框内的XML类型优先级高于黄色框内的JSON类型,因此在后续寻找最佳匹配时,会匹配到XML类型的消息转换器。
接着第二次遍历消息转换器,遍历到XML消息转换器后,将目标方法返回值转换成XML类型。
总结:如果在pom.xml中添加了XML转换器的依赖,则会将目标方法返回值解析成XML类型,因为浏览器发来的请求头信息中XML的权重更大;如果没有导入该依赖,则还是默认使用JSON转换器将返回值转换成JSON格式。
内容协商策略
Spring MVC支持多种内容协商策略,例如:
- 基于请求头Request Headers方式的内容协商策略
- 基于请求参数方式的内容协商策略
上文中分析的内容协商策略均为基于请求头Request Headers方式的内容协商策略,此种策略下acceptableTypes是从客户端发来请求的请求头Request Headers信息获取到的。开发人员也可以选择基于请求参数方式的内容协商策略,这种策略下,acceptableTypes将从请求参数中的format属性中获取到。
开启基于请求参数的内容协商策略:
1 | spring: |
开启该注解后,即会在容器中创建基于请求参数方式的请求协商策略ParameterContentNegotiationStrategy,该策略会解析请求参数中的format属性值,判断是JSON还是XML,并据此进行内容协商。
此时在浏览器中发送请求:http://localhost:8080/test/person?format=json 或 http://localhost:8080/test/person?format=xml
getAcceptableMediaTypes() 方法内将使用内容协商管理器contentNegotiationManager解析媒体类型:

若开启了基于请求参数方式的内容协商策略,则该管理器中将存在ParameterContentNegotiationStrategy策略,用于解析请求参数中的format属性值,该策略优先于默认的请求头协商策略HeaderContentNegotiationStrategy,即不再使用默认的解析请求头的方式。
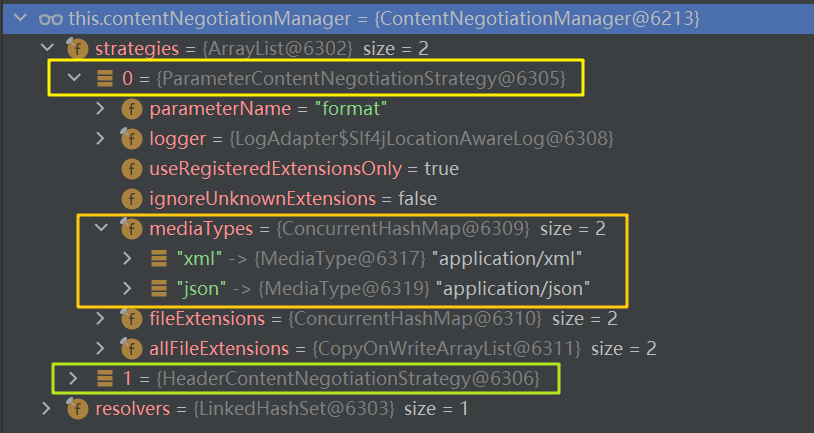
- 0 - ParameterContentNegotiationStrategy:基于请求头Request Headers方式的内容协商策略
- 1 - HeaderContentNegotiationStrategy:基于请求参数方式的内容协商策略
注意,此策略只支持JSON和XML,如果想自定义新的格式,需要:
1 |
|
视图解析原理
获取ModelAndView对象:getModelAndView()
注意:此时的方法栈仍然处于主线3:ha.handle() 方法中。getModelAndView() 方法为其内的最后一个方法,将返回ModelAndView对象mv用于后续的视图解析。
getModelAndView() 方法内:
之后该ModelAndView对象mv将作为 ha.handle() 方法的返回值,用于后续的视图解析。
至此, 主线3:ha.handle() 方法执行完毕。
主线4. 转发页面:this.processDispatchResult()
this.processDispatchResult():根据目标方法最终执行完成后封装的ModelAndView对象内的信息转发到相应的页面(页面信息保存在viewName里),并且可以从请求域中取出ModelAndView中保存的数据。
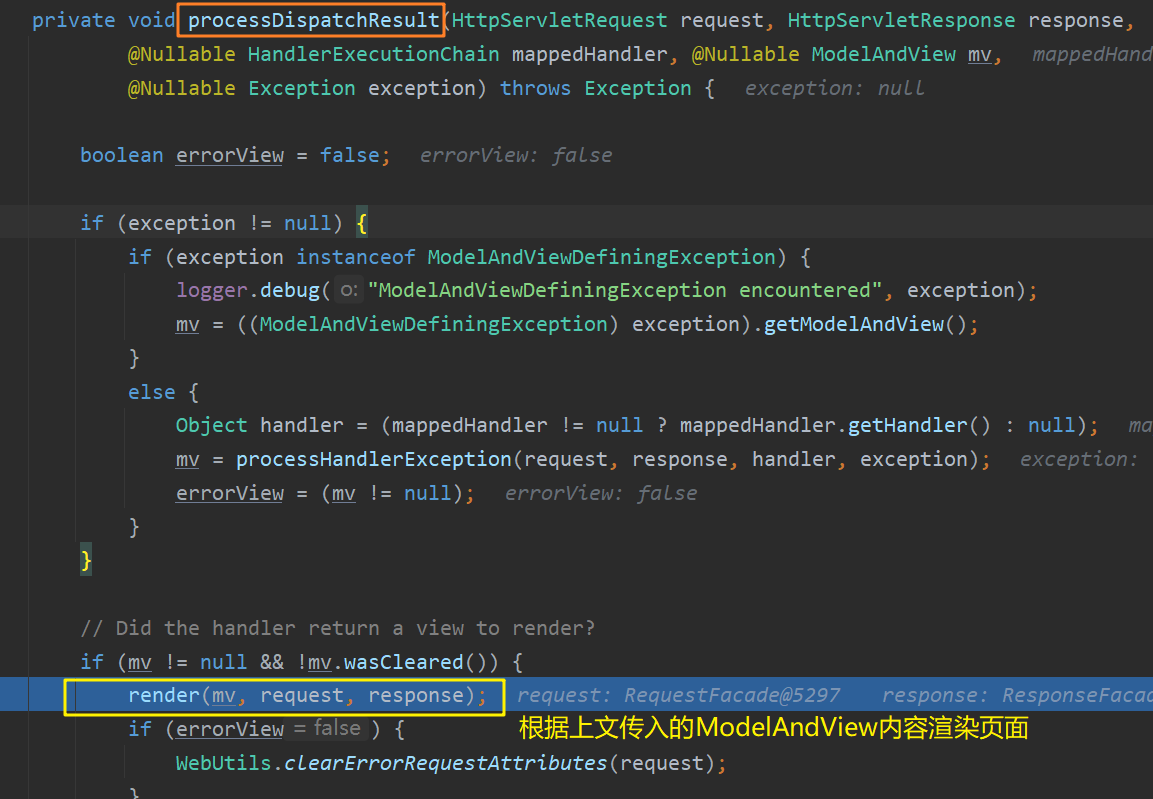
该方法内调用 render() 方法:
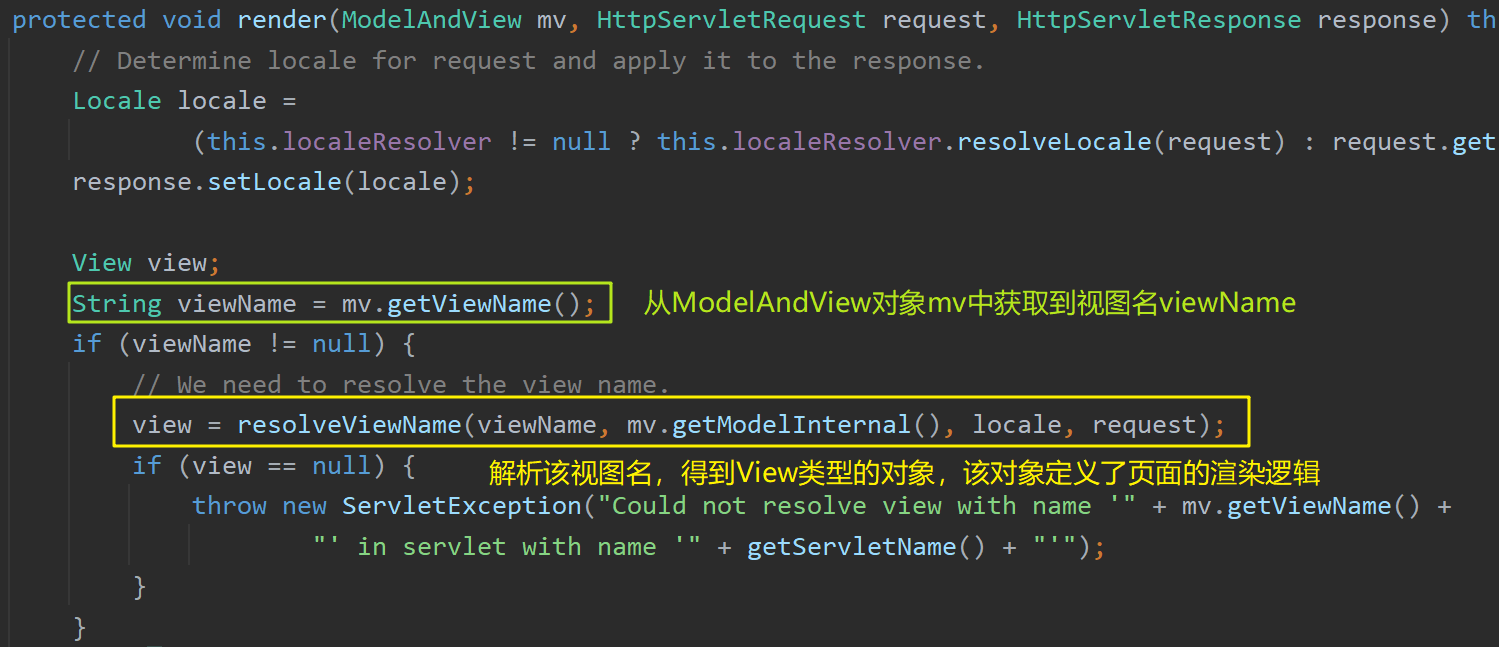

该方法调用 resolveViewName() 方法解析出该视图名对应的View类型对象,其定义了页面的渲染逻辑。之后将调用 view.render() 方法渲染页面。
resolveViewName() 方法内遍历了所有的视图解析器,依次判断哪个能解析当前返回值,并使用匹配的解析器解析出View类型对象:
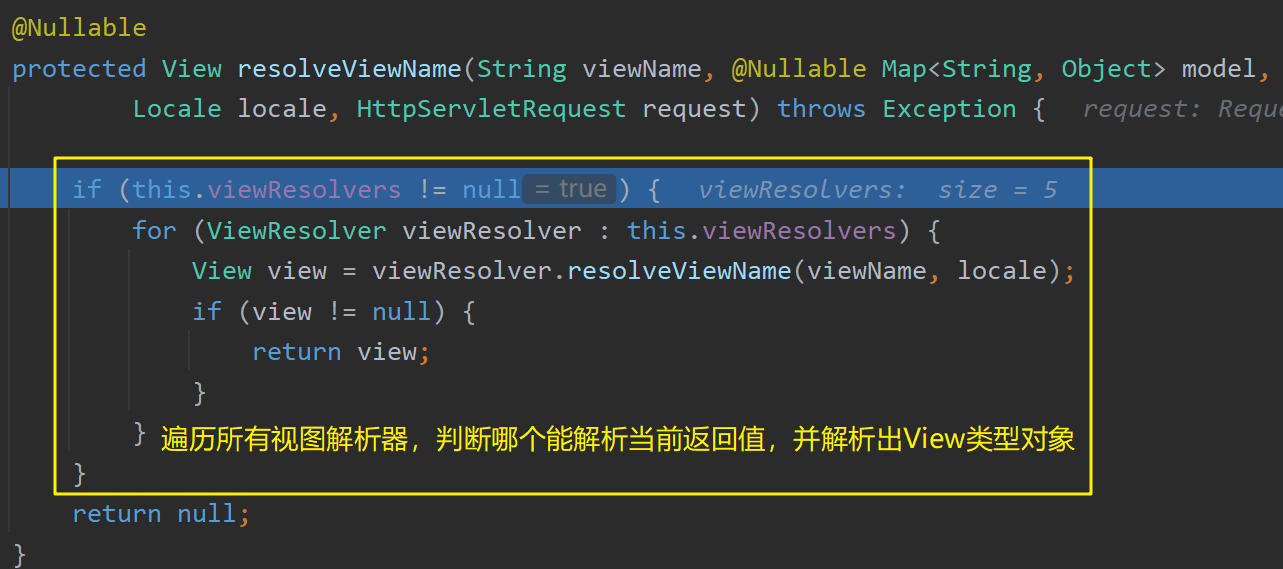
共有5种视图解析器,其中ContentNegotiatingViewResovler内容协商视图解析器中包含了其他四种解析器:
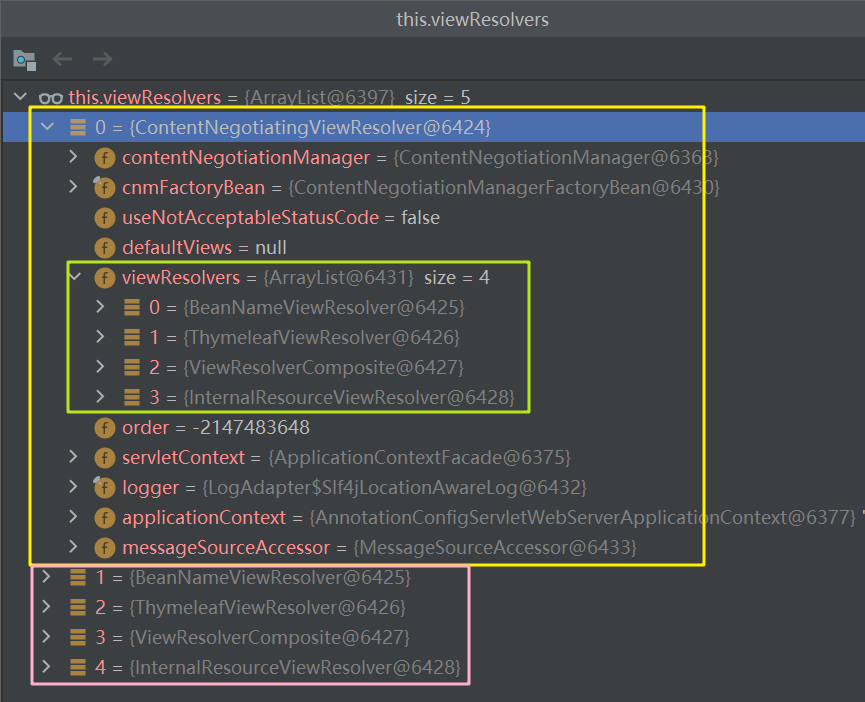
ContentNegotiatingViewResovler内容协商视图解析器解析视图名的方法:
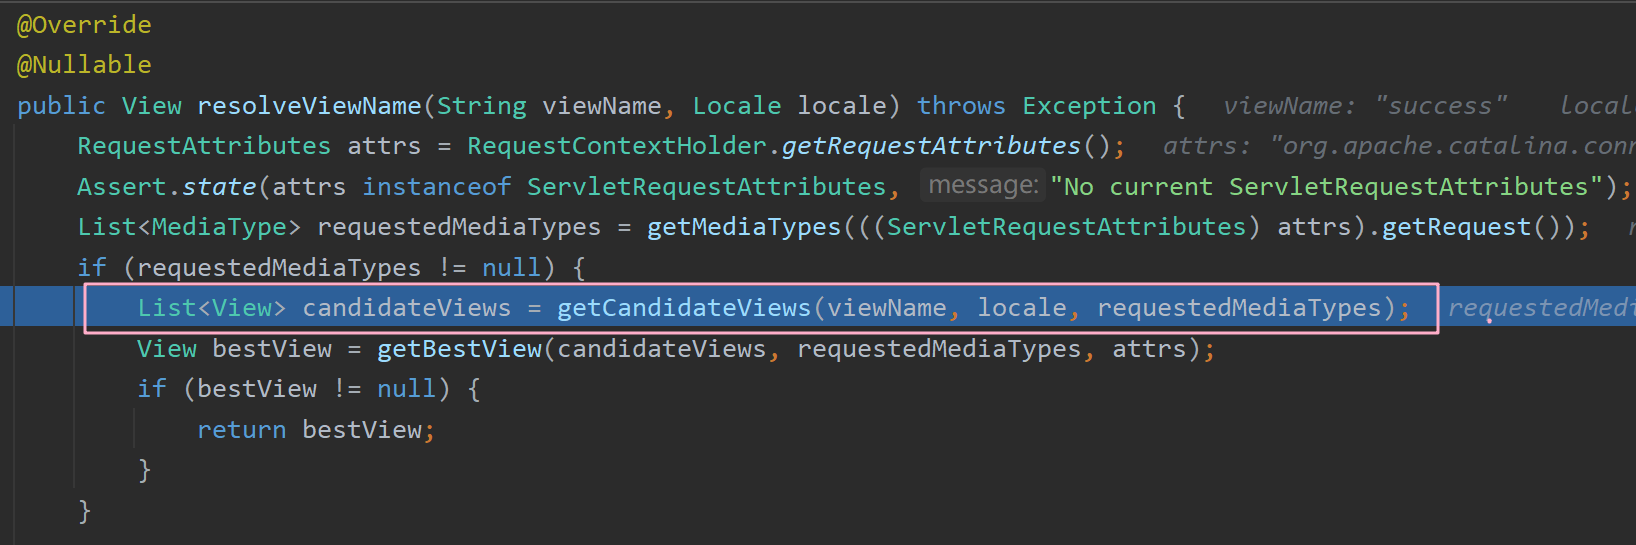
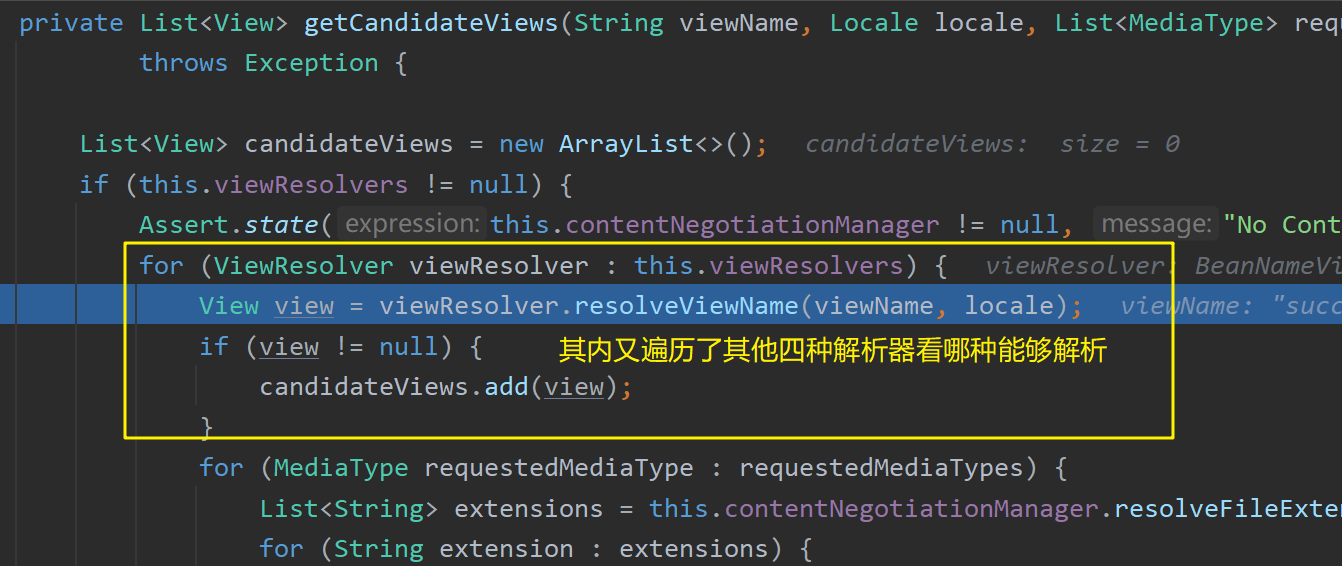
可以看出该方法内本质上还是依次遍历了其他四种视图解析器,判断哪个能解析当前视图名。
在遍历得到匹配的视图解析器后,将解析出对应的View类型对象,不同类型的返回值对应了不同的View类型对象:
- "redirect:xxx" 对应 RedirectView
- "forward:xxx" 对应 InternalResourceView
- "/xxx" 对应 ThymeleafView
最后调用 view.render() 方法渲染页面。不同的View类型对应了不同的渲染方法。

RedirectView类型渲染逻辑:
- 获取要重定向的url地址,调用 response.sendRedirect(encodedURL) 方法进行重定向。
InternalResourceView类型渲染逻辑:
- request.getRequestDispatcher(path).forward(request, response)
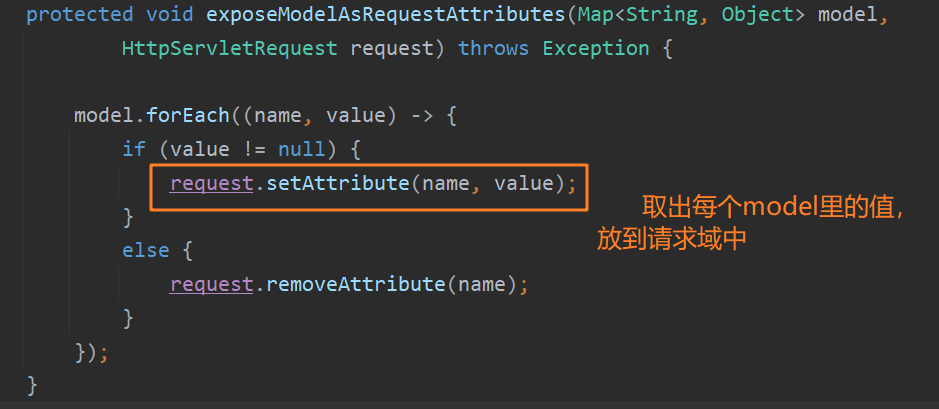
补充:经过许多层调用后,在 exposeModelAsRequestAttributes() 方法内将前面ModelAndView里存放的值放到请求域中:
至此,主线4分析完毕,完成了视图的解析与跳转。
异常处理原理
异常处理自动配置类ErrorMvcAutoConfiguration。其会在Spring Boot启动时被加载,该配置类会向容器中注册一些异常处理相关的组件:
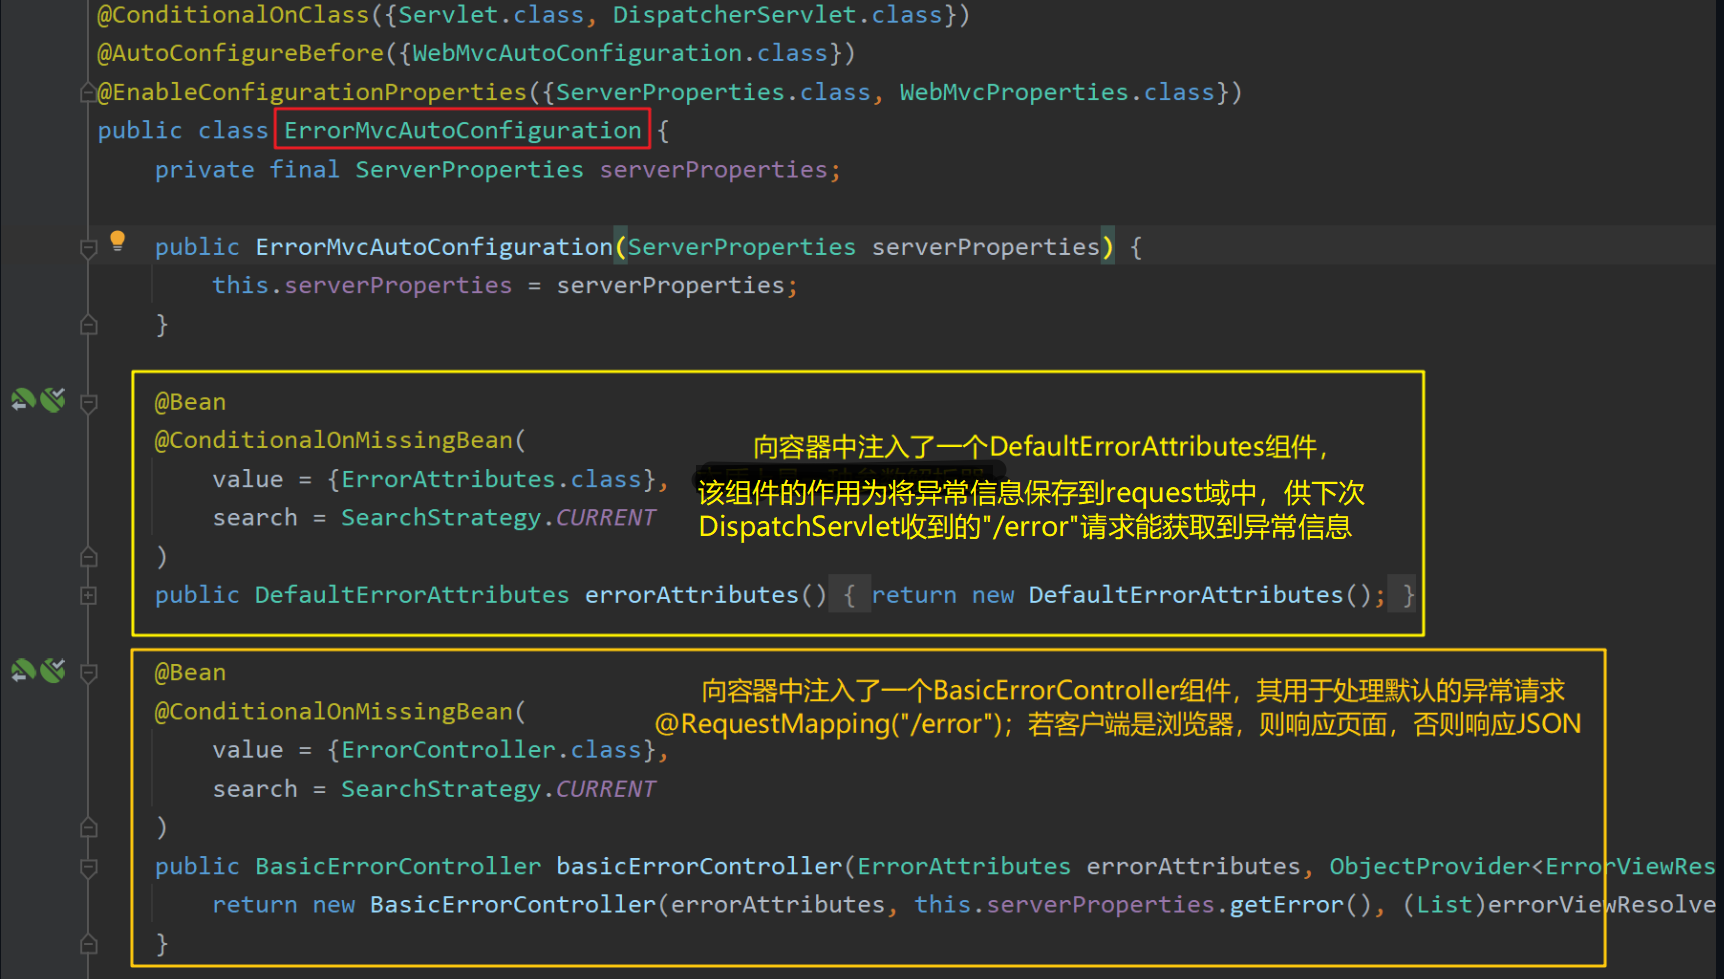
该配置类向容器中注册的异常处理相关组件:
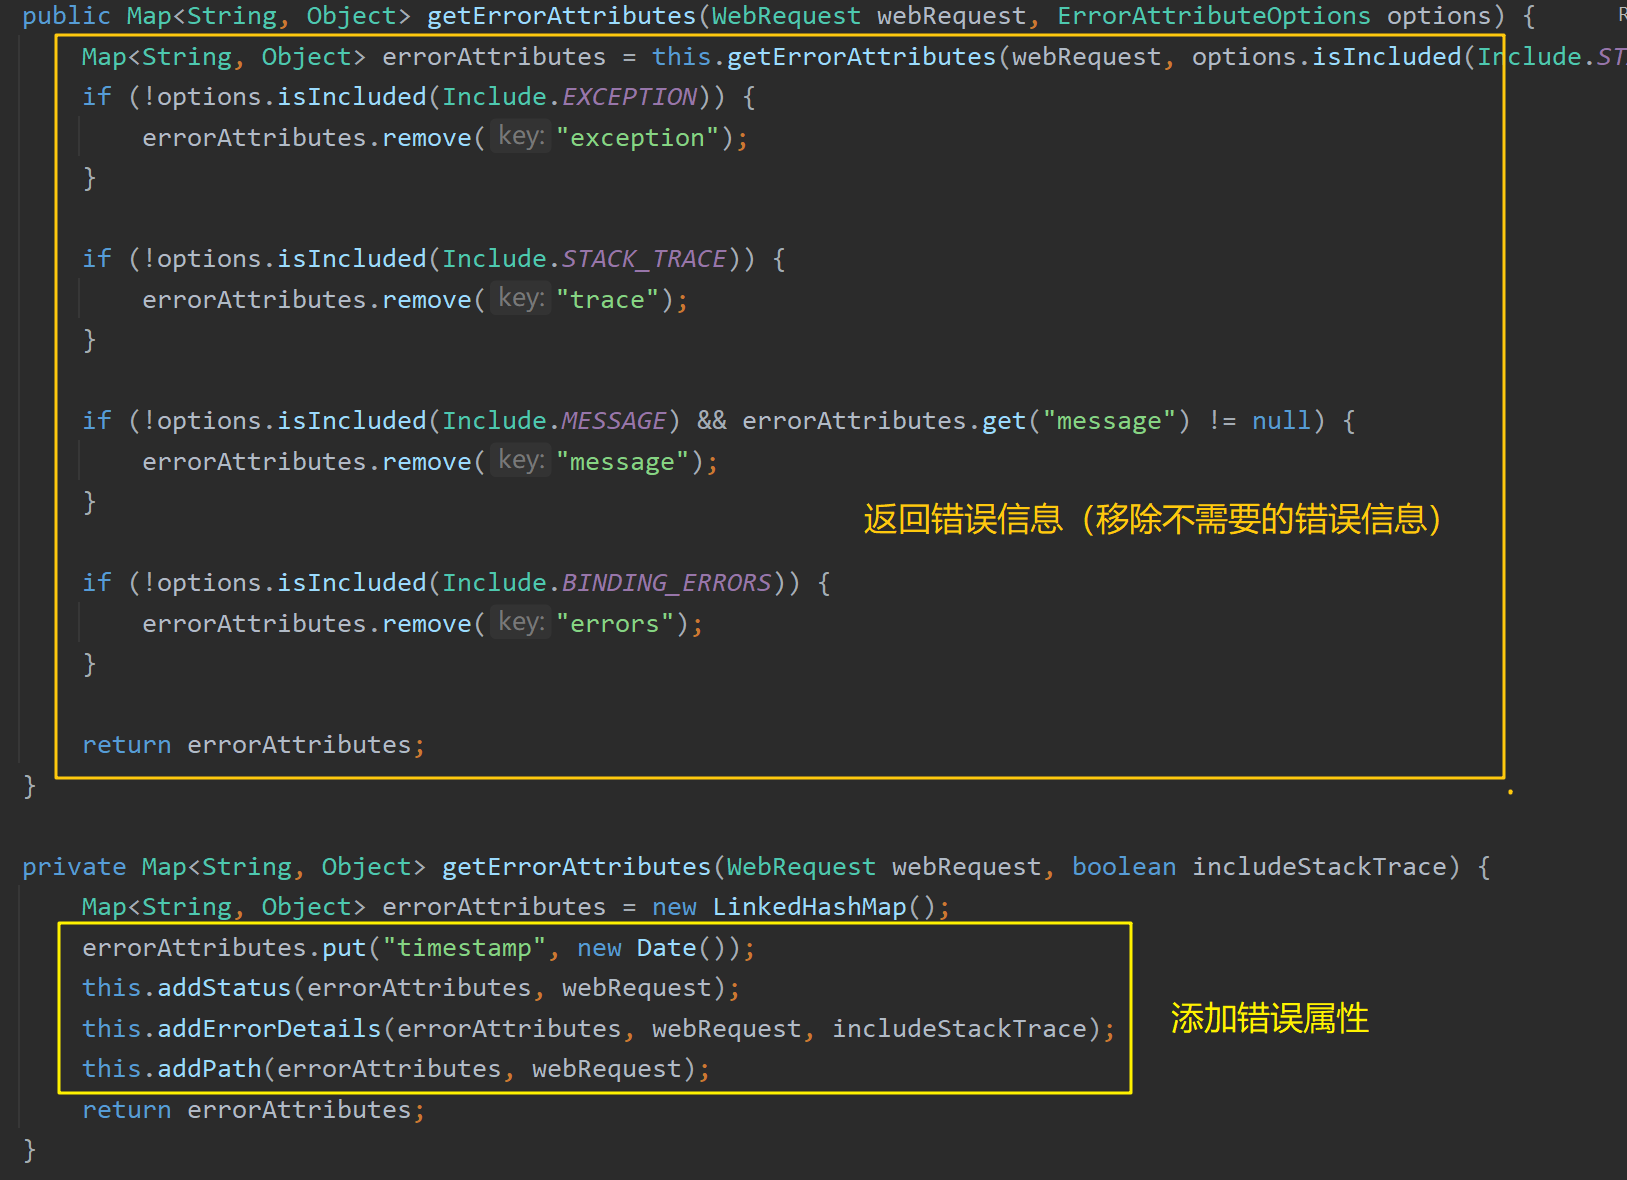
- DefaultErrorAttributes:在request域中保存异常信息,定义错误页面里能包含哪些内容。实现了ErrorAttributes接口和HandlerExceptionResolver接口(也是一种处理器异常解析器,用于将错误信息保存到request域中,安达市多撒)。其内保存了错误的状态信息。【该类用于自定义错误页面包含哪些信息】
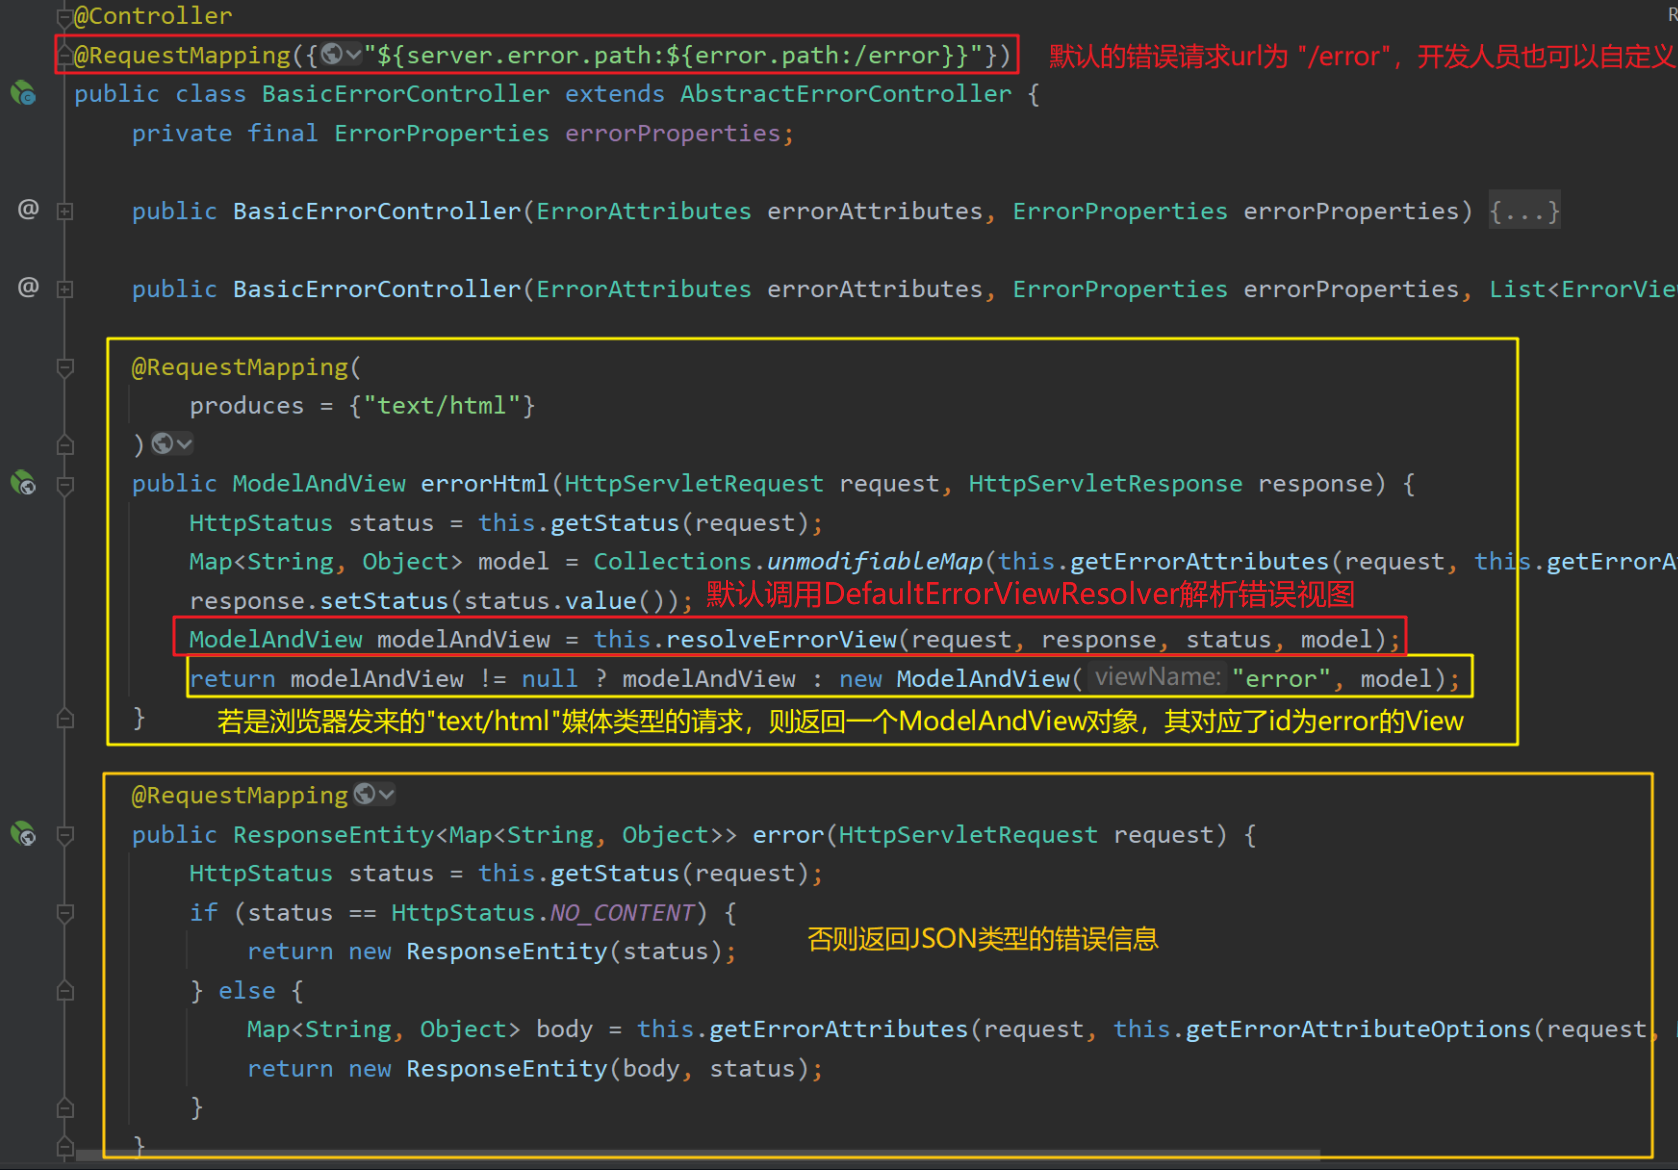
- BasicErrorController:处理异常错误消息的控制器,标注了 @Controller 注解。【该类用于进行异常错误消息的请求映射】
- 其用于处理默认的异常请求
@RequestMapping(/error)。 - 若是发浏览器端发来的
"text/html"类型请求后,则返回一个new ModelAndView("error", model) - 否则返回JSON类型的错误信息
ResponseEntity(body, status)
- 其用于处理默认的异常请求
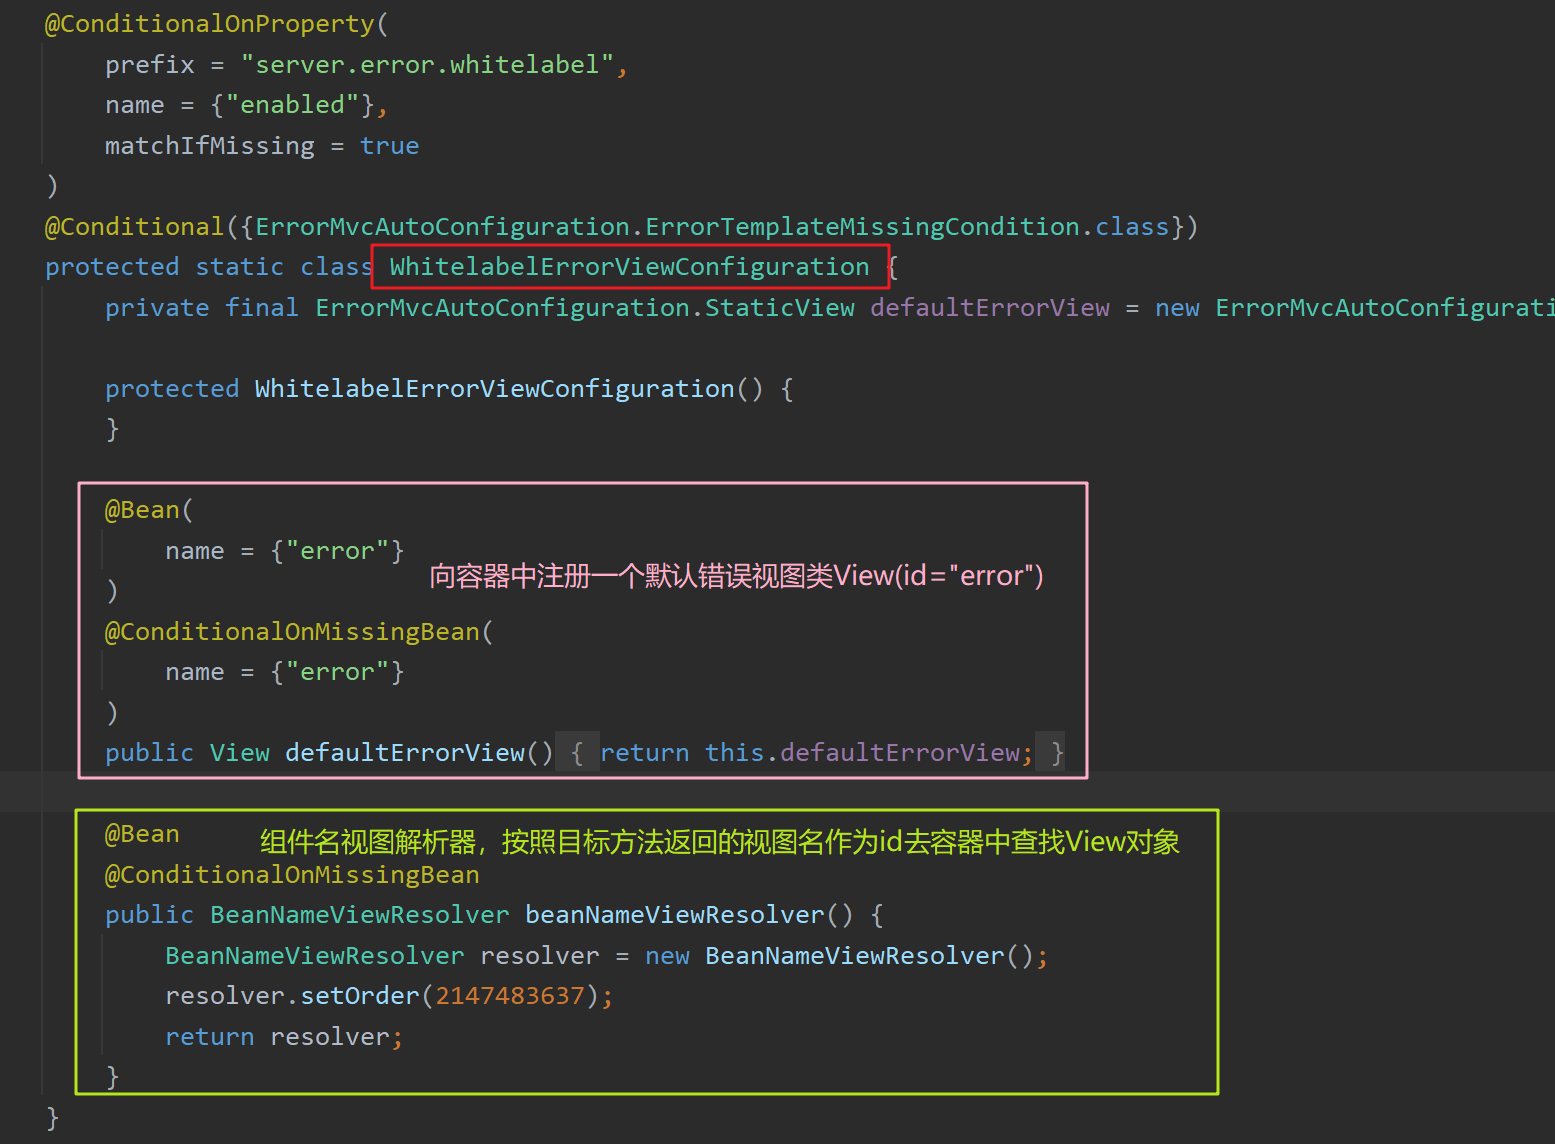
- StaticView
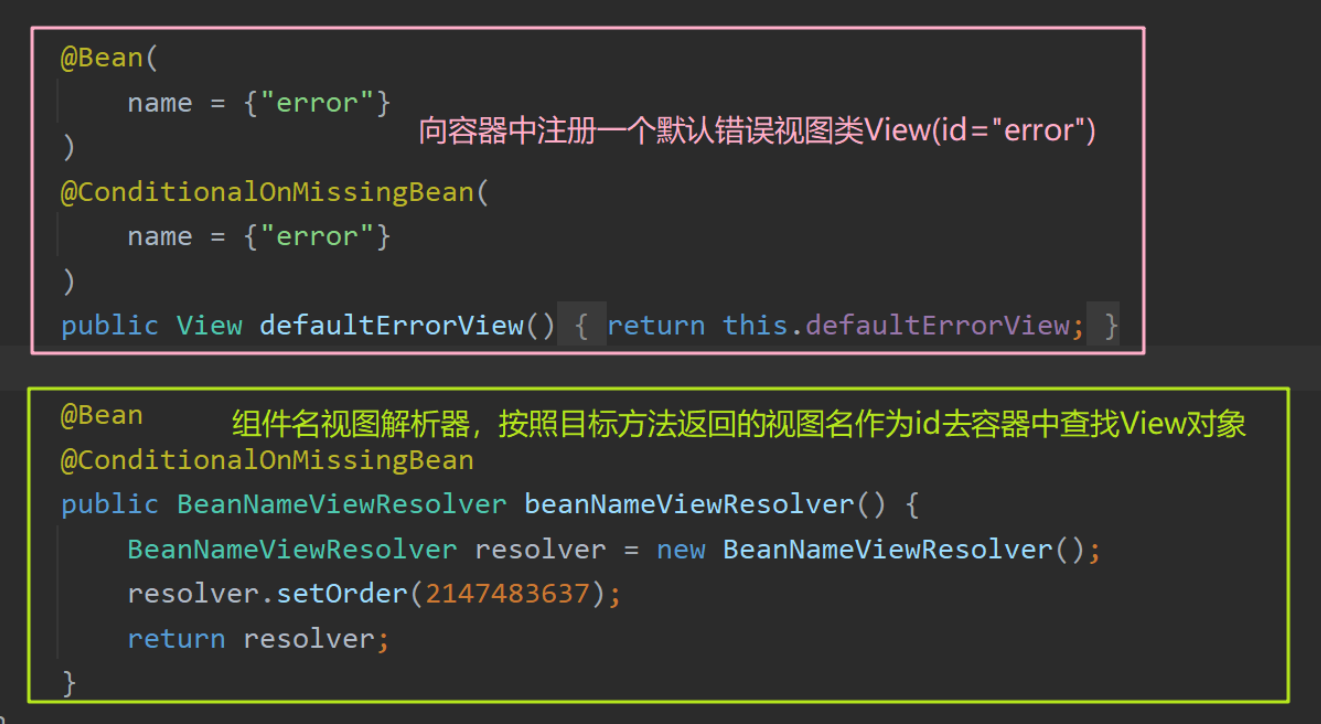
(id="error"):错误页面视图,实现了View接口。其 render() 方法定义了页面渲染的逻辑(渲染出白页错误信息页面)【该类用于渲染出白页错误信息页面】 - BeanNameViewResolver:组件名称视图解析器,是视图解析器的一种。按照目标方法返回的视图名作为组件的id去容器中查找View对象。其用于按照组件名
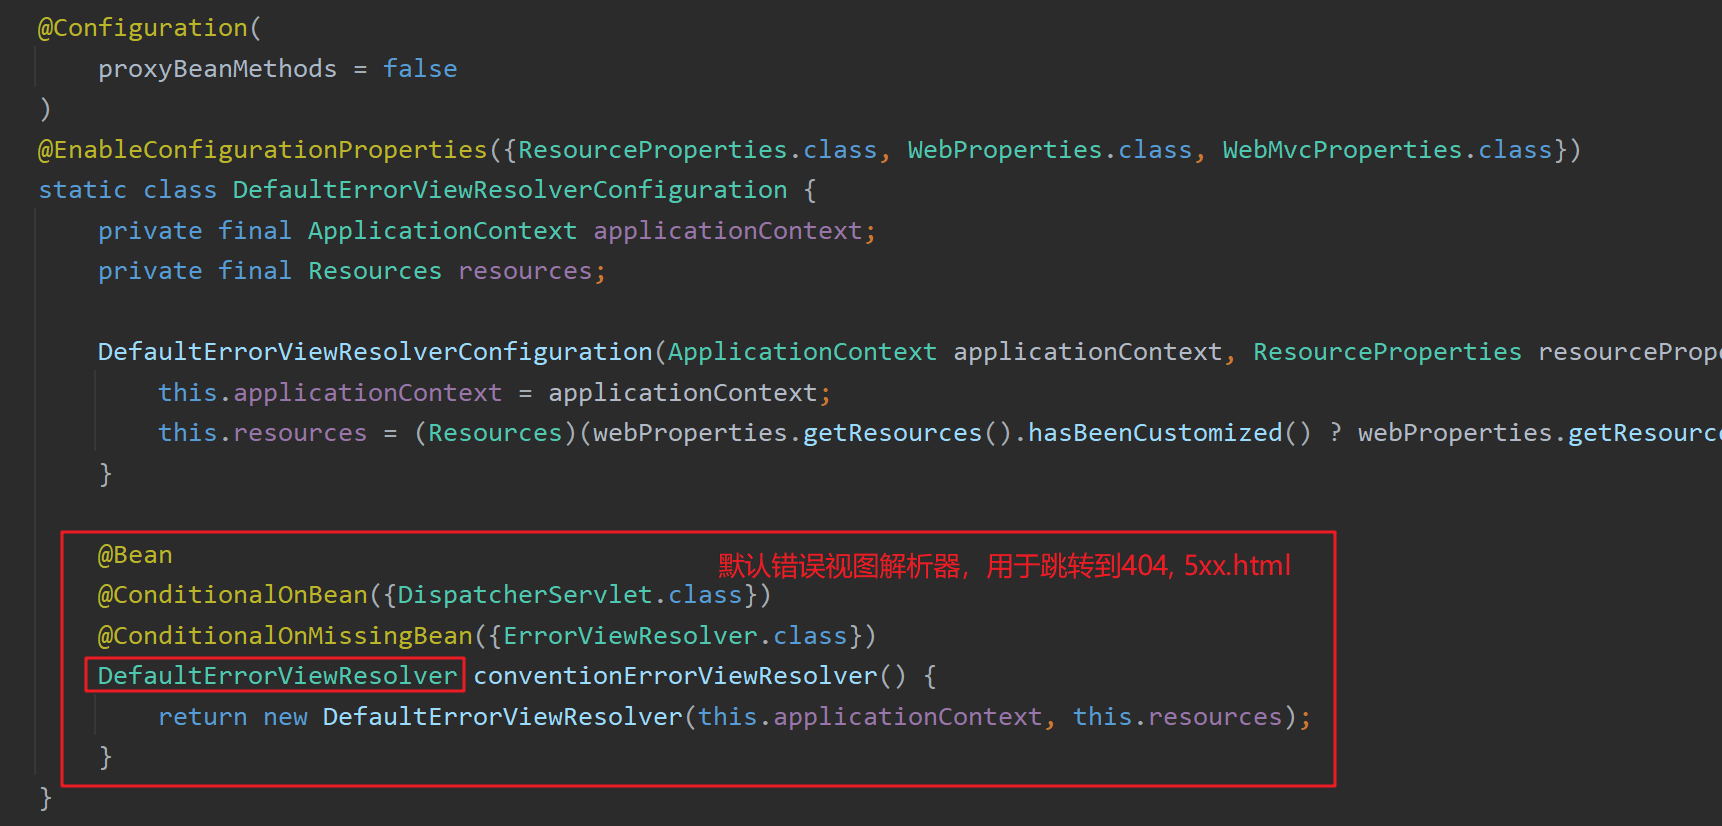
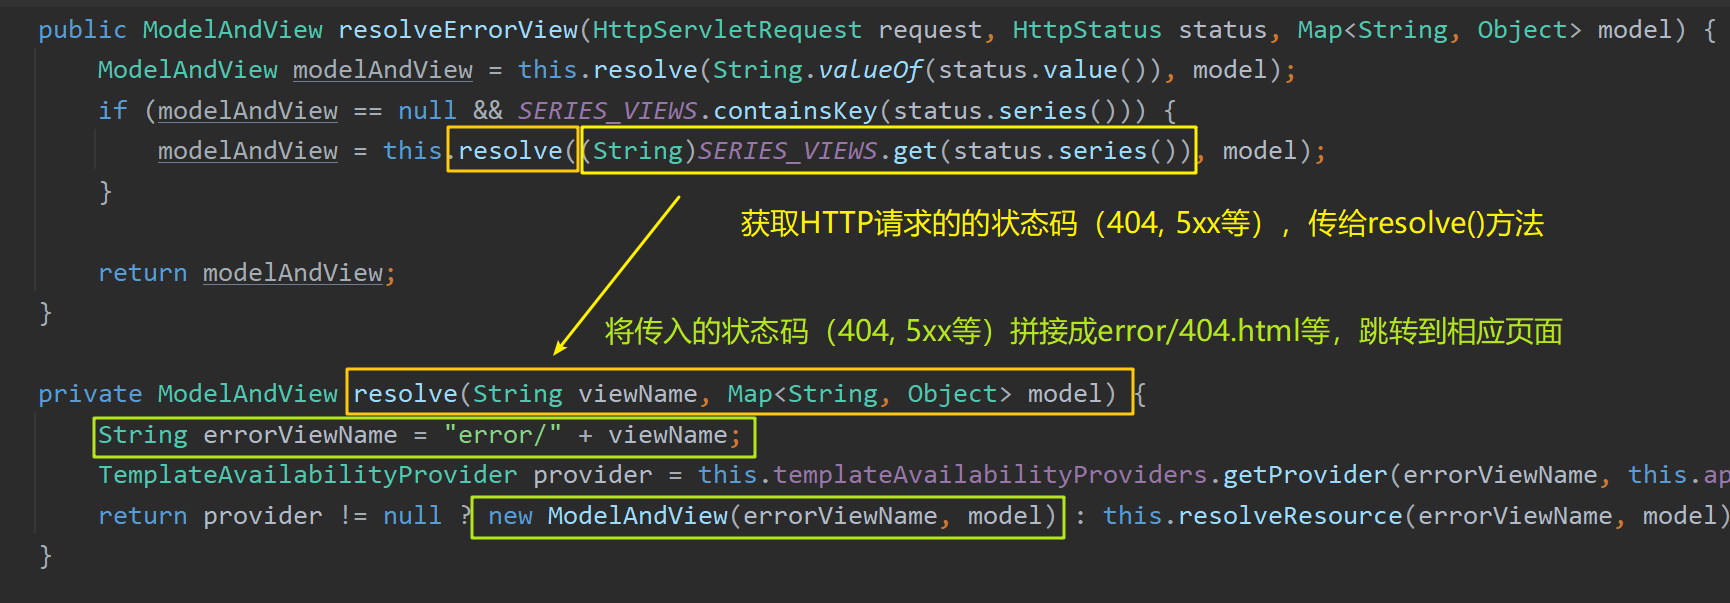
"error"去容器中查找到上述错误页面视图StaticView组件。【该类用于按照组件名称查找View对象】 - DefaultErrorViewResolver:错误视图解析器,是视图解析器的一种。如果浏览器发送的url请求出现错误,则会以HTTP的状态码
status.series()作为视图页地址viewName,返回一个ModelAndView对象。去找error/目录下对应的404.html或5xx.html资源。【该类用于自定义指定错误视图的跳转规则】
白页是谁解析的
下面介绍这些组件的细节:
DefaultErrorAttributes
DefaultErrorAttributes:在request域中保存异常信息,定义错误页面里能包含哪些内容。实现了ErrorAttributes接口和HandlerExceptionResolver接口。
其内保存了错误的状态信息,并会在解析异常时调用 resolveException() 方法,将异常信息存储在request域中,并返回一个null的ModelAndView(此处分析见【异常处理执行流程】)。
该类最关键的作用:在每个异常请求进来时首先使用该类进行解析,将异常信息保存在request域中,从而告诉服务器当前请求有异常,需要再次派发一个 "/error" 请求给DispatchServlet,该请求中保存了所有的异常信息,因此响应这个 "/error" 请求时就可以获取到了完整的异常信息,交给DefaultErrorViewResolver解析该异常请求。

BasicErrorController
BasicErrorController:处理异常消息的控制器,标注了 @Controller 注解。
当服务器端收到错误的url请求时==,将触==发"/error",此时Spring MVC会将此请求映射到控制器BasicErrorController的 errorHtml() 方法或 error() 方法。
情况一:若此请求的媒体类型为"text/html",则将执行 errorHtml() 方法,该方法将返回一个 viewName="error" 的ModelAndView。之后在视图解析步骤中将使用BeanNameViewResolver(组件名称视图解析器)去容器中查找viewName为"error"的View,并调用其render() 渲染出白页错误信息页面。(此种情况就解释了为什么在浏览器端访问了错误的url后会显示“白页”) DefaultViewErrorResolver还是 beanname
情况二:若请求来自于非浏览器的其他机器,则将返回JSON类型的错误信息。
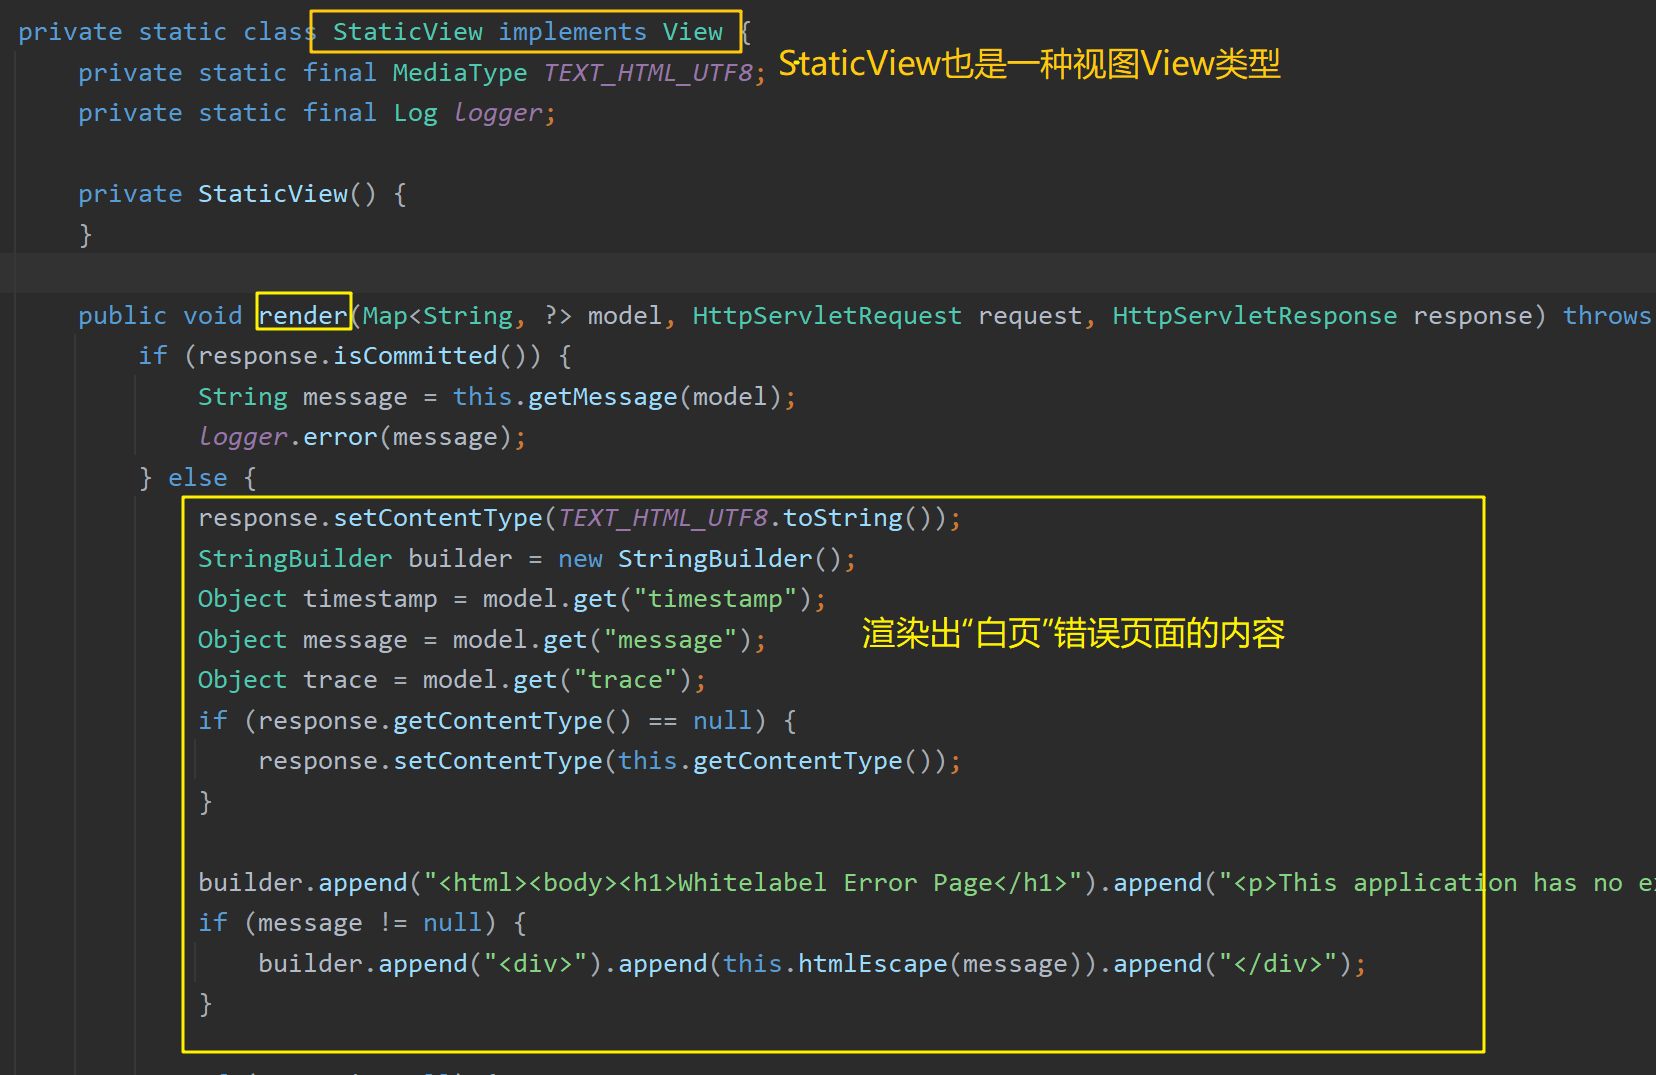
StaticView
StaticView实现了View接口,也是一种视图。其 render() 方法将渲染出白页错误信息页面:
BeanNameViewResolver
BeanNameViewResolver:组件名称视图解析器,是视图解析器的一种。其会按照目标方法返回的视图名作为组件的id去容器中查找View对象。
BasicErrorController.errorHtml() 方法返回了viewName="error"的视图StaticView。该解析器会按照组件名"error"去容器中查找到该StaticView组件,找到该组件后调用其 render() 方法渲染出白页错误信息页面
DefaultErrorViewResolver
DefaultErrorViewResolver:错误视图解析器,是视图解析器的一种。如果浏览器发送的url请求出现错误,则会以HTTP的状态码status.series()作为视图页地址viewName,返回一个ModelAndView对象。去找error/目录下对应的404.html 或 5xx.html 资源。
异常处理执行流程
在 doDispatch(request, response) 方法中,目标方法的执行过程中出现的任何异常,都会被dispatchException捕获到:
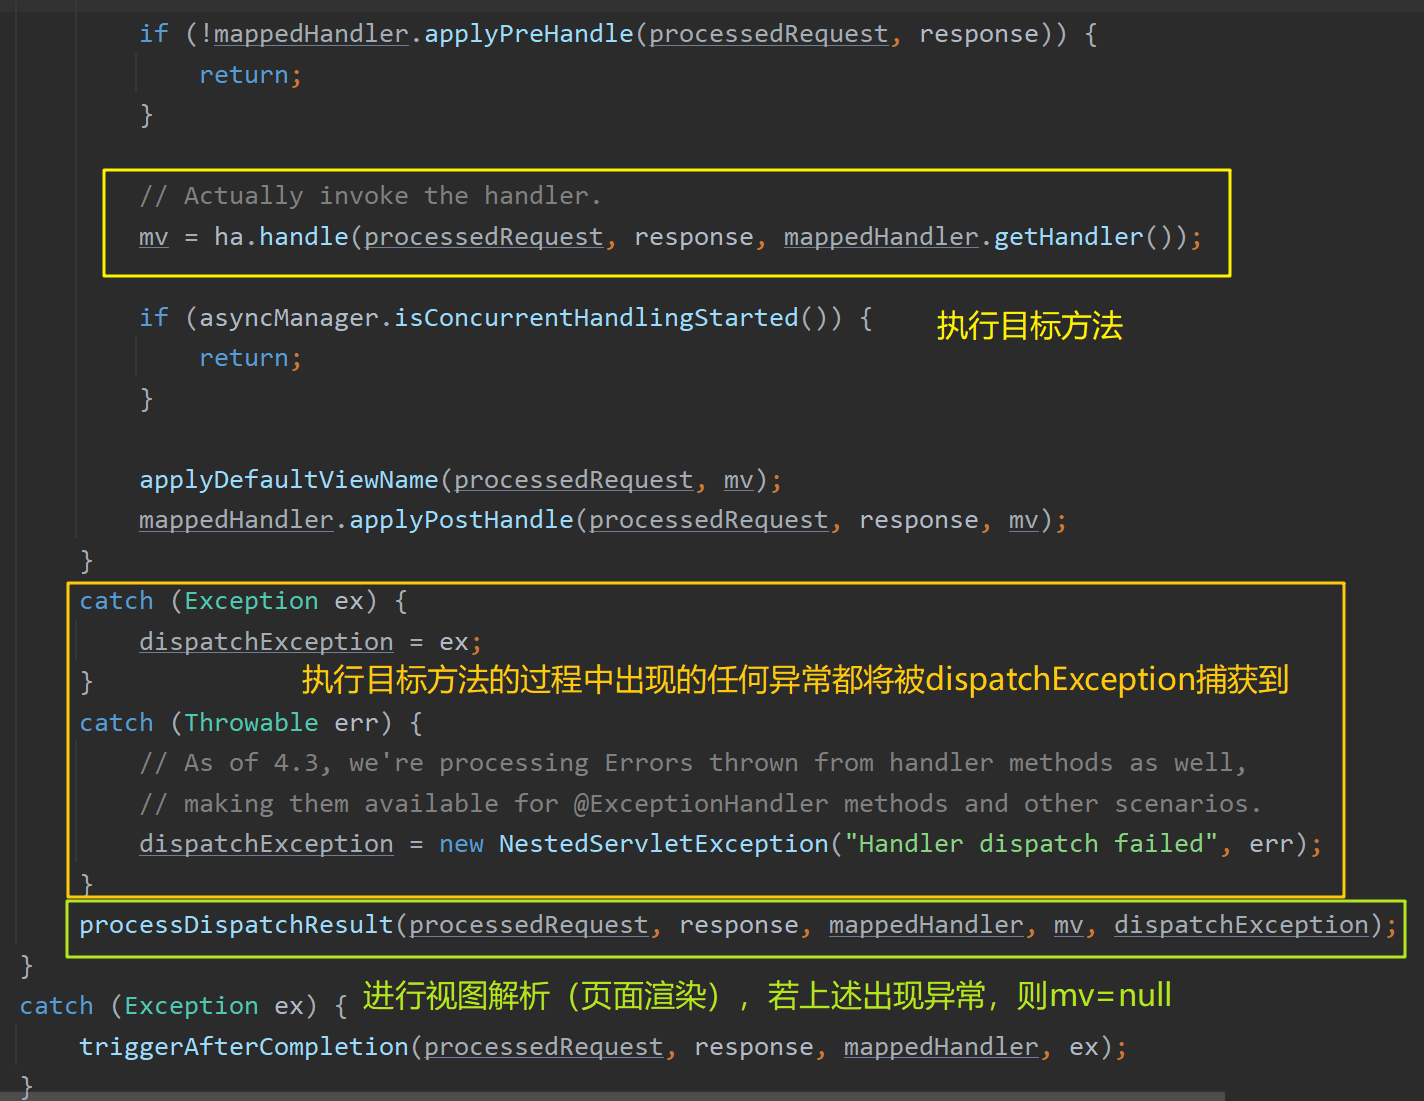
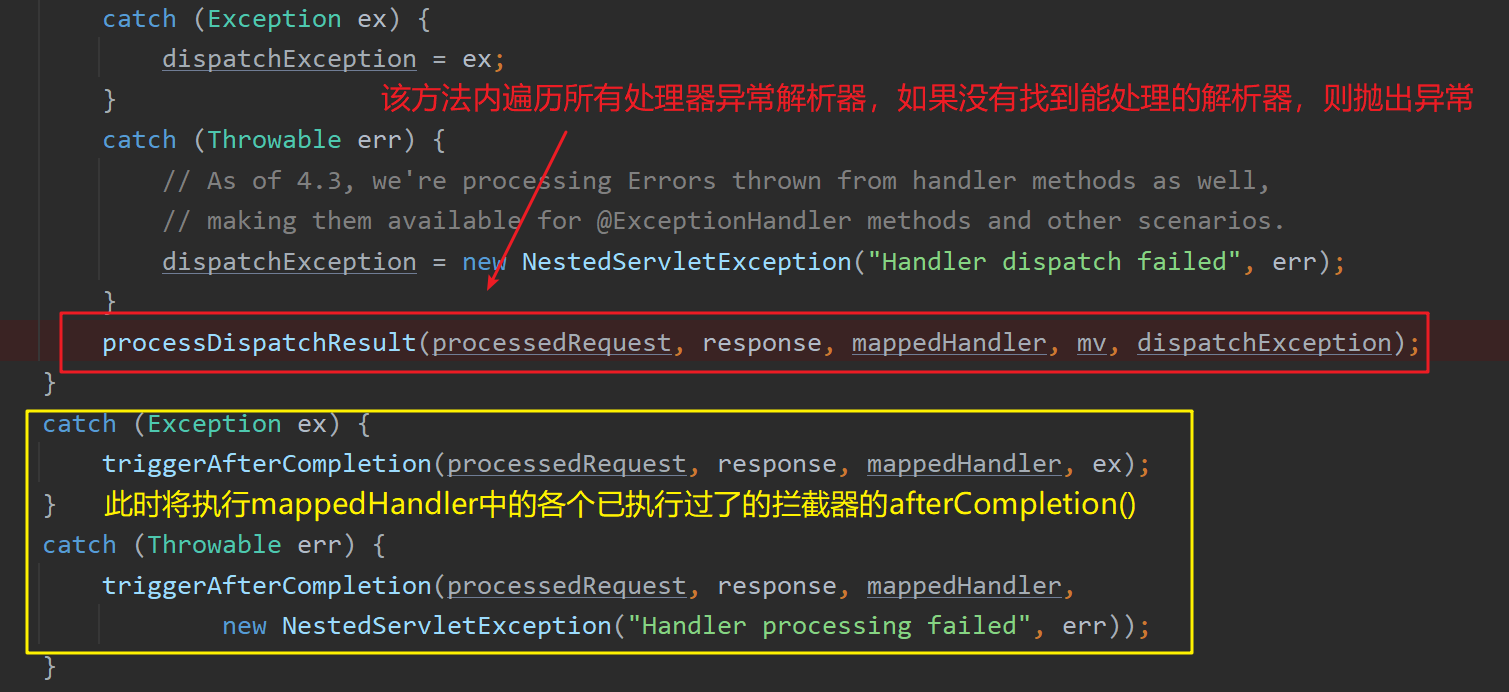
之后进入视图解析 processDispatchResult() :
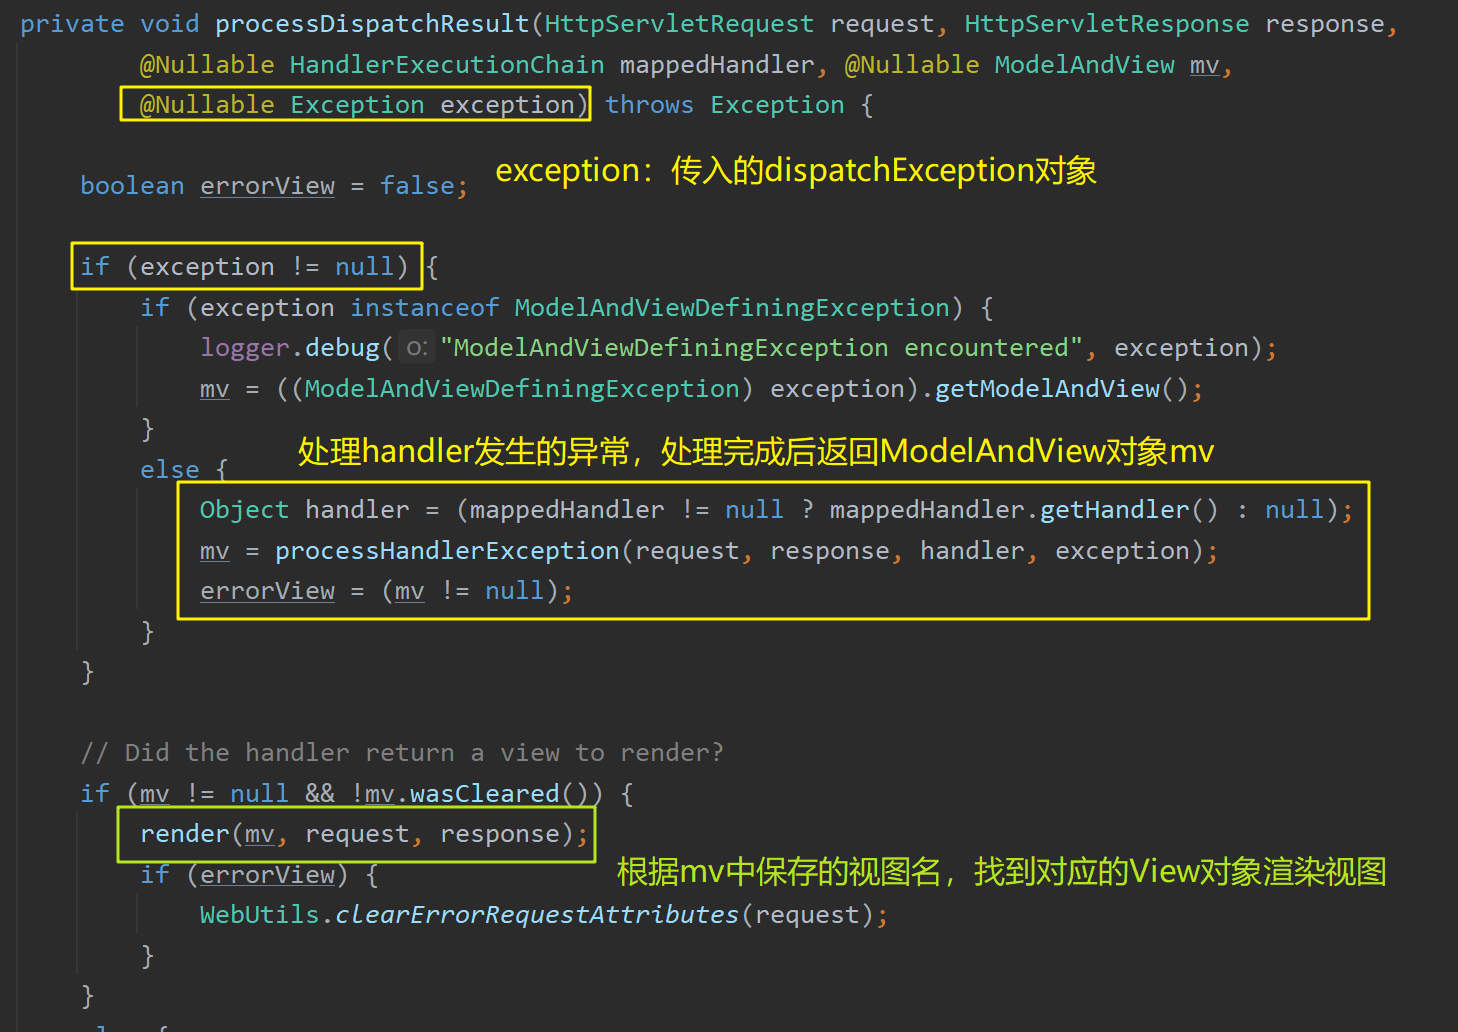
关键分析 processHandlerException() 方法,该方法内处理了异常消息,并返回了一个ModelAndView对象。该方法内遍历了容器中存在的所有处理器异常解析器HandlerExceptionResolver,判断哪一个能处理当前异常:
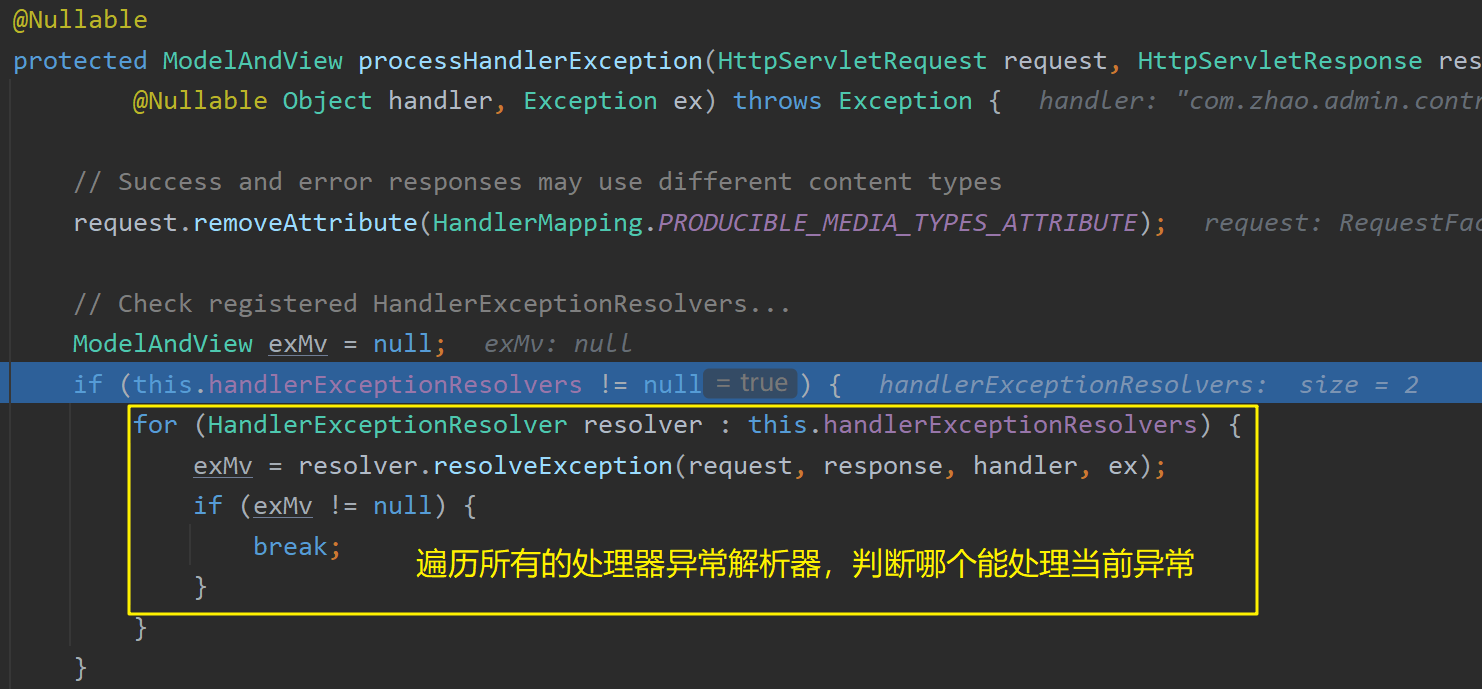
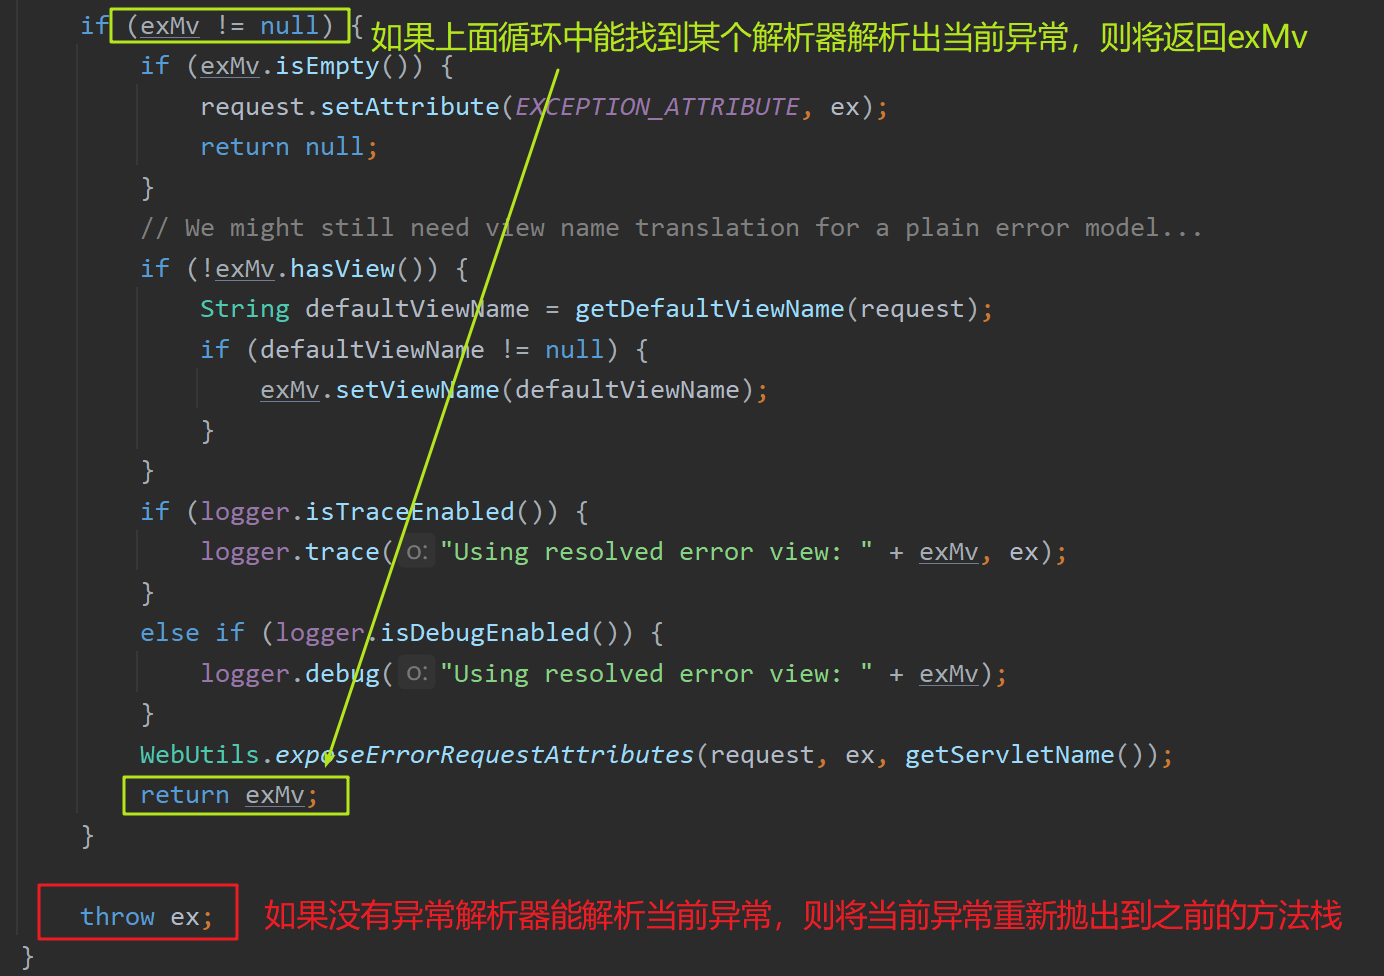
循环过程中,直到某个解析器解析异常后返回的exMv不为null,才跳出循环,默认没有任何解析器能够解析出exMv,异常将被抛出回 processDispatchResult() 所在的方法栈。该异常被catch后,将倒序执行mappedHandler中所有已执行过的拦截器的 afterCompletion() 方法:
此时,当前带有异常的请求的执行流程分析完毕,此时并没有进行页面跳转等操作。接着,Spring MVC的底层将发送一个url为"/error"的请求,该请求将由BasicErrorController处理(见上文分析)
容器中默认存在的处理器异常解析器有:
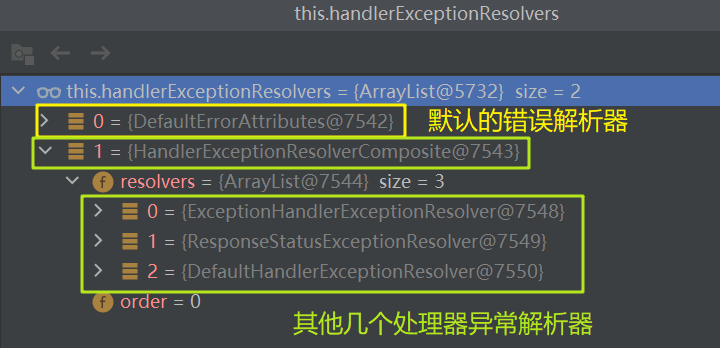
其中0 - DefaultErrorAttributes 即为之前分析过的默认错误解析器:
DefaultErrorAttributes:定义错误页面里能包含哪些内容。实现了ErrorAttributes接口和HandlerExceptionResolver接口。
其内保存了错误的状态信息,并会在解析异常时调用 resolveException() 方法,将异常信息存储在request域中,并返回一个null的ModelAndView: