Seata:https:// github.com/seata/seata
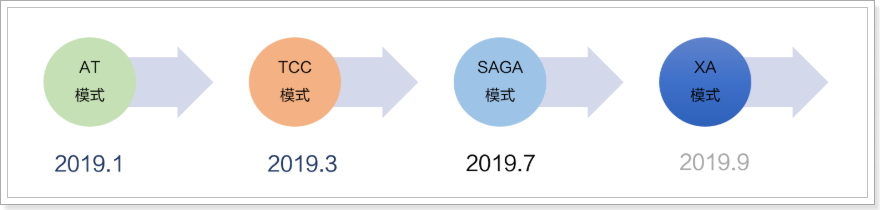
Seata(Simple Extensible Autonomous Transaction Architecture,简单可扩展自治事务框架)是 2019 年 1 月份蚂蚁金服和阿里巴巴共同开源的分布式事务解决方案。Seata 开源半年左右,目前已经有接近一万 star,社区非常活跃。
Seata 会有 4 种分布式事务解决方案,分别是 AT 模式、TCC 模式、Saga 模式和 XA 模式:
Seata中比较常用的是AT模式 。下面将介绍其工作原理。
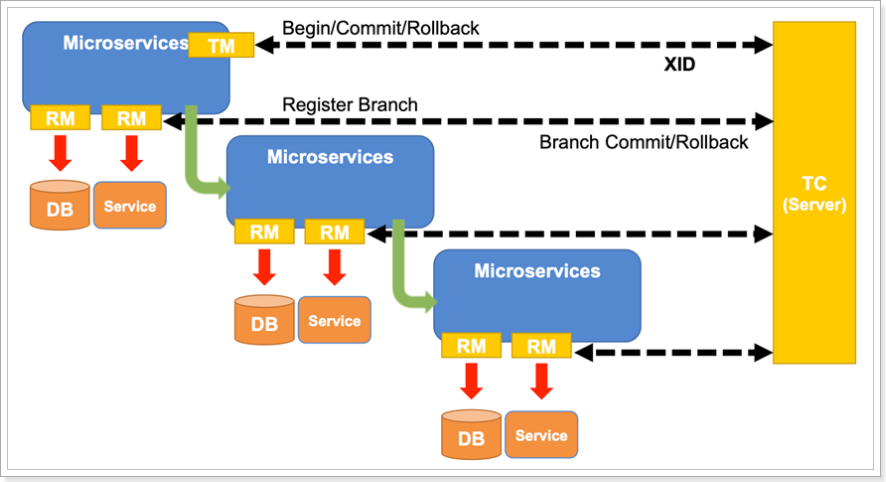
如下图所示,Seata 中有三大模块,分别是 TM 、RM 和 TC 。 其中 TM 和 RM 是作为 Seata 的客户端与业务系统集成在一起(集成在业务代码中) ,TC 作为 Seata 的服务端独立部署,并被注册到注册中心和配置中心 。
Seata 中的几个基本概念:
TC(Transaction Coordinator) :事务协调者,维护全局和分支事务的状态,驱动全局事务提交或回滚(TM之间的协调者),TC作为Seata的服务端 Seata-Serve,下载后直接使用jar包运行,其将被注册到注册中心和配置中心从而被各个微服务订阅 。TM(Transaction Manager) :事务管理器,定义全局事务的范围:开始全局事务、提交或回滚全局事务。TM对应的方法使用 @GlobalTransactional 注解标注,其内的业务代码处于同一个全局事务下。RM(Resource Manager) :资源管理器,管理分支事务处理的资源,与TC交谈以注册分支事务和报告分支事务的状态,并驱动分支事务提交或回滚。
三者工作分工 :
TM:业务模块中全局事务的开启者
向TC开启一个全局事务(标注 @GlobalTransactionnal 注解代表开启一个全局事务)
全局事务创建成功并生成一个全局唯一的XID,XID在微服务调用链路的上下文中传播;
调用其它微服务(例如订单模块作为TM调用了库存模块和支付模块)
TM向TC发起针对XID的全局提交或回滚决议
RM:业务模块执行者中包含RM部分,负责向TC汇报事务执行状态
负责与数据库交互,执行本地事务
向TC注册分支事务 ,并提交本地事务执行结果将其纳入XID对应全局事务的管辖
TM:结束对微服务的调用,通知TC全局事务执行完毕,事务一阶段结束
TC:汇总各个分支事务执行结果,决定分布式事务是提交还是回滚 ,通知所有 RM提交/回滚资源,事务二阶段结束。
三者的关系 :
TM用于开启全局事务生成XID,调用其他微服务,并在全局事务的方法执行完毕后通知TC全局事务执行完毕(即一阶段结束),此时TC即可统计各个分支事务的执行结果判断二阶段应该是提交还是回滚;
每个RM与本地数据库交互,执行本地事务并立即提交(不阻塞),之后向TC注册当前分支事务的信息,最后将本地事务提交的结果上报给 TC;
TC调度XID下管辖的全部分支事务完成提交或回滚请求。其先保存每个RM注册的分支事务信息,当收到TM的一阶段结束通知后,根据接收汇总到的各个分支事务的执行结果判断二阶段应该是提交还是回滚:若都成功,则通知每个RM二阶段提交;若有失败,则通知每个RM二阶段回滚
一阶段 :
TM开启全局事务,并向TC声明全局事务,包括全局事务XID信息
TM所在服务调用其它微服务
微服务主要由RM来执行
查询before_image
执行本地事务
查询after_image
生成undo_log并写入数据库
向TC注册分支事务,告知事务执行结果
获取全局锁(阻止其它全局事务并发修改当前数据)
释放本地锁(不影响其它业务对数据的操作)
待所有业务执行完毕,事务发起者(TM)会尝试向TC提交全局事务
二阶段 :
TC统计分支事务执行情况,根据结果判断下一步行为:
分支都成功:通知分支事务,提交事务
有分支执行失败:通知执行成功的分支事务,回滚数据
分支事务的RM收到TC传来的消息:
提交事务:直接清空before_image和after_image信息,释放全局锁
回滚事务:
校验after_image,判断是否有脏写
如果没有脏写,回滚数据到before_image,清除before_image和after_image
如果有脏写,请求人工介入
详见Seata的官方文档:https://seata.io/zh-cn/docs/overview/what-is-seata.html
以一个示例来说明 AT 分支的整个工作过程。
业务表:product
Field
Type
Key
id
bigint(20)
PRI
name
varchar(100)
since
varchar(100)
AT 分支事务的业务逻辑:
1 update product set name = 'GTS' where name = 'TXC' ;
过程:
解析 SQL :得到 SQL 的类型(UPDATE),表(product),条件(where name = ‘TXC’)等相关的信息。查询 before image(前镜像) :根据解析得到的条件信息,生成查询语句,定位数据(即修改前先查询出来当前这,保存到undo log)。
1 select id, name, since from product where name = 'TXC' ;
得到前镜像:
执行业务 SQL :更新这条记录的 name 为 ‘GTS’。查询 after image(后镜像) :根据前镜像的结果,通过 主键(id) 定位数据。
1 select id, name, since from product where id = `1 `;
得到后镜像:
插入回滚日志 :把前后镜像数据以及业务 SQL 相关的信息组成一条回滚日志记录,插入到 UNDO_LOG 表中:
1
2
3
4
5
6
7
8
9
10
11
12
13
14
15
16
17
18
19
20
21
22
23
24
25
26
27
28
29
30
31
32
33
34
35
36
37
38
39
40
41
42
43
{ "branchId" : 641789253 , "undoItems" : [{ "afterImage" : { "rows" : [{ "fields" : [{ "name" : "id" , "type" : 4 , "value" : 1 }, { "name" : "name" , "type" : 12 , "value" : "GTS" }, { "name" : "since" , "type" : 12 , "value" : "2014" }] }], "tableName" : "product" }, "beforeImage" : { "rows" : [{ "fields" : [{ "name" : "id" , "type" : 4 , "value" : 1 }, { "name" : "name" , "type" : 12 , "value" : "TXC" }, { "name" : "since" , "type" : 12 , "value" : "2014" }] }], "tableName" : "product" }, "sqlType" : "UPDATE" }], "xid" : "xid:xxx" }
提交前,向 TC 注册分支 :申请 product 表中,主键值等于 1 的记录的 全局锁 。本地事务提交 :业务数据的更新和前面步骤中生成的 UNDO LOG 一并提交。将本地事务提交的结果上报给 TC 。
若收到 TC 的分支回滚 请求,开启一个本地事务,执行如下操作:
通过 XID 和 Branch ID 查找到相应的 UNDO LOG 记录(同一个微服务可能同时参与多个不同的事务组,有多个 XID)。
数据校验 :拿 UNDO LOG 中的后镜像与当前数据进行比较,如果有不同,说明数据被当前全局事务之外的动作做了修改。这种情况,需要根据配置策略来做处理。根据 UNDO LOG 中的前镜像 和业务 SQL 的相关信息 生成并执行回滚的语句:
1 update product set name = 'TXC' where id = 1 ;
提交本地事务。并把本地事务的执行结果(即分支事务回滚的结果)上报给 TC 。
收到 TC 的分支提交 请求,把请求放入一个异步任务的队列 中,马上返回提交成功 的结果给 TC。
异步任务阶段的分支提交请求将异步和批量地删除相应 UNDO LOG 记录 。
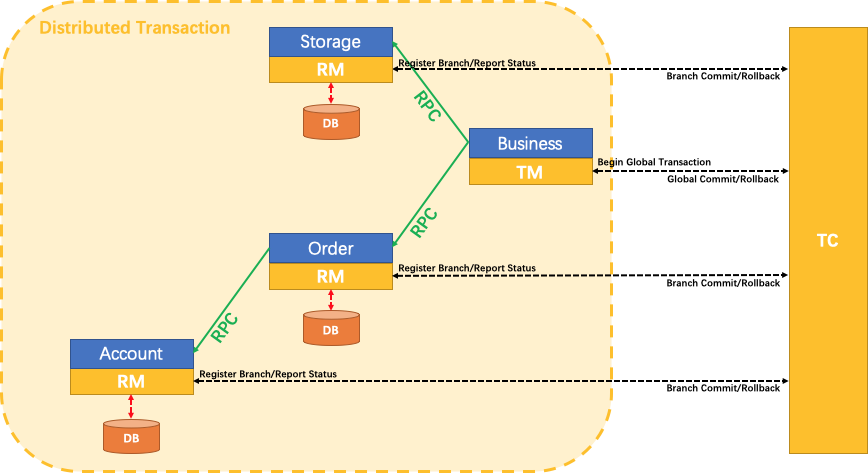
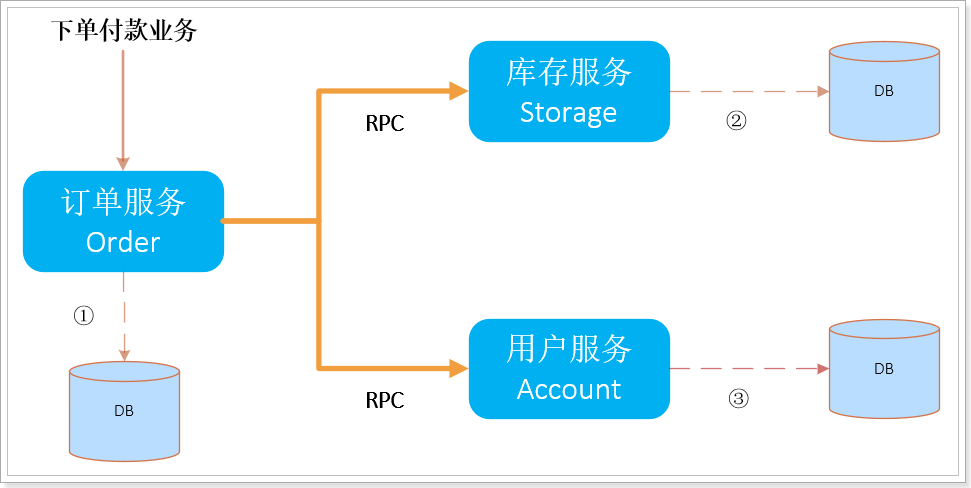
假定一个用户购买商品的业务逻辑。整个业务逻辑由3个微服务提供支持:
仓储服务 :对给定的商品扣除仓储数量。订单服务 :根据采购需求创建订单。帐户服务 :从用户帐户中扣除余额。
流程图:
订单服务在下单时,同时调用库存服务和用户服务,此时就会发生跨服务和跨数据源的分布式事务问题。
https://blog.csdn.net/u011863024/article/details/114298288
注意 :Seata 低版本与高版本配置文件差异很大,具体配置参考官方。
Seata 模型中的TC即为其官方提供的Seata-Server,下载地址
将seata-server-0.9.0.zip解压到指定目录。其核心配置文件主要有两个(${seata_home}/conf/目录):
registry.conf:配置注册中心信息file.conf:配置事务信息以及数据库信息
registry.conf配置文件需要指定使用的注册中心和配置中心信息(本案例使用Nacos), TC 将被注册到注册中心和配置中心,其他的微服务模块都去注册中心订阅TC的地址:
1
2
3
4
5
6
7
8
9
10
11
12
13
14
15
16
17
18
19
20
21
22
23
24
registry { # file 、nacos 、eureka、redis、zk、consul、etcd3、sofa # 注册中心改用为nacos type = "nacos" nacos { ## 加端口号 serverAddr = "localhost:8848" namespace = "public" cluster = "default" } ... } config { # file、nacos 、apollo、zk、consul、etcd3 type = "nacos" nacos { serverAddr = "localhost:8848" namespace = "public" } ... }
file.conf配置文件需要修改的内容:
事务组名称:my_tx_group(同一个事务组里的业务模块应配置相同的组名)
事务日志存储模式: "db"
数据库信息
1
2
3
4
5
6
7
8
9
10
11
12
13
14
15
16
17
18
19
20
21
22
23
24
25
26
27
28
29
30
31
32
33
34
35
36
37
38
39
40
41
42
43
44
45
46
47
48
49
50
51
service { ## my_tx_group 是自定义的事务组名 vgroup_mapping.my.test.tx_group="my_tx_group" default.grouplist = "127.0.0.1:8091" enableDegrade = false disable = false max.commitretry.timeout= "-1" max.ollbackretry.timeout= "-1" } ## transaction log store store { ## store mode: file, db ## 事务日志的存储模式改成db mode = "db" ## file store file { dir = "sessionStore" # branch session size, if exceeded first try compress lockkey, still exceeded throws exceptions max-branch-session-size = 16384 # globe session size, if exceeded throws exceptions max-global-session-size = 512 # file buffer size, if exceeded allocate new buffer file-write-buffer-cache-size = 16384 # when recover batch read size session.reload.read_size= 100 # async, sync flush-disk-mode = async } # database store db { ## the implement of javax.sql.DataSource, such as DruidDataSource(druid)/BasicDataSource(dbcp) etc. datasource = "dbcp" ## mysql/oracle/h2/oceanbase etc. ## 配置数据源 db-type = "mysql" driver-class-name = "com.mysql.jdbc.Driver" url = "jdbc:mysql://127.0.0.1:3306/seata" user = "root" password = "你自己密码" min-conn= 1 max-conn = 3 global.table = "global_table" branch.table = "branch_table" lock-table = "lock_table" query-limit = 100 } }
关键配置:
store:TC的服务端数据存储配置
mode:数据存储方式,支持两种:file和db
file:将数据存储在本地文件中,性能比较好,但不支持水平扩展db:将数据保存在指定的数据库中,需要指定数据库连接信息
如果用文件作为存储介质,不需要其它配置了,直接运行即可。但是如果使用db作为存储介质,还需要在数据库中创建3张表:"global_table"、"branch_table"、"lock_table",用于存储全局XID信息,分支信息和锁信息。在 Mysql 5.7 数据库新建库seata,在seata库里创建这三张表。建表db_store.sql在\seata-server-0.9.0\seata\conf目录里面:
1 2 3 4 5 6 7 8 9 10 11 12 13 14 15 16 17 18 19 20 21 22 23 24 25 26 27 28 29 30 31 32 33 34 35 36 37 38 39 40 41 42 43 44 45 46 47 48 49 50 51 52 drop table if exists `global_table`;create table `global_table` ( `xid` varchar (128 ) not null , `transaction_id` bigint , `status` tinyint not null , `application_id` varchar (32 ), `transaction_service_group` varchar (32 ), `transaction_name` varchar (128 ), `timeout` int , `begin_time` bigint , `application_data` varchar (2000 ), `gmt_create` datetime, `gmt_modified` datetime, primary key (`xid`), key `idx_gmt_modified_status` (`gmt_modified`, `status`), key `idx_transaction_id` (`transaction_id`) ); drop table if exists `branch_table`;create table `branch_table` ( `branch_id` bigint not null , `xid` varchar (128 ) not null , `transaction_id` bigint , `resource_group_id` varchar (32 ), `resource_id` varchar (256 ) , `lock_key` varchar (128 ) , `branch_type` varchar (8 ) , `status` tinyint, `client_id` varchar (64 ), `application_data` varchar (2000 ), `gmt_create` datetime, `gmt_modified` datetime, primary key (`branch_id`), key `idx_xid` (`xid`) ); drop table if exists `lock_table`;create table `lock_table` ( `row_key` varchar (128 ) not null , `xid` varchar (96 ), `transaction_id` long , `branch_id` long, `resource_id` varchar (256 ) , `table_name` varchar (32 ) , `pk` varchar (36 ) , `gmt_create` datetime , `gmt_modified` datetime, primary key(`row_key`) );
以上步骤即完成了Seata-Server的配置工作,接下来先启动Nacos服务中心,再启动seata-server - seata-server-0.9.0\seata\bin\seata-server.bat。此时的 Seata-Server 即注册到了Nacos服务中心,后续的微服务即可订阅到其信息。
创建三个业务数据库:
seata_ order:订单信息数据库seata_ storage:库存信息数据库seata_ account:账户信息数据库
在 seata_order 库下建 t_order 表:
1
2
3
4
5
6
7
8
9
10
CREATE TABLE t_order ( `id` BIGINT (11 ) NOT NULL AUTO_INCREMENT PRIMARY KEY, `user_id` BIGINT (11 ) DEFAULT NULL COMMENT '用户id' , `product_id` BIGINT (11 ) DEFAULT NULL COMMENT '产品id' , `count` INT (11 ) DEFAULT NULL COMMENT '数量' , `money` DECIMAL (11 ,0 ) DEFAULT NULL COMMENT'金额' , `status` INT (1 ) DEFAULT NULL COMMENT '订单状态: 0:创建中; 1:已完结' , ) ENGINE= INNODB AUTO_INCREMENT= ` DEFAULT CHARSET= utf8; SELECT * FROM t_order;
在 seata_storage 库下建 t_storage 表:
1
2
3
4
5
6
7
8
9
10
11
12
CREATE TABLE t_storage (`id` BIGINT (11 ) NOT NULL AUTO_INCREMENT PRIMARY KEY, `product_id` BIGINT (11 ) DEFAULT NULL COMMENT '产品id' , `total` INT (11 ) DEFAULT NULL COMMENT '总库存' , `used` INT (11 ) DEFAULT NULL COMMENT '已用库存' , `residue` INT (11 ) DEFAULT NULL COMMENT '剩余库存' ) ENGINE= INNODB AUTO_INCREMENT= 2 DEFAULT CHARSET= utf8; INSERT INTO seata_storage.t_storage(`id`, `product_id`, `total`, `used`, `residue`)VALUES ('1' , '1' , '100' , '0' ,'100' );SELECT * FROM t_storage;
在 seata_account库下建 t_account 表:
1
2
3
4
5
6
7
8
9
10
11
12
CREATE TABLE t_account( `id` BIGINT (11 ) NOT NULL AUTO_INCREMENT PRIMARY KEY COMMENT 'id' , `user_id` BIGINT (11 ) DEFAULT NULL COMMENT '用户id' , `total` DECIMAL (10 ,0 ) DEFAULT NULL COMMENT '总额度' , `used` DECIMAL (10 ,0 ) DEFAULT NULL COMMENT '已用余额' , I `residue` DECIMAL (10 ,0 ) DEFAULT '0' COMMENT '剩余可用额度' ) ENGINE= INNODB AUTO_INCREMENT= 2 DEFAULT CHARSET= utf8; INSERT INTO seata_account.t_account(`id`, `user_id`, `total`, `used`, `residue`)VALUES ('1' , '1' , '1000' , '0' , '1000' );SELECT * FROM t_account;
按照上述三个库分别建对应的回滚日志表 undo log
订单-库存-账户3个库下都需要建各自的回滚日志表
建表语句见 \seata-server-0.9.0\seata\conf 目录下的 db_ undo_ log.sql
1 2 3 4 5 6 7 8 9 10 11 12 13 14 15 16 17 18 19 drop table `undo_log`;CREATE TABLE `undo_log` ( `id` bigint (20 ) NOT NULL AUTO_INCREMENT, `branch_id` bigint (20 ) NOT NULL , `xid` varchar (100 ) NOT NULL , `context` varchar (128 ) NOT NULL , `rollback_info` longblob NOT NULL , `log_status` int (11 ) NOT NULL , `log_created` datetime NOT NULL , `log_modified` datetime NOT NULL , `ext` varchar (100 ) DEFAULT NULL , PRIMARY KEY (`id`), UNIQUE KEY `ux_undo_log` (`xid`,`branch_id`) ) ENGINE= InnoDB AUTO_INCREMENT= 1 DEFAULT CHARSET= utf8;
创建订单模块 seata-order-service2001
注意,排除了spring-cloud-starter-alibaba-seata中的seata版本,而使用自定义的seata版本包:
1
2
3
4
5
6
7
8
9
10
11
12
13
14
15
16
17
18
19
20
21
22
23
24
25
26
27
28
29
30
31
32
33
34
35
36
37
38
39
40
41
42
43
44
45
46
47
48
49
50
51
52
53
54
55
56
57
58
59
60
61
62
63
64
65
66
67
68
69
70
71
72
73
74
75
76
77
78
79
<?xml version="1.0" encoding="UTF-8"?> <project xmlns ="http://maven.apache.org/POM/4.0.0" xmlns:xsi ="http://www.w3.org/2001/XMLSchema-instance" xsi:schemaLocation ="http://maven.apache.org/POM/4.0.0 http://maven.apache.org/xsd/maven-4.0.0.xsd" > <parent > <artifactId > cloud2020</artifactId > <groupId > com.atguigu.springcloud</groupId > <version > 1.0-SNAPSHOT</version > </parent > <modelVersion > 4.0.0</modelVersion > <artifactId > seata-order-service2001</artifactId > <dependencies > <dependency > <groupId > com.alibaba.cloud</groupId > <artifactId > spring-cloud-starter-alibaba-nacos-discovery</artifactId > </dependency > <dependency > <groupId > com.alibaba.cloud</groupId > <artifactId > spring-cloud-starter-alibaba-seata</artifactId > <exclusions > <exclusion > <artifactId > seata-all</artifactId > <groupId > io.seata</groupId > </exclusion > </exclusions > </dependency > <dependency > <groupId > io.seata</groupId > <artifactId > seata-all</artifactId > <version > 0.9.0</version > </dependency > <dependency > <groupId > org.springframework.cloud</groupId > <artifactId > spring-cloud-starter-openfeign</artifactId > </dependency > <dependency > <groupId > org.springframework.boot</groupId > <artifactId > spring-boot-starter-web</artifactId > </dependency > <dependency > <groupId > org.springframework.boot</groupId > <artifactId > spring-boot-starter-actuator</artifactId > </dependency > <dependency > <groupId > mysql</groupId > <artifactId > mysql-connector-java</artifactId > <version > 5.1.37</version > </dependency > <dependency > <groupId > com.alibaba</groupId > <artifactId > druid-spring-boot-starter</artifactId > <version > 1.1.10</version > </dependency > <dependency > <groupId > org.mybatis.spring.boot</groupId > <artifactId > mybatis-spring-boot-starter</artifactId > <version > 2.0.0</version > </dependency > <dependency > <groupId > org.springframework.boot</groupId > <artifactId > spring-boot-starter-test</artifactId > <scope > test</scope > </dependency > <dependency > <groupId > org.projectlombok</groupId > <artifactId > lombok</artifactId > <optional > true</optional > </dependency > </dependencies > </project >
1
2
3
4
5
6
7
8
9
10
11
12
13
14
15
16
17
18
19
20
21
22
23
24
25
26
27
28
29
30
31
server: port: 2001 spring: application: name: seata-order-service cloud: alibaba: seata: tx-service-group: my_tx_group nacos: discovery: server-addr: localhost:8848 datasource: driver-class-name: com.mysql.jdbc.Driver url: jdbc:mysql://localhost:3306/seata_order username: root password: 123456 feign: hystrix: enabled: false logging: level: io: seata: info mybatis: mapperLocations: classpath:mapper/*.xml
在 resouces 目录下创建 file.conf 配置事务组名和数据等信息(另外两个模块同样需要创建该文件)
1
2
3
4
5
6
7
8
9
10
11
12
13
14
15
16
17
18
19
20
21
22
23
24
25
26
27
28
29
30
31
32
33
34
35
36
37
38
39
40
41
42
43
44
45
46
47
48
49
50
51
52
53
54
55
56
57
58
59
60
61
62
63
64
65
66
67
68
69
70
71
72
73
74
75
76
77
78
79
80
81
82
83
84
85
86
87
88
89
90
91
92
93
94
95
96
97
98
99
100
101
102
103
104
105
106
107
108
109
110
111
112
113
114
115
116
117
118
119
120
121
122
123
124
125
126
127
128
129
130
131
132
133
134
135
136
137
138
transport { # tcp udt unix-domain-socket type = "TCP" #NIO NATIVE server = "NIO" #enable heartbeat heartbeat = true #thread factory for netty thread-factory { boss-thread-prefix = "NettyBoss" worker-thread-prefix = "NettyServerNIOWorker" server-executor-thread-prefix = "NettyServerBizHandler" share-boss-worker = false client-selector-thread-prefix = "NettyClientSelector" client-selector-thread-size = 1 client-worker-thread-prefix = "NettyClientWorkerThread" # netty boss thread size,will not be used for UDT boss-thread-size = 1 #auto default pin or 8 worker-thread-size = 8 } shutdown { # when destroy server, wait seconds wait = 3 } serialization = "seata" compressor = "none" } service { vgroup_mapping.my_tx_group = "my_tx_group" # 修改自定义事务组名称 default.grouplist = "127.0.0.1:8091" enableDegrade = false disable = false max.commit.retry.timeout = "-1" max.rollback.retry.timeout = "-1" disableGlobalTransaction = false } client { async.commit.buffer.limit = 10000 lock { retry.internal = 10 retry.times = 30 } report.retry.count = 5 tm.commit.retry.count = 1 tm.rollback.retry.count = 1 } ## transaction log store store { ## store mode: file、db mode = "db" ## file store file { dir = "sessionStore" # branch session size , if exceeded first try compress lockkey, still exceeded throws exceptions max-branch-session-size = 16384 # globe session size , if exceeded throws exceptions max-global-session-size = 512 # file buffer size , if exceeded allocate new buffer file-write-buffer-cache-size = 16384 # when recover batch read size session.reload.read_size = 100 # async, sync flush-disk-mode = async } ## database store db { ## the implement of javax.sql.DataSource, such as DruidDataSource(druid)/BasicDataSource(dbcp) etc. datasource = "dbcp" ## mysql/oracle/h2/oceanbase etc. db-type = "mysql" driver-class-name = "com.mysql.jdbc.Driver" url = "jdbc:mysql://127.0.0.1:3306/seata" user = "root" password = "123456" min-conn = 1 max-conn = 3 global.table = "global_table" branch.table = "branch_table" lock-table = "lock_table" query-limit = 100 } } lock { ## the lock store mode: local、remote mode = "remote" local { ## store locks in user's database } remote { ## store locks in the seata's server } } recovery { #schedule committing retry period in milliseconds committing-retry-period = 1000 #schedule asyn committing retry period in milliseconds asyn-committing-retry-period = 1000 #schedule rollbacking retry period in milliseconds rollbacking-retry-period = 1000 #schedule timeout retry period in milliseconds timeout-retry-period = 1000 } transaction { undo.data.validation = true undo.log.serialization = "jackson" undo.log.save.days = 7 #schedule delete expired undo_log in milliseconds undo.log.delete.period = 86400000 undo.log.table = "undo_log" } ## metrics settings metrics { enabled = false registry-type = "compact" # multi exporters use comma divided exporter-list = "prometheus" exporter-prometheus-port = 9898 } support { ## spring spring { # auto proxy the DataSource bean datasource.autoproxy = false } }
配置解读:
transport:与TC交互的一些配置
heartbeat:client和server通信心跳检测开关enableClientBatchSendRequest:客户端事务消息请求是否批量合并发送
service:TC的地址配置,用于获取TC的地址
vgroup_mapping.test_tx_group = "my_tx_group":
test_tx_group:是事务组名称,要与application.yml中配置一致,seata_tc_server:是TC服务端在注册中心的id,将来通过注册中心获取TC地址enableDegrade:服务降级开关,默认关闭。如果开启,当业务重试多次失败后会放弃全局事务disableGlobalTransaction:全局事务开关,默认false。false为开启,true为关闭
default.grouplist:这个当注册中心为file的时候,才用到
client:客户端配置
rm:资源管理器配
asynCommitBufferLimit:二阶段提交默认是异步执行,这里指定异步队列的大小lock:全局锁配置
retryInterval:校验或占用全局锁重试间隔,默认10,单位毫秒retryTimes:校验或占用全局锁重试次数,默认30次retryPolicyBranchRollbackOnConflict:分支事务与其它全局回滚事务冲突时锁策略,默认true,优先释放本地锁让回滚成功
reportRetryCount:一阶段结果上报TC失败后重试次数,默认5次
tm:事务管理器配置
commitRetryCount:一阶段全局提交结果上报TC重试次数,默认1rollbackRetryCount:一阶段全局回滚结果上报TC重试次数,默认1
undo:undo_log的配置
dataValidation:是否开启二阶段回滚镜像校验,默认truelogSerialization:undo序列化方式,默认JacksonlogTable:自定义undo表名,默认是undo_log
log:日志配置
exceptionRate:出现回滚异常时的日志记录频率,默认100,百分之一概率。回滚失败基本是脏数据,无需输出堆栈占用硬盘空间
在 resouces 目录下创建 registry.conf 配置注册中心和配置中心信息(另外两个模块同样需要创建该文件)
1
2
3
4
5
6
7
8
9
10
11
12
13
14
15
16
17
18
19
20
21
22
23
24
25
26
27
28
29
30
31
32
33
34
35
36
37
38
39
40
41
42
43
44
45
46
47
48
49
50
51
52
53
54
55
56
57
58
59
60
61
62
63
64
65
66
67
68
69
70
71
72
73
registry { # file 、nacos 、eureka、redis、zk、consul、etcd3、sofa type = "nacos" nacos { serverAddr = "localhost:8848" namespace = "" cluster = "default" } eureka { serviceUrl = "http://localhost:8761/eureka" application = "default" weight = "1" } redis { serverAddr = "localhost:6379" db = "0" } zk { cluster = "default" serverAddr = "127.0.0.1:2181" session.timeout = 6000 connect.timeout = 2000 } consul { cluster = "default" serverAddr = "127.0.0.1:8500" } etcd3 { cluster = "default" serverAddr = "http://localhost:2379" } sofa { serverAddr = "127.0.0.1:9603" application = "default" region = "DEFAULT_ZONE" datacenter = "DefaultDataCenter" cluster = "default" group = "SEATA_GROUP" addressWaitTime = "3000" } file { name = "file.conf" } } config { # file、nacos 、apollo、zk、consul、etcd3 type = "nacos" nacos { serverAddr = "localhost:8848" namespace = "" } consul { serverAddr = "127.0.0.1:8500" } apollo { app.id = "seata-server" apollo.meta = "http://192.168.1.204:8801" } zk { serverAddr = "127.0.0.1:2181" session.timeout = 6000 connect.timeout = 2000 } etcd3 { serverAddr = "http://localhost:2379" } file { name = "file.conf" } }
domain:
1
2
3
4
5
6
7
8
9
10
11
12
13
14
15
16
import lombok.AllArgsConstructor;import lombok.Data;import lombok.NoArgsConstructor;@Data @AllArgsConstructor @NoArgsConstructor public class CommonResult <T > private Integer code; private String message; private T data; public CommonResult (Integer code, String message) this (code,message,null ); } }
1
2
3
4
5
6
7
8
9
10
11
12
13
14
15
16
17
18
19
20
21
22
23
24
package com.atguigu.springcloud.alibaba.domain;import lombok.AllArgsConstructor;import lombok.Data;import lombok.NoArgsConstructor;import java.math.BigDecimal;@Data @AllArgsConstructor @NoArgsConstructor public class Order private Long id; private Long userId; private Long productId; private Integer count; private BigDecimal money; private Integer status; }
Dao接口及实现:
1
2
3
4
5
6
7
8
9
10
11
12
import com.atguigu.springcloud.alibaba.domain.Order;import org.apache.ibatis.annotations.Mapper;import org.apache.ibatis.annotations.Param;@Mapper public interface OrderDao void create (Order order) void update (@Param("userId") Long userId,@Param("status") Integer status) }
1
2
3
4
5
6
7
8
9
10
11
12
13
14
15
16
17
18
19
20
21
22
23
24
25
<?xml version="1.0" encoding="UTF-8" ?> <!DOCTYPE mapper PUBLIC "-//mybatis.org//DTD Mapper 3.0//EN" "http://mybatis.org/dtd/mybatis-3-mapper.dtd" > <mapper namespace ="com.atguigu.springcloud.alibaba.dao.OrderDao" > <resultMap id ="BaseResultMap" type ="com.atguigu.springcloud.alibaba.domain.Order" > <id column ="id" property ="id" jdbcType ="BIGINT" /> <result column ="user_id" property ="userId" jdbcType ="BIGINT" /> <result column ="product_id" property ="productId" jdbcType ="BIGINT" /> <result column ="count" property ="count" jdbcType ="INTEGER" /> <result column ="money" property ="money" jdbcType ="DECIMAL" /> <result column ="status" property ="status" jdbcType ="INTEGER" /> </resultMap > <insert id ="create" > insert into t_order (id,user_id,product_id,count,money,status) values (null,#{userId},#{productId},#{count},#{money},0); </insert > <update id ="update" > update t_order set status = 1 where user_id=#{userId} and status = #{status}; </update > </mapper >
Service接口及实现:
OrderService
StorageService
AccountService
1
2
3
4
5
import com.atguigu.springcloud.alibaba.domain.Order;public interface OrderService void create (Order order) }
StorageService 接口和 AccountService 接口标注 @FeignClient 注解,开启远程调用与负载均衡
1
2
3
4
5
6
7
8
9
10
11
12
import com.atguigu.springcloud.alibaba.domain.CommonResult;import org.springframework.cloud.openfeign.FeignClient;import org.springframework.web.bind.annotation.PostMapping;import org.springframework.web.bind.annotation.RequestParam;import java.math.BigDecimal;@FeignClient(value = "seata-storage-service") public interface StorageService @PostMapping(value = "/storage/decrease") CommonResult decrease (@RequestParam("productId") Long productId, @RequestParam("count") Integer count) ; }
1
2
3
4
5
6
7
8
9
10
11
12
import com.atguigu.springcloud.alibaba.domain.CommonResult;import org.springframework.cloud.openfeign.FeignClient;import org.springframework.web.bind.annotation.PostMapping;import org.springframework.web.bind.annotation.RequestParam;import java.math.BigDecimal;@FeignClient(value = "seata-account-service") public interface AccountService @PostMapping(value = "/account/decrease") CommonResult decrease (@RequestParam("userId") Long userId, @RequestParam("money") BigDecimal money) ; }
订单微服务的 OrderServiceImpl 调用其他微服务,使用 @GlobalTransactional 注解开启 Seata 全局事务,表示当前方法内的业务全部处于同一个 Seata 全局事务中
1
2
3
4
5
6
7
8
9
10
11
12
13
14
15
16
17
18
19
20
21
22
23
24
25
26
27
28
29
30
31
32
33
34
35
36
37
38
39
40
41
42
43
44
45
46
47
48
49
50
51
52
import com.atguigu.springcloud.alibaba.dao.OrderDao;import com.atguigu.springcloud.alibaba.domain.Order;import com.atguigu.springcloud.alibaba.service.AccountService;import com.atguigu.springcloud.alibaba.service.OrderService;import com.atguigu.springcloud.alibaba.service.StorageService;import io.seata.spring.annotation.GlobalTransactional;import lombok.extern.slf4j.Slf4j;import org.springframework.stereotype.Service;import javax.annotation.Resource;@Service @Slf4j public class OrderServiceImpl implements OrderService @Resource private OrderDao orderDao; @Resource private StorageService storageService; @Resource private AccountService accountService; @Override @GlobalTransactional(name = "my-create-order", rollbackFor = Exception.class) public void create (Order order) { log.info("----->开始新建订单" ); orderDao.create(order); log.info("----->订单微服务开始调用库存,做扣减Count" ); storageService.decrease(order.getProductId(),order.getCount()); log.info("----->订单微服务开始调用库存,做扣减end" ); log.info("----->订单微服务开始调用账户,做扣减Money" ); accountService.decrease(order.getUserId(),order.getMoney()); log.info("----->订单微服务开始调用账户,做扣减end" ); log.info("----->修改订单状态开始" ); orderDao.update(order.getUserId(),0 ); log.info("----->修改订单状态结束" ); log.info("----->下订单结束了,O(∩_∩)O哈哈~" ); } }
Seata 的二阶段执行是通过拦截sql语句,分析语义来指定回滚策略,因此需要对DataSource做代理。在项目中添加一个配置类:
1
2
3
4
5
6
7
8
9
10
11
12
13
14
15
16
17
18
19
20
21
22
23
24
25
26
27
28
29
30
31
32
33
34
35
36
37
38
39
40
41
42
43
44
package com.zhao.order.config;import com.baomidou.mybatisplus.extension.spring.MybatisSqlSessionFactoryBean;import io.seata.rm.datasource.DataSourceProxy;import org.apache.ibatis.session.SqlSessionFactory;import org.springframework.context.annotation.Bean;import org.springframework.context.annotation.Configuration;import javax.sql.DataSource;@Configuration public class DataSourceProxyConfig @Value("${mybatis.mapperLocations}") private String mapperLocations; @Bean @ConfigurationProperties(prefix = "spring.datasource") public DataSource druidDataSource () return new DruidDataSource(); } @Bean public DataSourceProxy dataSourceProxy (DataSource dataSource) return new DataSourceProxy(dataSource); } @Bean public SqlSessionFactory sqlSessionFactoryBean (DataSource dataSource) throws Exception SqlSessionFactoryBean sqlSessionFactoryBean = new SqlSessionFactoryBean(); sqlSessionFactoryBean.setDataSource(new DataSourceProxy(dataSource)); return sqlSessionFactoryBean.getObject(); } }
这里的 DataSourceProxy 是 Seata 提供的代理类,用于代理原始数据源,进行拦截解析SQL语句等操作。
1
2
3
4
5
6
7
8
9
10
11
12
13
14
15
16
import org.springframework.boot.SpringApplication;import org.springframework.boot.autoconfigure.SpringBootApplication;import org.springframework.boot.autoconfigure.jdbc.DataSourceAutoConfiguration;import org.springframework.cloud.client.discovery.EnableDiscoveryClient;import org.springframework.cloud.openfeign.EnableFeignClients;@EnableDiscoveryClient @EnableFeignClients @SpringBootApplication(exclude = DataSourceAutoConfiguration.class) public class SeataOrderMainApp2001 public static void main (String[] args) SpringApplication.run(SeataOrderMainApp2001.class, args); } }
另外两个微服务模块与订单模块配置相同,本文不再赘述。区别在于其他业务模块的事务注解可以使用@Transactionnal,而不是@GlobalTransactional,只有事务发起者TM才需要添加@GlobalTransactional。
未完待续…