本项目前端选用 Vue + ElementUI + Thymeleaf 技术栈,后端选用 Spring Boot + Spring Cloud + Spring Cloud Alibaba + MyBatis-Plus + MySQL + Redis + ElasticSearch + RabbitMQ + Docker + Nginx 等技术栈。
云商城目前已实现注册、登录、上架、检索、购物车、订单、支付、秒杀等功能。
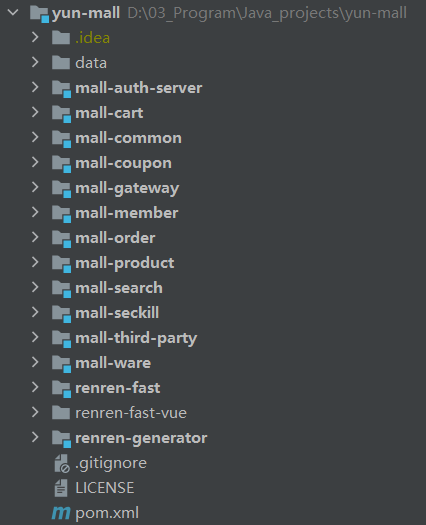
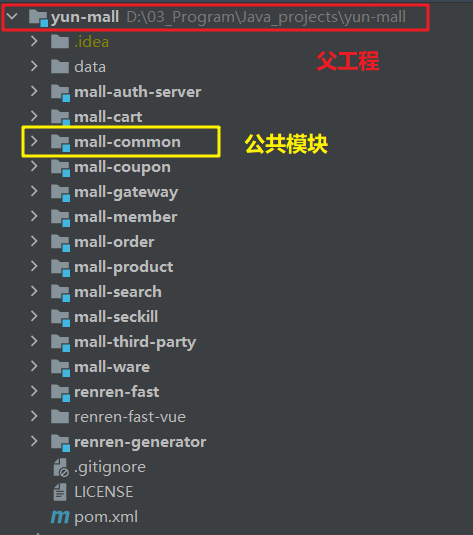
yun-mall父工程 。负责依赖管理与版本控制
mall-common:公共服务 。提供公共工具类、常量类、异常类与 TO/VO 类等mall-gateway:网关服务 。配置其他微服务的路由规则mall-auth-server:认证服务 。负责用户注册、登录与社交登录mall-cart:购物车服务 。负责将用户挑选好的 SKU 添加到购物车中mall-order:订单服务 。负责下订单、锁库存与第三方支付mall-product:商品服务 。核心服务,负责管理所有商品信息mall-search:检索服务 。负责在商城检索页提供商品检索功能mall-seckill:秒杀服务 。负责提供定时秒杀功能mall-third-party:第三方服务 。负责提供对象云存储与手机短信功能mall-ware:仓储服务 。被其他微服务远程调用,管理商品的库存信息mall-coupon:优惠券服务 。被其他微服务远程调用,查询会员的优惠券信息mall-member:会员服务 。被其他微服务远程调用,查询会员信息renren-fast:人人开源后台管理系统renren-generator:人人开源代码生成器
本项目前端选用 Vue + ElementUI + Thymeleaf 技术栈,具体为:
Vue:前端框架
Element :基于 Vue 的桌面端组件库(提供了许多 Vue 组件)
Axios:异步通信框架
Thymeleaf :Spring 模板引擎
Node.js:服务端 js
后端选用 Spring Boot + Spring Cloud + MyBatis-Plus + MySQL + Redis + ElasticSearch + RabbitMQ + Nginx + Docker技术栈。具体为:
Spring Boot
MyBatis-Plus:持久层框架
Redis:缓存中间件
ElasticSearch:全文搜索引擎中间件
RabbitMQ:消息中间件
Docker:应用容器引擎
Nginx:反向代理服务器
Redisson:分布式锁
Spring Cloud
Spring Cloud - Ribbon:负载均衡
Spring Cloud - OpenFeign:声明式 HTTP 客户端(调用服务远程)
Spring Cloud - Gateway:API 网关(webflux 编程模式)
Spring Cloud - Sleuth:调用链监控
Spring Cloud Alibaba
Spring Cloud Alibaba - Nacos:注册中心(服务注册与发现)
Spring Cloud Alibaba - Nacos:配置中心(动态配置管理)
Spring Cloud Alibaba - Seata:分布式事务解决方案
Spring Cloud Alibaba - Sentinel:服务容错(限流、降级、熔断)
Spring Cloud Alibaba OSS 对象云存储
Spring Cache:分布式缓存技术
Spring Session:分布式 Session 技术
各个微服务的端口号:
mall-gateway:88mall-coupon:7000mall-member:8000mall-order:9000mall-product:10000mall-ware:11000mall-search:12000mall-auth-server:20000mall-seckill:25000mall-third-party:30000mall-cart:50000renren-fast:8080
第三方技术栈端口号:
MySQL:3306
Redis:6379
ElasticSearch:9200
Kibana:5601
Nginx:80
RabbitMQ:5672;管理台:15672
1
2
3
4
5
6
7
8
192.168.56.102 yunmall.com 192.168.56.102 search.yunmall.com 192.168.56.102 item.yunmall.com 192.168.56.102 auth.yunmall.com 192.168.56.102 cart.yunmall.com 192.168.56.102 order.yunmall.com 192.168.56.102 member.yunmall.com 192.168.56.102 seckill.yunmall.com
后端项目结构:
yun-mall
创建父工程 yun-mall 管理所有微服务的依赖版本(其只包含 pom 文件)。
在 <properties> 中指定依赖的版本,这样子模块在导入 <dependencyManagement> 中的依赖时就不需要指定版本了,做到全局版本统一控制
在 <dependencyManagement> 中导入子模块常用的依赖(例如数据库、Spring Boot 和 Spring Cloud 等),并做好版本控制。这样子模块就可以在 <dependencies> 标签中按需导入 这些依赖:
在 <dependencyManagement> 中导入的依赖不会默认继承,子模块需要按需继承。
这些依赖只有子模块手动导入后才会生效(不会直接继承);如果在子模块中没有在 <dependencies> 标签中导入,则依赖不会生效
子模块导入的依赖都无需指定版本,由父模块统一管理版
不是所有模块都需要的依赖才会配置在 <dependencyManagement> 中,每个子模块按需导入自己需要的依赖 。
在 <dependencies> 中导入的依赖,子模块会直接继承 ,无需手动导入 也会默认生效。通常在这里配置所有子模块都需要 的依赖,例如 spring-boot-starter-test。
1
2
3
4
5
6
7
8
9
10
11
12
13
14
15
16
17
18
19
20
21
22
23
24
25
26
27
28
29
30
31
32
33
34
35
36
37
38
39
40
41
42
43
44
45
46
47
48
49
50
51
52
53
54
55
56
57
58
59
60
61
62
63
64
65
66
67
68
69
70
71
72
73
74
75
76
77
78
79
80
81
82
83
84
85
86
87
88
89
90
91
92
93
94
95
96
97
98
99
100
101
102
103
104
105
106
107
108
109
110
111
112
113
114
115
116
117
118
119
120
121
122
123
124
125
126
127
128
129
130
131
132
<?xml version="1.0" encoding="UTF-8"?> <project xmlns ="http://maven.apache.org/POM/4.0.0" xmlns:xsi ="http://www.w3.org/2001/XMLSchema-instance" xsi:schemaLocation ="http://maven.apache.org/POM/4.0.0 https://maven.apache.org/xsd/maven-4.0.0.xsd" > <modelVersion > 4.0.0</modelVersion > <groupId > com.zhao.yunmall</groupId > <artifactId > mall</artifactId > <version > 0.0.1-SNAPSHOT</version > <name > mall</name > <description > 父工程</description > <packaging > pom</packaging > <modules > <module > mall-coupon</module > <module > mall-member</module > <module > mall-order</module > <module > mall-product</module > <module > mall-ware</module > <module > mall-common</module > <module > mall-cart</module > <module > mall-search</module > <module > mall-third-party</module > <module > mall-gateway</module > <module > mall-auth-server</module > <module > renren-fast</module > <module > renren-generator</module > </modules > <properties > <mall.version > 0.0.1-SNAPSHOT</mall.version > <java.version > 1.8</java.version > <maven.compiler.source > 8</maven.compiler.source > <maven.compiler.target > 8</maven.compiler.target > <mysql.version > 8.0.23</mysql.version > <mybatis-plus.version > 3.4.2</mybatis-plus.version > <spring.boot.version > 2.2.5.RELEASE</spring.boot.version > <spring.cloud.version > Hoxton.SR3</spring.cloud.version > <cloud.alibaba.version > 2.2.1.RELEASE</cloud.alibaba.version > <elasticsearch.version > 7.4.2</elasticsearch.version > <http.components.version > 4.4.13</http.components.version > <commons.lang.version > 2.6</commons.lang.version > <lombok.version > 1.18.18</lombok.version > </properties > <dependencyManagement > <dependencies > <dependency > <groupId > mysql</groupId > <artifactId > mysql-connector-java</artifactId > <version > ${mysql.version}</version > </dependency > <dependency > <groupId > com.baomidou</groupId > <artifactId > mybatis-plus-boot-starter</artifactId > <version > ${mybatis-plus.version}</version > </dependency > <dependency > <groupId > org.springframework.boot</groupId > <artifactId > spring-boot-dependencies</artifactId > <version > ${spring.boot.version}</version > <type > pom</type > <scope > import</scope > </dependency > <dependency > <groupId > org.springframework.cloud</groupId > <artifactId > spring-cloud-dependencies</artifactId > <version > ${spring.cloud.version}</version > <type > pom</type > <scope > import</scope > </dependency > <dependency > <groupId > com.alibaba.cloud</groupId > <artifactId > spring-cloud-alibaba-dependencies</artifactId > <version > ${cloud.alibaba.version}</version > <type > pom</type > <scope > import</scope > </dependency > <dependency > <groupId > org.elasticsearch.client</groupId > <artifactId > elasticsearch-rest-high-level-client</artifactId > <version > ${elasticsearch.version}</version > </dependency > <dependency > <groupId > com.zhao.yunmall</groupId > <artifactId > mall-common</artifactId > <version > ${mall.version}</version > </dependency > <dependency > <groupId > org.apache.httpcomponents</groupId > <artifactId > httpcore</artifactId > <version > ${http.components.version}</version > </dependency > <dependency > <groupId > commons-lang</groupId > <artifactId > commons-lang</artifactId > <version > ${commons.lang.version}</version > </dependency > <dependency > <groupId > org.projectlombok</groupId > <artifactId > lombok</artifactId > <version > ${lombok.version}</version > </dependency > </dependencies > </dependencyManagement > <dependencies > <dependency > <groupId > org.springframework.boot</groupId > <artifactId > spring-boot-starter-test</artifactId > <scope > test</scope > </dependency > </dependencies > </project >
注意,需要以 pom 形式导入:
spring-boot-dependenciesspring-cloud-dependenciesspring-cloud-alibaba-dependencies
这样会将这些 pom 文件中的所有 starter 依赖一起导入到当前父模块中(包括 spring-boot-starter-web、spring-cloud-starter-openfeign 以及 spring-boot-starter-data-redis 等场景启动器)。从而子模块中可以直接在 <dependencies> 中导入这些场景启动器。
导入 spring-boot-dependencies 依赖就相当于导入了其内管理的所有场景启动器。模块化的思想。
之所以额外导入 ElasticSearch 的场景启动器,是因为 spring-boot-dependencies 中的 elasticsearch-rest-high-level-client 的版本会冲突,所以我们需要手动导入该依赖并指定版本,从而覆盖默认的版本。
注意 Spring Cloud 的版本必须和 Spring Boot 的版本对应上,否则无法启动项目。版本对应查询:https://spring.io/projects/spring-cloud
mall-common
公共模块需要继承自父工程。在公共模块配置每个微服务都需要 的公共依赖(例如数据库、spring-boot-starter-web 等场景启动器)。其他模块都会导入公共模块,从而不需要再手动导入这些公共的依赖。
因为公共模块继承自父工程,因此在 <dependencies> 中不需要指定依赖的版本。
1
2
3
4
5
6
7
8
9
10
11
12
13
14
15
16
17
18
19
20
21
22
23
24
25
26
27
28
29
30
31
32
33
34
35
36
37
38
39
40
41
42
43
44
45
46
47
48
49
50
51
52
53
54
55
56
57
58
59
60
61
62
63
64
65
66
67
68
69
70
71
72
73
74
75
76
77
78
79
80
81
82
83
84
85
86
87
88
89
90
<?xml version="1.0" encoding="UTF-8"?> <project xmlns ="http://maven.apache.org/POM/4.0.0" xmlns:xsi ="http://www.w3.org/2001/XMLSchema-instance" xsi:schemaLocation ="http://maven.apache.org/POM/4.0.0 http://maven.apache.org/xsd/maven-4.0.0.xsd" > <modelVersion > 4.0.0</modelVersion > <parent > <artifactId > mall</artifactId > <groupId > com.zhao.yunmall</groupId > <version > 0.0.1-SNAPSHOT</version > </parent > <artifactId > mall-common</artifactId > <description > 配置所有微服务公共的依赖库</description > <dependencies > <dependency > <groupId > mysql</groupId > <artifactId > mysql-connector-java</artifactId > </dependency > <dependency > <groupId > com.baomidou</groupId > <artifactId > mybatis-plus-boot-starter</artifactId > </dependency > <dependency > <groupId > org.springframework.boot</groupId > <artifactId > spring-boot-starter-web</artifactId > </dependency > <dependency > <groupId > com.alibaba.cloud</groupId > <artifactId > spring-cloud-starter-alibaba-nacos-discovery</artifactId > </dependency > <dependency > <groupId > com.alibaba.cloud</groupId > <artifactId > spring-cloud-starter-alibaba-nacos-config</artifactId > </dependency > <dependency > <groupId > org.springframework.cloud</groupId > <artifactId > spring-cloud-starter-openfeign</artifactId > <exclusions > <exclusion > <groupId > com.google.code.findbugs</groupId > <artifactId > jsr305</artifactId > </exclusion > </exclusions > </dependency > <dependency > <groupId > com.alibaba.cloud</groupId > <artifactId > spring-cloud-starter-alibaba-sentinel</artifactId > </dependency > <dependency > <groupId > org.springframework.cloud</groupId > <artifactId > spring-cloud-starter-sleuth</artifactId > </dependency > <dependency > <groupId > org.springframework.cloud</groupId > <artifactId > spring-cloud-starter-zipkin</artifactId > </dependency > <dependency > <groupId > org.apache.httpcomponents</groupId > <artifactId > httpcore</artifactId > </dependency > <dependency > <groupId > org.apache.httpcomponents</groupId > <artifactId > httpclient</artifactId > </dependency > <dependency > <groupId > commons-lang</groupId > <artifactId > commons-lang</artifactId > </dependency > <dependency > <groupId > org.projectlombok</groupId > <artifactId > lombok</artifactId > </dependency > <dependency > <groupId > javax.validation</groupId > <artifactId > validation-api</artifactId > <version > 2.0.1.Final</version > </dependency > </dependencies > </project >
其他微服务都需要继承自父工程,并且都需要在 <dependencies> 中导入公共模块 mall-common,这样就可以省去导入数据库、spring-boot-starter-web 等场景启动器的依赖。只需要手动导入本服务所需要的特殊依赖即可(例如 Redis,Spring Session 等)
例如商品服务 mall-product:
1
2
3
4
5
6
7
8
9
10
11
12
13
14
15
16
17
18
19
20
21
22
23
24
25
26
27
28
29
30
31
32
33
34
35
36
37
38
39
40
41
42
43
44
45
46
47
48
49
50
51
52
53
54
55
56
57
58
59
60
61
62
63
64
65
66
67
68
69
70
71
72
73
74
75
76
77
78
79
80
81
82
83
84
<?xml version="1.0" encoding="UTF-8"?> <project xmlns ="http://maven.apache.org/POM/4.0.0" xmlns:xsi ="http://www.w3.org/2001/XMLSchema-instance" xsi:schemaLocation ="http://maven.apache.org/POM/4.0.0 https://maven.apache.org/xsd/maven-4.0.0.xsd" > <modelVersion > 4.0.0</modelVersion > <parent > <artifactId > mall</artifactId > <groupId > com.zhao.yunmall</groupId > <version > 0.0.1-SNAPSHOT</version > </parent > <groupId > com.zhao.yunmall</groupId > <artifactId > mall-product</artifactId > <version > 0.0.1-SNAPSHOT</version > <name > mall-product</name > <description > 云商城-商品服务</description > <dependencies > <dependency > <groupId > com.zhao.yunmall</groupId > <artifactId > mall-common</artifactId > </dependency > <dependency > <groupId > org.springframework.boot</groupId > <artifactId > spring-boot-starter-thymeleaf</artifactId > </dependency > <dependency > <groupId > org.springframework.boot</groupId > <artifactId > spring-boot-starter-data-redis</artifactId > <exclusions > <exclusion > <groupId > io.lettuce</groupId > <artifactId > lettuce-core</artifactId > </exclusion > </exclusions > </dependency > <dependency > <groupId > redis.clients</groupId > <artifactId > jedis</artifactId > </dependency > <dependency > <groupId > org.redisson</groupId > <artifactId > redisson</artifactId > <version > 3.11.1</version > </dependency > <dependency > <groupId > org.springframework.boot</groupId > <artifactId > spring-boot-starter-cache</artifactId > </dependency > <dependency > <groupId > org.springframework.session</groupId > <artifactId > spring-session-data-redis</artifactId > </dependency > <dependency > <groupId > org.springframework.boot</groupId > <artifactId > spring-boot-devtools</artifactId > <optional > true</optional > </dependency > </dependencies > <build > <plugins > <plugin > <groupId > org.springframework.boot</groupId > <artifactId > spring-boot-maven-plugin</artifactId > <configuration > <fork > true</fork > <addResources > true</addResources > </configuration > </plugin > </plugins > </build > </project >
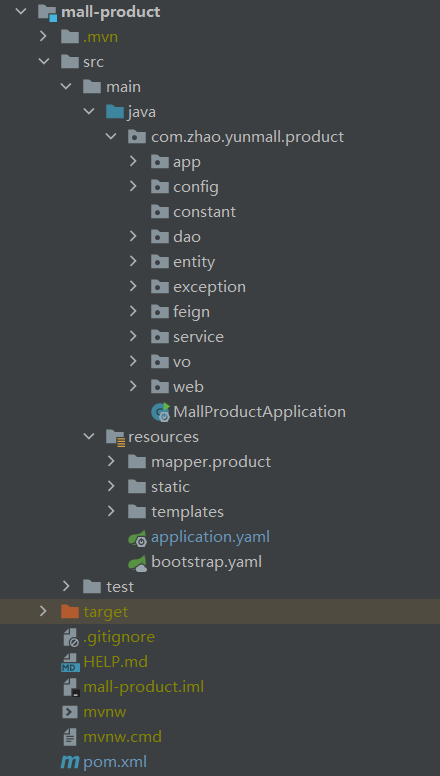
以商品服务 mall-product 为例,介绍每个微服务的基础配置。包括:数据库配置、Nacos 配置、OpenFeign 配置。
项目结构:
配置文件 bootstrap.yaml:
1
2
3
4
5
6
7
8
9
10
11
12
13
14
15
16
17
spring: application: name: yunmall-product cloud: nacos: config: server-addr: localhost:8848 file-extension: yaml namespace: e65bee3e-aec7-421a-8efa-dea0e16f908a
Nacos 的配置中心设置必须在 bootstrap.yaml 文件中,而不能在 application.yaml 文件中
其中:
分组:区分开发 / 测试 / 生产环境
命名空间:区分不同的微服务,例如 会员 / 商品 / 库存服务等,实现微服务间的隔离
配置文件 application.yaml:
1
2
3
4
5
6
7
8
9
10
11
12
13
14
15
16
17
18
19
20
21
22
23
24
25
26
27
28
29
30
31
32
33
34
35
36
37
38
39
40
41
42
43
44
45
46
47
48
49
50
51
52
53
54
55
56
57
58
59
60
61
62
63
64
65
66
67
68
69
70
71
72
server: port: 10000 servlet: session: timeout: 30m spring: datasource: username: root password: zhaoyuyun url: jdbc:mysql://47.98.120.35:3306/yunmall_pms?useUnicode=true&characterEncoding=UTF-8&useSSL=false&serverTimezone=Asia/Shanghai driver-class-name: com.mysql.cj.jdbc.Driver cloud: nacos: discovery: server-addr: localhost:8848 redis: host: yuyunzhao.cn port: 6379 password: zhaoyuyun cache: type: redis redis: time-to-live: 360000 use-key-prefix: true cache-null-values: true session: store-type: redis jackson: date-format: yyyy-MM-dd HH:mm:ss time-zone: GMT+8 thymeleaf: cache: false resources: static-locations: [classpath:/static/ ] mvc: static-path-pattern: /static/** date-format: yyyy-MM-dd HH:mm::ss mybatis-plus: mapperLocations: classpath:mapper/**/*.xml global-config: db-config: id-type: auto logic-delete-value: 1 logic-not-delete-value: 0 configuration: log-impl: org.apache.ibatis.logging.stdout.StdOutImpl logging: level: com.zhao.yunmall: debug yunmall: thread: core-size: 20 max-size: 200 keep-alive-time: 10
主启动类使用 EnableXxx 开启各个功能:
1
2
3
4
5
6
7
8
9
10
@EnableRedisHttpSession @EnableCaching @EnableFeignClients(basePackages = "com.zhao.yunmall.product.feign") @EnableDiscoveryClient @SpringBootApplication public class MallProductApplication public static void main (String[] args) SpringApplication.run(MallProductApplication.class, args); } }
本项目选用 Spring Cloud OpenFeign 实现微服务间的远程调用。
主启动类开启 OpenFeign:
1
2
3
4
5
6
7
8
@EnableFeignClients(basePackages = "com.zhao.yunmall.product.feign") @EnableDiscoveryClient @SpringBootApplication public class MallProductApplication public static void main (String[] args) SpringApplication.run(MallProductApplication.class, args); } }
商品服务 yunmall-product 创建接口 WareFeignService,绑定优惠券服务 yunmall-coupon:
1
2
3
4
5
@FeignClient("yunmall-coupon") public interface CouponFeignService @PostMapping("/coupon/spubounds/save") R saveSpuBounds (@RequestBody SpuBoundTo spuBoundTo) ; }
Service 层注入 Feign 接口的代理对象:
1
2
@Autowired CouponFeignService couponFeignService;
调用方法:
1 2 R r = couponFeignService.saveSpuBounds(spuBoundTo);
解析返回数据
1 2 3 4 5 String json = JSONObject.toJSONString(r.get("skuInfo" )); SkuInfoVo skuInfo = JSONObject.parseObject(json, new TypeReference<SkuInfoVo>() { });
注意:远程调用的返回结果如果是 Java 实体类对象,则 OpenFeign 会自动将网络间传送的 JSON 数据填充到该实体类对象中,无需额外转换。但若是返回 Map 类型对象,则该 Map 中保存的 Java 实体类对象无法被自动转换,直接 get() 返回的是 Object 类型。此时需要先将该对象转换成 JSON 字符串,然后再解析成对应类型。OpenFeign 的原理见文章 【Spring Cloud】OpenFeign
在远程调用其他服务时会出现 Feign 远程调用丢失请求头 问题:在远程调用购物车 服务 cartFeignService 时,会发现 Feign 并没有把当前服务的请求头加到远程请求中。
这是因为 Feign 在创建 cartFeignService 接口的代理对象 时创建了一个新的 HttpRequest 对象,并且没有给该对象添加订单服务的请求头,从而在远程调用到购物车服务时,因缺少请求头内的 Cookie 信息 导致购物车服务的登陆拦截器 判定此请求没有登录(无法获取到登录用户信息),从而无法获取到购物车项信息。
解决该问题的方法:向容器中注入自定义的请求拦截器 ,在 Feign 发出远程调用前先执行该拦截器内的方法,将原始请求中的 Cookie 放到请求头里。
使用拦截器而非过滤器是因为:拦截器是 Spring 的组件,被 Spring 容器管理,可以实现自动注入等功能。
自定义请求拦截器:
1
2
3
4
5
6
7
8
9
10
11
12
13
14
15
16
17
18
19
20
21
22
23
24
25
26
27
28
@Configuration public class MyFeignConfig @Bean public RequestInterceptor requestInterceptor () return new RequestInterceptor() { @Override public void apply (RequestTemplate template) ServletRequestAttributes requestAttributes = (ServletRequestAttributes) RequestContextHolder.getRequestAttributes(); if (requestAttributes != null ) { HttpServletRequest request = requestAttributes.getRequest(); if (request != null ) { String cookie = request.getHeader("Cookie" ); template.header("Cookie" , cookie); } } } }; } }
其中,RequestContextHolder 中保存的数据也是存在 ThreadLocal 中的,可以在同一个线程内共享 HttpServletRequest 对象。
CartFeignService 是一个接口。在 @Autowire 注入时没有实例化代理对象,只有在调用其方法时才会基于代理模式创建代理对象,并执行所有拦截器 RequestInterceptor中的方法,然后才执行远程调用
这样在远程调用购物车服务时,就会把 Cookie 放到请求头中,从而购物车服务也就有了登录用户信息。
Controller 层只干三件事
处理请求,解析前端传来的参数,并校验数据合法性
调用 Service 层处理业务,捕获 Service 层可能抛出的异常
根据 Service 层执行结果返回 JSON 数据给前端(包含状态信息)
GET 请求:常用于检索 && 获取 ,是幂等性 的。一般不会携带请求体数据,传递的参数会拼接在 URL 上(URL 长度有限制,视浏览器而定,例如 Chrome 的 URL 长度限制为 2Mb,2048 个字符)。Content-Type 通常为 application/x-www-form-urlencoded。
在 Spring MVC 中:
使用 @PathVariable("xxx") 注解解析 Restful 请求 URL 中的路径参数
使用 @RequestParam("xxx") 注解解析 GET 请求 URL 中的 "xxx" 数据(如果方法中的参数名和 URL 中传来的参数名一致,可以省略该注解)。如果前端传来的的表单域参数名和 VO 类的所有属性名都一致,可以直接省略该注解,使用 VO
也可以直接使用 @RequestParam Map<String, Object> params 将 URL 中所有数据都存储到一个 map 中
若想返回 JSON 数据,则只需要在方法上标注 @ResponseBody 或直接在类上标注 @RestController
若不想返回 JSON 数据,而想进行页面跳转,则不需要标注 @ResponseBody 注解,直接返回视图名即可(不适合前后端分离项目)
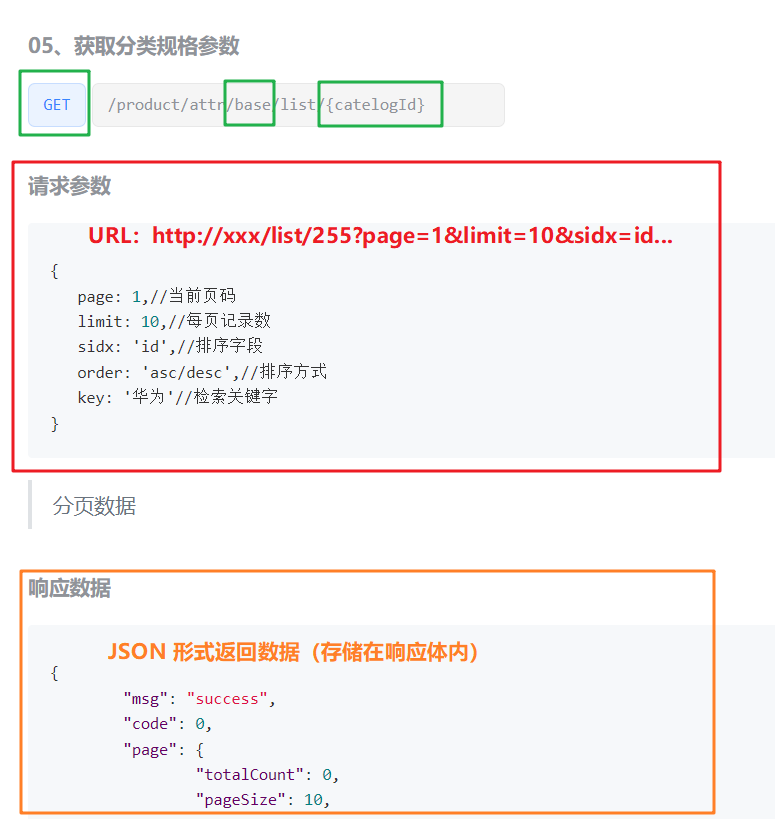
案例:前端发送 GET 请求 /product/attr/base/list/{catelogId},在路径中指定属性类型 base 以及商品分类 id catelogId,并在 URL 上携带需要分页查询的参数。要求后端返回 JSON 数据(存储在响应体里)
Controller 层代码:
1 2 3 4 5 6 7 8 9 10 11 12 13 14 @ResponseBody @GetMapping("/{attrType}/list/{catelogId}") public R baseAttrList (@RequestParam Map<String, Object> params, @PathVariable("attrType") String type, @PathVariable("catelogId") Long catelogId) PageUtils page = attrService.queryBaseAttrPage(params, type, catelogId); return R.ok().put("page" , page); }
POST 请求:常用来创建 || 更新 。数据内容不会显示在 URL 中,而是显示在请求体 中。相对安全。请求对资源有副作用,不是幂等性的 ,多次 POST 请求会创建重复的数据内容。前端以 JSON 形式发送 POST 请求时,Content-Type 为 application/json; charset=utf-8。
HTTP POST 请求的内容是在请求体内的,但也不是绝对安全的。他人截获该请求后仍可以得到请求体内容。若想保证安全性,还需要使用 HTTPS 的加密方法对请求体内容进行加密。
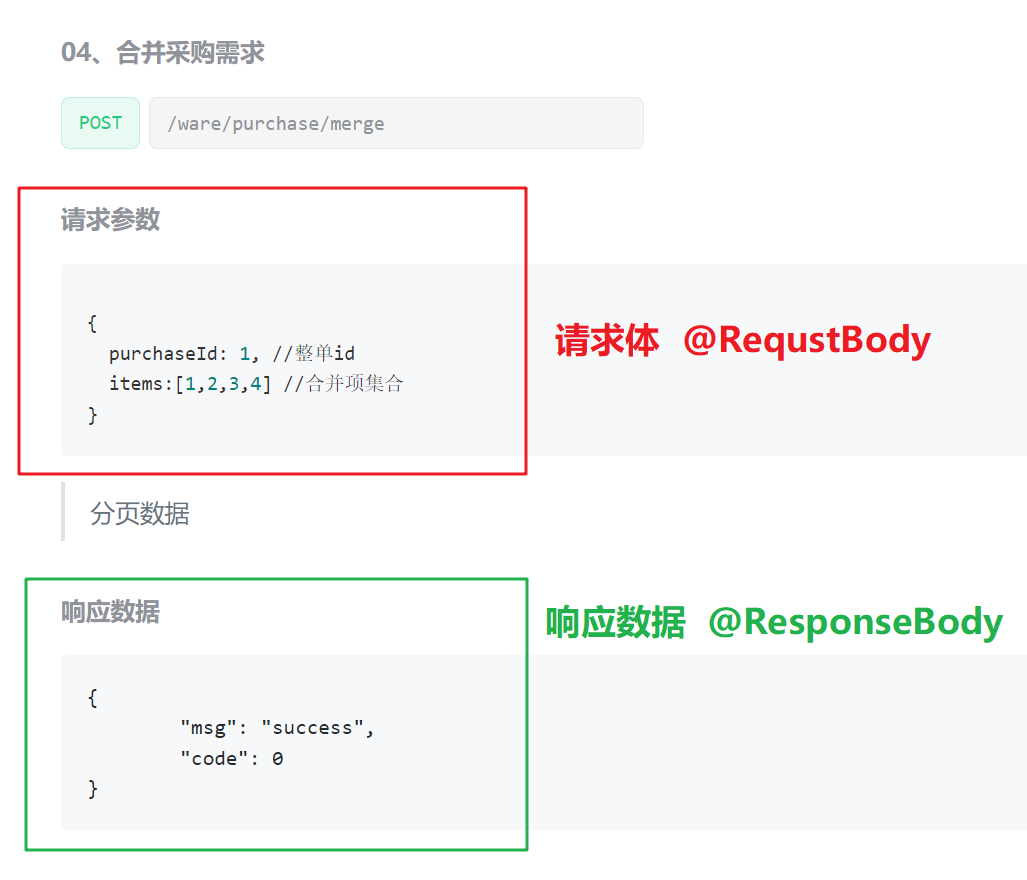
在 Spring MVC 中,使用 @RequestBody 注解修饰的参数将接受 POST 请求体中的 JSON 数据,按照属性名映射。
案例:
Controller 层代码:
1
2
3
4
5
6
@ResponseBody @PostMapping("/merge", consumes="application/json", produces="application/json") public R merge (@RequestBody MergeVo mergeVo) purchaseService.mergePurchase(mergeVo); return R.ok(); }
其中,方法仅处理 Content-Type 为 "application/json" 类型的请求;并且返回的类型为 "application/json"。
若想实现:实体类中某些字段不为空时才添加到 JSON 中返回给前端,如果为空不添加到 JSON 中。则可以给字段添加 JsonInclude() 注解(com.fasterxml.jackson 包):
1 2 3 4 5 6 7 8 @JsonInclude(JsonInclude.Include.NON_EMPTY) @TableField(exist = false) private List<CategoryEntity> children;
本项目使用 Nginx 作为反向代理服务器,代理本项目的所有请求,并将请求都转发到网关服务,网关服务再根据域名转发到具体的微服务。
在 nginx/conf/conf.d/ 目录下创建云商城项目的配置文件 yunmall.conf(只配置 server 块),作为 Nginx 的子配置文件 ,主配置文件 nginx.conf 会将该子配置文件纳入其中。
1
2
3
4
5
6
7
8
9
10
11
12
13
14
15
16
17
18
19
server { listen 80; server_name yunmall.com *.yunmall.com; # 访问静态资源 location /static/ { root /usr/share/nginx/html; } # 支付服务内网穿透时需要指定 Host 为订单服务的主机名 location /payed/ { proxy_set_header Host order.yunmall.com; proxy_pass http://yunmall; } # 其他请求都转发到网关,并且保留原始请求的请求头中的主机名,将在网关中路由到指定服务 location / { proxy_set_header Host $host; proxy_pass http://yunmall; } }
其中,http://yunmall 需要配置在 nginx.conf 的负载均衡配置中:
1
2
3
4
5
6
7
http { ... # 负载均衡配置,将 http://yunmall 映射到云商城的网关服务 upstream yunmall { server 202.120.40.239:88; } }
之所以在 Nginx 的反向代理配置中添加 proxy_set_header Host $host,是因为 Nginx 在反向代理时默认会删掉请求头。所以需要额外指定代理后的请求拥有和原始请求相同的域名(Host),从而在网关服务里根据 Host 匹配路由到相应的服务。例如:
1 2 3 4 5 - id: yunmall_order_host uri: lb://yunmall-order predicates: - Host=order.yunmall.com
1
2
3
4
5
6
7
8
9
10
11
12
13
14
15
16
17
18
19
20
21
22
23
24
25
26
27
28
29
30
31
32
33
34
35
36
37
38
39
40
41
42
43
44
45
46
47
48
49
50
51
52
53
54
55
56
57
58
59
60
61
62
63
64
65
66
67
68
69
70
71
72
73
74
75
76
77
78
79
80
81
82
83
84
85
86
87
88
89
90
91
92
93
94
spring: zipkin: base-url: http://localhost:9411 sender: type: web discovery-client-enabled: false sleuth: sampler: probability: 1 cloud: gateway: routes: - id: third_party_route uri: lb://yunmall-third-party predicates: - Path=/api/thirdparty/** filters: - RewritePath=/api/thirdparty/(?<segment>/?.*),/$\{segment} - id: product_route uri: lb://yunmall-product predicates: - Path=/api/product/** filters: - RewritePath=/api/(?<segment>/?.*),/$\{segment} - id: yunmall-member uri: lb://yunmall-member predicates: - Path=/api/member/** filters: - RewritePath=/api/(?<segment>/?.*),/$\{segment} - id: yunmall-ware uri: lb://yunmall-ware predicates: - Path=/api/ware/** filters: - RewritePath=/api/(?<segment>/?.*),/$\{segment} - id: yunmall-coupon uri: lb://yunmall-coupon predicates: - Path=/api/coupon/** filters: - RewritePath=/api/(?<segment>/?.*),/$\{segment} - id: admin_route uri: lb://renren-fast predicates: - Path=/api/** filters: - RewritePath=/api/(?<segment>/?.*), /renren-fast/$\{segment} - id: yunmall_serach_host uri: lb://yunmall-search predicates: - Host=search.yunmall.com - id: yunmall_auth_host uri: lb://yunmall-auth-server predicates: - Host=auth.yunmall.com - id: yunmall_cart_host uri: lb://yunmall-cart predicates: - Host=cart.yunmall.com - id: yunmall_order_host uri: lb://yunmall-order predicates: - Host=order.yunmall.com - id: yunmall_seckill_host uri: lb://yunmall-seckill predicates: - Host=seckill.yunmall.com - id: yunmall_host uri: lb://yunmall-product predicates: - Host=**.yunmall.com sentinel: transport: dashboard: localhost:8080 management: endpoints: web: exposure: include: '*'
本项目共有 6 个数据库:
yunmall_admin:后台管理系统数据库yunmall_oms:订单数据库yunmall_pms:商品数据库yunmall_sms:积分数据库yunmall_ums:会员数据库yunmall_wms:库存数据库
关于数据库设计的具体介绍见文章 【Project】云商城 - 数据库设计
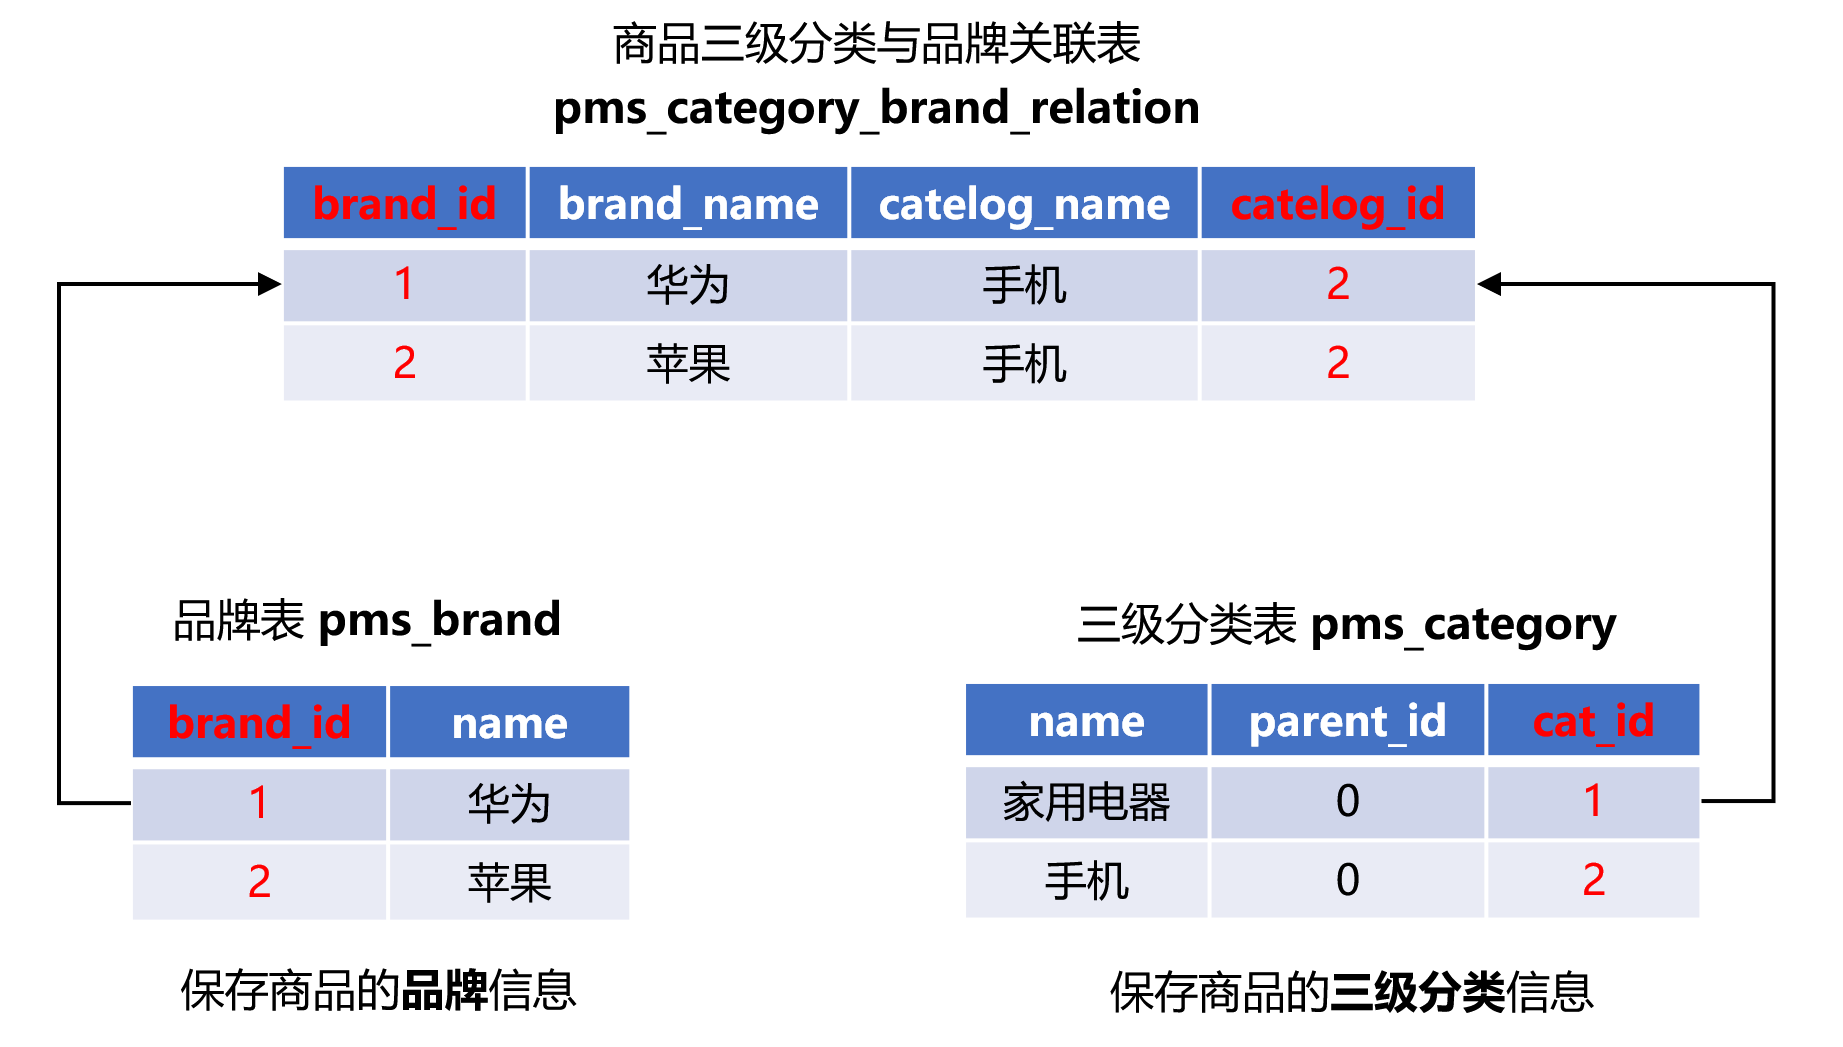
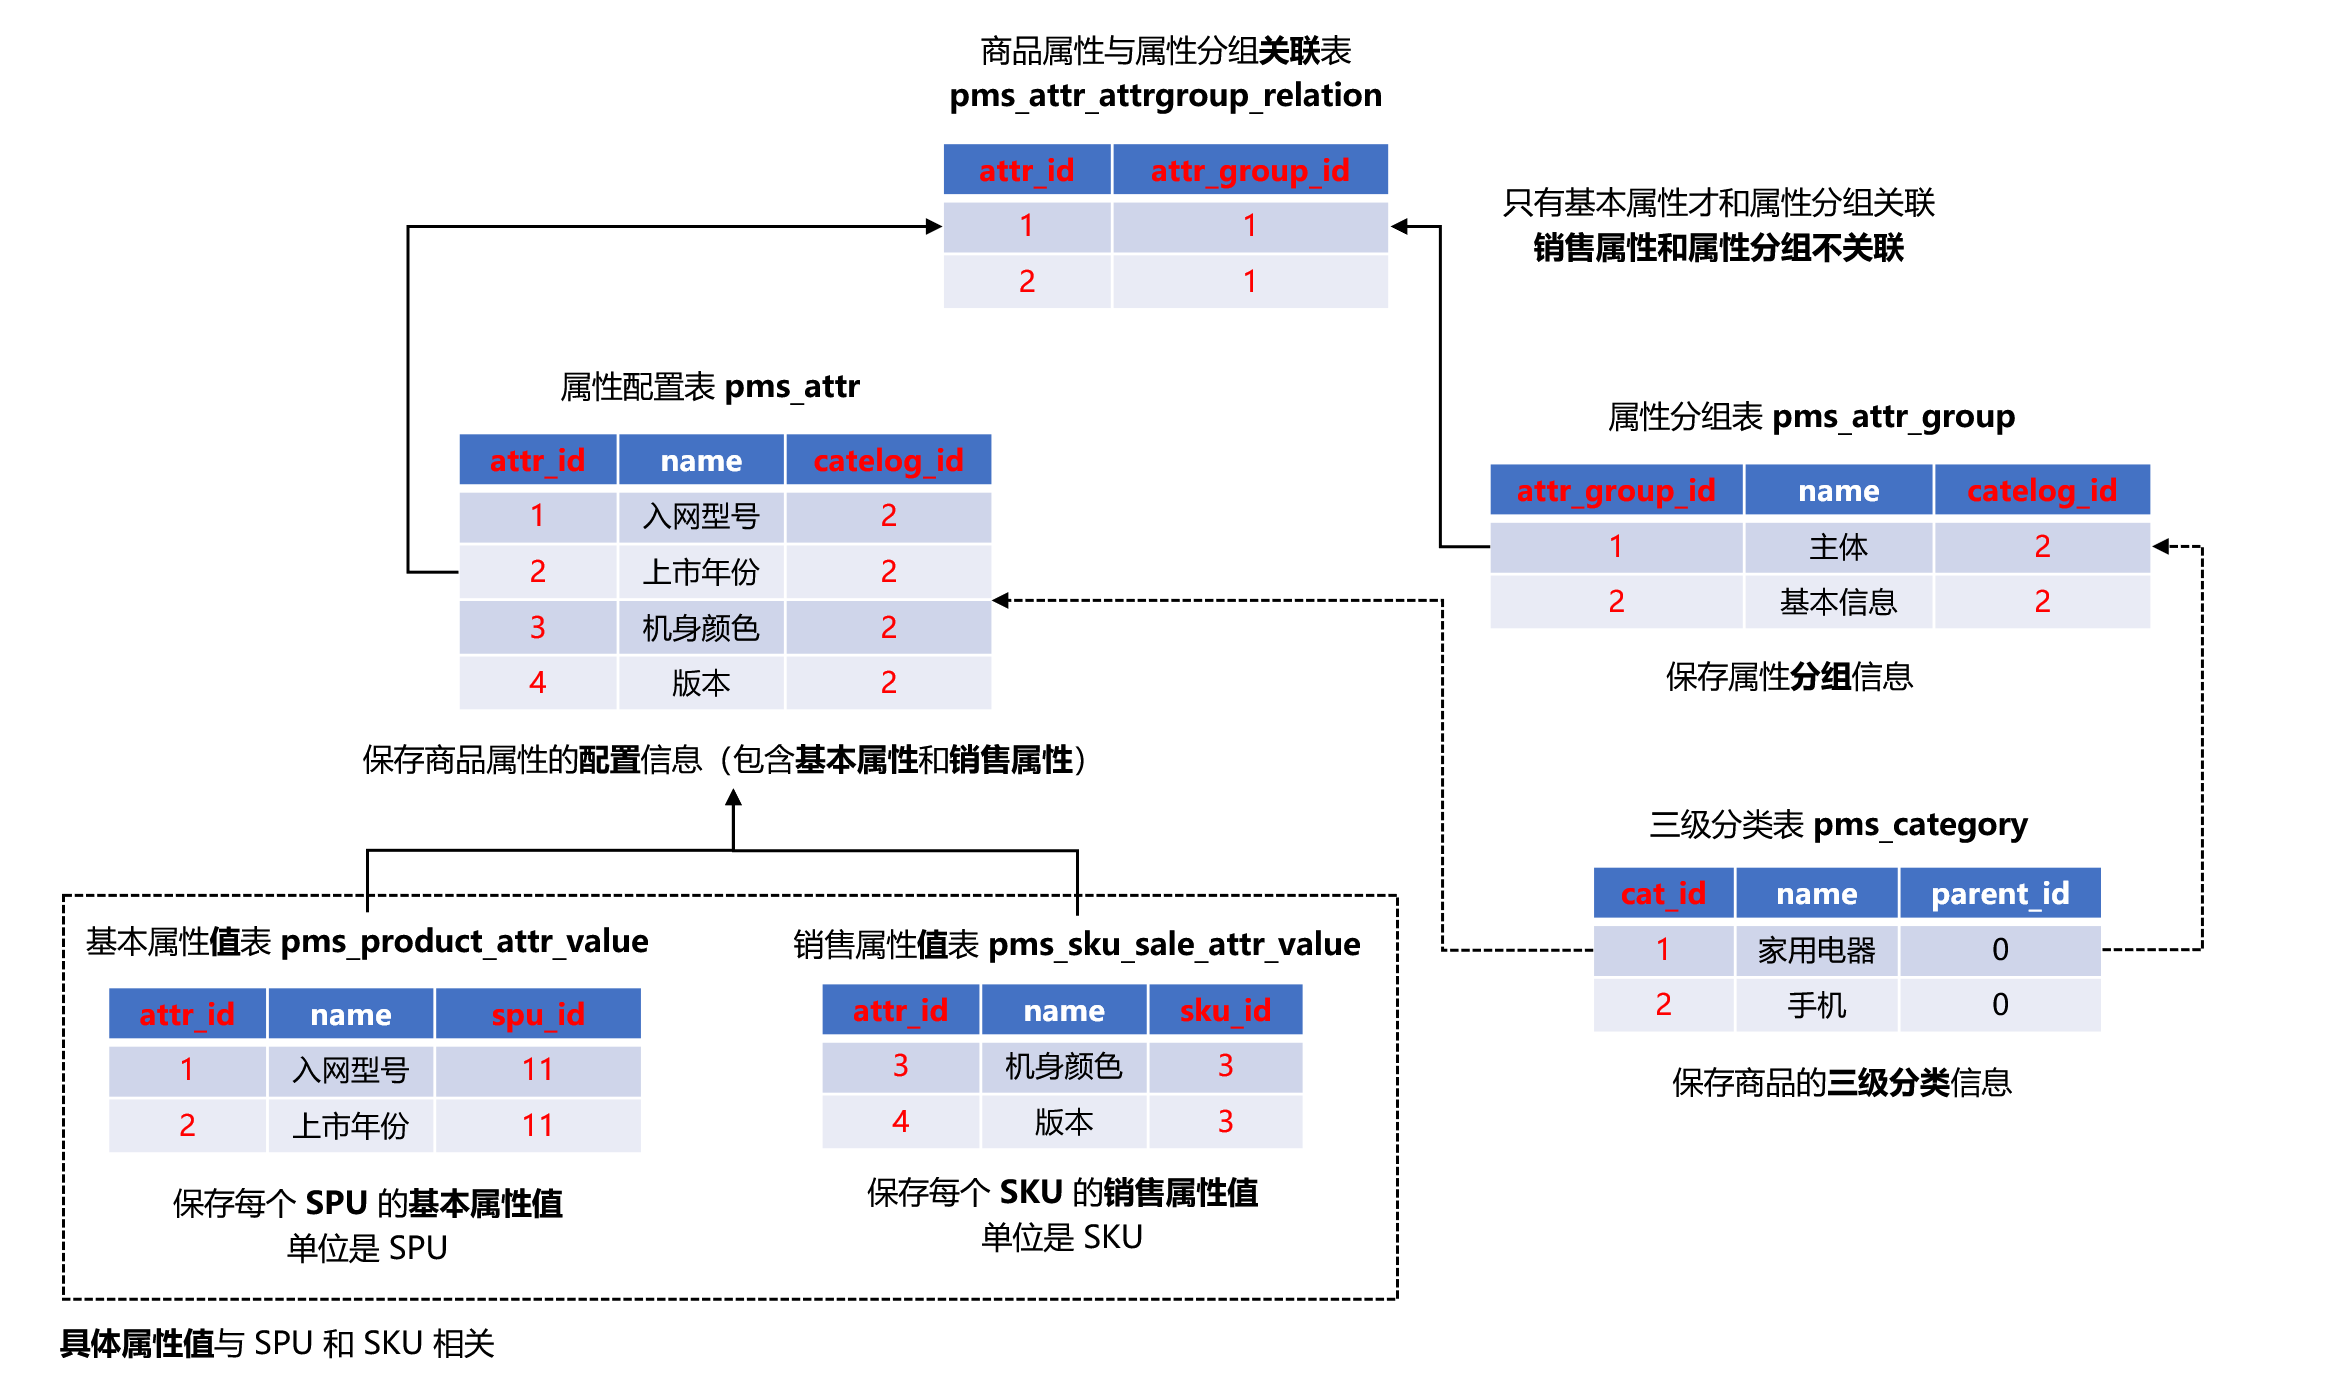
商品数据库中的几张核心表间的关系为:
商品三级分类表与品牌表的关系
商品属性表间关系
本项目的后台管理系统基于人人开源项目 renren-fast 和 renren-fast-vue 进行快速开发。后台管理系统实现以下功能:
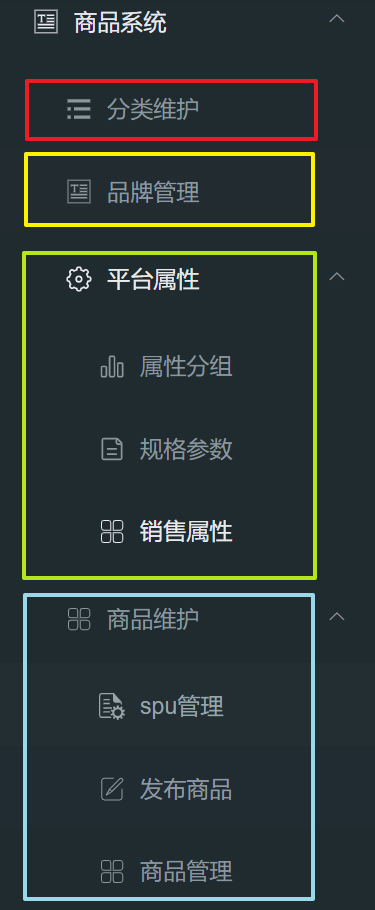
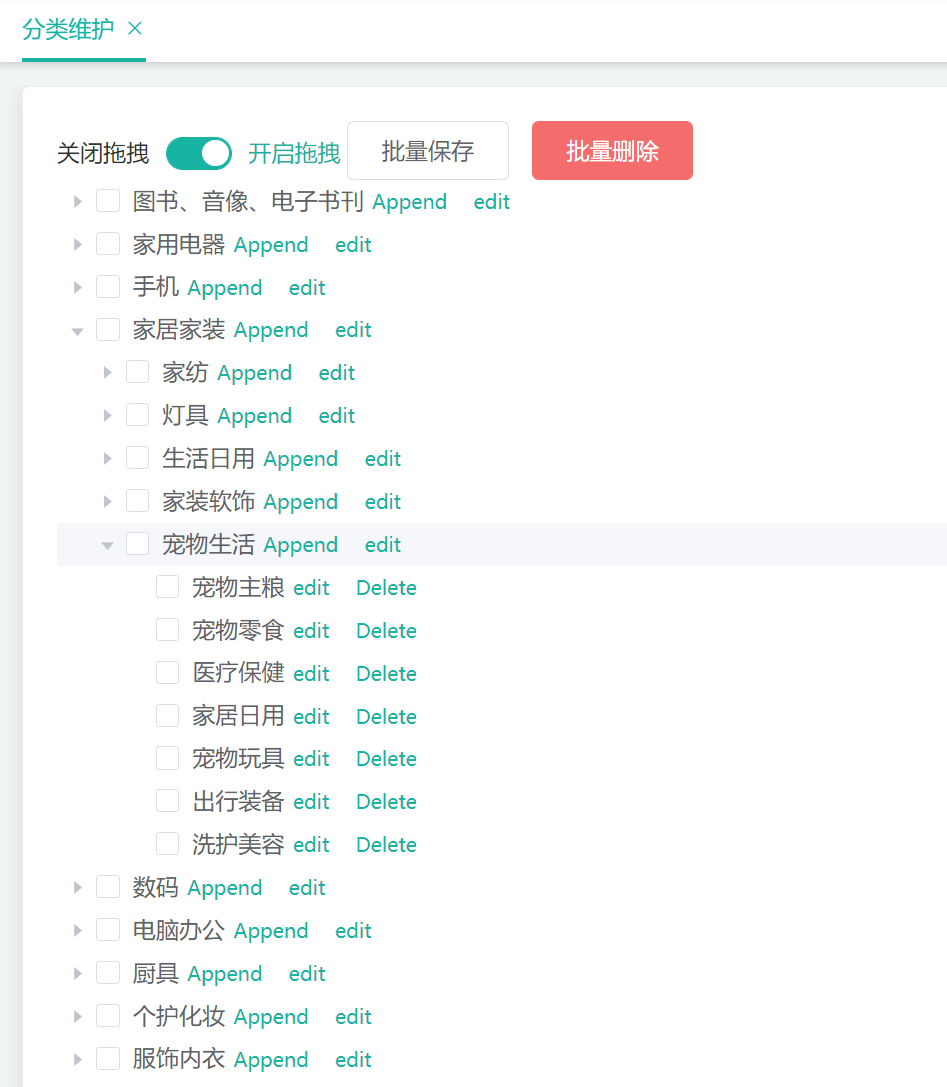
管理商品分类
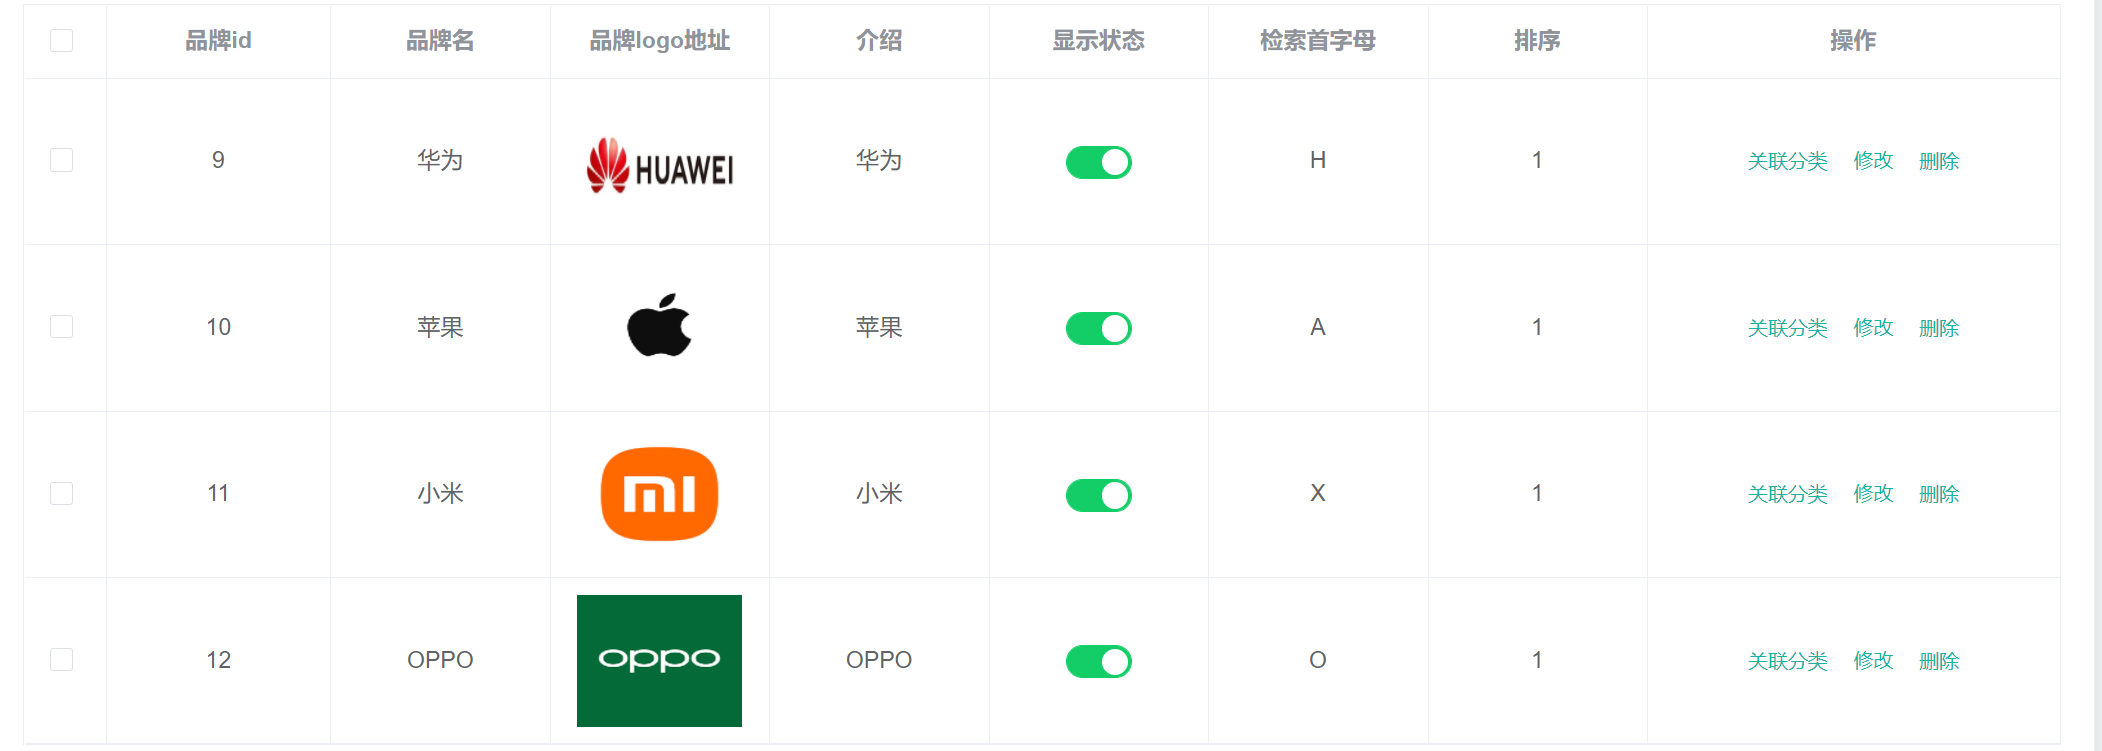
管理品牌分类
关联商品分类与品牌分类
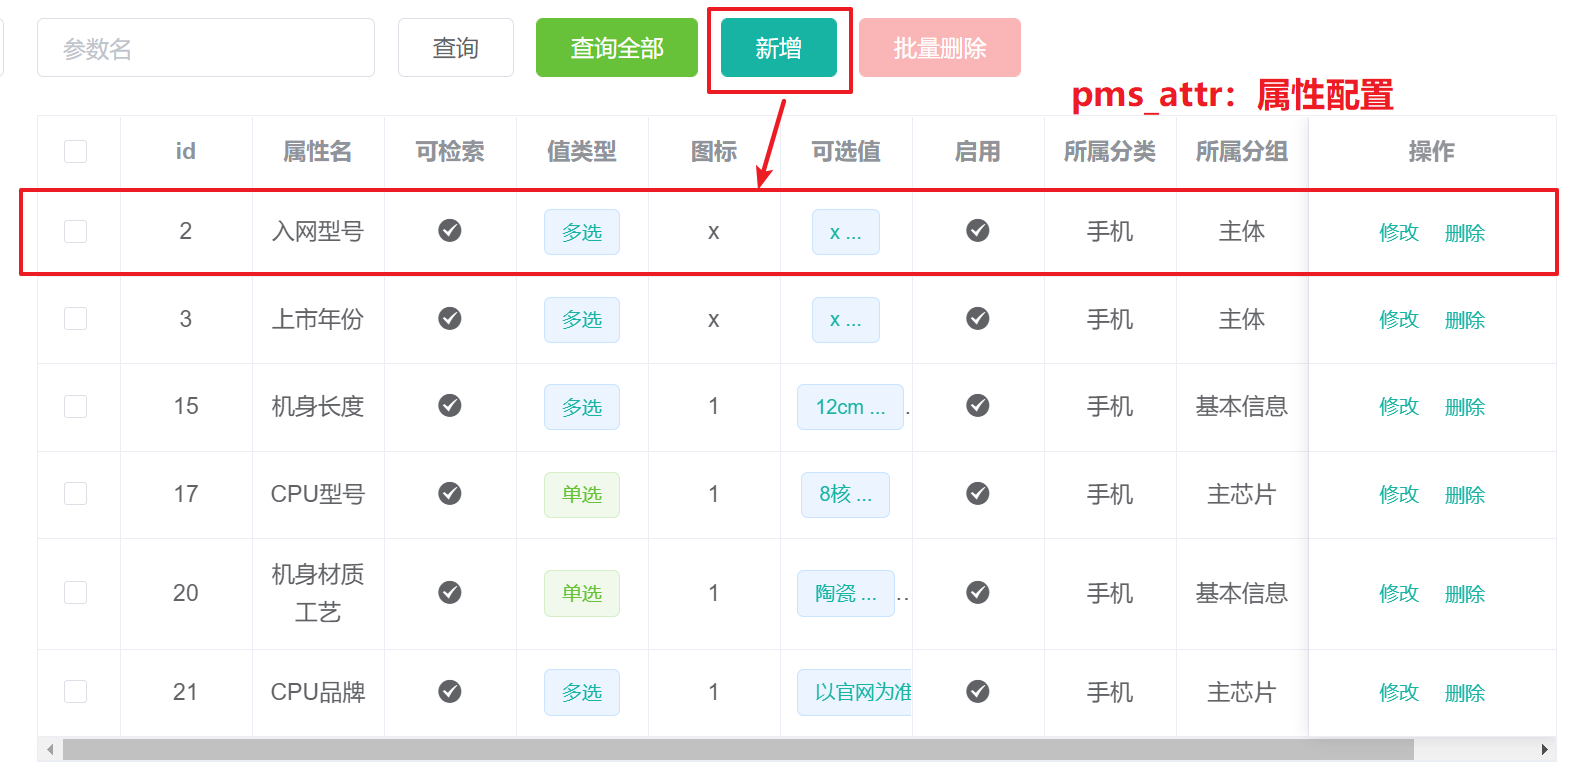
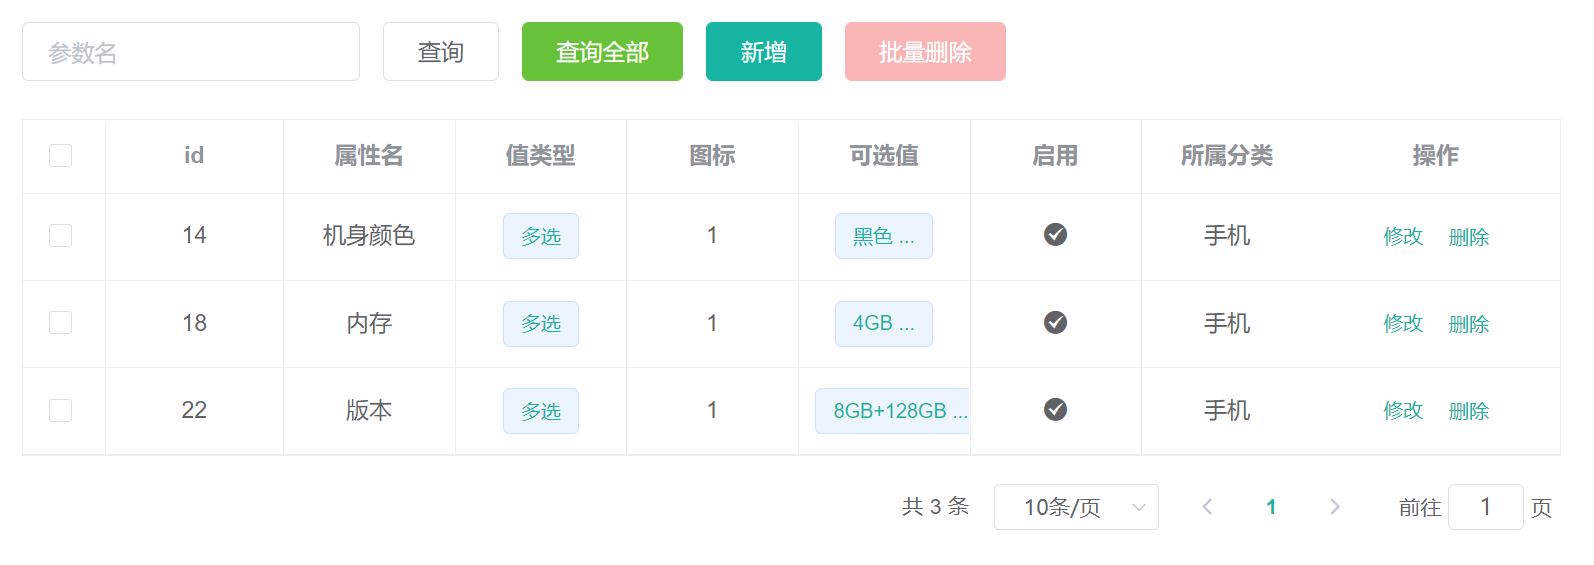
管理商品属性(基础属性和销售属性)
维护商品(SPU 管理、商品发布与商品管理)
仓库管理(管理所有仓库的信息)
库存工作单(查看订单服务创建的库存工作单)
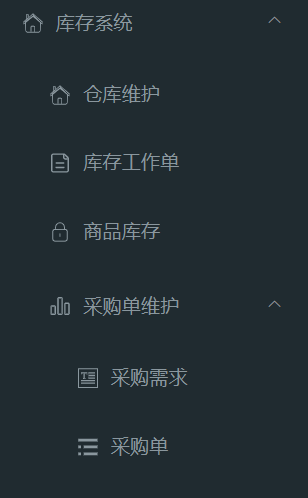
商品库存管理(管理每个 SKU 的库存信息)
采购单维护(与采购系统对接)
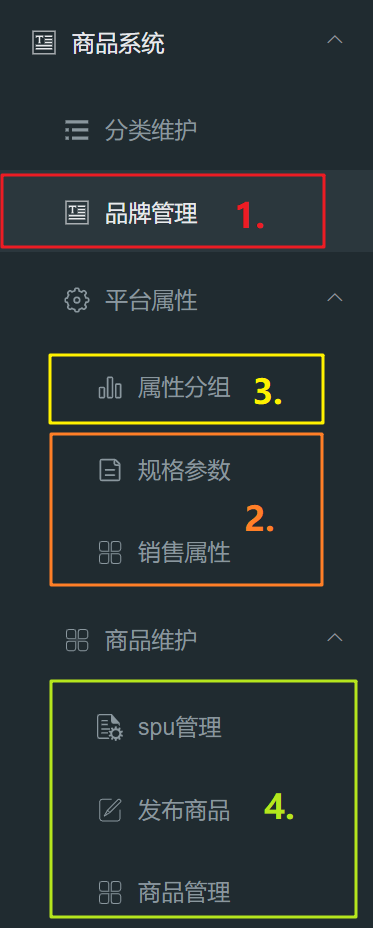
后台管理系统中添加商品的流程:
添加品牌信息,并绑定对应的分类
新增基本属性与销售属性
新增基本属性
新增销售属性
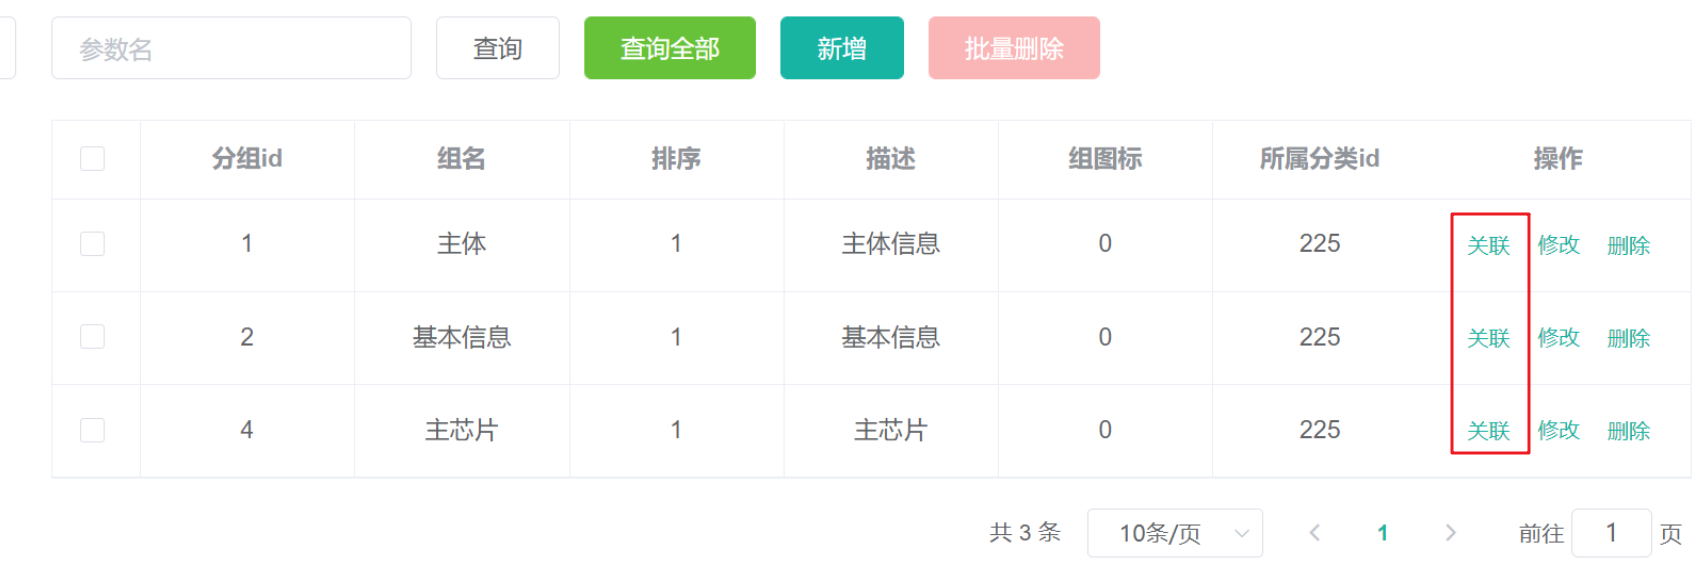
新增属性分组,并关联 每个分组内都有哪些属性
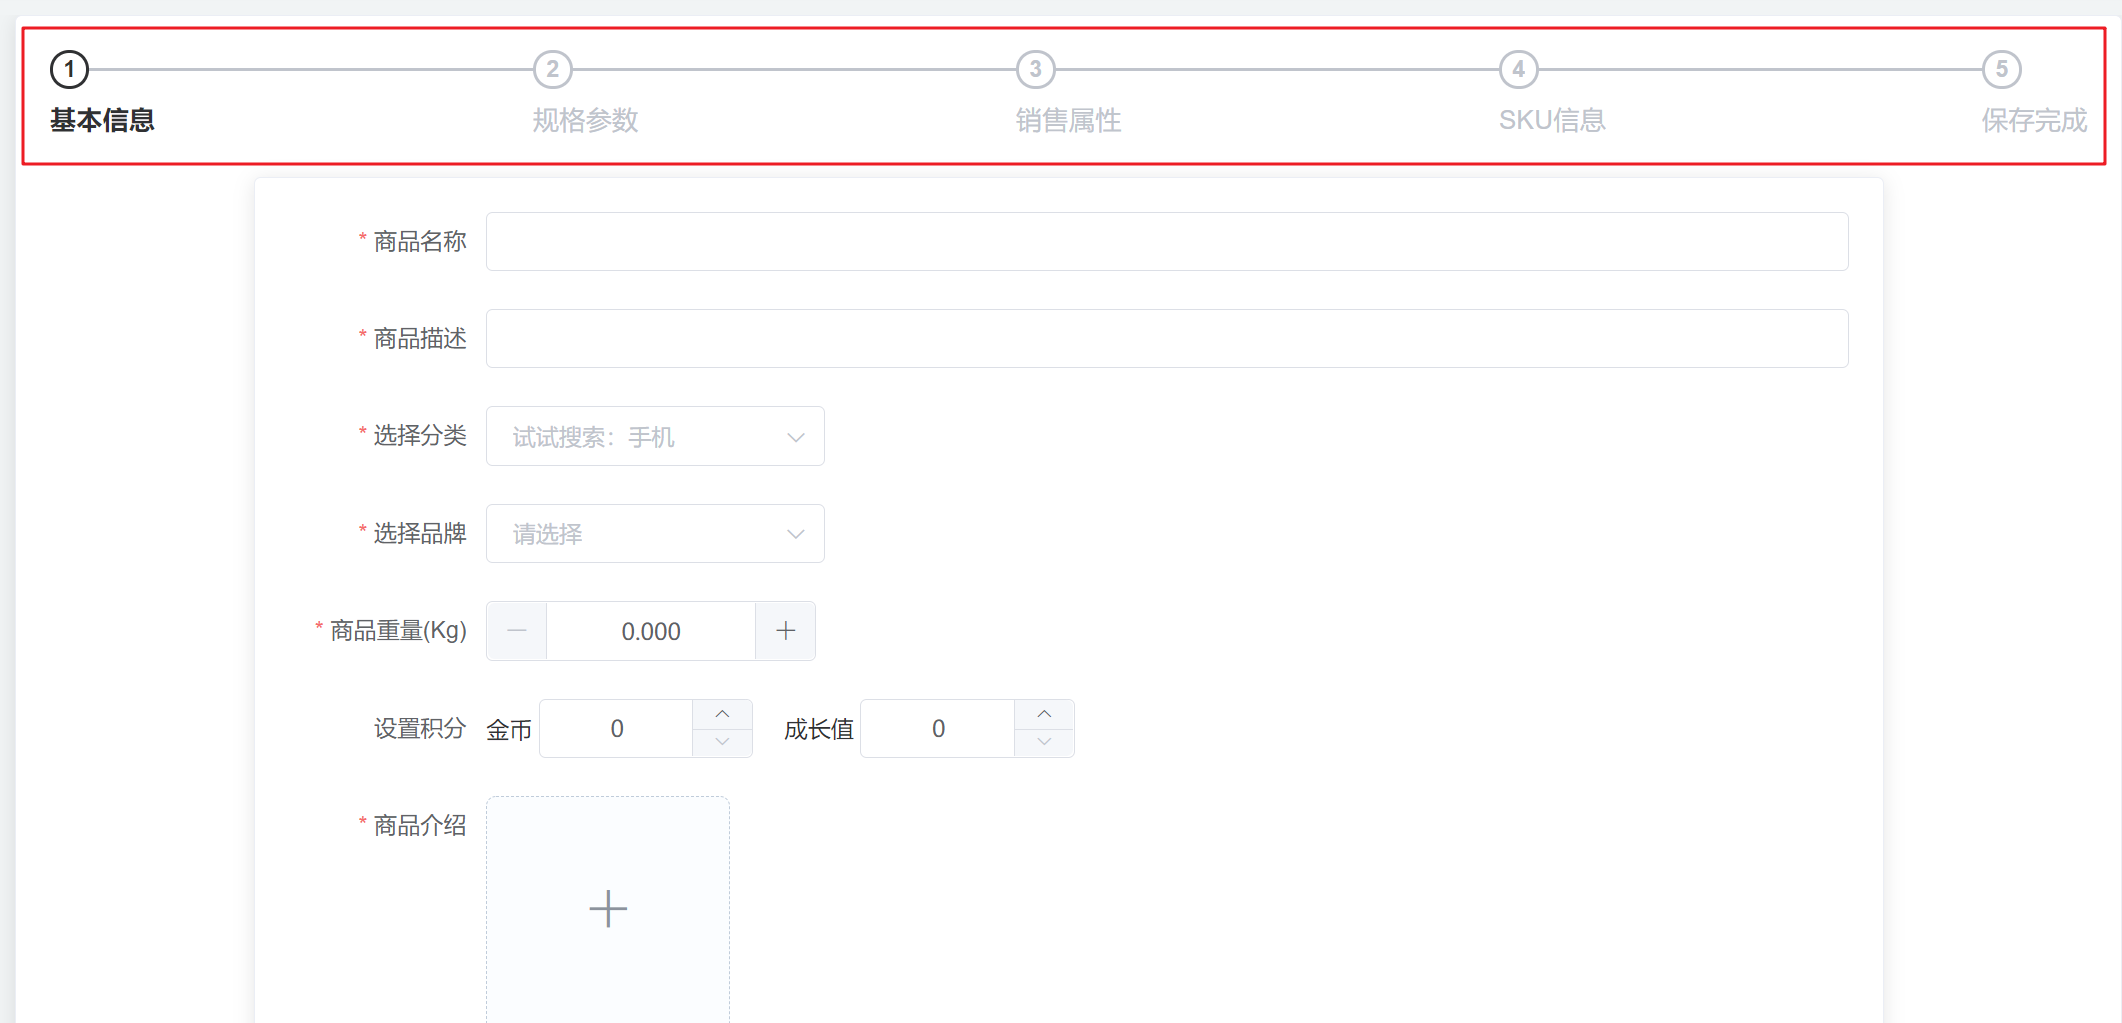
发布商品,需要依次指定商品的分类、品牌、基本树形(规格参数)、销售属性、SKU 信息:
发布完成后,即可进行 SPU 管理 与商品(SKU)管理
SPU 管理:上架商品
商品(SKU)管理:上传图片、参与秒杀、满减设置、折扣设置、库存管理等
仓库管理:
库存工作单管理(由订单服务生成):
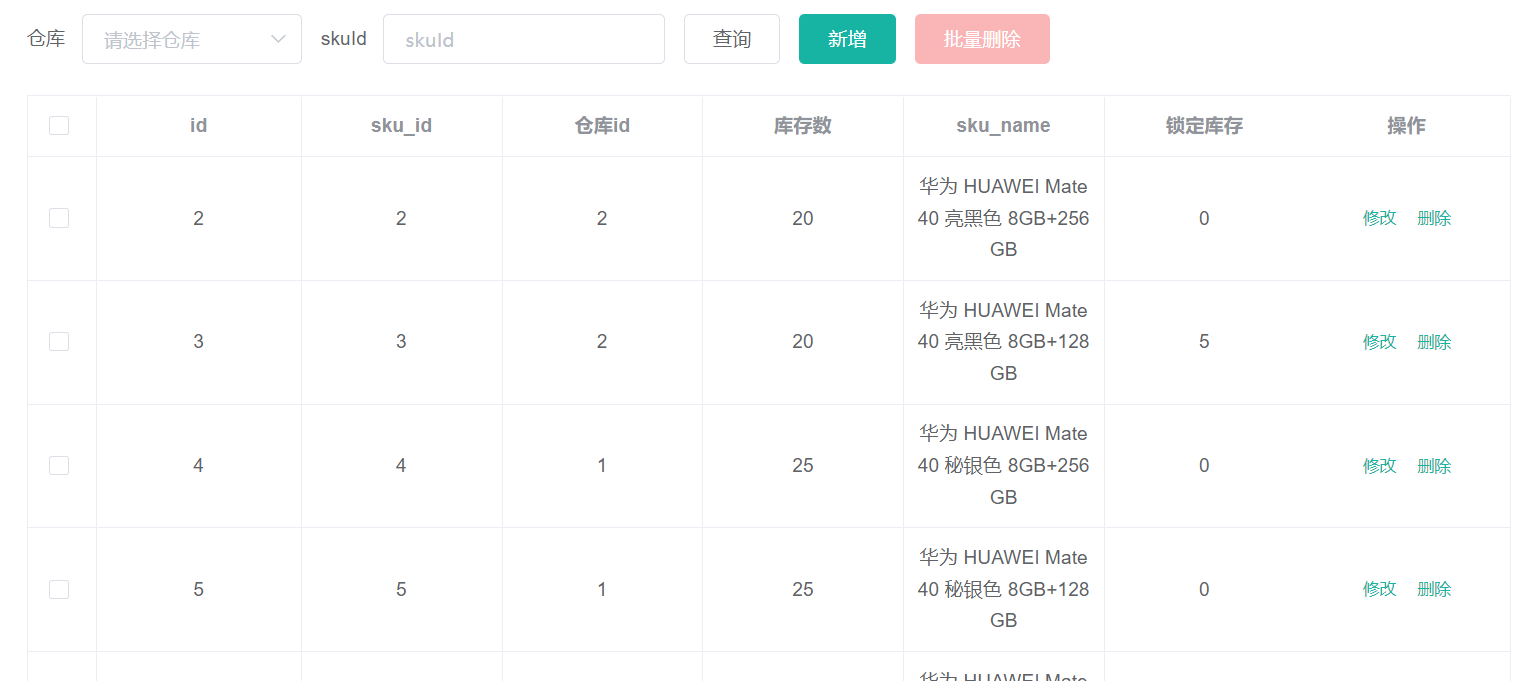
商品库存管理:
采购需求管理:
采购单管理:
后台管理系统的前端工程基于人人开源的 renren-fast-vue 项目进行快速开发,其提供了整个后台管理系统的框架与基本功能。该项目将与人人开源的后端工程 renren-fast 配合使用。
整个工程的结构:
其中,/src/views 目录下的文件将显示在前端页面上,我们主要在其内进行开发,为每个功能创建相应的前端界面。具体介绍见下文。
https://www.cnblogs.com/misscai/p/12809404.html
该工程的启动流程:
切换淘宝镜像安装
1 npm install -g cnpm --registry=https://registry.npm.taobao.org
设置权限:输入 set-ExecutionPolicy RemoteSigned 选择 A
安装该项目的依赖
启动项目
下面介绍如何为该前端项目创建自定义的功能菜单。
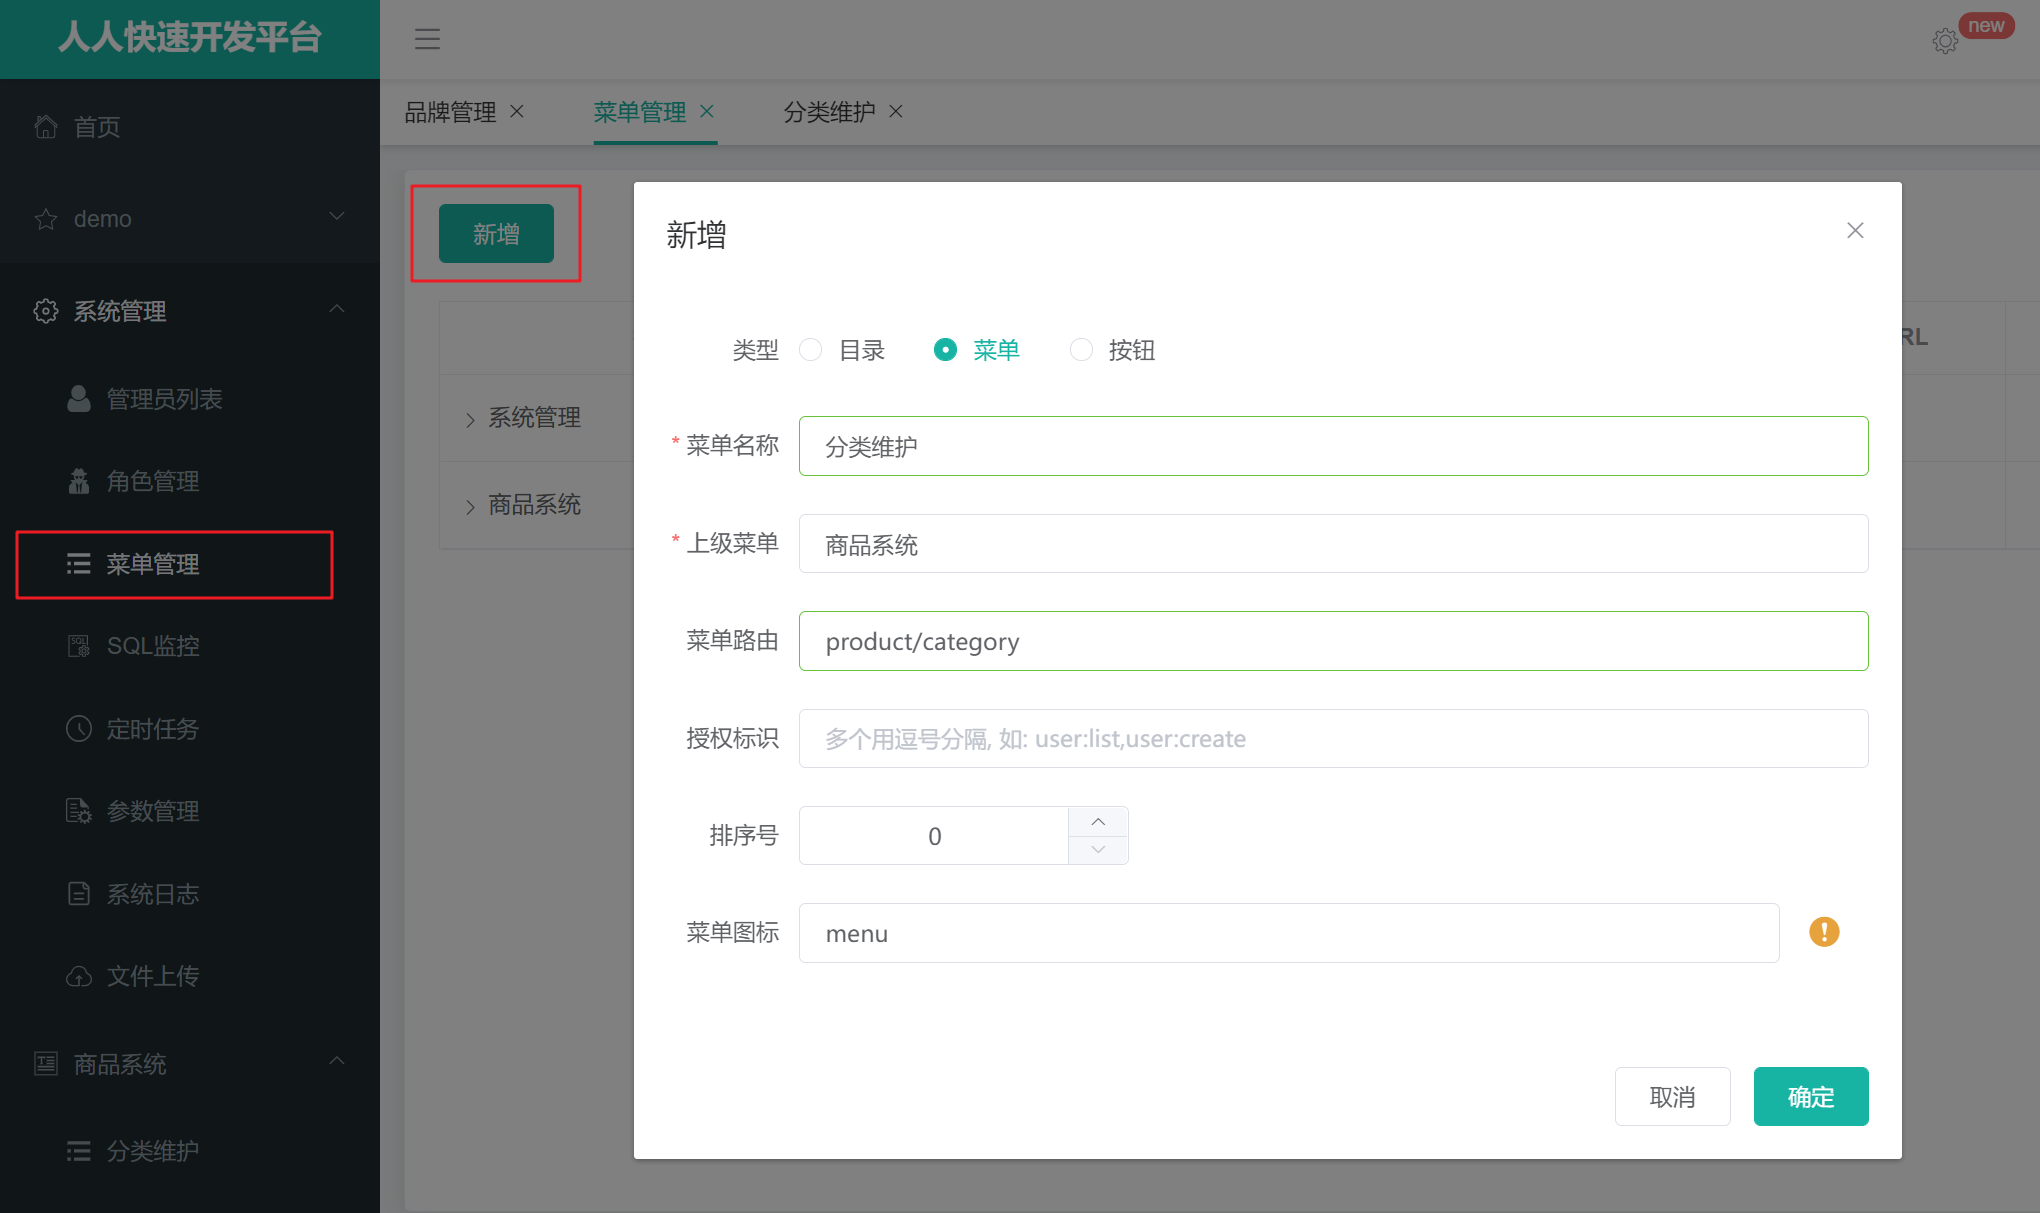
首先在人人快速开发平台中新建一个商品系统 菜单,然后在其内新增一个分类维护 菜单:
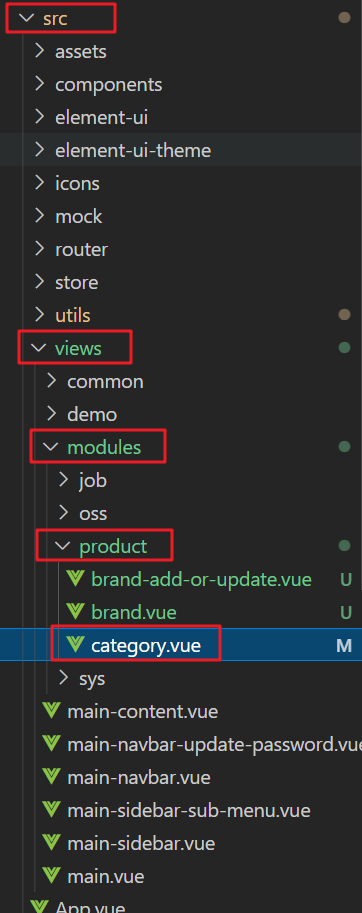
然后根据在菜单路由中配置的 prodcut/category,我们需要在 renren-fast-vue 项目的 src/views/modules/ 目录下创建一个 product文件夹,代表前面创建的商品系统 菜单,该菜单下的所有子菜单的页面都应该在该文件夹下。然后根据当前的分类维护 页面创建一个 category.vue 文件。目录结构如下:
在其内编写代码即可在 http:/xxx/#/product-category 页面生成对应 Vue 组件。
本项目后台管理系统采用前后端分离技术 分别部署前端项目 renren-fast-vue 和后端众多微服务。数据通讯方式为:前端发出 POST/GET 请求给后端,后端以 JSON 形式传输数据。
详细接口文档:https://easydoc.net/s/78237135/ZUqEdvA4/hKJTcbfd
后端统一将返回结果封装到 R 对象中:
1 2 3 4 5 6 7 8 9 10 11 12 13 14 15 16 17 18 19 20 21 22 23 24 25 26 27 28 29 30 31 32 33 34 35 36 37 38 39 40 41 42 43 44 45 46 47 public class R extends HashMap <String , Object > private static final long serialVersionUID = 1L ; public R () put("code" , 0 ); put("msg" , "success" ); } public static R error () return error(HttpStatus.SC_INTERNAL_SERVER_ERROR, "未知异常,请联系管理员" ); } public static R error (String msg) return error(HttpStatus.SC_INTERNAL_SERVER_ERROR, msg); } public static R error (int code, String msg) R r = new R(); r.put("code" , code); r.put("msg" , msg); return r; } public static R ok (String msg) R r = new R(); r.put("msg" , msg); return r; } public static R ok (Map<String, Object> map) R r = new R(); r.putAll(map); return r; } public static R ok () return new R(); } public R put (String key, Object value) super .put(key, value); return this ; } }
该对象继承自 HashMap,Controller 层将会把该对象转换成 JSON 字符串发送给前端,前端接收到数据后,通过 response.data 获取到后端发送的真实数据,例如:
1 2 3 4 5 6 7 8 9 10 11 @ResponseBody @RequestMapping("/list/tree") public R list () List<CategoryEntity> entities = categoryService.listWithTree(); return R.ok().put("data" , entities); }
注意后端 Controller 层必须按照该协议封装成 R 对象,因为和前端的通讯协议里,都是从response.data 中获取数据,如果不按照该协议,前端将无法解析到后端发送的数据
其中,前端项目在发出 GET 请求时,都会在最后拼接上一个时间戳 参数 url = xxxxxx?t=new Data().getTime():
1 2 3 4 5 6 7 8 9 10 11 http.adornParams = (params = {}, openDefultParams = true ) => { var defaults = { 't' : new Date ().getTime() } return openDefultParams ? merge(defaults, params) : params }
这是因为浏览器向服务器发出的 GET 请求如果和之前一样,会直接返回缓存 的结果,而不会向服务器发出新的请求。因此需要在后面带个一个时间戳参数,使得每一次发出的请求都不相同,这样浏览器就不会返回缓存结果了。
前端发出 POST 请求的模板:
1 2 3 4 5 6 7 8 9 10 11 12 13 14 15 http.adornData = (data = {}, openDefultdata = true , contentType = 'json' ) => { var defaults = { 't' : new Date ().getTime() } data = openDefultdata ? merge(defaults, data) : data return contentType === 'json' ? JSON .stringify(data) : qs.stringify(data) }
其中,data 为传入的 JSON 对象,后端将使用 @RequestBody 注解解析该对象数据,并同样返回一个 JSON 对象给前端:
1
2
3
4
5
6
@ResponseBody @RequestMapping("/update") public R update (@RequestBody CategoryEntity category) categoryService.updateById(category); return R.ok(); }
商品的三级分类功能将在后台管理系统中以树形结构显示所有商品,最终效果图:
三级分类页面打开时,前端 renren-fast-vue 项目会发出 GET 请求访问后端的商品模块 yunmall-product 以获取商品信息:
1 2 3 4 5 6 7 8 9 10 11 12 methods: { getMenus() { this .$http({ url: this .$http.adornUrl ("/product/category/list/tree" ), method: "get" , }).then ((data) => { console.log ("成功获取到菜单数据..." , data); }); }, },
但因为默认 renren-fast-vue 项目配置的 api 接口请求地址的前缀是:
1 2 window .SITE_CONFIG['baseUrl' ] = 'http://localhost:8080/renren-fast' ;
此时,我们发送的请求 /product/category/list/tree 会拼接上 http://localhost:8080/renren-fast,导致无法正确向后端发送请求。
因此,我们需要修改前端项目发送的 api 接口地址前缀为:'http://localhost:88/api/。其中,88 端口为 Gateway 网关的端口,我们将请求统一发到网关,然后再根据定义的路由规则转发到对应的服务。/api 为我们为前端发出请求锁规定的统一前缀。
同时,我们也需要将 renren-fast 后台管理模块也加入到网关中,因为前端项目也会向 renren-fast 模块发出请求,例如获取验证码的请求:https://localhost:8080/renrenfast/captcha.jpg?uuid=xxx /api 转换成 /renren-fast,否则无法正确指向验证码的链接):
1
2
3
4
5
6
7
8
9
10
11
12
13
14
15
16
17
18
19
20
21
22
23
24
25
26
27
28
29
30
31
32
33
server: port: 88 spring: application: name: yunmall-gateway cloud: nacos: discovery: server-addr: localhost:8848 gateway: routes: - id: product_route uri: lb://yunmall-product predicates: - Path=/api/product/** filters: - RewritePath=/api/(?<segment>.*), /$\{segment} - id: admin_route uri: lb://renren-fast predicates: - Path=/api/** filters: - RewritePath=/api/(?<segment>.*), /renren-fast/$\{segment}
配置完毕后,访问前端界面时,发现报错:
1 Access to XMLHttpRequest at 'http://localhost:88/api/sys/login' from origin 'http://localhost:8001' has been blocked by CORS policy: Response to preflight request doesn't pass access control check: No 'Access-Control-Allow-Origin' header is present on the requested resource.
这是跨域问题所导致的:
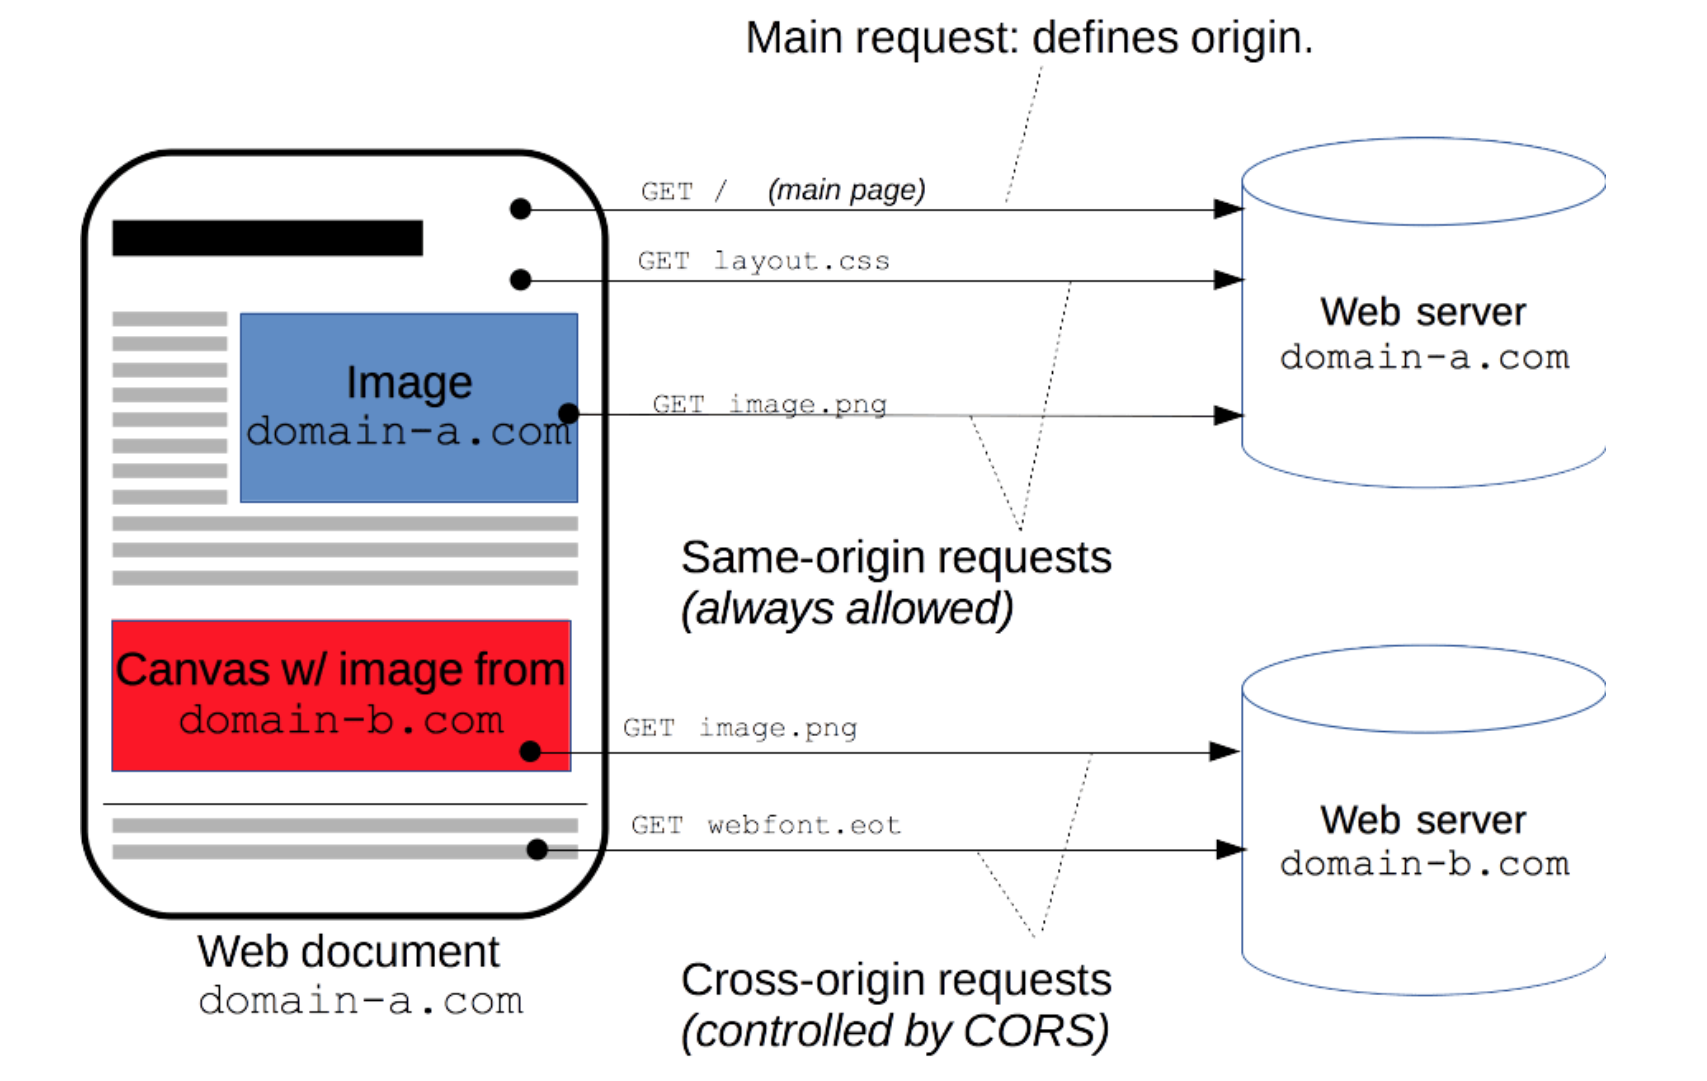
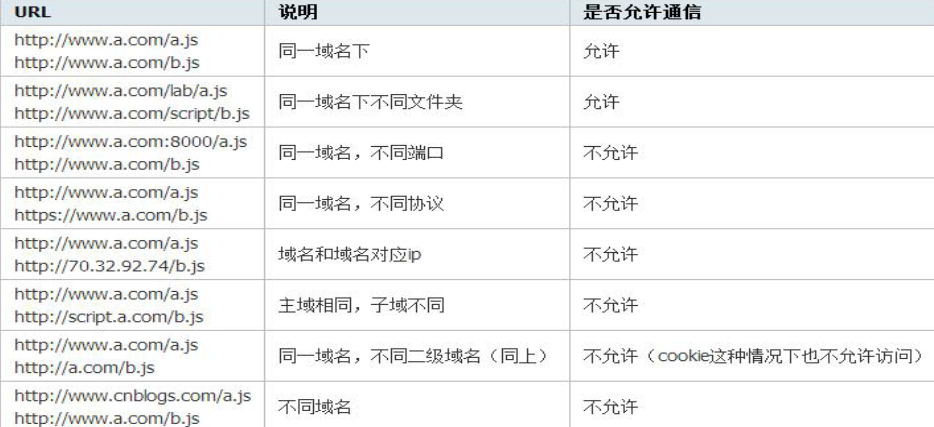
跨域 :指的是浏览器不能执行其他网站的脚本。它是由浏览器的同源策略造成的,是浏览器对 javascript 施加的安全限制,不让 js 获取远程网站的数据 。js 要向获取数据,需要使用 XMLHttpRequest 对象发出 ajax 请求,该对象要想从本网站向远程的其他 URL 发送请求,默认是不允许的。这是因为同源策略所限制的。同源策略 :是指协议,域名,端口都要相同,其中有一个不同都会产生跨域
CORS:Cross-Origin Requests(跨域请求)。
注意 :跨域只有在 js 代码 中发出非普通请求(例如 PUT/PATCH/DELETE 或 Content-Type=application/json)获取其他域名的资源时才会发生。普通的跳转和转发不存在该问题。
参考资料:https://segmentfault.com/a/1190000040220542
跨域示例:
我们的报错原因:浏览器在 http://localhost:8001/#/login renren-fast-vue 的登录页地址)发出了一个 http://localhost:88/api/sys/login
我们的服务器默认是不允许跨域的,因此真实的请求并没有发送过去。
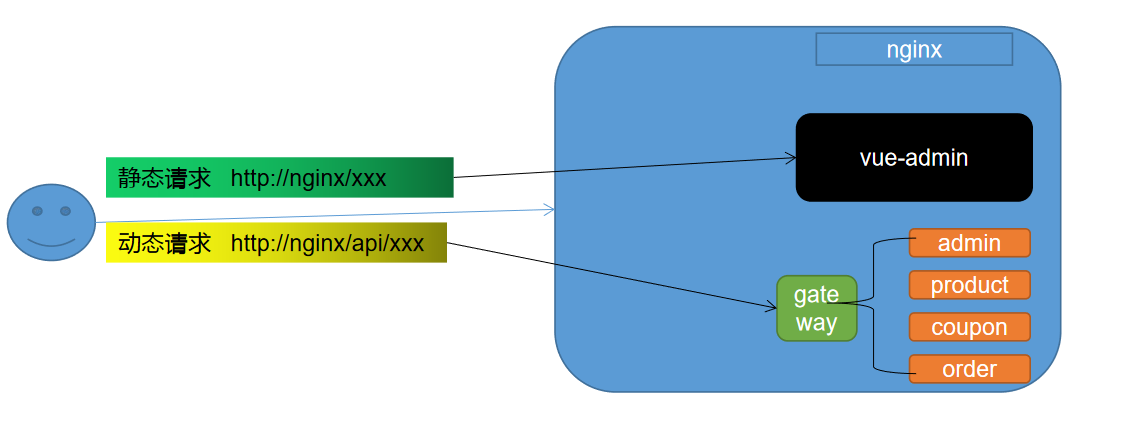
可以将服务都交给 Nginx 代理,实现动静分离,静态请求路由到 vue-admin,动态请求路由到网关:
该方法在最终上线项目时再采用,开发时选用方案二。
CORS 的核心简单来说就是设置头部 Access-Control-Allow-Origin
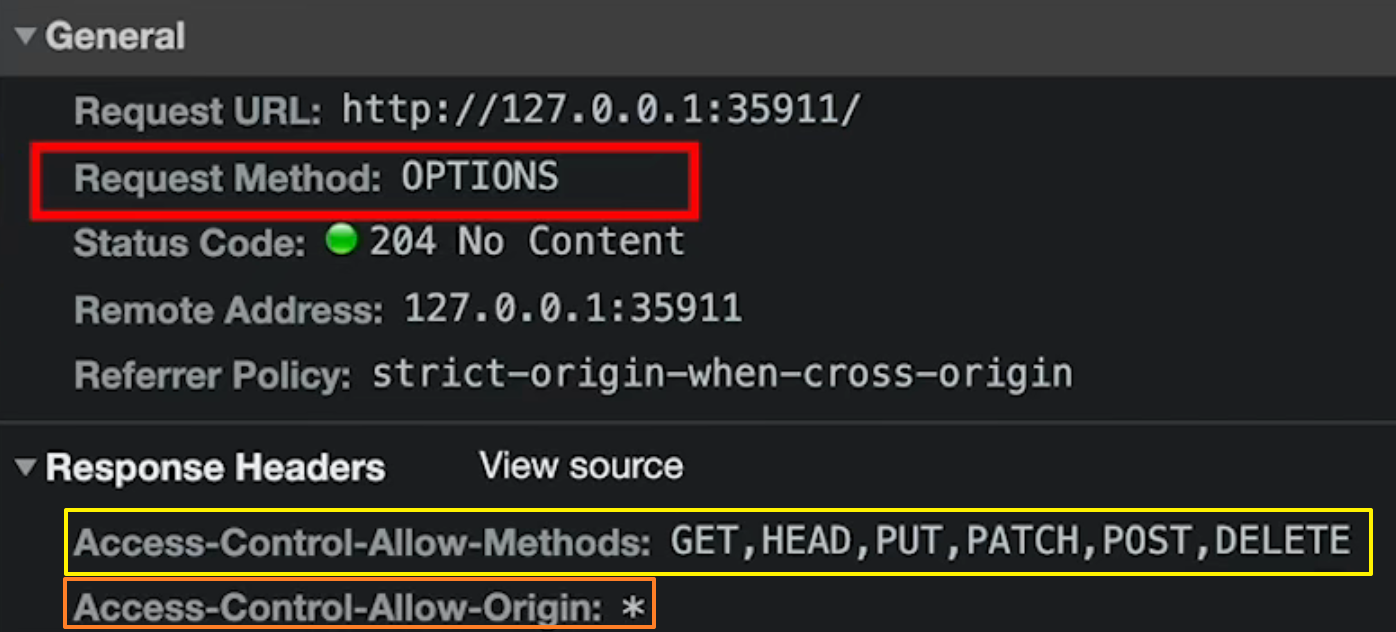
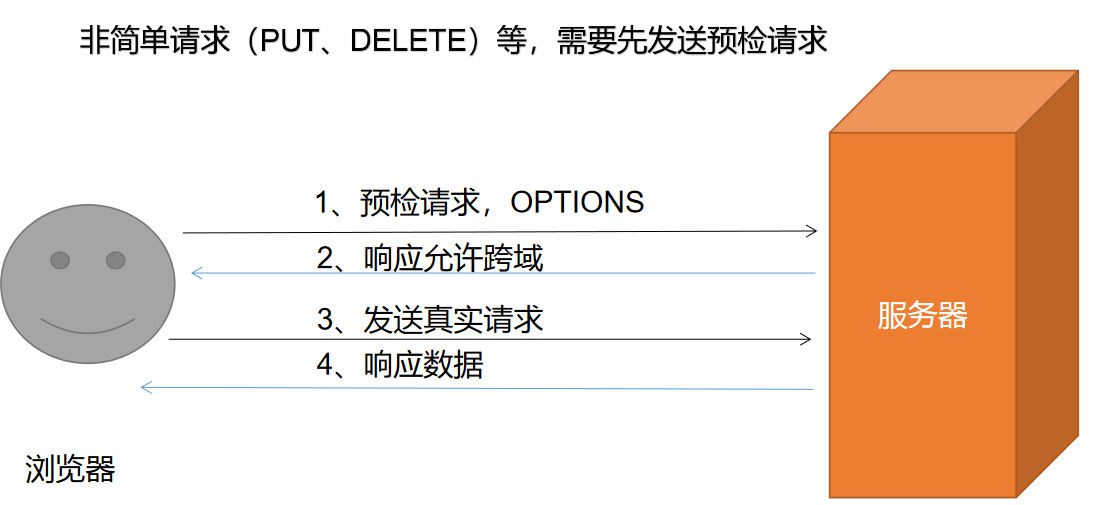
当浏览器判断当前请求为 js 代码中发出的非普通请求(例如 PUT/PATCH/DELETE)时,会先发送一个 OPSTIONS 请求(预检请求 )到目标服务器,并且会在请求头里添加头部 origin,表明自己的协议、主机和端口号。当目标服务器收到该请求时就可以看到该头部,此时:
如果服务器允许该来源访问,就会在请求响应头中添加 Access-Control-Allow-Origin来源 的跨域请求。并且返回成功 Status 204 No Content,这样浏览器就会再发送真正的跨域请求。
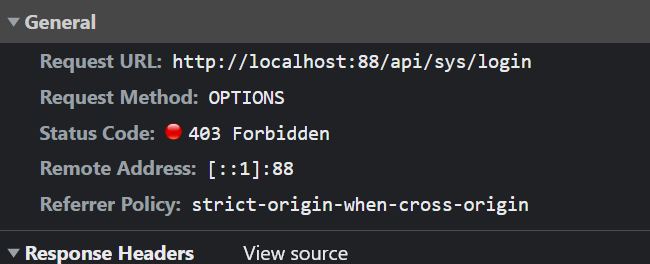
如果服务器发现该请求的 origin 不在自己可支持的来源范围内,就会发送请求拒绝该预检请求 Status 403 Forbidden,浏览器收到后就不会再发送跨域请求了
成功 Status 204 No Content:
失败 Status 403 Forbidden:
跨域流程:
相关资料参考:https://developer.mozilla.org/zh-CN/docs/Web/HTTP/Access_control_CORS
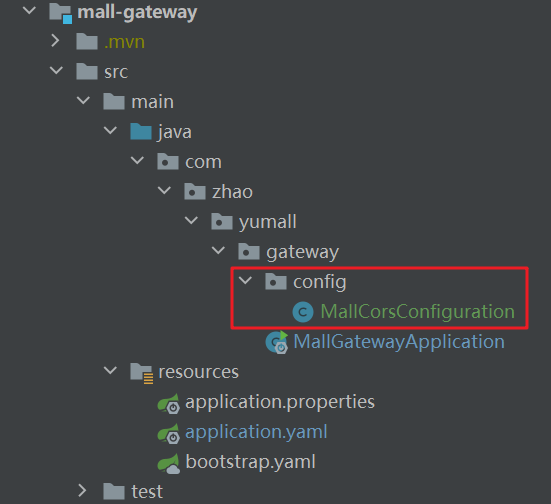
在开发阶段,可以暂时不考虑安全问题,将所有请求都放行,具体做法是:在网关服务 创建配置类(这样就能对所有服务都进行跨域配置),向 Spring 容器中注入一个 CorsWebFilter 对象,在其内配置放行所有请求:
1
2
3
4
5
6
7
8
9
10
11
12
13
14
15
16
17
18
@Configuration public class MallCorsConfiguration @Bean public CorsWebFilter corsWebFilter () UrlBasedCorsConfigurationSource source = new UrlBasedCorsConfigurationSource(); CorsConfiguration corsConfiguration = new CorsConfiguration(); corsConfiguration.addAllowedHeader("*" ); corsConfiguration.addAllowedMethod("*" ); corsConfiguration.addAllowedOrigin("*" ); corsConfiguration.setAllowCredentials(true ); source.registerCorsConfiguration("/**" ,corsConfiguration); return new CorsWebFilter(source); } }
响应头含义:
Access-Control-Allow-Origin:支持哪些来源的请求跨域Access-Control-Allow-Methods:支持哪些方法跨域Access-Control-Allow-Credentials:跨域请求默认不包含cookie,设置为true可以包含cookieAccess-Control-Expose-Headers:跨域请求暴露的字段。CORS请求时, XML .HttpRequest对象的 getResponseHeader() 方法只能拿到6个基本字段:CacheControl、Content-L anguage、Content Type、Expires、 Last-Modified、 Pragma。 如果想拿到其他字段,就必须在Access-Control-Expose-Headers里面指定。Access-Control-Max-Age:表明该响应的有效时间为多少秒。在有效时间内,浏览器无须为同一-请求再次发起预检请求。请注意,浏览器自身维护了一个最大有效时间,如果该首部字段的值超过了最大有效时间,将不会生效。
后端在收到前端发出的 GET 请求后,将去数据库查询所有分类,并进行三级分类:
Controller 层:
1
2
3
4
5
6
7
8
9
10
11
12
13
14
15
16
17
18
@RestController @RequestMapping("product/category") public class CategoryController @Autowired private CategoryService categoryService; @RequestMapping("/list/tree") public R list () List<CategoryEntity> entities = categoryService.listWithTree(); return R.ok().put("data" , entities); } }
Service 层:
1
2
3
public interface CategoryService extends IService <CategoryEntity > List<CategoryEntity> listWithTree () ; }
1
2
3
4
5
6
7
8
9
10
11
12
13
14
15
16
17
18
19
20
21
22
23
24
25
26
27
28
29
30
31
32
33
34
35
36
37
38
39
40
41
42
43
44
45
46
47
48
49
50
51
52
53
@Service("categoryService") public class CategoryServiceImpl extends ServiceImpl <CategoryDao , CategoryEntity > implements CategoryService @Override public List<CategoryEntity> listWithTree () List<CategoryEntity> entities = baseMapper.selectList(null ); List<CategoryEntity> menusLevel1 = entities.stream() .filter(categoryEntity -> categoryEntity.getParentCid() == 0 ) .map((menu) -> { menu.setChildren(getChildren(menu, entities)); return menu; }) .sorted((m1, m2) -> (m1.getSort() == null ? 0 : m1.getSort()) - (m2.getSort() == null ? 0 : m2.getSort())) .collect(Collectors.toList()); return menusLevel1; } @Override public void removeMenusByIds (List<Long> idList) baseMapper.deleteBatchIds(idList); } public List<CategoryEntity> getChildren (CategoryEntity root, List<CategoryEntity> all) List<CategoryEntity> children = all.stream() .filter(entity -> entity.getParentCid().equals(root.getCatId())) .map(menu -> { menu.setChildren(getChildren(menu, all)); return menu; }).sorted((m1, m2) -> (m1.getSort() == null ? 0 : m1.getSort()) - (m2.getSort() == null ? 0 : m2.getSort())) .collect(Collectors.toList()); return children; } }
我们不直接在数据库中删除数据,而是采用逻辑删除 的方式,将某个字段设置为 1 代表逻辑已删除,设置为 0 代表逻辑未删除。该字段可选择表中的 show_status。
1、配置 MyBatis-Plus 的逻辑删除功能:
1
2
3
4
5
6
mybatis-plus: global-config: db-config: logic-delete-value: 1 logic-not-delete-value: 0
2、给实体类的指定字段上加上@TableLogic注解,该字段就将被视为逻辑删除标志字段:
1 2 3 4 5 6 7 @TableLogic(value = "1", delval = "0") private Integer showStatus;
这样再执行 MyBatis-Plus 的 baseMapper.deleteBatchIds(idList) 方法时,就不再将数据从表中删除,而是只修改其标志位。
3、测试:开启日志功能,查看实际向数据库发出的 SQL 语句:
1
2
3
2021-12-25 13:37:45.585 DEBUG 12700 --- [io-10000-exec-1] c.z.y.p.dao.CategoryDao.deleteBatchIds : ==> Preparing: UPDATE pms_category SET show_status=0 WHERE cat_id IN ( ? , ? ) AND show_status=1 2021-12-25 13:37:45.606 DEBUG 12700 --- [io-10000-exec-1] c.z.y.p.dao.CategoryDao.deleteBatchIds : ==> Parameters: 1431(Long), 54126(Long) 2021-12-25 13:37:45.631 DEBUG 12700 --- [io-10000-exec-1] c.z.y.p.dao.CategoryDao.deleteBatchIds : <== Updates: 2
可以看到只是更新了 show_status 字段而已,从而实现了逻辑删除的功能。
为三级分类添加拖拽功能,具体做法:为每个分类菜单添加拖拽的响应事件:
一个用于响应拖拽时的 UI 变化
一个用于响应拖拽后更新所有层级信息,并同步到数据库中
其中,在完成拖拽后可以得知源菜单 source 相对拖拽的目标位置 target 的位置是 inner 还是 before/after:
如果是 inner,则源菜单将成为 target 菜单的子菜单。此时源菜单的新层级就等于 target 的层级 + 1(前提是不超过 3,否则就不允许拖拽),新的父节点就是 target
如果是 before/after,则源菜单将成为 target 菜单的兄弟菜单(同一级)。此时源菜单的新层级就等于 target 的层级,新的父节点就是 target 的父节点
同时拖拽完毕后,要:
对变化后的层内的节点重新排序(按照字母等策略)
递归地对源节点的所有子节点都更新其新的层级
品牌管理功能需要上传品牌的图片,本项目选用阿里云的 OSS 存储图片,并创建微服务:mall-third-party(即第三方服务),专门负责向 OSS 发送请求获取许可签名。关于第三方服务的配置见章节第三方服务 。
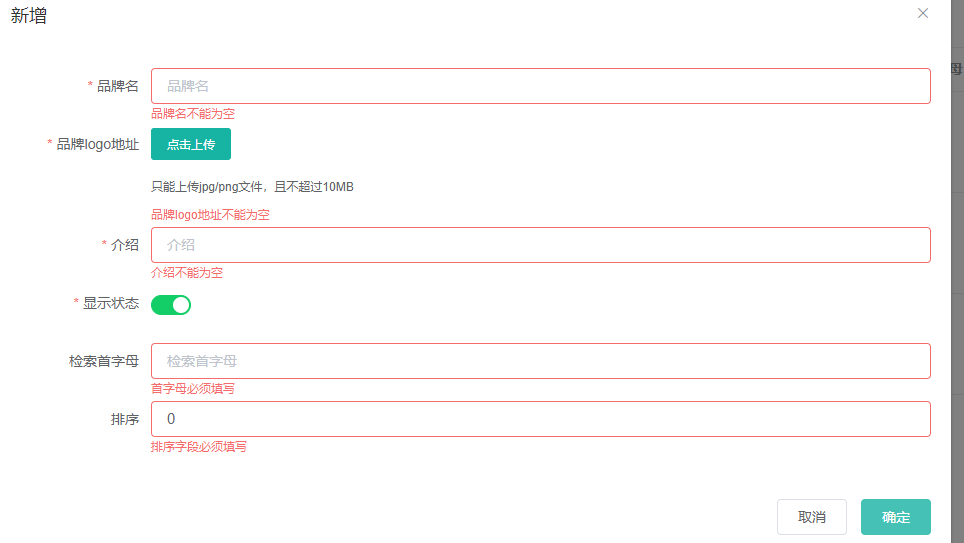
首先在前端的“新增品牌”表单里添加校验规则,对不合规的输入进行限制,效果:
el-form 组件提供了表单验证的功能,只需要通过 rules 属性传入约定的验证规则,并将 Form-Item 的 prop 属性设置为需校验的字段名即可。
1
2
3
4
5
6
7
8
<el-form :model="dataForm" :rules="dataRule" ref="dataForm" @keyup.enter.native="dataFormSubmit()" label-width="140px" > </el-form>
自定义规则,对用户输入的数据进行校验:
1
2
3
4
5
6
7
8
9
10
11
12
13
14
15
16
17
18
19
20
21
22
23
24
25
dataRule: { name: [{ required : true , message : "品牌名不能为空" , trigger : "blur" }], firstLetter: [ { validator : (rule, value, callback ) => { if (value == '' ) { callback(new Error ("首字母必须填写" )) } else if (! /^[a-zA-Z]$/ .test(value)) { callback(new Error ("首字母必须a-z或者A-Z之间" )) } else { callback() } },trigger :'blur' } ], sort: [{ validator : (rule, value, callback ) => { if (value == '' ) { callback(new Error ("排序字段必须填写" )); } else if (!Number .isInteger(value) || value < 0 ) { callback(new Error ("排序必须是一个大于等于0的整数" )); } else { callback(); } }, trigger : "blur" }] }
这样前端就可以对一些非法数据进行拦截,但仍然可能有人绕过前端发送非法数据请求,因此还需要进行后端校验。
JSR 303 用于对 Java Bean 中的字段的值进行验证
后端的数据校验采用 JSR 303 技术。本项目中 JSR 303 的具体配置见文章【Java】JSR 303 数据校验
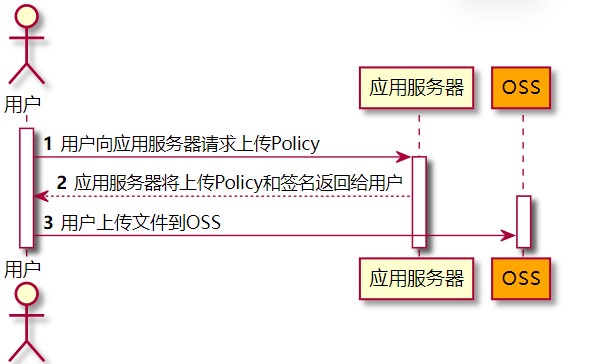
本项目中的所有图片信息都选择存储在阿里云的 OSS 中,在数据库中仅保存这些图片在 OSS 中的 URL。前端在本地选择好图片后,将向第三方服务 mall-third-party 发出请求获取许可签名 。在收到签名后,前端将使用许可密码信息向阿里云 OSS 中的指定 Bucket 发出请求保存选中的图片数据。
第三方服务仅用于向阿里云 OSS 获取许可签名,真正的上传工作由前端完成 。
https://help.aliyun.com/document_detail/31926.html
对象存储服务(Object Storage Service,OSS)用于是一种海量、安全、低成本、高可靠的云存储服务,适合存放任意类型的文件。容量和处理能力弹性扩展,多种存储类型供选择,全面优化存储成本。
本项目中 OSS 的具体配置见文章【Spring Cloud】Spring Cloud Alibaba OSS
本项目使用阿里云的短信服务实现短信验证功能,具体开通与使用方法见文章【AlibabaCloud】阿里云短信服务
在开始编写商城业务之前,首先我们需要先考虑商城内应该出现哪些数据:只有在后台管理系统选择 【上架】 的商品才会出现在商城首页,同时这些商品也将被存储到 ElasticSearch 中 ,这样就能被快速检索 到。后台管理系统界面:
首先定义要存储到 ES 中的模型类 SkuEsModel,将其存放在 mall-common 微服务的 to 包下,包含的具体属性:
1
2
3
4
5
6
7
8
9
10
11
12
13
14
15
16
17
18
19
20
21
22
23
24
25
26
27
28
29
30
31
32
33
34
35
36
37
38
39
40
41
42
43
44
45
46
47
48
49
50
51
@Data public class SkuEsModel private Long spuId; private Long skuId; private String skuTitle; private BigDecimal skuPrice; private String skuImg; private Long saleCount; private Boolean hasStock; private Long hotScore; private Long catalogId; private String catalogName; private Long brandId; private String brandName; private String brandImg; private List<Attrs> attrs; @Data public static class Attrs private Long attrId; private String attrName; private String attrValue; } }
attrs 属性是所有 spu 共享一份的,该 spu 下的所有 sku 都有相同的值。这种存储方法虽然造成了大量的 attrs 信息冗余,但是其却节省了大量的查询时间,否则每个 sku 还要再去单独检索其对应的 spu 的 attrs,无疑会浪费很多时间,在高并发下会发生严重阻塞。所以选择这种冗余方式存储 attrs,虽然浪费了空间,但是节省了时间
点击上架后,将发送该商品的 spuId 到商品服务。商品服务响应该请求后将根据该值查询得到下面的其他信息。具体逻辑见 SpuInfoServiceImpl:
1 2 3 4 5 6 7 8 9 10 11 12 13 14 15 16 17 18 19 20 21 22 23 24 25 26 27 28 29 30 31 32 33 34 35 36 37 38 39 40 41 42 43 44 45 46 47 48 49 50 51 52 53 54 55 56 57 58 59 60 61 62 63 64 65 66 67 68 69 70 71 72 73 74 75 76 77 78 79 80 81 82 83 84 85 86 87 88 89 90 @Override public boolean up (Long spuId) List<ProductAttrValueEntity> baseAttrs = productAttrValueService.baseAttrListForSpu(spuId); List<Long> attrIds = baseAttrs.stream().map(attr -> { return attr.getAttrId(); }).collect(Collectors.toList()); List<Long> searchAttrIds = attrService.selectSearchAttrIds(attrIds); Set<Long> idSet = new HashSet<>(searchAttrIds); List<SkuEsModel.Attrs> attrsList = baseAttrs.stream() .filter(item -> idSet.contains(item.getAttrId())) .map(item -> { SkuEsModel.Attrs attrs = new SkuEsModel.Attrs(); BeanUtils.copyProperties(item, attrs); return attrs; }).collect(Collectors.toList()); List<SkuInfoEntity> skus = skuInfoService.getSkuBySpuId(spuId); List<Long> skuIdList = skus.stream().map(SkuInfoEntity::getSkuId).collect(Collectors.toList()); Map<Long, Boolean> stockMap = null ; try { List<SkuHasStockVo> skuHasStockList = wareFeignService.getSkusHasStock(skuIdList); stockMap = skuHasStockList.stream() .collect(Collectors.toMap(SkuHasStockVo::getSkuId, item -> item.getHasStock())); } catch (Exception e) { log.error("库存服务查询异常:原因 {}" , e); } Map<Long, Boolean> finalStockMap = stockMap; List<SkuEsModel> upProducts = skus.stream().map(sku -> { SkuEsModel esModel = new SkuEsModel(); BeanUtils.copyProperties(sku, esModel); esModel.setSkuPrice(sku.getPrice()); esModel.setSkuImg(sku.getSkuDefaultImg()); if (finalStockMap == null ) { esModel.setHasStock(true ); } else { esModel.setHasStock(finalStockMap.get(sku.getSkuId())); } esModel.setHotScore(0L ); BrandEntity brandEntity = brandService.getById(esModel.getBrandId()); esModel.setBrandName(brandEntity.getName()); esModel.setBrandImg(brandEntity.getLogo()); CategoryEntity categoryEntity = categoryService.getById(esModel.getCatalogId()); esModel.setCatalogName(categoryEntity.getName()); esModel.setAttrs(attrsList); return esModel; }).collect(Collectors.toList()); R r = searchFeignService.productStatusUp(upProducts); if (r.getCode() == 0 ) { this .baseMapper.updateSpuStatus(spuId, ProductConstant.StatusEnum.SPU_UP.getCode()); return true ; } else { return false ; } }
检索服务 mall-search 将传来的 SkuEsModel 数据保存到 ElasticSearch 中:
1 2 3 4 5 6 7 8 9 10 11 12 13 14 15 16 17 18 19 20 21 22 23 24 25 26 27 28 29 @Override public boolean productStatusUp (List<SkuEsModel> skuEsModelList) throws IOException BulkRequest bulkRequest = new BulkRequest(); for (SkuEsModel skuEsModel : skuEsModelList) { IndexRequest indexRequest = new IndexRequest(EsConstant.PRODUCT_INDEX); indexRequest.id(skuEsModel.getSkuId().toString()); String jsonString = JSON.toJSONString(skuEsModel); indexRequest.source(jsonString, XContentType.JSON); bulkRequest.add(indexRequest); } BulkResponse bulk = restHighLevelClient.bulk(bulkRequest, MallElasticSearchConfig.COMMON_OPTIONS); boolean hasFailures = bulk.hasFailures(); List<String> collect = Arrays.stream(bulk.getItems()).map(BulkItemResponse::getId).collect(Collectors.toList()); log.info("商品上架完成:{}" , collect); return hasFailures; }
其中,向 ES 中创建的 product 索引的语句为:
1
2
3
4
5
6
7
8
9
10
11
12
13
14
15
16
17
18
19
20
21
22
23
24
25
26
27
28
29
30
31
PUT product { "mappings" :{ "properties" : { "skuId" :{ "type" : "long" }, "spuId" :{ "type" : "keyword" }, "skuTitle" : { "type" : "text" , "analyzer" : "ik_smart" }, "skuPrice" : { "type" : "keyword" }, "skuImg" : { "type" : "keyword" }, "saleCount" :{ "type" :"long" }, "hasStock" : { "type" : "boolean" }, "hotScore" : { "type" : "long" }, "brandId" : { "type" : "long" }, "catalogId" : { "type" : "long" }, "brandName" : { "type" : "keyword" }, "brandImg" :{ "type" : "keyword" }, "catalogName" : {"type" : "keyword" }, "attrs" : { "type" : "nested" , "properties" : { "attrId" : { "type" : "long" }, "attrName" : { "type" : "keyword" }, "attrValue" : { "type" : "keyword" } } } } } }
注意 attrs 字段的类型为 nested,表示嵌入式字段,不会被扁平化处理。
Thymeleaf 官网:https://www.thymeleaf.org/。中文文档:http://note.youdao.com/noteshare?id=7771a96e9031b30b91ed55c50528e918
商城首页的前端使用 Thymeleaf 进行开发。Spring Boot 整合了 Thymeleaf,可以快速开发出前端页面。Spring Boot 的静态资源解析原理见文章 【Spring Boot】Spring Boot2
导入 Maven 依赖(注意一定要导入依赖,否则不报错也无法显示页面效果)
1 2 3 4 5 <dependency > <groupId > org.springframework.boot</groupId > <artifactId > spring-boot-starter-thymeleaf</artifactId > </dependency >
配置关闭缓存
1
2
3
Spring: thymeleaf: cache: false
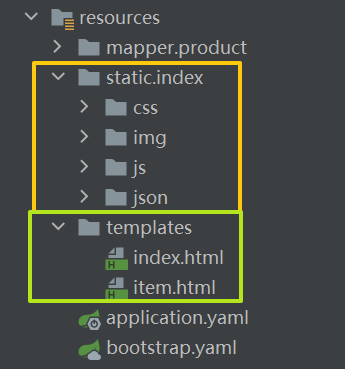
在 resources 目录下存放前端代码
前端页面文件必须加上
1
2
3
<!DOCTYPE html > <html lang ="en" xmlns:th ="http://www.thymeleaf.org" >
如果前端页面跳转时有固定前缀(例如 /static),则需要在配置文件中指定该前缀:
1
2
3
4
5
spring: resources: static-locations: [classpath:/static/ ] mvc: static-path-pattern: /static/**
最终将会把前端代码放到 Nginx 中实现动静分离,减轻服务器压力。
配置静态页面跳转 Controller,只有配置了页面跳转规则才可以访问到 templates 目录下的页面。
Spring Boot 只支持自动跳转到 index.html 页面。templates 目录下的其他路径都不能直接在浏览器中访问到,必须通过 Controller 进行跳转
1
2
3
4
5
6
7
8
9
10
11
12
13
14
15
@GetMapping({"/", "/index.html"}) public String indexPage (Model model) List<CategoryEntity> categoryEntities = categoryService.getCategoryLevel1(); model.addAttribute("categories" , categoryEntities); return "index" ; } @GetMapping("/item.html") public String indexPage () return "item" ; }
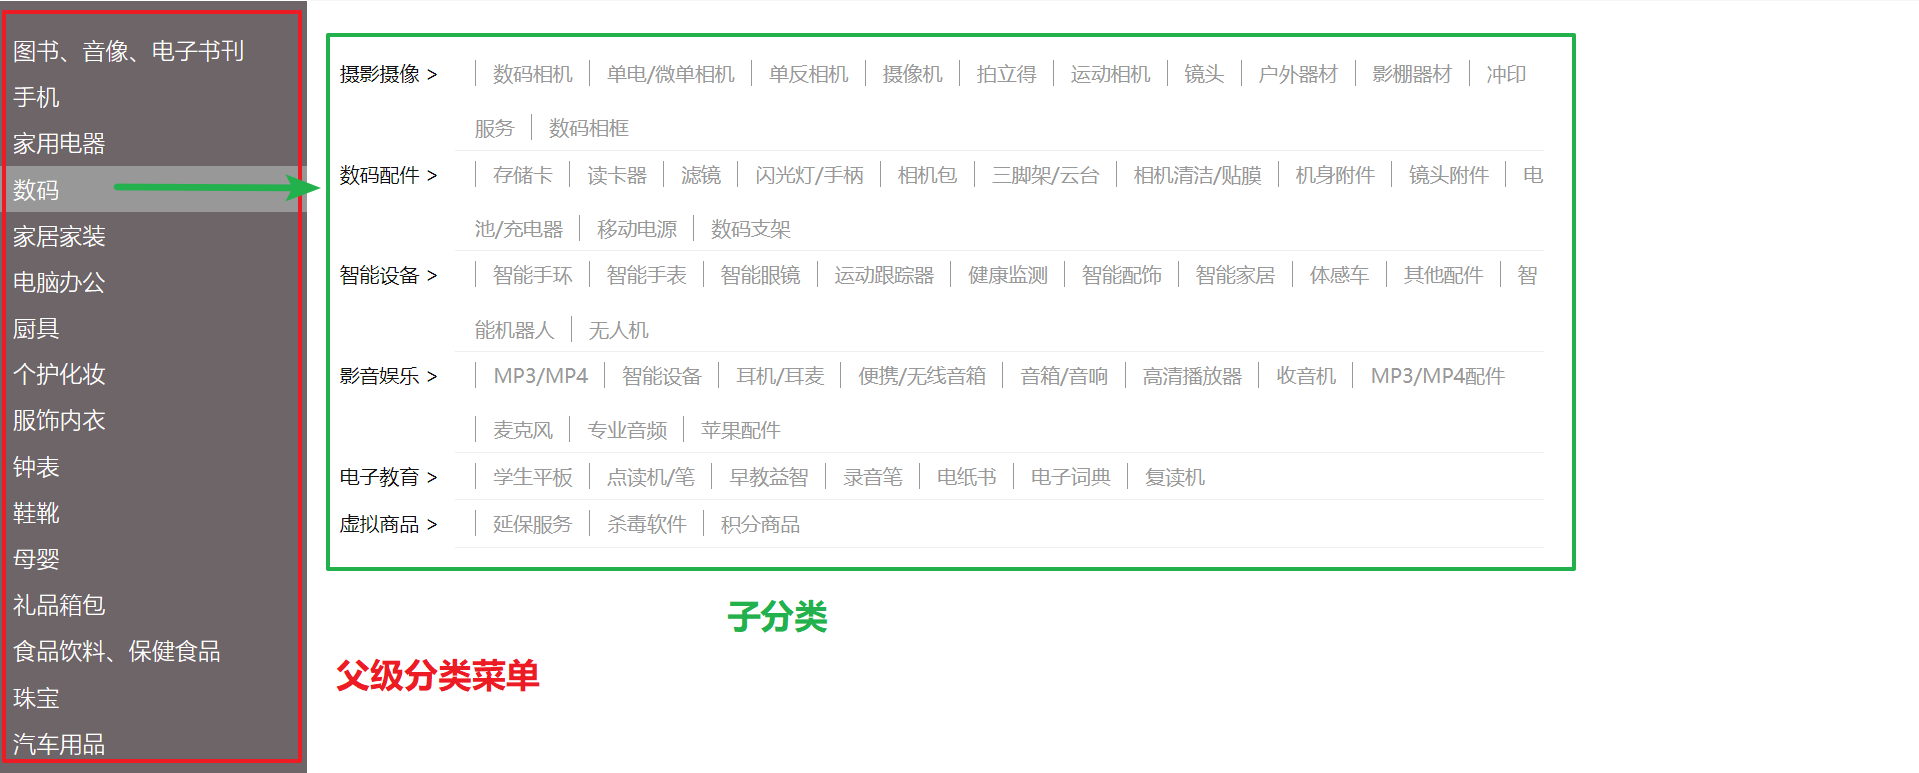
商城首页需要展示所有商品的三级分类信息,效果如下:
在 mall-product 服务下创建 web 包,在其内存放商城首页的 IndexController:
1 2 3 4 5 6 7 8 9 10 11 12 13 14 15 16 17 18 19 20 21 22 23 24 25 26 27 28 29 30 31 @Controller public class IndexController @Autowired CategoryService categoryService; @GetMapping({"/", "/index.html"}) public String indexPage (Model model) List<CategoryEntity> categoryEntities = categoryService.getCategoryLevel1(); model.addAttribute("categories" , categoryEntities); return "index" ; } @GetMapping("/index/json/catalog.json") @ResponseBody public Map<String, List<Catalog2Vo>> getCategoryMap() { return categoryService.getCatalogJson(); } }
查询所有的一级分类:
1 2 3 4 5 6 7 8 9 @Override public List<CategoryEntity> getCategoryLevel1 () return this .baseMapper.selectList(new QueryWrapper<CategoryEntity>().eq("parent_cid" , 0 )); }
从数据库中查二级与三级分类数据并封装成 Catalog2Vo 类型:
1 2 3 4 5 6 7 8 9 10 11 12 13 14 15 16 17 18 19 20 21 22 23 24 25 26 27 28 29 30 31 32 33 public Map<String, List<Catalog2Vo>> getCatalogJsonFromDB() { List<CategoryEntity> categoryEntities = this .list(new QueryWrapper<CategoryEntity>().eq("cat_level" , 2 )); List<Catalog2Vo> catalog2Vos = categoryEntities.stream().map(categoryEntity -> { List<CategoryEntity> level3 = this .list(new QueryWrapper<CategoryEntity>().eq("parent_cid" , categoryEntity.getCatId())); List<Catalog2Vo.Catalog3Vo> catalog3Vos = level3.stream().map(cat -> { return new Catalog2Vo.Catalog3Vo(cat.getParentCid().toString(), cat.getCatId().toString(), cat.getName()); }).collect(Collectors.toList()); Catalog2Vo catalog2Vo = new Catalog2Vo(categoryEntity.getParentCid().toString(), categoryEntity.getCatId().toString(), categoryEntity.getName(), catalog3Vos); return catalog2Vo; }).collect(Collectors.toList()); Map<String, List<Catalog2Vo>> catalogMap = new HashMap<>(); for (Catalog2Vo catalog2Vo : catalog2Vos) { List<Catalog2Vo> list = catalogMap.getOrDefault(catalog2Vo.getCatalog1Id(), new LinkedList<>()); list.add(catalog2Vo); catalogMap.put(catalog2Vo.getCatalog1Id(), list); } return catalogMap; }
目前的版本每次查询时都需要去数据库中查询数据,在高并发情况下对数据库的访问压力过大,因此需要增加缓存功能,将数据库访问到的数据存储在缓存中,这样其他用户再访问时就可以直接从缓存中读取,从而减轻了数据库的压力。
哪些数据适合放入缓存?
即时性、数据一致性要求不高的 访问量大且更新频率不高的数据(读多、写少)
举例:电商类应用、商品分类,商品列表等适合缓存并加一个过期时间 (根据数据更新频率来定)后台如果发布一个商品、买家需要 5 分钟才能看到新商品一般还是可以接受的。
注意:在开发中,凡是放到缓存中的数据我们都应该设置过期时间,使其可以在系统即使没有主动更新数据也能自动触发数据加载的流程,避免业务崩溃导致的数据永久不一致的问题。
本项目使用 Redis 缓存数据。在 Docker 中配置 Redis 的过程见文章【Docker】Docker 配置实战案例 【Spring Boot】Spring Boot2 整合第三方技术
增加缓存后的代码:
1 2 3 4 5 6 7 8 9 10 11 12 13 14 15 16 17 18 19 20 21 22 23 24 public Map<String, List<Catalog2Vo>> getCatalogJsonWithRedis() { String catalogJSON = redisTemplate.opsForValue().get("catalogJSON" ); if (StringUtils.isEmpty(catalogJSON)) { Map<String, List<Catalog2Vo>> catalogJsonFromDB = getCatalogJsonFromDBWithRedissonLock(); String s = JSON.toJSONString(catalogJsonFromDB); redisTemplate.opsForValue().set("catalogJSON" , s); return catalogJsonFromDB; } Map<String, List<Catalog2Vo>> result = JSON.parseObject(catalogJSON, new TypeReference<Map<String, List<Catalog2Vo>>>() { }); return result; }
其中,与 Redis 进行通讯时:
序列化:先将 Java 实体对象转换成 JSON 字符串,然后再存储到 Redis 中
反序列化:从 Reids 中读取 JSON 字符串,然后再转换成 Java 实体对象
缓存三大问题的具体分析见文章 【Redis】Redis 基础
缓存穿透:缓存空对象 ;或使用布隆过滤器
缓存击穿:加分布式锁 ;或预先设置热门数据
缓存雪崩:为失效时间增加随机值 ;或做服务降级
本项目采用加粗部分的策略缓解这些问题。关于分布式锁的详细配置与分析见文章 【Redis】Redis 分布式锁
使用布隆过滤器防止缓存穿透的方法:访问缓存前先经过布隆过滤器判断当前查询的 key 在布隆过滤器中是否存在,如果存在则代表当前请求查询值大概率在数据库中存在,此时可以放行继续查;否则直接丢弃,不再访问缓存数据。每次在数据库中更新了 key 后,都立即在布隆过滤器中更新该 key 对应的槽位置为 1,代表该数据存在于数据库中,可以放行。
先查看缓存中是否有该数据,如果有就返回
如果没有,先加分布式锁,然后再去数据库里查数据,而不应该先加锁再查缓存。
代码:
1 2 3 4 5 6 7 8 9 10 11 12 13 14 15 16 17 18 19 20 21 22 23 24 25 26 27 28 29 30 31 32 33 34 35 36 37 38 39 40 41 42 43 44 45 46 47 48 49 50 51 52 53 54 55 56 57 @Override public Map<String, List<Catalog2Vo>> getCatalogJsonWithRedis() { String cache = redisTemplate.opsForValue().get("catalogJSON" ); if (StringUtils.isEmpty(cache)) { Map<String, List<Catalog2Vo>> catalogJson = getCatalogJsonFromDBWithRedissonLock(); String s = JSON.toJSONString(catalogJson); redisTemplate.opsForValue().set("catalogJSON" , s); return catalogJson; } Map<String, List<Catalog2Vo>> result = JSON.parseObject(cache, new TypeReference<Map<String, List<Catalog2Vo>>>() { }); return result; } public Map<String, List<Catalog2Vo>> getCatalogJsonFromDBWithRedissonLock() { RLock lock = redissonClient.getLock("catalogJson-lock" ); lock.lock(); String cache = redisTemplate.opsForValue().get("catalogJSON" ); if (cache != null ) { Map<String, List<Catalog2Vo>> result = JSON.parseObject(cache, new TypeReference<Map<String, List<Catalog2Vo>>>() { }); return result; } Map<String, List<Catalog2Vo>> catalogJsonFromDB; try { catalogJsonFromDB = getCatalogJsonFromDB(); } finally { lock.unlock(); } return catalogJsonFromDB; }
每次增加缓存功能,我们都需要将添加缓存的代码耦合到业务代码中,这样每个业务代码都需要添加重复的缓存代码。自然可以想到,使用 Spring AOP 的思想进行解耦。
Spring Cache 就是这么一个框架。它利用了 Spring AOP,实现了基于注解的缓存功能 ,并且进行了合理的抽象,业务代码不用关心底层是使用了什么缓存框架,只需要简单地加一个注解并配置缓存框架的类型,就能实现缓存功能了。而且 Spring Cache 也提供了很多默认的配置,用户可以为自己的业务代码快速加上一个很不错的缓存功能。关于 Spring Cache 的具体配置方法见文章 【Spring】Spring Cache
本项目最终版本的代码:
1
2
3
4
5
6
7
8
9
10
11
12
@Cacheable(value = {"category"}, key = "#root.method.name", sync = true) @Override public List<CategoryEntity> getCategoryLevel1 () return this .baseMapper.selectList(new QueryWrapper<CategoryEntity>().eq("parent_cid" , 0 )); } @Cacheable(value = {"category"}, key = "'getCatalogJson'", sync = true) @Override public Map<String, List<Catalog2Vo>> getCatalogJson() { return getCatalogJsonFromDB(); }
如果使用 Spring Cache 框架,就不能使用上面介绍的 Redisson 方案了,因为被 Spring AOP 托管后不会调用自己的加锁方法。不过可以使用 sync = true 配置开启本地锁 ,也能极大地缓解缓存击穿问题。
配置类:
1
2
3
4
5
6
7
8
9
10
11
12
13
14
15
16
17
18
19
20
21
22
23
24
25
26
27
28
29
30
31
32
33
34
35
36
37
38
39
40
@EnableConfigurationProperties(CacheProperties.class) @EnableCaching @Configuration public class MyCacheConfig @Bean RedisCacheConfiguration redisCacheConfiguration (CacheProperties cacheProperties) { RedisCacheConfiguration config = RedisCacheConfiguration.defaultCacheConfig(); config = config.serializeKeysWith(RedisSerializationContext.SerializationPair.fromSerializer(new StringRedisSerializer())); config = config.serializeValuesWith(RedisSerializationContext.SerializationPair.fromSerializer(new GenericJackson2JsonRedisSerializer())); CacheProperties.Redis redisProperties = cacheProperties.getRedis(); if (redisProperties.getTimeToLive() != null ) { config = config.entryTtl(redisProperties.getTimeToLive()); } if (redisProperties.getKeyPrefix() != null ) { config = config.prefixKeysWith(redisProperties.getKeyPrefix()); } if (!redisProperties.isCacheNullValues()) { config = config.disableCachingNullValues(); } if (!redisProperties.isUseKeyPrefix()) { config = config.disableKeyPrefix(); } return config; } }
配置文件:
1
2
3
4
5
6
7
8
9
10
11
12
13
spring: redis: host: yuyunzhao.cn port: 6379 password: zhaoyuyun cache: type: redis redis: time-to-live: 360000 use-key-prefix: true cache-null-values: true
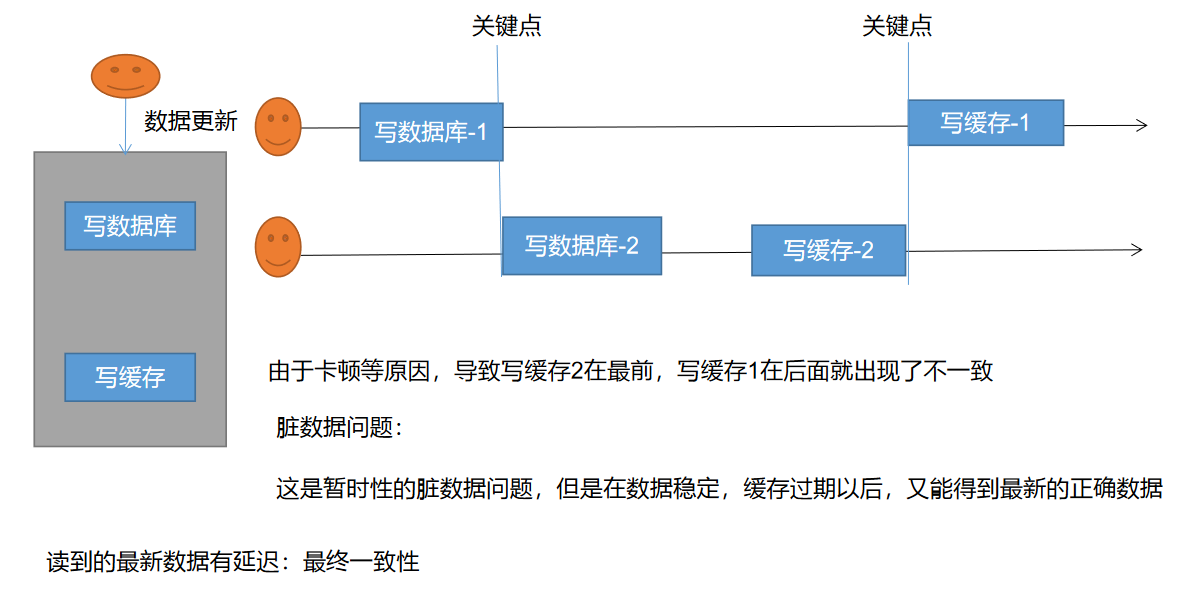
缓存数据一致性问题只有在并发写 时才会出现,如果只有并发读,则不会出现该问题
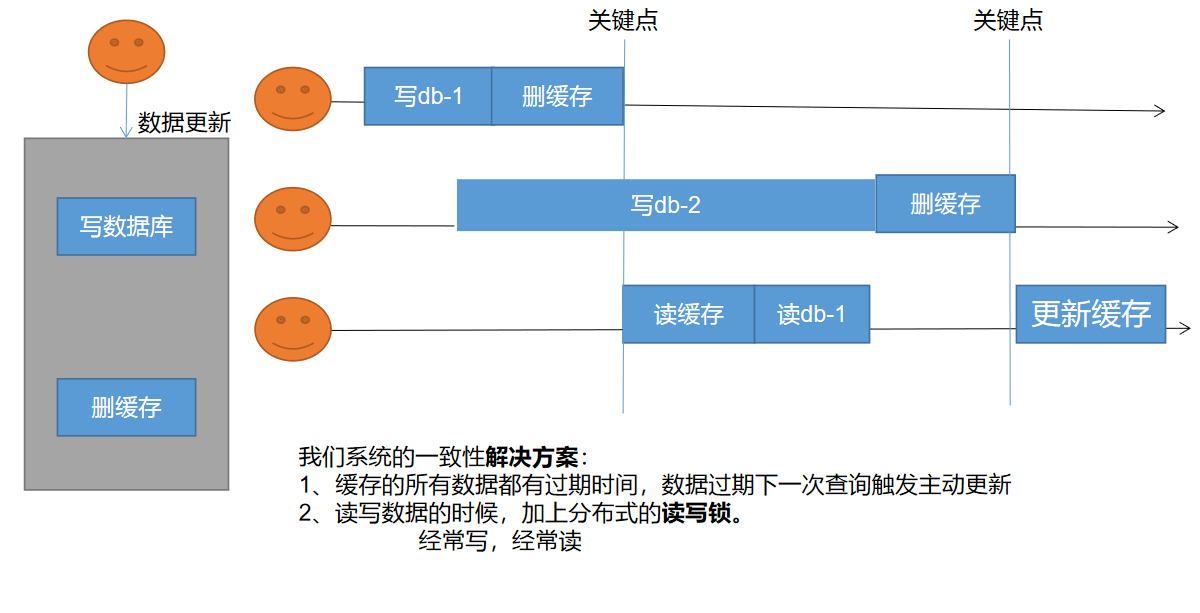
缓存数据一致性问题:缓存中的数据和数据库中的数据不一致。这是因为数据库中的数据更新后缓存中并没有实时更新该数据导致的。有两种模式可以解决该问题:
双写模式 :一旦数据库更新,就立刻更新缓存 。这样数据就会实时同步。因此叫做双写模式失效模式 :一旦数据库更新,就立刻清空缓存 。用户在下一次访问时就会再读取一遍数据库并保存到缓存中。因此叫做失效模式
Spring Cache 双写模式与失效模式的配置见文章 【Spring】Spring Cache
但是这两种模式在高并发下都可能会失效,例如:
双写模式
失效模式
无论是双写模式还是失效模式,在高并发下都可能会出现缓存不一致问题。我们该如何解决?
如果是用户纯度数据(订单数据、用户数据),并发几率很小,几乎不用考虑这个问题,缓存数据加上过期时间,每当缓存过期后再访问时主动更新缓存即可
如果是读多写少的场景,则可以在每次更新数据库前加上读写锁 ,在从缓存中删除数据后再释放读写锁,保证并发读写时只能有一个请求访问数据库。并发读的时候不会有任何影响
如果写请求也很多,同时对数据强一致性要求不高的场景,其实可以简单地为缓存数据设置过期时间(例如一分钟),在过期后其他请求在查询时就能从数据库中得到最新值。如果不要求这期间的数据不一致性,那么该方案完全能够满足需求
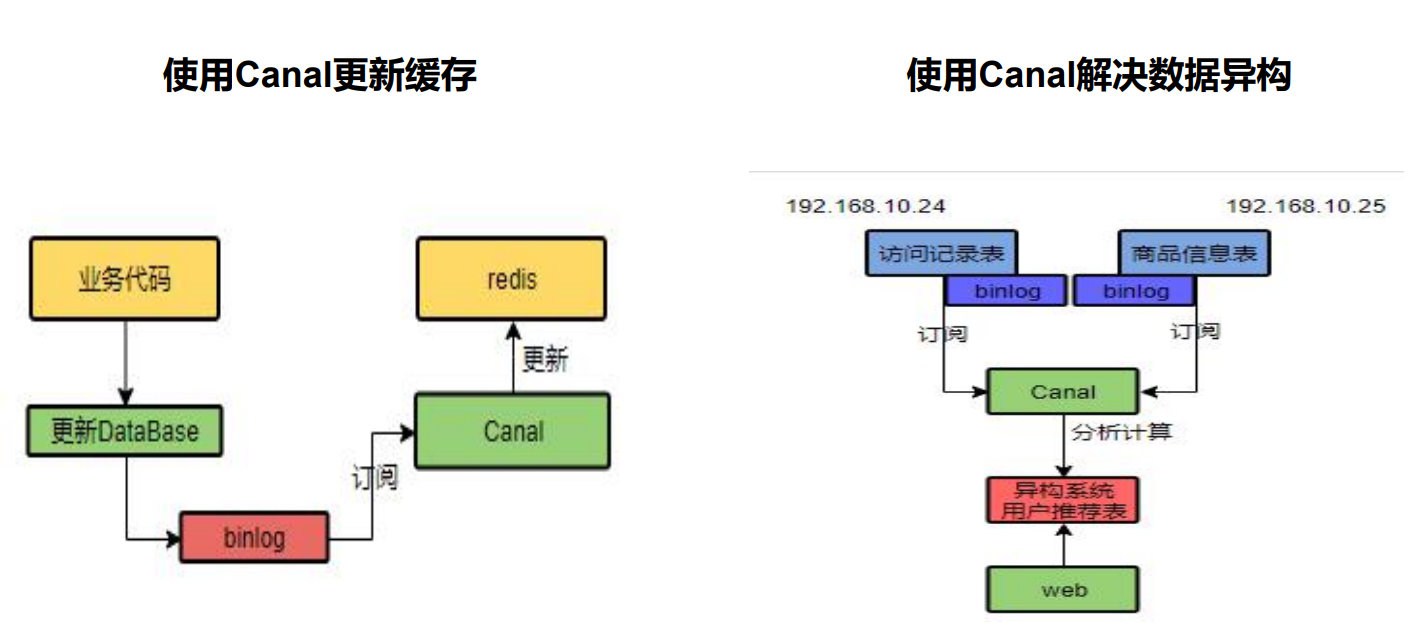
如果必须要求数据强一致性,可以使用 Canal 订阅 ,实时同步数据库中的数据与缓存中的数据
其实,使用失效模式 + 为缓存数据添加过期时间 足够解决大部分业务对缓存的要求。
Canal 将自己伪装成一个 MySQL 从库。订阅数据库的 binlog,一旦数据库发生读写修改,就会将该操作保存到 binlog 中,这样 Canal 就会实时订阅到最新的数据库变化,从而推送给 Redis 进行实时更新。Canal 还能用于其他场景例如解决数据异构:首页推荐不需要在每次推荐时进行大量计算推算出推荐产品,而是一直订阅用户的访问记录,不断更新访问记录数据库的 binlog,从而不断分析计算推荐结果并实时更新到用户推荐表中。
我们能放入缓存的数据本来就不应该是实时性、一致性要求超高的。所以缓存数据的时候加上过期时间,保证每天拿到当前的最新值即可
我们不应该过度设计,增加系统的复杂性
遇到实时性、一致性要求高的数据,就应该每次直接查数据库,即使速度较慢也要保证一致性
本系统属于读多写少 场景,大量请求都是读,少量才是写。因此对实时性的要求不是很高 。本系统最终一致性的解决方案为:失效模式 + 分布式读写锁 + 设置过期时间 :
缓存的所有数据都设置过期时间,数据过期后,下一次读时触发主动更新
添加读写锁,大多数都是读,少量写的时候很好用,因为基本不怎么改数据,就偶尔改一下数据,顶多这几秒的读请求阻塞一下,之后的读与读请求都不会互相影响。
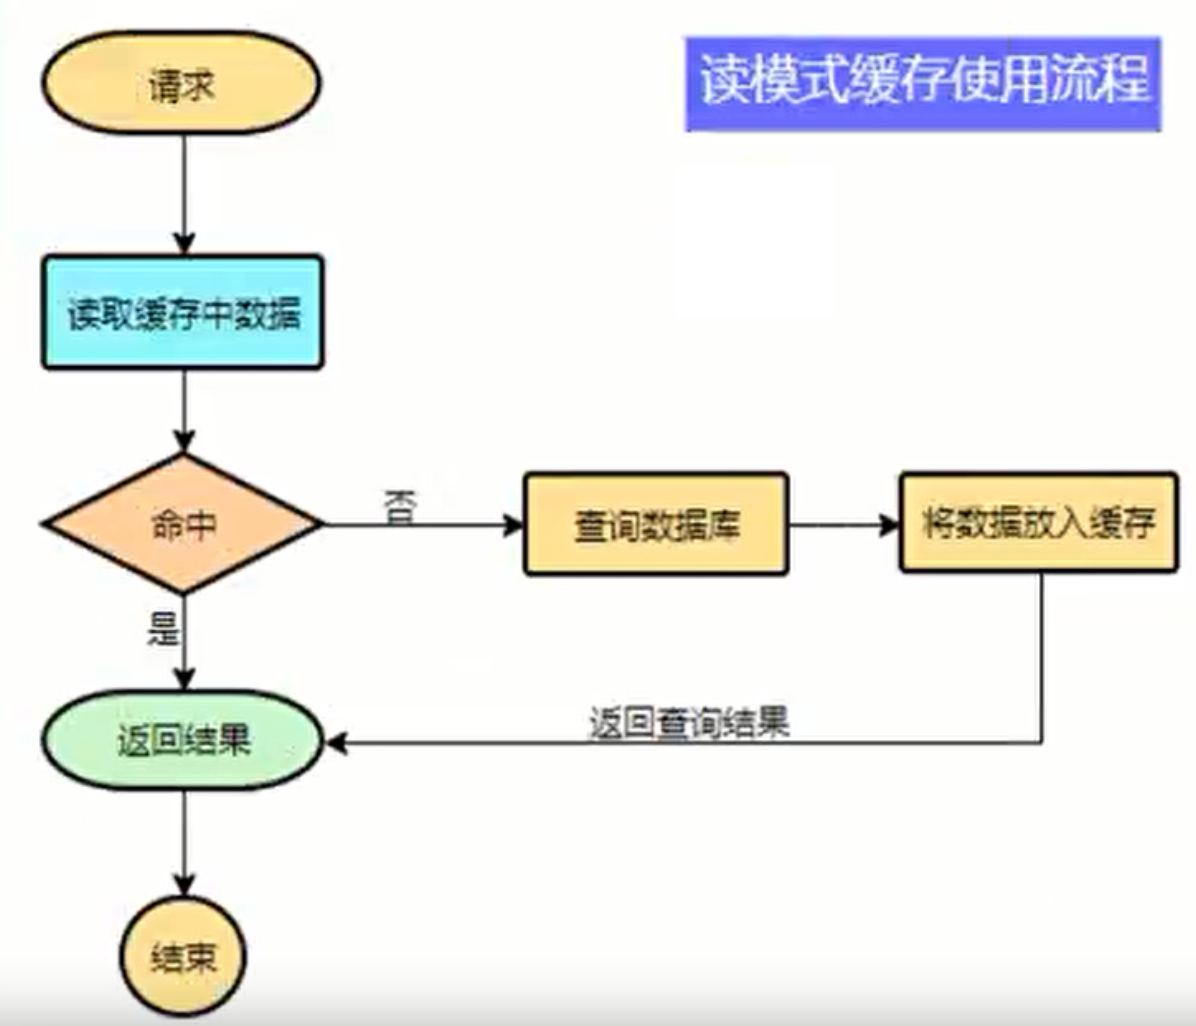
我们在商城首页三级分类功能中添加了 Redis 缓存功能,并最终选用 Spring Cache 框架进行解耦。在读模式 下考虑了:
加锁的方式缓解缓存击穿问题
加随机值的方式缓解缓存雪崩问题
缓存空值的方式缓解缓存穿透问题
在写模式 (缓存与数据库不一致)下使用失效模式 + 分布式读写锁 + 设置过期时间 策略:
常规数据(读多写少,即时性,一致性要求不高的数据)完全可以使用 Spring Cache 写模式( 只要缓存数据有过期时间就足够了)
为每个缓存数据设置过期时间,允许短期内的数据不一致
特殊数据:特殊设计
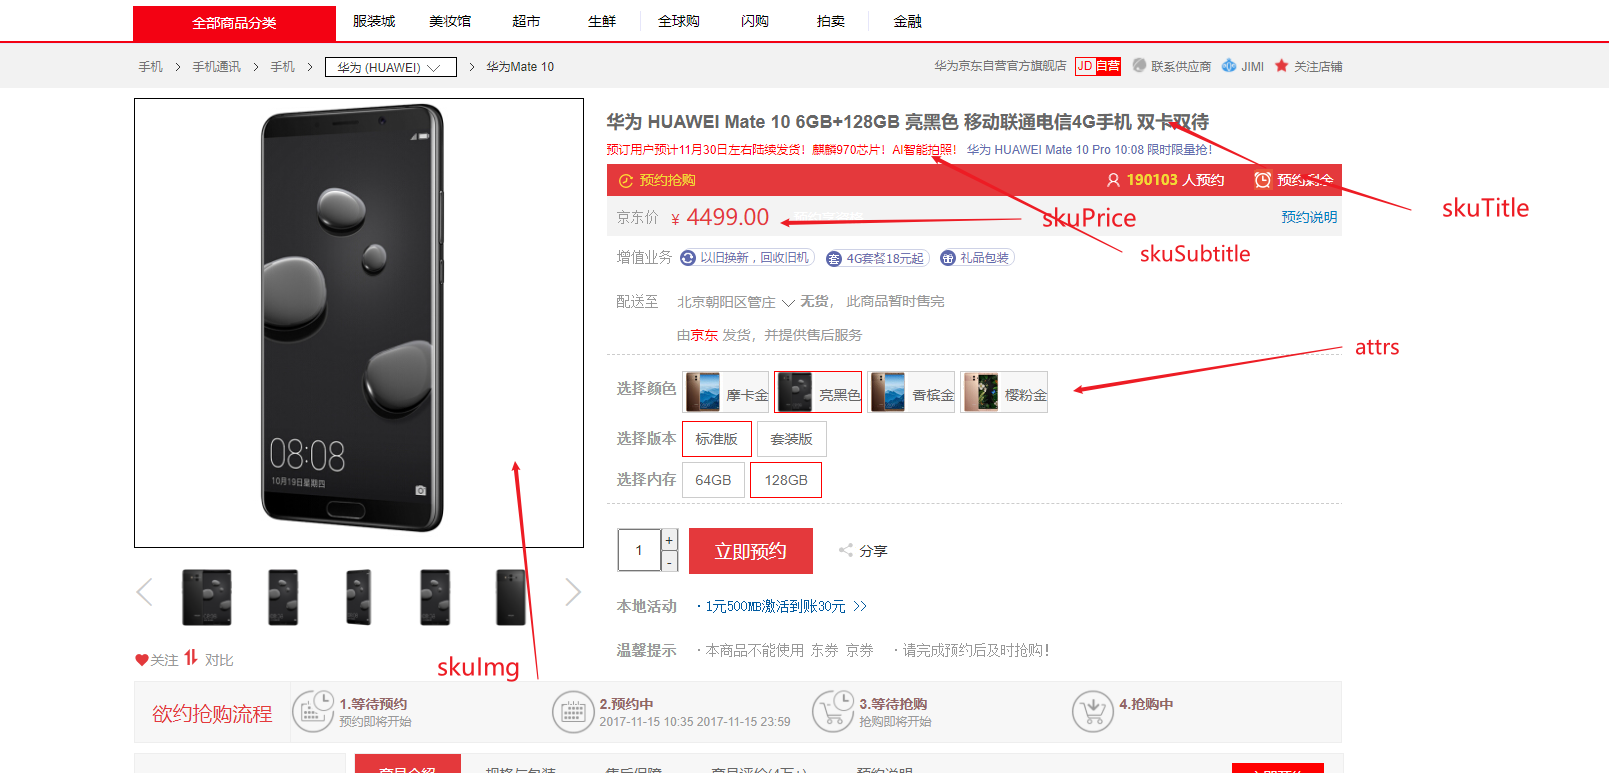
需求分析 :通过 skuId 查询出商品的相关信息,图片、标题、价格,属性对应版本等等。在点击商城项目中的详情页后,前端将发出请求查询指定 skuId 的各种商品信息,包括:
当前 SKU 基本信息
当前 SKU 的图片信息
当前 SKU 所属的 SPU 的所有销售属性组合,展示在界面上
当前 SKU 所属的 SPU 的介绍信息
SPU 的规格参数(基本属性)信息
当前 SKU 参与的秒杀活动的优惠信息
其中,查询 3/4/5 前需要先完成查询 1,因为三者都需要 SKU 的信息,同时三者之间是没有依赖关系的,完全可以并行 查询节省时间。查询 2 则和其余的四条查询没有任何依赖关系,也可以并行查询。查询 6 和其余几条查询没有任何依赖关系,也可以并行查询。
自定义线程池并使用异步编排进行查询,详细配置见文章 【JUC】JUC 常用锁与线程池
1
2
3
4
5
6
7
8
9
10
11
12
13
14
15
16
17
18
19
20
21
22
23
24
25
26
27
28
29
30
31
32
33
34
35
36
37
38
39
40
41
42
43
44
45
46
47
48
49
50
51
52
53
54
55
56
57
@Override public SkuItemVo item (Long skuId) throws ExecutionException, InterruptedException SkuItemVo skuItemVo = new SkuItemVo(); CompletableFuture<SkuInfoEntity> infoFuture = CompletableFuture.supplyAsync(() -> { SkuInfoEntity skuInfoEntity = this .getById(skuId); skuItemVo.setInfo(skuInfoEntity); return skuInfoEntity; }, executor); CompletableFuture<Void> saleAttrFuture = infoFuture.thenAcceptAsync(info -> { List<SkuItemSaleAttrVo> saleAttrVos = skuSaleAttrValueService.listSaleAttrs(info.getSpuId()); skuItemVo.setSaleAttr(saleAttrVos); }, executor); CompletableFuture<Void> descFuture = infoFuture.thenAcceptAsync(info -> { SpuInfoDescEntity spuInfoDescEntity = spuInfoDescService.getById(info.getSpuId()); skuItemVo.setDesc(spuInfoDescEntity); }, executor); CompletableFuture<Void> baseAttrFuture = infoFuture.thenAcceptAsync(info -> { List<SpuItemAttrGroupVo> attrGroupVos = attrGroupService.getAttrGroupWithAttrsBySpuId(info.getSpuId(), info.getCatalogId()); skuItemVo.setGroupAttrs(attrGroupVos); }, executor); CompletableFuture<Void> imagesFuture = CompletableFuture.runAsync(() -> { List<SkuImagesEntity> imagesEntities = imagesService.getImagesBySkuId(skuId); skuItemVo.setImages(imagesEntities); }, executor); CompletableFuture<Void> secKillFuture = CompletableFuture.runAsync(() -> { R seckillInfo = seckillFeignService.getSeckillSkuInfo(skuId); if (seckillInfo.getCode() == 0 ) { String data = JSON.toJSONString(seckillInfo.get("data" )); SeckillSkuVo seckillSkuVo = JSON.parseObject(data, new TypeReference<SeckillSkuVo>() { }); skuItemVo.setSeckillSkuVo(seckillSkuVo); } }, executor); CompletableFuture.allOf(saleAttrFuture, descFuture, baseAttrFuture, imagesFuture, secKillFuture).get(); return skuItemVo; }
检索服务 mall-search 负责实现的功能:
商品上架 :在后台管理系统中【上架】某个商品时,将其 SPU 传给商品服务。商品服务会查询出该 SPU 所包含的所有 SKU 的详细信息并封装成一个个 SkuEsModel,然后远程调用检索服务将这些 SKU 信息保存到 ElasticSearch 中,用于在商城页面快速查询出某个 SKU 的详细信息检索 SKU :根据前端传来的关键词等参数对商品(SKU)进行检索。
关于检索服务的具体介绍见文章【Project】云商城 - 检索服务
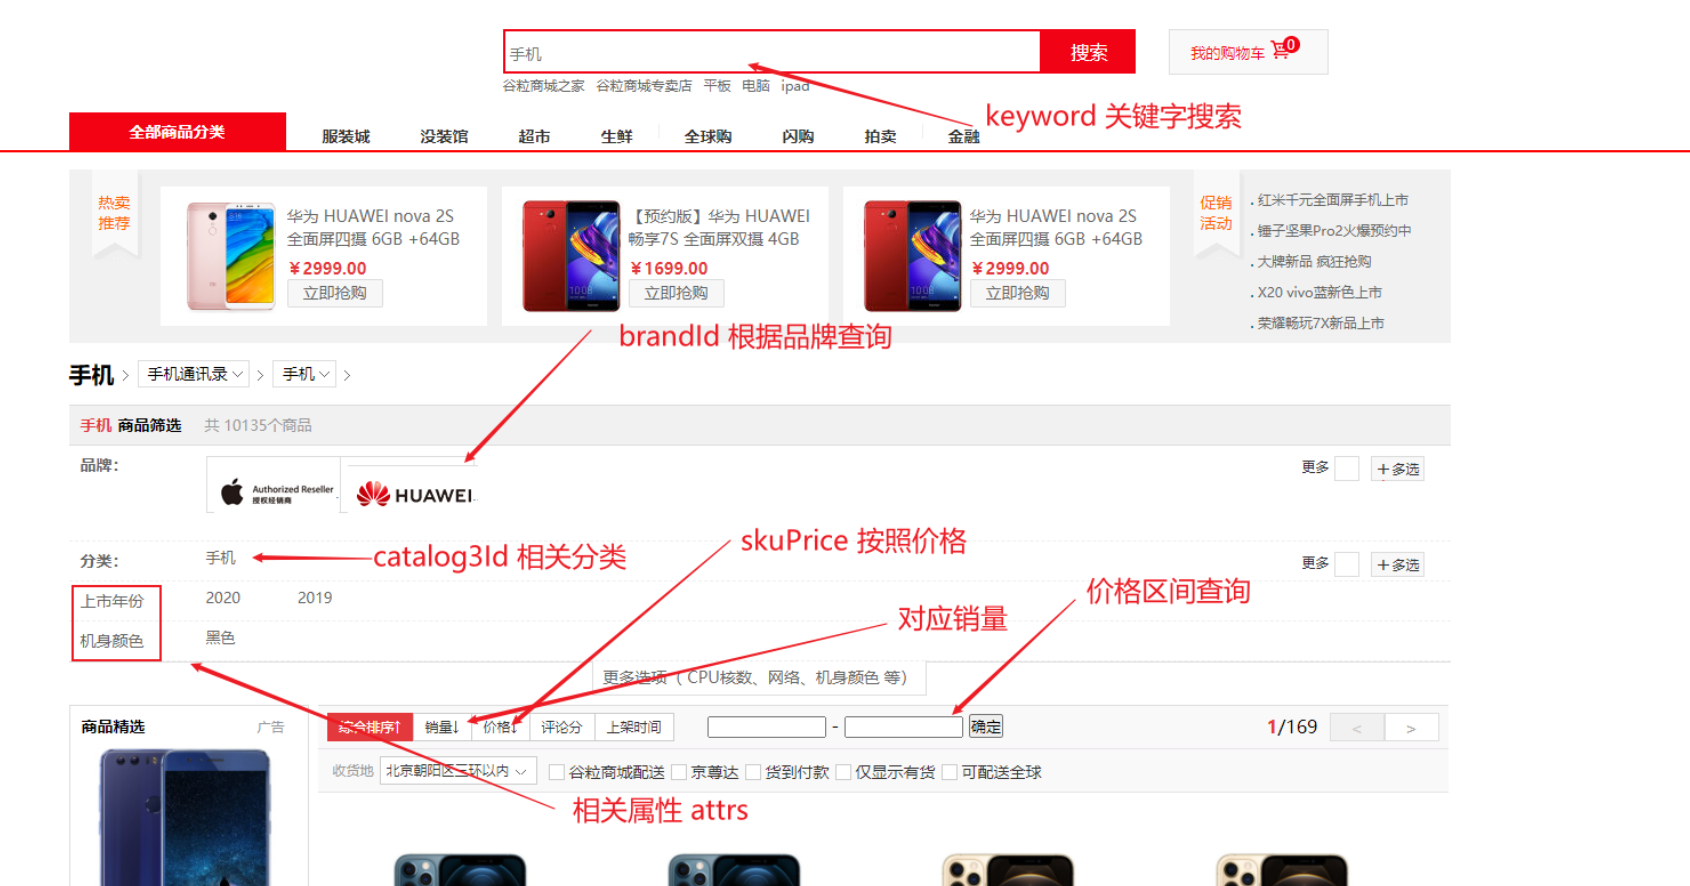
商城的前端检索页面效果:
认证服务 mall-auth-server,用于实现以下功能:
只有登录的用户才可以创建订单进行支付
关于认证服务的具体介绍见文章【Project】云商城 - 认证服务
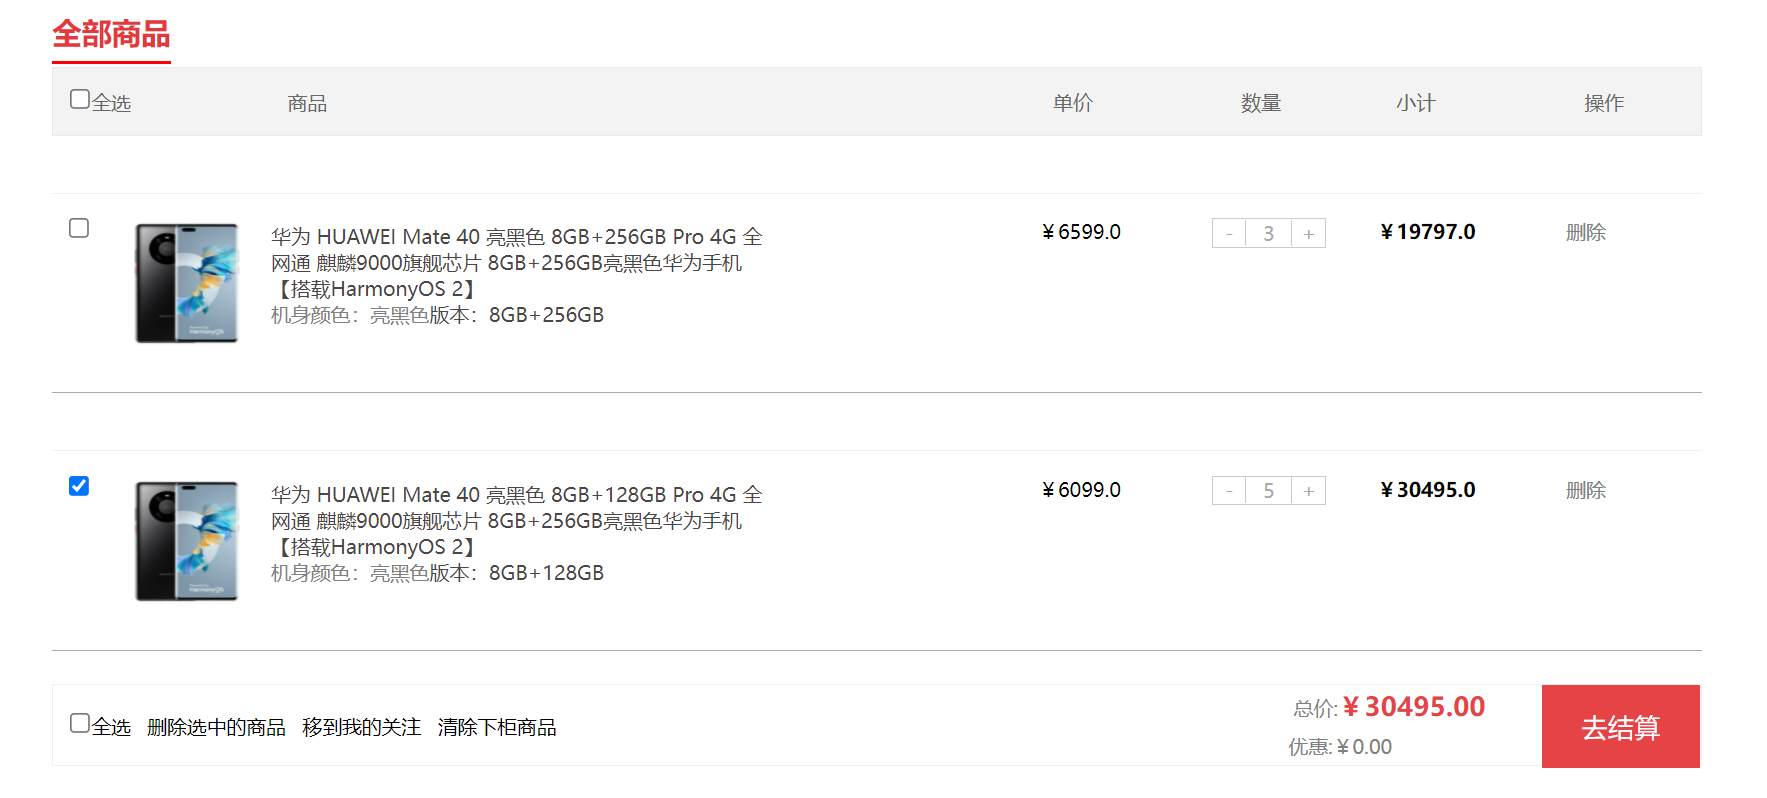
购物车服务 mall-cart 负责将用户挑选好的 SKU 添加到购物车中。添加后的效果如下:
购物车服务需要实现的功能:
登录用户可以添加购物车,并且在结算购物车前该信息一直保留
临时用户(未登录用户)也可以添加购物车,并且该信息可以保留 30 天
临时用户在 30 天内再次访问本网站仍然能看到之前添加过的购物车信息
临时用户一旦登录,就会把其之前添加的商品一起合并 到自己登录用户的购物车里
实现思路:
为实现购物车信息一直保留,需要将购物车的信息一直存放在 Redis 中 ,并且开启 Reids 的持久化 。
为实现临时用户功能,需要使用拦截器 ,判断每个访问本网站的用户是否已登录(Redis 中的 Session 是否存储了 loginUser 数据),如果没登录过就要为其设置一个唯一标识 user-key 并且以 Cookie 的形式保存在浏览器中 30 天 。这样下次临时用户登录时仍然能获取其购物车数据
关于购物车服务的具体介绍见文章【Project】云商城 - 购物车服务
订单服务 mall-order 需要实现的功能:
订单服务登录拦截
用户在购物车页点击【去结算】,将购物车内商品信息封装成订单确认页数据 OrderConfirmVo,并跳转到订单确认页 confirm.html
用户在订单确认页确定订单信息后点击【提交订单】,将根据前端传来的订单确认页数据创建出订单实体对象 ,并持久化到数据库中。30 分钟后关闭失败订单
之后远程调用库存服务锁定库存。并在 50 分钟后进行失败订单的库存解锁
用户点击【支付订单】后,使用支付宝支付服务完成订单支付
在订单服务中使用消息队列 保证整体事务一致性(订单和库存事务一致)。其他要求并发性不高的场景可以使用 Seata(例如后台管理系统中的分布式事务)
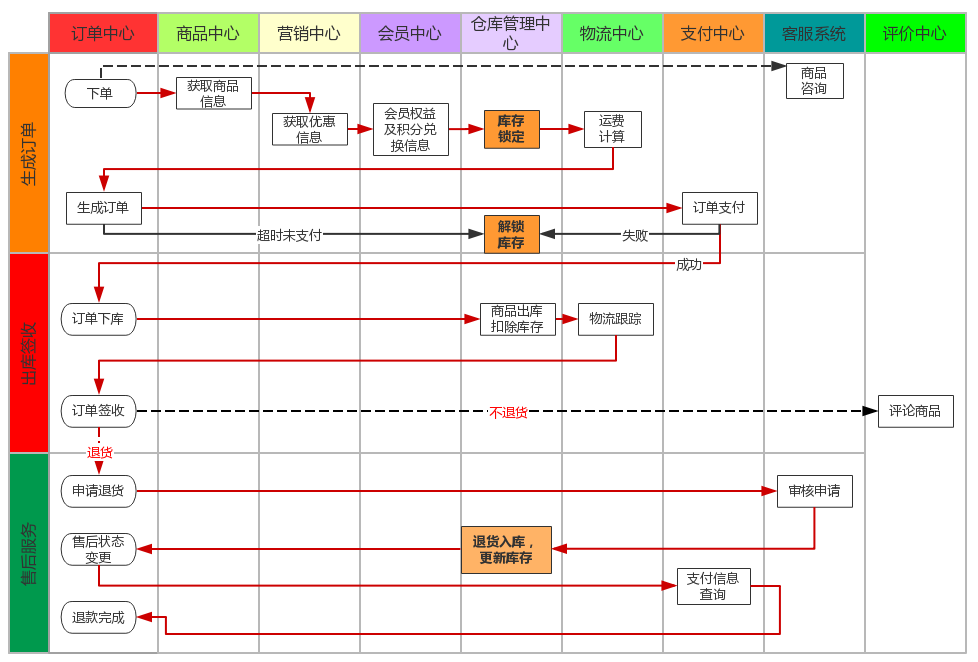
完整的订单中心依次需要流程:
关于订单服务的具体介绍见文章【Project】云商城 - 订单服务
mysql 启动后,可以使用 telnet 命令测试 mysql 能否被顺利连接:
1 telnet 47.98.120.35 3306
https://www.jianshu.com/p/b0abc38aa601
如果不能连通,可能的原因:
防火墙没有开启 3306 端口
云服务器的安全组没有开通 3306 端口
docker 内的 mysql 只允许其所在的服务器连接,不能被其他主机访问。此时需要在 mysql 服务器上设置一下允许的 ip 权限:
1 2 3 4 5 6 grant all privileges on *.* to root@'%' identified by 'zhaoyuyun' with grant option; flush privileges;
进入 docker 内 mysql 时报错::045 (28000)错误:
”Access denied for user ‘root’@’localhost’ (using password: YES)”
解决方案:https://www.jianshu.com/p/a49389497a0c
当二者版本不对应时,无法启动 Spring Boot 项目,会报错:
1
2
3
4
5
6
7
8
Error starting ApplicationContext. To display the conditions report re-run your application with 'debug' enabled. 2021-12-21 17:18:03.123 ERROR 17424 --- [ main] o.s.boot.SpringApplication : Application run failed org.springframework.context.ApplicationContextException: Unable to start web server; nested exception is org.springframework.beans.factory.BeanCreationException: Error creating bean with name 'org.springframework.boot.autoconfigure.web.servlet.ServletWebServerFactoryConfiguration$EmbeddedTomcat': Initialization of bean failed; nested exception is java.lang.NoClassDefFoundError: org/springframework/boot/context/properties/ConfigurationPropertiesBean at ...... Process finished with exit code 1
此时需要修改 Spring Boot 和 Spring Cloud 的版本,使其能适配。
https://www.programminghunter.com/article/2768944322/
设置当前会话的隔离级别为读未提交 ,以方便开发期间 DEBUG:
1
2
3
4
set session transaction isolation level read uncommitted;select * from `table_name`;
